


SpringBoot集成MVC
文章目录
1.1WebMvcConfigurer接口
(1)简介
WebMvcConfigurer配置接口其实是Spring内部的一种配置方式,采用JavaBean的形式来代替传统的xml配置文件形式进行针对框架个性化定制,可以自定义一些Handler,Interceptor,ViewResolver,MessageConverter。
(2)具体使用
在Spring Boot 1.5版本都是靠重写WebMvcConfigurerAdapter类的方法来添加自定义拦截器,消息转换器等。SpringBoot 2.0 后,该类被标记为@Deprecated(弃用)。官方推荐@Configuration配置类直接实现WebMvcConfigurer接口或者直接继承WebMvcConfigurationSupport类
//下面为部分常用方法
public interface WebMvcConfigurer {
    /* 拦截器配置 */
	void addInterceptors(InterceptorRegistry var1);
	/* 视图跳转控制器 */
	void addViewControllers(ViewControllerRegistry registry);
	/**
     *静态资源处理
	**/
	void addResourceHandlers(ResourceHandlerRegistry registry);
	/* 默认静态资源处理器 */
	void configureDefaultServletHandling(DefaultServletHandlerConfigurer configurer);
	/**
     * 这里配置视图解析器
 	**/
	void configureViewResolvers(ViewResolverRegistry registry);
	/* 配置内容裁决的一些选项*/
	void configureContentNegotiation(ContentNegotiationConfigurer configurer);
	/** 解决跨域问题 **/
	public void addCorsMappings(CorsRegistry registry) ;
}
--------------------------------------------------------------------------------------------------------------
@Configuration
public class WebMvcConfig implements WebMvcConfigurer{
    @Autowired
    private PermissionInterceptor permissionInterceptor;
    @Autowired
    private CookieInterceptor cookieInterceptor;

    /**
     * 1.添加拦截器
     * 	addPathPatterns:用于设置拦截器的过滤路径规则;addPathPatterns("/**")对所有请求都拦截
     * 	excludePathPatterns:用于设置不需要拦截的过滤规则
	**/
    @Override
    public void addInterceptors(InterceptorRegistry registry) {
        super.addInterceptors(registry);
        registry.addInterceptor(permissionInterceptor).addPathPatterns("/**");
        registry.addInterceptor(cookieInterceptor).addPathPatterns("/**").excludePathPatterns("/home");
    }
    //2.页面跳转
    @Override
    public void addViewControllers(ViewControllerRegistry registry) {
        registry.addViewController("/toLogin").setViewName("login");
    }
    /**
     * 3.静态资源访问
     *	addResoureHandler:指的是对外暴露的访问路径
     *	addResourceLocations:指的是内部文件放置的目录
    **/
    @Override
    public void addResourceHandlers(ResourceHandlerRegistry registry) {
        registry.addResourceHandler("/statics/**").addResourceLocations("classpath:/statics/");
        registry.addResourceHandler("/swagger/**").addResourceLocations("classpath:/statics/swagger/");
    }
    /**
     * 4.跨域访问
	**/
    @Override
    public void addCorsMappings(CorsRegistry corsRegistry){
        corsRegistry.addMapping("/**")//允许跨域的访问路径
                    .allowedOrigins("http://localhost:8081")//允许跨域访问的源,允许所有则为 *
                    .allowedMethods("POST","GET","PUT","OPTIONS","DELETE")//允许请求方法
                    .allowCredentials(true)//是否允许发送cookie
                    .maxAge(3600)//预检的间隔时间,默认为1800秒什么是预检?				 https://www.cnblogs.com/xianrongbin/p/10447159.html
                    .allowedHeaders("*");//允许跨域访问的header
    }
}
1.2RequestContextHolder类
(1)简介
RequestContextHolder是springmvc自带的一个工具类,封装了当前请求-Request对象,目的是为了在任何地方能够获取到当前请求Request对象(这样不用从controller中把HttpServletRequest对象一层层往下传递)
public abstract class RequestContextHolder  {

	private static final boolean jsfPresent =
			ClassUtils.isPresent("javax.faces.context.FacesContext", RequestContextHolder.class.getClassLoader());

	private static final ThreadLocal<RequestAttributes> requestAttributesHolder =
			new NamedThreadLocal<RequestAttributes>("Request attributes");

	private static final ThreadLocal<RequestAttributes> inheritableRequestAttributesHolder =
			new NamedInheritableThreadLocal<RequestAttributes>("Request context");

	public static void resetRequestAttributes() {
		requestAttributesHolder.remove();
		inheritableRequestAttributesHolder.remove();
	}

	public static void setRequestAttributes(RequestAttributes attributes) {
		setRequestAttributes(attributes, false);
	}

	public static void setRequestAttributes(RequestAttributes attributes, boolean inheritable) {
		if (attributes == null) {
			resetRequestAttributes();
		}
		else {
			if (inheritable) {
				inheritableRequestAttributesHolder.set(attributes);
				requestAttributesHolder.remove();
			}
			else {
				requestAttributesHolder.set(attributes);
				inheritableRequestAttributesHolder.remove();
			}
		}
	}

	public static RequestAttributes getRequestAttributes() {
		RequestAttributes attributes = requestAttributesHolder.get();
		if (attributes == null) {
			attributes = inheritableRequestAttributesHolder.get();
		}
		return attributes;
	}

	public static RequestAttributes currentRequestAttributes() throws IllegalStateException {
		RequestAttributes attributes = getRequestAttributes();
		if (attributes == null) {
			if (jsfPresent) {
				attributes = FacesRequestAttributesFactory.getFacesRequestAttributes();
			}
			if (attributes == null) {
				throw new IllegalStateException("...");
			}
		}
		return attributes;
	}
}
(2)基本使用
//获取RequestAttributes对象
RequestAttributes requestAttributes = RequestContextHolder.getRequestAttributes();
// 底层实现:request.getAttribute("userId");
String userId = (String) requestAttributes.getAttribute("userId",RequestAttributes.SCOPE_REQUEST);

// 底层实现:session.getAttribute("userId");
String userId = (String) requestAttributes.getAttribute("userId",RequestAttributes.SCOPE_SESSION);

//获取到当前请求
HttpServletRequest request = ((ServletRequestAttributes)requestAttributes).getRequest();
HttpServletResponse response = ((ServletRequestAttributes)requestAttributes).getResponse();
(3)源码分析
- 每一个请求发送过来时,springmvc都会调用FrameworkServlet的
processRequest(HttpServletRequest req,HttpServletRespose resp)方法;FrameworkServlet是DispatcherServlet的父类 - processRequest方法内部的主要流程如下
- 根据当前请求,构造RequestAttributes接口的子类ServletRequestAttributes对象。ServletRequestAttributes类有成员变量HttpServletRequest,构造时将
this.request = request(当前对象) - 将ServletRequestAttributes对象塞到RequestContextHolder里面的成员变量requestAttributesHolder(ThreadLocal类型)
- 上面两步就把当前请求放到了RequestContextHolder里面,然后接下来执行doService方法
- doService方法由DispatcherServlet来调用,之后就是到了doDispatch()方法去分发请求,找对应的controller
- 最终执行完毕拿到响应数据后回到这个processRequest方法,调用publishRequestHandledEvent响应回客户端
protected final void processRequest(HttpServletRequest request, HttpServletResponse response)
    throws ServletException, IOException {

    long startTime = System.currentTimeMillis();
    Throwable failureCause = null;

    LocaleContext previousLocaleContext = LocaleContextHolder.getLocaleContext();
    LocaleContext localeContext = buildLocaleContext(request);

    //1.
    RequestAttributes previousAttributes = RequestContextHolder.getRequestAttributes();
    ServletRequestAttributes requestAttributes = buildRequestAttributes(request, response, previousAttributes);

    WebAsyncManager asyncManager = WebAsyncUtils.getAsyncManager(request);
    asyncManager.registerCallableInterceptor(FrameworkServlet.class.getName(), new RequestBindingInterceptor());

    //2.
    initContextHolders(request, localeContext, requestAttributes);

    try {
        //3.
        doService(request, response);
    }
    catch (ServletException ex) {
        failureCause = ex;
        throw ex;
    }
    catch (IOException ex) {
        failureCause = ex;
        throw ex;
    }
    catch (Throwable ex) {
        failureCause = ex;
        throw new NestedServletException("Request processing failed", ex);
    }

    finally {
        resetContextHolders(request, previousLocaleContext, previousAttributes);
        if (requestAttributes != null) {
            requestAttributes.requestCompleted();
        }

        if (logger.isDebugEnabled()) {
            if (failureCause != null) {
                this.logger.debug("Could not complete request", failureCause);
            }
            else {
                if (asyncManager.isConcurrentHandlingStarted()) {
                    logger.debug("Leaving response open for concurrent processing");
                }
                else {
                    this.logger.debug("Successfully completed request");
                }
            }
        }
		//4.
        publishRequestHandledEvent(request, response, startTime, failureCause);
    }
}
2.如何统一接口封装
统一封装请求参数,返回报文
3.如何进行参数校验
针对这个普遍的问题,Java开发者在Java API规范 (JSR303) 定义了Bean校验的标准validation-api,但没有提供实现。
hibernate validation是对这个规范的实现,并增加了校验注解如@Email、@Length等。
Spring Validation是对hibernate validation的二次封装,用于支持spring mvc参数自动校验。
如果不用到BindingResult,那么参数校验不通过抛出的是2种异常BindException(子类:MethodArgumentNotValidException),ValidationException(子类:ConstraintViolationException)异常
(1)实现案例
导包:
<dependency>
    <groupId>org.springframework.boot</groupId>
    <artifactId>spring-boot-starter-validation</artifactId>
</dependency>
注解校验常见情况:
- 第一种情况:GET请求
@RestController
//@Validate+校验注解。因为只有@Validate能标注在类上
@Validate
public class MyController{

    @GetMapping("/test")
    public String getMessage(@NotEmpty @RequestParam("param") String param){}
}
--------------------------------------------------------------------------------------------------------------@RestController
public class MyController{
    //@Valid+校验注解
    @GetMapping("/test")
    public String getMessage(@Valid @NotEmpty @RequestParam("param") String param){}
}
- 第二种情况:POST请求,(@Validate或@Valid)+ 校验注解,@Validate和@Valid都标注在方法参数上
/**
 * user.
 *
 * @author pdai
 */
public class UserParam implements Serializable {

    private static final long serialVersionUID = 1L;

    @NotEmpty(message = "could not be empty")
    private String userId;

    @NotEmpty(message = "could not be empty")
    @Email(message = "invalid email")
    private String email;

    @NotEmpty(message = "could not be empty")
    @Pattern(regexp = "^(\\d{6})(\\d{4})(\\d{2})(\\d{2})(\\d{3})([0-9]|X)$", message = "invalid ID")
    private String cardNo;

    @NotEmpty(message = "could not be empty")
    @Length(min = 1, max = 10, message = "nick name should be 1-10")
    private String nickName;

    @NotEmpty(message = "could not be empty")
    @Range(min = 0, max = 1, message = "sex should be 0-1")
    private int sex;

    @Max(value = 100, message = "Please input valid age")
    private int age;

    @Valid
    private AddressParam address;

}
在Controller中获取校验结果,BindingResult要放在@Valid/@Validate标注的参数后一位,如果不写的话就会抛异常,这一点就像try-catch和throws,BindingResult写的话就相当于try-catch(不写的话相当于throws,如何实现放在下一节:异常处理)
@RestController
@RequestMapping("/user")
public class UserController {

    /**
     * http://localhost:8080/user/add .
     *
     * @param userParam user param
     * @return user
     */
    @PostMapping("add")
    public ResponseEntity<String> add(@Validate/@Valid @RequestBody UserParam userParam, BindingResult bindingResult) {
        if (bindingResult.hasErrors()) {
            List<ObjectError> errors = bindingResult.getAllErrors();
            errors.forEach(p -> {
                FieldError fieldError = (FieldError) p;
                log.error("Invalid Parameter : object - {},field - {},errorMessage - {}", fieldError.getObjectName(), fieldError.getField(), fieldError.getDefaultMessage());
            });
            return ResponseEntity.badRequest().body("invalid parameter");
        }
        return ResponseEntity.ok("success");
    }
}
(2)进一步理解
①分组校验
上面的例子中,其实存在一个问题,UserParam既可以作为addUser的参数(id为空),又可以作为updateUser的参数(id不能为空),这时候怎么办呢?分组校验登场。
public class UserParam implements Serializable {

    private static final long serialVersionUID = 1L;

    @NotEmpty(message = "could not be empty") // 这里定为空,对于addUser时是不合适的,因为新增操作时还没有id
    private String userId;

}
--------------------------------------------------------------------------------------------------------------
//先定义分组接口(无需实现)
public interface AddValidationGroup {
}
public interface EditValidationGroup {
}
--------------------------------------------------------------------------------------------------------------
//添加分组
@NotEmpty(message = "{user.msg.userId.notEmpty}", groups = {EditValidationGroup.class}) // 这里
private String userId;
--------------------------------------------------------------------------------------------------------------
//Controller中需要使用@Validated注解而不能用@Valid,因为@Valid不支持分组校验
@RestController
@RequestMapping("/user")
public class UserController {

    /**
     * http://localhost:8080/user/add .
     *
     * @param userParam user param
     * @return user
     */
    @ApiOperation("Add User")
    @ApiImplicitParam(name = "userParam", type = "body", dataTypeClass = UserParam.class, required = true)
    @PostMapping("add")
    public ResponseEntity<UserParam> add(@Validated(AddValidationGroup.class) @RequestBody UserParam userParam) {
        return ResponseEntity.ok(userParam);
    }

    /**
     * http://localhost:8080/user/add .
     *
     * @param userParam user param
     * @return user
     */
    @ApiOperation("Edit User")
    @ApiImplicitParam(name = "userParam", type = "body", dataTypeClass = UserParam.class, required = true)
    @PostMapping("edit")
    public ResponseEntity<UserParam> edit(@Validated(EditValidationGroup.class) @RequestBody UserParam userParam) {
        return ResponseEntity.ok(userParam);
    }
}
②@Validated和@Valid的区别
| @Validated | @Valid | |
|---|---|---|
| 使用位置 | TYPE,METHOD,PARAMTER | METHOD,CONSTRUCT,PARAMTER,FIELD |
| 支持分组校验 | 是 | 否 |
| 支持嵌套校验 | 否 | 是(因为嵌套对象为成员变量FIELD,只有@Vaid支持) 比如:public class User{ @Valid private Address address; } |
如果需要校验List,则需要使用@Validated+@Valid的方式:https://blog.csdn.net/coolcoffee168/article/details/111059895
③自定义Validation
如果上面的注解不能满足我们检验参数的要求,我们能不能自定义校验规则呢? 可以。
主要分为三步:自定义校验注解,自定义校验器,使用
-
自定义校验注解
/** * @author zhangshiqin * @date 2022/8/1 - 18:33 * @description:自定义校验注解 */ @Target({ElementType.TYPE,ElementType.METHOD,ElementType.CONSTRUCTOR,ElementType.FIELD,ElementType.PARAMETER}) @Retention(RetentionPolicy.RUNTIME) @Constraint(validatedBy = {TelNumberValidator.class})//设置校验器 public @interface TelNumber { //校验失败时的提示 String message() default "no valid telNumber"; //表示支持分组校验 Class<?>[] groups() default {}; //表示负载 Class<? extends Payload>[] payload() default { }; } -
自定义校验器
/** * @author zhangshiqin * @date 2022/8/1 - 18:36 * @description:自定义校验器 */ public class TelNumberValidator implements ConstraintValidator<TelNumber, String> { @Override public void initialize(TelNumber telNumber) { } private static final String REGEX_TEL = "0\\d{2,3}[-]?\\d{7,8}|0\\d{2,3}\\s?\\d{7,8}|13[0-9]\\d{8}|15[1089]\\d{8}"; @Override public boolean isValid(String s, ConstraintValidatorContext constraintValidatorContext) { try { return Pattern.matches(REGEX_TEL, s); } catch (Exception e) { return false; } } } -
使用
public class User{
    @TelNumber(groups = {EditValidationGroup.class})
    private String tellNumber;
}
(3)校验注解大全
//JSR303/JSR-349
@AssertFalse            被注释的元素只能为false
@AssertTrue             被注释的元素只能为true
@DecimalMax             被注释的元素必须小于或等于{value}
@DecimalMin             被注释的元素必须大于或等于{value}
@Digits                 被注释的元素数字的值超出了允许范围(只允许在{integer}位整数和{fraction}位小数范围内)
@Email                  被注释的元素不是一个合法的电子邮件地址
@Future                 被注释的元素需要是一个将来的时间
@FutureOrPresent        被注释的元素需要是一个将来或现在的时间
@Max                    被注释的元素最大不能超过{value}
@Min                    被注释的元素最小不能小于{value}
@Negative               被注释的元素必须是负数
@NegativeOrZero         被注释的元素必须是负数或零
@NotBlank               被注释的元素不能为空,用于字符串
@NotEmpty               被注释的元素不能为空,用于数组或字符串
@NotNull                被注释的元素不能为null
@Null                   被注释的元素必须为null
@Past                   被注释的元素需要是一个过去的时间
@PastOrPresent          被注释的元素需要是一个过去或现在的时间
@Pattern                被注释的元素需要匹配正则表达式"{regexp}"
@Positive               被注释的元素必须是正数
@PositiveOrZero         被注释的元素必须是正数或零
@Size                   被注释的元素个数必须在{min}和{max}之间
--------------------------------------------------------------------------------------------------------------
//hibernate validation
@CreditCardNumber       被注释的元素不合法的信用卡号码
@Currency               被注释的元素不合法的货币 (必须是{value}其中之一)
@EAN                    被注释的元素不合法的{type}条形码
@Email                  被注释的元素不是一个合法的电子邮件地址  (已过期)
@Length                 被注释的元素长度需要在{min}和{max}之间
@CodePointLength        被注释的元素长度需要在{min}和{max}之间
@LuhnCheck              被注释的元素${validatedValue}的校验码不合法, Luhn模10校验和不匹配
@Mod10Check             被注释的元素${validatedValue}的校验码不合法, 模10校验和不匹配
@Mod11Check             被注释的元素${validatedValue}的校验码不合法, 模11校验和不匹配
@ModCheck               被注释的元素${validatedValue}的校验码不合法, ${modType}校验和不匹配  (已过期)
@NotBlank               被注释的元素不能为空  (已过期)
@NotEmpty               被注释的元素不能为空  (已过期)
@ParametersScriptAssert 被注释的元素执行脚本表达式"{script}"没有返回期望结果
@Range                  被注释的元素需要在{min}和{max}之间
@SafeHtml               被注释的元素可能有不安全的HTML内容
@ScriptAssert           被注释的元素执行脚本表达式"{script}"没有返回期望结果
@URL                    被注释的元素需要是一个合法的URL
@DurationMax            被注释的元素必须小于${inclusive == true ? '或等于' : ''}${days == 0 ? '' : days += '天'}${hours == 0 ? '' : hours += '小时'}${minutes == 0 ? '' : minutes += '分钟'}${seconds == 0 ? '' : seconds += '秒'}${millis == 0 ? '' : millis += '毫秒'}${nanos == 0 ? '' : nanos += '纳秒'}
@DurationMin            被注释的元素必须大于${inclusive == true ? '或等于' : ''}${days == 0 ? '' : days += '天'}${hours == 0 ? '' : hours += '小时'}${minutes == 0 ? '' : minutes += '分钟'}${seconds == 0 ? '' : seconds += '秒'}${millis == 0 ? '' : millis += '毫秒'}${nanos == 0 ? '' : nanos += '纳秒'}
4.如何统一异常处理
@ControllerAdvice的作用:说明对添加了@Controller的类织入一个通知(增强功能)
(1)@ControllerAdvice+@ExceptionHandler+@ResponseStatus
/**
 * 1.异常处理遵循原则:精度优先,局部优先(局部就是在controller里面用@ExceptionHandler注解定义一个局部异常处理器)
 * 2.@RestControllerAdvice:
 *   1)所有不处理的异常,即throws出来的异常,包括局部不处理的都到这里来
 * 3.@ExceptionHandler:
 *   1)指定当前METHOD能够处理哪些异常
 *   2)标注的METHOD的方法参数中只能包含spring认识的,比如Throwable,Exception,HttpServletRequest,HttpServletResponse
 * 4.@ResponseStatus:改变HTTP响应的状态码
 * 5.如果任何全局异常处理器中都没有找到处理异常的方法,那么就会给spring自带的DefaultHandlerException(默认处理所有异常)
 */
@RestControllerAdvice
public class GlobalExceptionHandler {

    @ResponseStatus(value = HttpStatus.INTERNAL_SERVER_ERROR)
    @ExceptionHandler(value = Throwable.class)
    public BasicResponseContentVO<Object> defaultErrorHandler(HttpServletRequest request,Throwable e){
        //todo 1.日志打印请求+异常信息

        Class<? extends Throwable> eClass = e.getClass();
        //todo 2.分别处理各个异常
        //数据库异常,isAssignableFrom(eClass)判断eClass是否为SQLException的子类
        if(SQLException.class.isAssignableFrom(eClass)|| e instanceof SQLException){
            SQLException sqlException = (SQLException) e;
            int errorCode = sqlException.getErrorCode();
            String message = sqlException.getMessage();
            return new BasicResponseContentVO<>(new BusinessError(String.valueOf(errorCode),message));
        }else{
            return new BasicResponseContentVO<>(new BusinessError(ErrorCode.SYSTEM_UN_KNOW_ERROR,"系统异常!"+e.getMessage()));
        }
    }

}
(2)@ControllerAdvice还有什么用
-
自定义请求参数格式:@InitBinder注解
@RestControllerAdvice public class MyController{ //将前端传的String自动格式化为Date @InitBinder public void formatterHandler(WebDataBinder webDataBinder){ webDataBinder.registerCustomEditor(Date.class ,new CustomDateEditor(new SimpleDateFormat("yyyy-MM-dd"),false));//false代表需要格式化的参数不能为空,否则不进行格式化 } } -
自定义全局参数:@ModelAttributed注解
@RestControllerAdvice
public class MyController{
    @ModelAttributed("global_param")
    public String globalParam(){
        return "hello,world"
    }
}

//使用
@PostMapping("saveSomething")
public ResponseEntity<String> saveSomeObj(@ModelAttribute("global_param") String param) {
    return ResponseEntity.success("ok");
}
5.如何定义拦截器并生效
1)自定义拦截器,实现HandlerInterceptor接口或者继承HandlerInterceptorAdapt类
@Component
public class MyInterceptor implements HandlerInterceptor{
    //默认return true是放行,return false不放行
    @Override
    public boolean preHandle(HttpServletRequest request, HttpServletResponse response, Object handler) throws Exception {
        //todo 具体业务
        return false;
    }

    @Override
    public void postHandle(HttpServletRequest request, HttpServletResponse response, Object handler, ModelAndView modelAndView) throws Exception {

    }

    @Override
    public void afterCompletion(HttpServletRequest request, HttpServletResponse response, Object handler, Exception ex) throws Exception {

    }
}
2)添加拦截器
- addPathPatterns:拦截哪些请求url
- excludePathPatterns:不拦截哪些请求url
@Configuration
public class WebMvcConfig implements WebMvcConfigurationSupport{

    @Autowired
    MyInterceptor myInterceptor;
    @Autowired
    CookieInterceptor cookieInterceptor;

    @Override
    public void addInterceptors(InterceptorRegistry registry) {
        registry.addInterceptor(myInterceptor).addPathPatterns("/**");
        registry.addInterceptor(cookieInterceptor).addPathPatterns("/**").excludePathPatterns("/home");
    }
}
3)多个拦截器执行顺序:
正常执行的顺序:prehandle -> postHandle -> afterCompletion
preHandle按拦截器定义顺序(代码中addInterceptor的先后顺序)调用
postHandle按拦截器定义逆序调用
afterCompletion按拦截器定义逆序调用
postHandle在拦截器链内所有preHandle返回true调用
afterCompletion只要对应的拦截器的preHandle返回true就会调用
参考:https://blog.csdn.net/amaxiaochen/article/details/77210880?spm=1001.2101.3001.6661.1&utm_medium=distribute.pc_relevant_t0.none-task-blog-2%7Edefault%7ECTRLIST%7ERate-1-77210880-blog-120451728.pc_relevant_default&depth_1-utm_source=distribute.pc_relevant_t0.none-task-blog-2%7Edefault%7ECTRLIST%7ERate-1-77210880-blog-120451728.pc_relevant_default&utm_relevant_index=1
6.如何提供多个版本的接口
(1)Spring RequestCondition接口
实现该接口能够自定义请求匹配规则
public interface RequestCondition<T> {

	// 作用:不同层级的请求匹配条件合并,TYPE和METHOD就是不同层级
    // 触发:容器启动时调用,如果调用完getCustomMethodCondition()再调用getCustomTypeCondition()就会到这里来,其中other是调用完getCustomMethodCondition后返回的requestCondition
	T combine(T other);

	// 作用:这个是重点,用于判断匹配条件和请求是否匹配;如果不匹配返回null;如果匹配,返回this
	// 触发:用户发送请求到服务器时,需要去HandlerMapping里面找有没有符合的Handler。每有一个接口就调用1次此方法
	T getMatchingCondition(HttpServletRequest request);

    // 作用:请求对象request发现有多个满足条件的接口,使用最优的进行响应。
    // 触发:用户发送请求到服务器时,如果调用多次调用getMatchingCondition()都返回this,则调用本方法
    // 默认spring mvc如果发现有多个直接在‘容器启动时’就抛异常了
	int compareTo(T other, HttpServletRequest request);

}
(2)Spring RequestMappingHandlerMapping类
RequestMappingHandelrMapping类是HandlerMapping接口的子类,需要@Controller才会工作,用来匹配@RequestMapping标注的类和方法是否符合请求。通过继承该类重写该类方法能够添加接口对请求的匹配规则,加入到HandlerMapping后会和默认的匹配规则一起生效
//容器启动时先执行1,再执行2。如果1不执行,那么2也不执行
public class ApiVersionHandlerMapping extends RequestMappingHandlerMapping {

    //2.从类上获取自定义的匹配规则(注解)
    @Override
    protected RequestCondition<?> getCustomTypeCondition(Class<?> handlerType) {
        ApiVersion annotation = AnnotationUtils.findAnnotation(handlerType, ApiVersion.class);
        if(annotation!=null){
            System.out.println("getCustomTypeCondition:"+annotation.version());
            return new ApiVersionCondition(annotation.version());
        }else{
            //super.getCustomTypeCondition(handlerType)相当于null,如果没有找到自定义的匹配规,就用父类RequestMappingHandlerMapping之前的规则
            return super.getCustomTypeCondition(handlerType);
        }
    }

    //1.从方法上获取自定义的匹配规则(注解)
    @Override
    protected RequestCondition<?> getCustomMethodCondition(Method method) {
        ApiVersion annotation = AnnotationUtils.findAnnotation(method, ApiVersion.class);
        if(annotation!=null){
            System.out.println("getCustomTypeCondition:"+annotation.version());
            return new ApiVersionCondition(annotation.version());
        }else{
            //super.getCustomTypeCondition(handlerType)这一句意义在于,如果没有找到自定义的匹配规,就用父类RequestMappingHandlerMapping之前的规则
            return super.getCustomMethodCondition(method);
        }
    }
}
(3)实现:自定义匹配规则并添加到HandlerMapping中
①自定义匹配规则
- 创建请求注解:用来给自定义的RequestMappingHandlerMapping在容器启动时判断是否添加匹配规则用
- 自定义匹配规则:实现RequestCondition接口
②添加到HandlerMapping
- 自定义RequestMappingHandlerMapping的子类,重写getCustomTypeEditor()方法和getCustomMethodEditor()方法
- 在配置类(继承了WebMvcConfigurationSupport)中重写createRequestMappingHandlerMapping()方法
7.如何保证接口的幂等
1.什么是接口幂等性
相同的请求调用这个接口一次和调用这个接口多次,对系统数据产生的影响是相同的。如果一个接口满足这个特性,那么我们就说这个 接口是一个幂等接口。
2.接口幂等和防止重复提交是一回事吗?
-
幂等: 更多的是在重复请求已经发生,或是无法避免的情况下,采取一定的技术手段让这些重复请求不给系统带来副作用,
主要是从服务端角度来解决问题。 -
防止重复提交: 更多的是不让用户发起多次一样的请求。比如说用户在线购物下单时点了提交订单按钮,但是由于网络原因响应很慢,此时用户比较心急多次点击了订单提交按钮。 这种情况下就可能会造成多次下单。一般防止重复提交的方案有:将订单按钮置灰,跳转到结果页等。
主要还是从客户端的角度来解决这个问题。 -
哪些情况下会导致接口不幂等,或者说哪些情况下客户端是防止不了重复提交的?
- 虽然我们可在客户端做一些防止接口重复提交的事(比如将订单按钮置灰,跳转到结果页等), 但是如下情况依然客户端是很难控制接口重复提交到后台的,这也进一步表明了接口幂等和防止重复提交不是一回事以及后端接口保证接口幂等的必要性所在。
- 接口超时重试:接口可能会因为某些原因而调用失败,出于容错性考虑会加上失败重试的机制。如果接口调用一半,再次调用就会因为脏数据的存在而出现异常。
- 消息重复消费:在使用消息中间件来处理消息队列,且手动ack确认消息被正常消费时。如果消费者突然断开连接,那么已经执行了一半的消息会重新放回队列。被其他消费者重新消费时就会导致结果异常,如数据库重复数据,数据库数据冲突,资源重复等。
- 请求重发:网络抖动引发的nginx重发请求,造成重复调用;
- 虽然我们可在客户端做一些防止接口重复提交的事(比如将订单按钮置灰,跳转到结果页等), 但是如下情况依然客户端是很难控制接口重复提交到后台的,这也进一步表明了接口幂等和防止重复提交不是一回事以及后端接口保证接口幂等的必要性所在。
3.如何实现接口幂等?
(1)数据库唯一主键
方案描述
数据库唯一主键的实现主要是利用数据库中主键唯一约束的特性,一般来说唯一主键比较适用于“插入”时的幂等性,其能保证一张表中只能存在一条带该唯一主键的记录。
使用数据库唯一主键完成幂等性时需要注意的是,该主键一般来说并不是使用数据库中自增主键,而是使用分布式 ID (SnowFake算法,Redis自增id)充当主键,这样才能能保证在分布式环境下 ID 的全局唯一性。
适用操作:
- 插入操作
- 删除操作
使用限制:
- 需要生成全局唯一主键 ID;
主要流程:
① 客户端执行创建请求,调用服务端接口。
② 服务端执行业务逻辑,生成一个分布式 ID,将该 ID 充当待插入数据的主键,然后执数据插入操作,运行对应的 SQL 语句。
③ 服务端将该条数据插入数据库中,如果插入成功则表示没有重复调用接口。如果抛出主键重复异常,则表示数据库中已经存在该条记录,返回错误信息到客户端。
(2)数据库乐观锁
方案描述:
数据库乐观锁方案一般只能适用于执行“更新操作”的过程,我们可以提前在对应的数据表中多添加一个字段,充当当前数据的版本标识。这样每次对该数据库该表的这条数据执行更新时,都会将该版本标识作为一个条件,值为上次待更新数据中的版本标识的值。
适用操作:
- 更新操作
使用限制:
- 需要数据库对应业务表中添加额外字段;
描述示例:
UPDATE my_table SET price=price+50,version=version+1 WHERE id=1 AND version=5
上面 WHERE 后面跟着条件 id=1 AND version=5 被执行后,id=1 的 version 被更新为 6,所以如果重复执行该条 SQL 语句将不生效,因为 id=1 AND version=5 的数据已经不存在,这样就能保住更新的幂等,多次更新对结果不会产生影响
(3)防重Token令牌
方案描述:
针对客户端连续点击或者调用方的超时重试等情况,例如提交订单,此种操作就可以用 Token 的机制实现防止重复提交。
简单的说就是调用方在调用接口的时候先向后端请求一个全局 ID(Token),请求的时候携带这个全局 ID 一起请求(Token 最好将其放到 Headers 中),后端需要对这个 Token 作为 Key,用户信息作为 Value 到 Redis 中进行键值内容校验,如果 Key 存在且 Value 匹配就执行redis删除命令,然后正常执行后面的业务逻辑。如果不存在对应的 Key 或 Value 不匹配就返回重复执行的错误信息,这样来保证幂等操作。
适用操作:
- 插入操作
- 更新操作
- 删除操作
使用限制:
- 需要生成全局唯一 Token 串;
- 需要使用第三方组件 Redis 进行数据效验;
主要流程:
① 服务端提供获取 Token 的接口,该 Token 可以是一个序列号,也可以是一个分布式 ID 或者 UUID 串。
② 客户端调用接口获取 Token,这时候服务端会生成一个 Token 串。
③ 然后将该串存入 Redis 数据库中,以该 Token 作为 Redis 的键(注意设置过期时间)。
④ 将 Token 返回到客户端,客户端拿到后应存到表单隐藏域中。
⑤ 客户端在执行提交表单时,把 Token 存入到 Headers 中,执行业务请求带上该 Headers。
⑥ 服务端接收到请求后从 Headers 中拿到 Token,然后根据 Token 到 Redis 中查找该 key 是否存在。
⑦ 服务端根据 Redis 中是否存该 key 进行判断,如果存在就将该 key 删除,然后正常执行业务逻辑。如果不存在就抛异常,返回重复提交的错误信息。
注意,在并发情况下,第6,7两步执行 Redis 查找数据与删除需要保证原子性,否则很可能在并发下无法保证幂等性。其实现方法可以使用分布式锁或者使用 Lua 表达式来注销查询与删除操作。还有,当key被删除后,要有重新生成token给客户端的操作。
8.如何对接口进行签名
(1)JWT(JSON WEB Token)——认证流程和结构
①认证流程
- 用户从前台登录,携带用户名和密码发送post请求到后端(这里最好使用https请求)。
- 后端校验通过后,生成一串token返回到前台。
- 前台接收到token后将它保存在localStorage或者sessionStorage中,之后每一次请求后端接口时都在请求头
Authorization带上token - 后端对前端发来的业务请求在网关处做拦截操作,检查token的有效性,比如是否过期,是否被篡改
- 验证token通过后则进行后续的业务流程

②结构
JWT由3部分组成:标头(Header)、有效载荷(Payload)和签名(Signature)。在传输的时候,会将JWT的标头、有效载荷部分分别进行Base64编码,签名部分根据前两部分的Base64编码和加密算法+密钥进行加密。最终用**.**进行连接形成最终传输的字符串。Heade+Playload是可逆的,Signature是不可逆的
1.Header
JWT头是一个描述JWT元数据的JSON对象,alg属性表示签名使用的算法,默认为HMAC SHA256(写为HS256);typ属性表示令牌的类型,JWT令牌统一写为JWT。最后,使用Base64 URL算法将上述JSON对象转换为字符串保存
{
  "alg": "HS256",
  "typ": "JWT"
}
2.Payload
有效载荷部分,是JWT的主体内容部分,也是一个JSON对象,包含需要传递的数据。 JWT指定七个默认字段供选择

iss:发行人
exp:到期时间
sub:主题
aud:用户
nbf:在此之前不可用
iat:发布时间
jti:JWT ID用于标识该JWT
除以上默认字段外,我们还可以自定义私有字段,一般会把包含用户信息的数据放到payload中,如下例:
{
  "sub": "1234567890",
  "name": "Helen",
  "admin": true
}
请注意,默认情况下JWT是未加密的,因为只是采用base64算法,拿到JWT字符串后可以转换回原本的JSON数据,任何人都可以解读其内容,因此不要构建隐私信息字段,比如用户的密码一定不能保存到JWT中,以防止信息泄露。JWT只是适合在网络中传输一些非敏感的信息
3.Signature
签名哈希部分是对上面两部分数据签名,需要使用base64编码后的header和payload数据,通过指定的算法生成哈希,以确保数据不会被篡改。首先,需要指定一个密钥(secretKey),该密码仅仅为保存在服务器中,并且不能向用户公开。signature由于使用了不可逆的加密算法,`无法解码出原文`,它的作用是校验token有没有被篡改。服务端使用生成签名时用的加密算法加上secretKey对header、payload进行验签,比对加密后的数据和客户端发送过来的是否一致。`注意secretKey只能保存在服务端`,而且对于不同的加密算法其含义有所不同。
(2)JWT(JSON WEB Token)——基本使用
https://baobao555.tech/archives/40#java%E4%B8%AD%E4%BD%BF%E7%94%A8jwt
加密的算法一般有2类:
- 对称加密:secretKey指加密密钥,可以生成签名与验签
- 非对称加密:secretKey指私钥,只用来生成签名,不能用来验签(验签用的是公钥)
如果应对token即将失效?
- old token不能重新设置过期时间,因为重新设置过期时间就意味着要重新生成new token
- 解决:前端定时任务 发送请求到后端,后端重新生成新的token返回。这样的话也能保证安全性,因为token可以通过暴力穷举破解
9.如何对接口进行限流
(1)基于令牌桶算法
原理图:
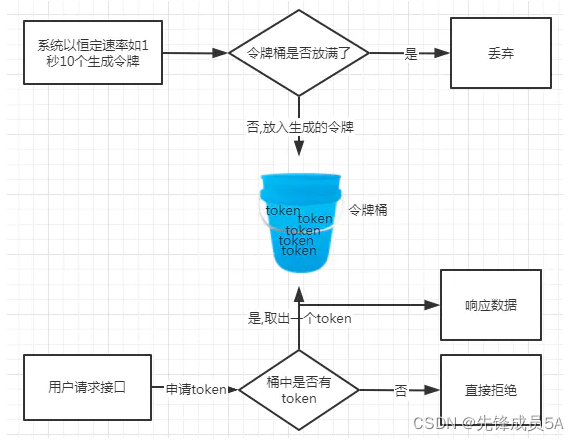
代码实现:redis分布式锁+redis限流器(基于Guava RateLimiter)+Guava Cache
问题:为什么不能直接用Guava RateLimiter。因为它只能应用于单进程,对于多进程即分布式(一个微服务多个pod)的情况无能为力
,该密码仅仅为保存在服务器中,并且不能向用户公开。signature由于使用了不可逆的加密算法,无法解码出原文,它的作用是校验token有没有被篡改。服务端使用生成签名时用的加密算法加上secretKey对header、payload进行验签,比对加密后的数据和客户端发送过来的是否一致。注意secretKey只能保存在服务端,而且对于不同的加密算法其含义有所不同。
### (2)JWT(JSON WEB Token)——基本使用
https://baobao555.tech/archives/40#java%E4%B8%AD%E4%BD%BF%E7%94%A8jwt
> 加密的算法一般有2类:
>
> * 对称加密:secretKey指加密密钥,可以生成签名与验签
> * 非对称加密:secretKey指私钥,只用来生成签名,不能用来验签(验签用的是公钥)
>
>
>
> 如果应对token即将失效?
>
> * old token不能重新设置过期时间,因为重新设置过期时间就意味着要重新生成new token
> * 解决:前端定时任务 发送请求到后端,后端重新生成新的token返回。这样的话也能保证安全性,因为token可以通过暴力穷举破解
## 9.如何对接口进行限流
### (1)基于令牌桶算法
原理图:

代码实现:redis分布式锁+redis限流器(基于Guava RateLimiter)+Guava Cache
问题:为什么不能直接用Guava RateLimiter。因为它只能应用于单进程,对于多进程即分布式(一个微服务多个pod)的情况无能为力
总结:`当令牌生成的速度小于用户线程平均访问的速度时,就会出现限流`


 229
229


 被折叠的 条评论
为什么被折叠?
被折叠的 条评论
为什么被折叠?
 到【灌水乐园】发言


