


微信小程序scroll-view和swiper结合使用
大家好,今天我们来学习一下scroll-view和swiper结合使用,好好看,好好学,超详细的。(这里我没有用动态的数据,我怕有些小伙伴看不懂我就用静态的数据)
第一步
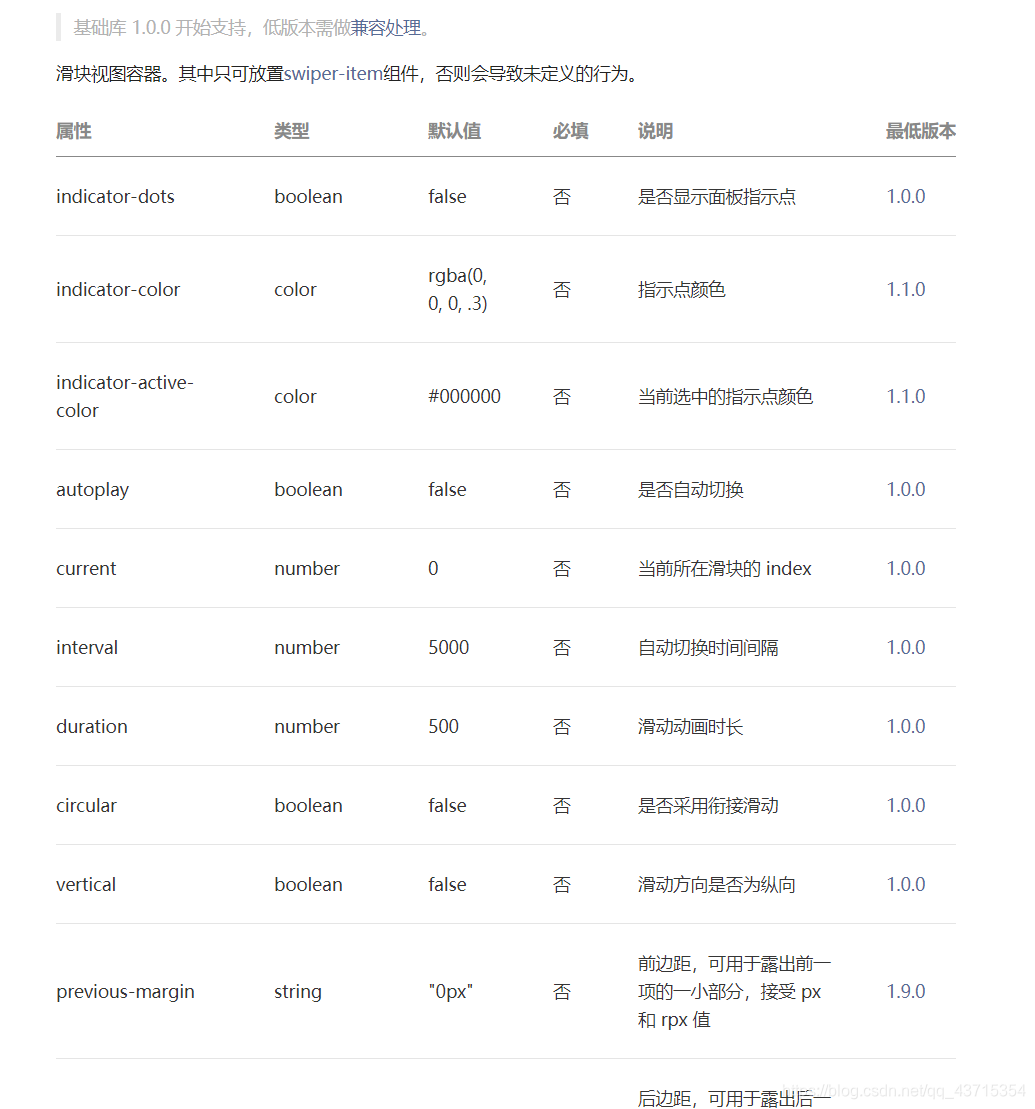
首先,我们来了解一下微信小程序scroll-view和swiper的组件,进入小程序官方文档

第二步
直接上代码
<!-- 导航 -->
<scroll-view scroll-x enable-flex scroll-with-animation class="navScroll">
  <view id="{{'scroll'+ item.id}}" class="navItem">
    <view class="navContent {{navId == 0?'active':'' }}" bindtap="changNav" data-id="0">
      品牌介绍
    </view>
  </view>
  <view id="{{'scroll'+ item.id}}" class="navItem">
    <view class="navContent {{navId == 1?'active':'' }}" bindtap="changNav" data-id="1">
      专利认证
    </view>
  </view>
  <view id="{{'scroll'+ item.id}}" class="navItem">
    <view class="navContent {{navId == 2?'active':'' }}" bindtap="changNav" data-id="2">
      售后保险
    </view>
  </view>
  <view id="{{'scroll'+ item.id}}" class="navItem">
    <view class="navContent {{navId == 3?'active':'' }}" bindtap="changNav" data-id="3">
      加入我们
    </view>
  </view>
</scroll-view>

<swiper class="top_swiper" circular bindchange="topSwiper" current="{{currentId}}" style="height: {{windowHeight}}rpx;line-height: {{windowHeight}}rpx;">
  <swiper-item duration="{{duration}}">
    <view class="swiperItem" style="background-color: red;">A</view>
  </swiper-item>
  <swiper-item duration="{{duration}}">
    <view class="swiperItem" style="background-color: black;">B</view>
  </swiper-item>
  <swiper-item duration="{{duration}}">
    <view class="swiperItem" style="background-color: blue;">C</view>
  </swiper-item>
  <swiper-item duration="{{duration}}">
    <view class="swiperItem" style="background-color: orange;">D</view>
  </swiper-item>
</swiper>
.navScroll {
  display: flex;
  white-space: nowrap;
  height: 80rpx;
  background-color: rgba(83, 83, 83, 100);
  position: fixed;
  top: 0;
  z-index: 100;
}

.navScroll .navItem {
  width: calc(100%/4);
  font-size: 20rpx;
  border: 0rpx solid red;
  display: flex;
  justify-content: center;
  align-items: center;
}

.navScroll .navItem .active {
  background-color: rgba(238, 205, 141, 100);
  color: rgba(255, 255, 255, 100);
}

.navScroll .navContent {
  width: 60%;
  height: 48rpx;
  line-height: 48rpx;
  border-radius: 24rpx;
  border: 0rpx solid red;
  text-align: center;
  color: rgba(238, 205, 141, 100);
}

.top_swiper{
  width: 100%;
  text-align: center;
  color:#FFF;

}

.swiperItem{
  width: 100%;
  height: 100%;
}
// pages/test/test.js
Page({

  /**
   * 页面的初始数据
   */
  data: {
    navId: 0, //导航栏id
    windowHeight: '', //屏幕的高度
    currentId: 0 //swiper下标
  },
  topSwiper(event) {
    let navId = event.detail.current; //获取swiper下标
    console.log(event.detail.current)
    this.setData({
      navId
    })
  },
  //导航栏
  changNav(event) {
    let navId = event.currentTarget.dataset.id; //获取导航栏下标
    let windowHeight = this.data.windowHeight; //
    console.log(windowHeight)
    if (this.data.currentId == navId) {
      return false;
    } else {
      this.setData({
        currentId: navId
      })
    }
    this.setData({
      navId,
    })
  },

  /**
   * 生命周期函数--监听页面加载
   */
  onLoad: function (options) {
    //获取屏幕高度
    let that = this;
    wx.getSystemInfo({
      success: function (res) {
        let clientHeight = res.windowHeight,
          clientWidth = res.windowWidth,
          rpxR = 750 / clientWidth;
        let calc = clientHeight * rpxR;
        console.log(calc);
        console.log(rpxR);
        that.setData({
          windowHeight: calc,
        });
      }
    });
  },

  /**
   * 生命周期函数--监听页面初次渲染完成
   */
  onReady: function () {

  },

  /**
   * 生命周期函数--监听页面显示
   */
  onShow: function () {

  },

  /**
   * 生命周期函数--监听页面隐藏
   */
  onHide: function () {

  },

  /**
   * 生命周期函数--监听页面卸载
   */
  onUnload: function () {

  },

  /**
   * 页面相关事件处理函数--监听用户下拉动作
   */
  onPullDownRefresh: function () {

  },

  /**
   * 页面上拉触底事件的处理函数
   */
  onReachBottom: function () {

  },

  /**
   * 用户点击右上角分享
   */
  onShareAppMessage: function () {

  }
})
如图所示:

结语
关于微信小程序scroll-view和swiper结合使用就介绍到这里 ,欢迎大家多多指教,互相交流,一起学习


 3078
3078


 被折叠的 条评论
为什么被折叠?
被折叠的 条评论
为什么被折叠?
 到【灌水乐园】发言


