


文章目录
教程
环境配置
安装Windows CPU版本tensorflow
参考链接:
打开cmd,运行以下语句:
- pip install tensorflow
- 进入python,运行import tensorflow as tf
错误:
2021-09-06 21:51:38.471339: W tensorflow/stream_executor/platform/default/dso_loader.cc:64] Could not load dynamic library 'cudart64_110.dll'; dlerror: cudart64_110.dll not found
2021-09-06 21:51:38.472290: I tensorflow/stream_executor/cuda/cudart_stub.cc:29] Ignore above cudart dlerror if you do not have a GPU set up on your machine.
- 打开链接下载cudart64_110.dll下载 CUDART64_110.DLL
- 复制文件dll进路径C:\Windows\System32
- 重新运行import tensorflow as tf不报错
参考链接:
出现Could not load dynamic library ‘cudart64_110.dll‘; dlerror: cudart64_110.dll not found解决办法
但复制文件的路径有变化
注意:
运行程序可以出现结果,但同时会出现:
2021-09-07 16:33:57.746978: W tensorflow/stream_executor/platform/default/dso_loader.cc:64] Could not load dynamic library 'cublas64_11.dll'; dlerror: cublas64_11.dll not found
2021-09-07 16:33:57.749512: W tensorflow/stream_executor/platform/default/dso_loader.cc:64] Could not load dynamic library 'cublasLt64_11.dll'; dlerror: cublasLt64_11.dll not found
2021-09-07 16:33:57.751775: W tensorflow/stream_executor/platform/default/dso_loader.cc:64] Could not load dynamic library 'cufft64_10.dll'; dlerror: cufft64_10.dll not found
2021-09-07 16:33:57.753878: W tensorflow/stream_executor/platform/default/dso_loader.cc:64] Could not load dynamic library 'curand64_10.dll'; dlerror: curand64_10.dll not found
2021-09-07 16:33:57.756025: W tensorflow/stream_executor/platform/default/dso_loader.cc:64] Could not load dynamic library 'cusolver64_11.dll'; dlerror: cusolver64_11.dll not found
2021-09-07 16:33:57.758276: W tensorflow/stream_executor/platform/default/dso_loader.cc:64] Could not load dynamic library 'cusparse64_11.dll'; dlerror: cusparse64_11.dll not found
2021-09-07 16:33:57.761254: W tensorflow/stream_executor/platform/default/dso_loader.cc:64] Could not load dynamic library 'cudnn64_8.dll'; dlerror: cudnn64_8.dll not found
2021-09-07 16:33:57.762224: W tensorflow/core/common_runtime/gpu/gpu_device.cc:1835] Cannot dlopen some GPU libraries. Please make sure the missing libraries mentioned above are installed properly if you would like to use GPU. Follow the guide at https://www.tensorflow.org/install/gpu for how to download and setup the required libraries for your platform.
Skipping registering GPU devices...
2021-09-07 16:33:57.763272: I tensorflow/core/platform/cpu_feature_guard.cc:142] This TensorFlow binary is optimized with oneAPI Deep Neural Network Library (oneDNN) to use the following CPU instructions in performance-critical operations:  AVX AVX2
To enable them in other operations, rebuild TensorFlow with the appropriate compiler flags.
原因是没有装上GPU版本的
CUDA
cuDNN
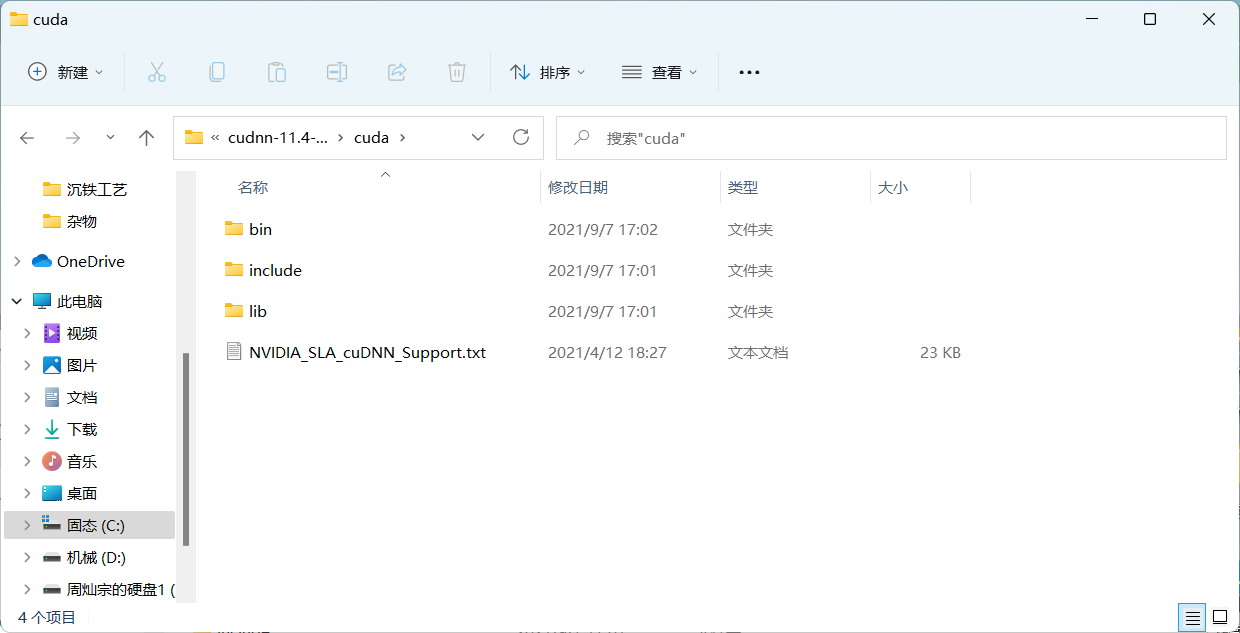
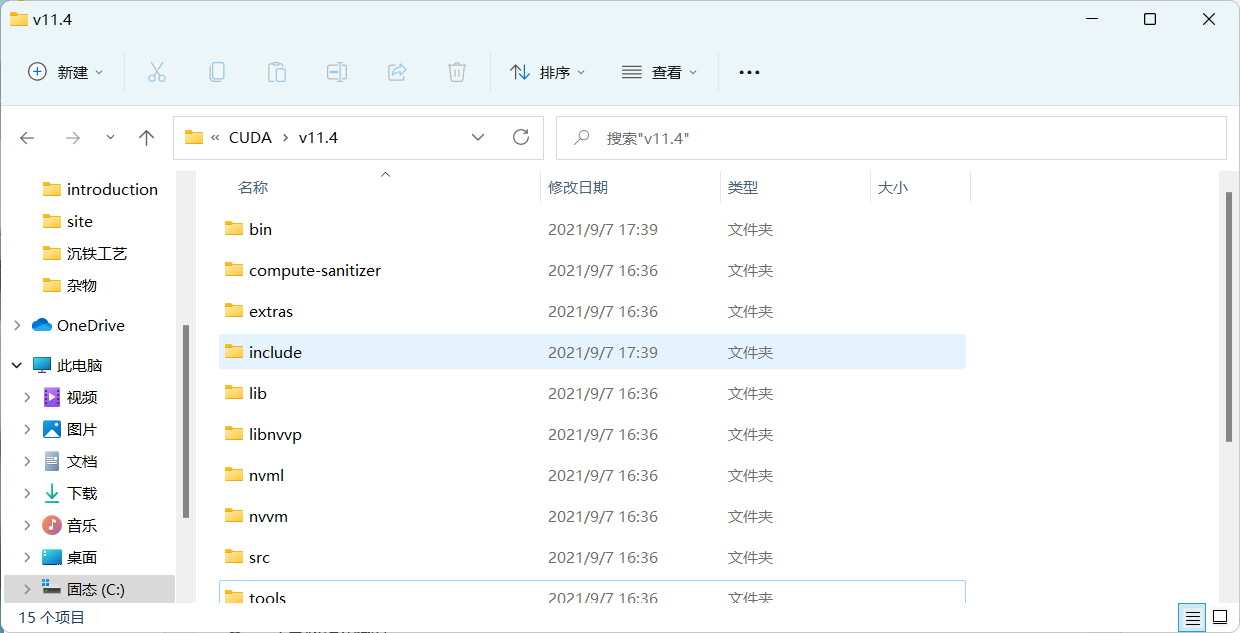
安装CUDA、cuDNN
参考链接:
- 在Windows下安装TensorFlow GPU版本教程(超级详细哦)
C:\Windows\System32\cuda\bin - 在安装cuDNN时:下载dudnn之后,复制cuDNN里的三个文件夹到C:\Program Files\NVIDIA GPU Computing Toolkit\CUDA\v11.4
安装Windows GPU版本tensorflow
- pip install tensorflow-gpu
报错:
ERROR: Could not install packages due to an OSError: [WinError 5] 拒绝访问。: 'c:\\users\\22164\\appdata\\local\\programs\\python\\python39\\Lib\\site-packages\\tensorflow\\lite\\experimental\\microfrontend\\python\\ops\\_audio_microfrontend_op.so'
Consider using the `--user` option or check the permissions.
- pip install --user tensorflow-gpu
警告:
  WARNING: The scripts estimator_ckpt_converter.exe, import_pb_to_tensorboard.exe, saved_model_cli.exe, tensorboard.exe, tf_upgrade_v2.exe, tflite_convert.exe, toco.exe and toco_from_protos.exe are installed in 'C:\Users\22164\AppData\Roaming\Python\Python39\Scripts' which is not on PATH.
  Consider adding this directory to PATH or, if you prefer to suppress this warning, use --no-warn-script-location.
将C:\Users\22164\AppData\Roaming\Python\Python39\Scripts加入path环境变量
查看使用的是CPU还是GPU
- 使用以下代码:
from tensorflow.python.client import device_lib
print(device_lib.list_local_devices())
可以查看挂载的设备有哪些
print(tf.config.list_physical_devices('GPU'))
print(tf.config.list_physical_devices('CPU'))
可以查看挂载的CPU/GPU设备有哪些
- 使用以下代码可以启用/禁用GPU
import os
os.environ["CUDA_VISIBLE_DEVICES"] = "-1"  # 禁用GPU,使用CPU
os.environ["CUDA_VISIBLE_DEVICES"] = "0"  # 使用GPU:0
- 使用以下代码:
with tf.device('/gpu:0'):
使用指定设备运行代码段
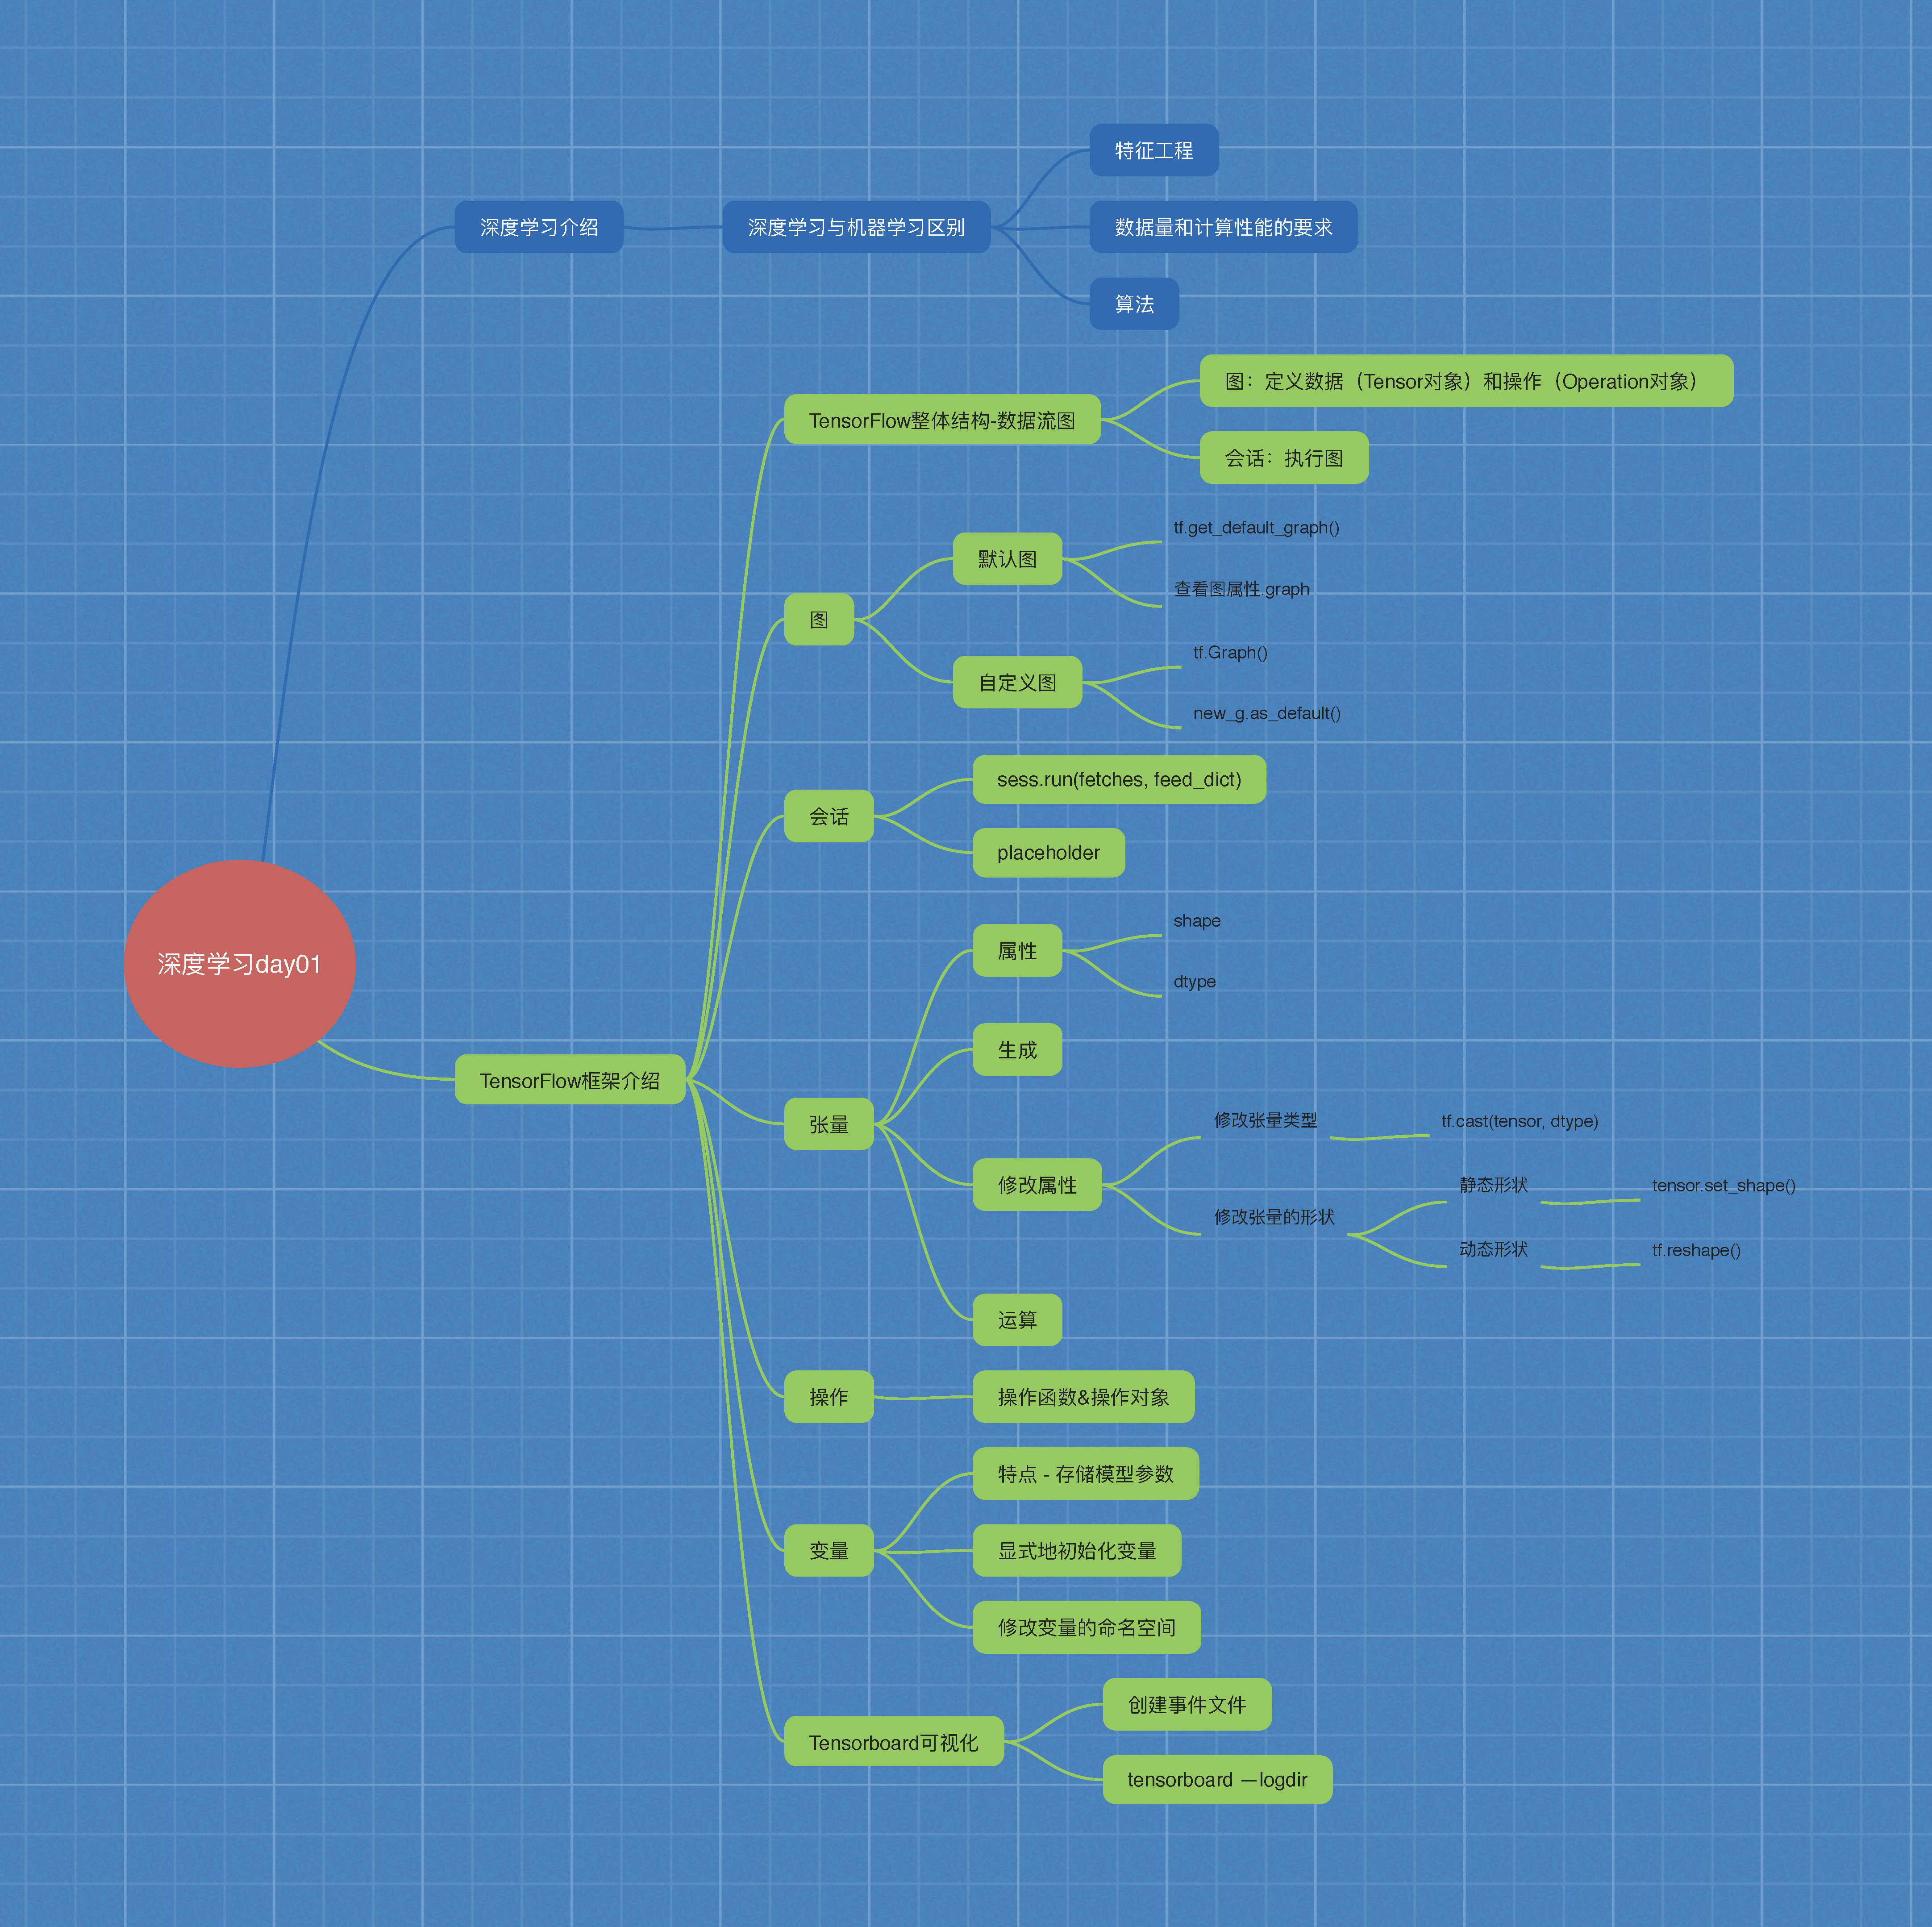
深度学习介绍
1.1 深度学习与机器学习的区别
机器学习是实现人工智能的一种途径,深度学习是机器学习的一个子集,也就是说深度学习是实现机器学习的一种方法。
1.1.1 特征提取方面
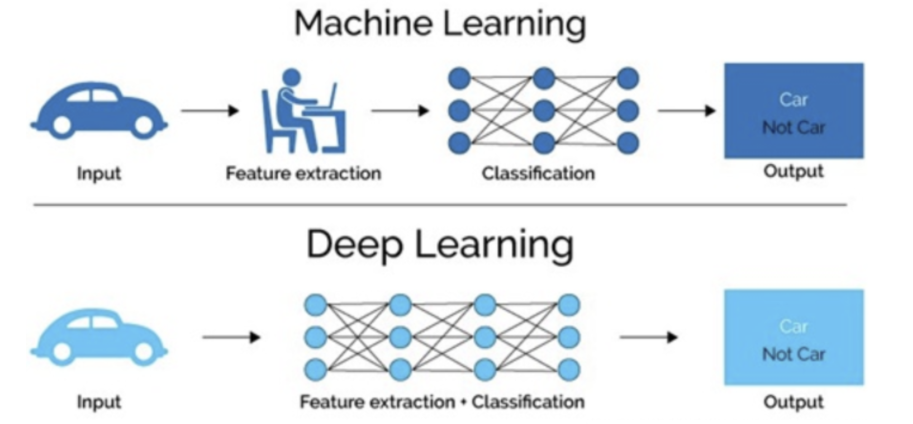
- 机器学习的特征工程步是要手动究成的,而且需要大量领域专业知识
- 深度学习通常由多个层组成,它们通常将更简单的模型组合在一起,将数据从层传选到另一层来构建更复杂的模型,通过训练大量数据自动得出模型,不需要人工特征提取环节。
深度学习算法试图从数据中学习高级功能,这是深度学习的一个非常独特的部分。因此,减少了为每个问题开发新特征提取器的任务。适合用在难提取特征的图像、语音、自然语言处理领域。
1.1.2 数据量和计算性能要求

第一、深度学习需要大量的训练数据集
第二、训练深度神经网络需要大量的算力
可能要花费数天、甚至数周的时间,才能使用数百万张图像的数据集训练出一个深度网络。所以深度学习通常
- 需要强大的GPU服务器来进行计算
- 全面管理的分布式训练与预测服务ー一比如谷歌 Tensorflow云机器学习平台
1.1.3 算法代表
- 机器学习
朴素贝叶斯、决策树等 - 深度学习
神经网络
1.2 深度学习的应用场景
- 图像识别
物体识别
场景识别
车型识别
人脸检测跟踪
人脸关键点定位
人脸身份认证 - 自然语言处理技术
机器翻译
文本识别
聊天对话 - 语音技术
语音识别
1.3 深度学习框架介绍
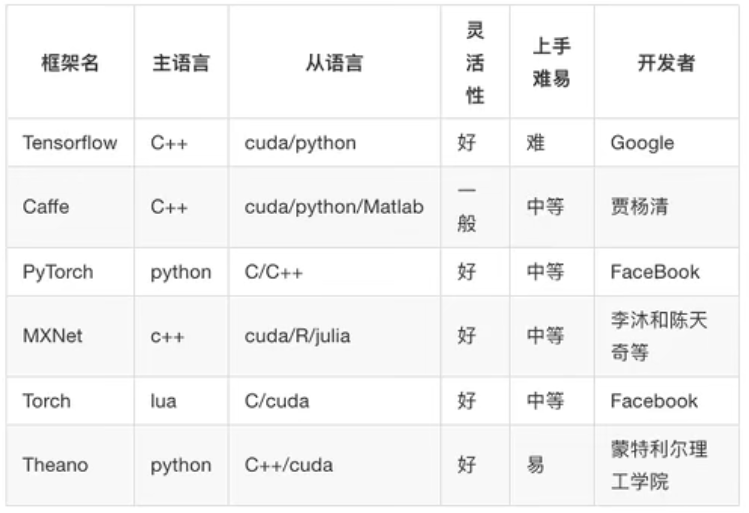
1.3.1 常见深度学习框架对比
总结
- 最常用的框架当 Tensorflow和 Pytorch,而Cafe和Cafe2次之。
- Pytorch和Toch更适用于学术研究( (research); Tensorflow,Cafe
Cafe2更适用于工业界的生产环境部署( (industrial production) - Caffe适用于处理静态图像( static graph); Torch和 Pytorch更适用于动
态图像( dynamic graph); Tensorflow在两种情况下都很实用。 - Tensorflow和Cafe2可在移动端使用。
1.3.2 TensorFlow的特点
- 高度灵活( Deep Flexibility)
它不仅可来做神经网络算法研究,也可以用来做普通的机器学习算法,
甚至是只要把计算表示成数据流图,都可以用 Tensorflow - 语言多样( Language Options)
Tensorflom使用C+实现的,然后用 Python封装。谷歌号召社区通过SWG
开发更多的语言接口来支持 Tensorflow - 设备支持
Tensorflow可以运行在各种硬件上,同时根据计算的需要,合理将运算分配
到相应的设备,比如卷积就分配到GPU上,也允许在CPU和GPU上的计算
分布,甚至支持使用gRPC进行水平扩展 - Tensorboard可视化
Tensorboard是 Tensorflow的一组Web应用,用来监控 Tensorflow运行过程,或可视化 Computation Graph. Tensorboard日前支持5种可视化:标量scalars)、图片( Images)、音频( audio)、直方图( histograms)和计算图( Computation Graph). Tensorboardp的 Events Dashboard可以用来持地监控运行时的关键指标,比如loss、学习速率( ( learning rate)或是验证集上的准确率( accuracy)
1.3.3 TensorFlow的安装
-
1 CPU版本
-
2 GPU版本
注:
- CPU:诸葛亮
综合能力比较强
核芯的数量更少
更适用于处理连续性(sequential)任务。 - GPU:臭皮匠
专做某一个事情很好
核芯的数量更多
更适用于并行(parallel)任务
TensorFlow框架的使用
2.0 兼容性问题
2.0版本的tensorflow与1.8的有很多不一样的地方。当出现模块找不到的情况(大部分情况)可以使用兼容性运行的办法解决。
用法:
指令中间加入compat.v1
例如:
- 1.8版本:tf.disable_eager_execution()
- 2.0版本:tf.compat.v1.disable_eager_execution()
2.1 TF数据流图
2.1.1 案例:TensorFlow实现一个加法运算
import tensorflow as tf

a_t = tf.constant(2)
b_t = tf.constant(3)
c_t = a_t + b_t
print("tensorflow加法运算的结果:\n", c_t)

with tf.Session() as sess
c_t_value = sess.run(c_t)
print("c_t_value:\n", c_t_value)
错误:找不到Session()
原因:2.0版本的tensorflow已经没有Session()模块
方案:改用以下语句
import tensorflow as tf
tf.compat.v1.disable_eager_execution()

a_t = tf.constant(2)
b_t = tf.constant(3)
c_t = a_t + b_t
print("tensorflow加法运算的结果:\n", c_t)

sess = tf.compat.v1.Session()
c_t_value = sess.run(c_t)
sess = tf.compat.v1.Session()
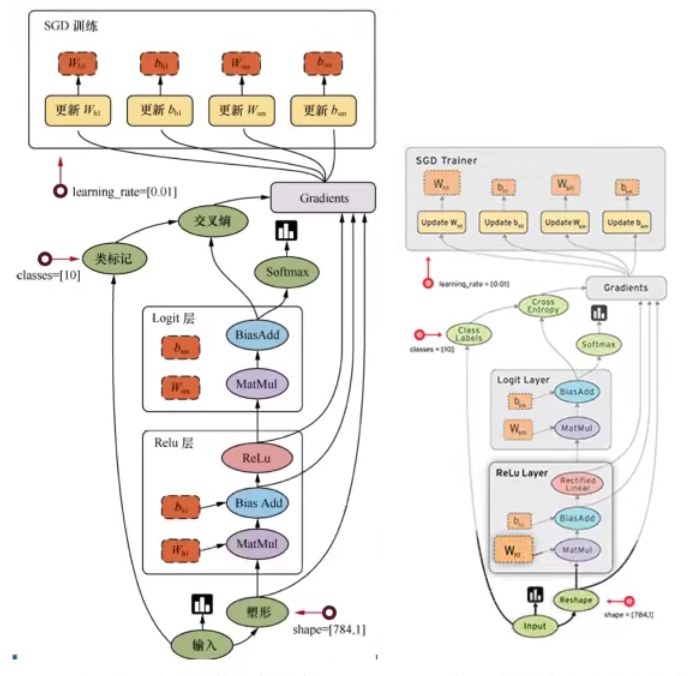
TensorFlow结构分析
-
一个构建图阶段
流程图:定义数据(张量Tensor)和操作(节点Operation) -
一个执行图阶段
调用各方资源,将定义好的数据和操作运行起来 -
图和会话:
- 图:这是 Tensorflow将计算表示为指令之间的依赖关系的一种表示法
- 会话: Tensorflow跨一个或多个本地或远程设备运行数据流图的机制
-
张量: Tensorflow中的基本数据对象
-
节点:提供图当中执行的操作
2.1.2 数据流图介绍
Tensor - 张量 - 数据
Flow - 流动
Tensorflow是一个采用数据流图( data flow graphs),用于数值计算的开源框架。
节点( Operation)在图中表示数学操作,线( edges)则表示在节点间相互联系的多维数据数组,即张量( tensor)
2.2 图与TensorBoard
2.2.1 什么是图结构
图包含了一组tf.Operation代表的计算单元对象和tf.Tensor代表的计算单元之间流动的数据。
图结构:
数据(Tensor) + 操作(Operation)
2.2.2 图相关操作
1 默认图
通常 Tensorflow会默认帮我们创建一张图。
查看默认图的方法
- 1)调用方法
用tf.get_default_graph()访问,要将操作添加到默认图形中,直接创建OP即可
2.0版本改用:tf.compat.v1.get_default_graph() - 2)查看属性
op、sess都含有graph属性,默认都在一张图中
.graph
2 创建图
new_g = tf.Graph()
with new_g.as_default():
定义数据和操作
示例
图的演示
def graph_show():
    """
    图的演示
    :return:
    """
    # tensorflow加法运算
    a_t = tf.constant(2)
    b_t = tf.constant(3)
    c_t = a_t + b_t
    print("tensorflow加法运算的结果:\n", c_t)

    # 查看默认图
    # 方法1:调用方法
    # default_g = tf.get_default_graph()  # 2.0版本没有get_default_graph()
    default_g = tf.compat.v1.get_default_graph()
    print("default_g:\n", default_g)
    # 方法2:查看属性
    print("a_t的图属性:\n", a_t.graph)
    print("c_t的图属性:\n", c_t.graph)

    # 自定义图
    new_g = tf.Graph()
    # 在自己的图中定义数据和操作
    with new_g.as_default():
        a_new = tf.constant(20)
        b_new = tf.constant(30)
        c_new = a_new + b_new
        print("c_new:\n", c_new)
        # print(tf.config.list_physical_devices('GPU'))
        # print(tf.config.list_physical_devices('CPU'))

    # 开启会话
    # with tf.Session() as sess  # 2.0版本没有Session模块
    # with tf.compat.v1.Session() as sess:  # 使用这个
    sess = tf.compat.v1.Session()  # 或者使用这个
    c_t_value = sess.run(c_t)
    print("c_t_value:\n", c_t_value)
    print("sess的图属性:\n", sess.graph)
    # 尝试运行自定义图中的数据、操作(会报错,因为这个数据在自定义的图中)
    # c_new_value = sess.run(c_new)
    # print("c_new_value:\n", c_new_value)

    # 开启new_g的会话
    new_sess = tf.compat.v1.Session(graph=new_g)
    c_new_value = new_sess.run(c_new)
    print("c_new_value:\n", c_new_value)
    print("new_sess的图属性:\n", new_sess.graph)
结果:
tensorflow加法运算的结果:
 Tensor("add:0", shape=(), dtype=int32)
default_g:
 <tensorflow.python.framework.ops.Graph object at 0x00000143571916A0>
a_t的图属性:
 <tensorflow.python.framework.ops.Graph object at 0x00000143571916A0>
c_t的图属性:
 <tensorflow.python.framework.ops.Graph object at 0x00000143571916A0>
c_new:
 Tensor("add:0", shape=(), dtype=int32)
2021-09-08 10:25:14.248406: I tensorflow/core/platform/cpu_feature_guard.cc:142] This TensorFlow binary is optimized with oneAPI Deep Neural Network Library (oneDNN) to use the following CPU instructions in performance-critical operations:  AVX AVX2
To enable them in other operations, rebuild TensorFlow with the appropriate compiler flags.
2021-09-08 10:25:14.896050: I tensorflow/core/common_runtime/gpu/gpu_device.cc:1510] Created device /job:localhost/replica:0/task:0/device:GPU:0 with 2778 MB memory:  -> device: 0, name: NVIDIA GeForce GTX 1050 Ti, pci bus id: 0000:01:00.0, compute capability: 6.1
c_t_value:
 5
sess的图属性:
 <tensorflow.python.framework.ops.Graph object at 0x00000143571916A0>
c_new_value:
 50
new_sess的图属性:
 <tensorflow.python.framework.ops.Graph object at 0x000001436BE9BC40>
2021-09-08 10:25:14.944687: I tensorflow/core/common_runtime/gpu/gpu_device.cc:1510] Created device /job:localhost/replica:0/task:0/device:GPU:0 with 2778 MB memory:  -> device: 0, name: NVIDIA GeForce GTX 1050 Ti, pci bus id: 0000:01:00.0, compute capability: 6.1
2.2.3 TensorBoard:可视化学习
- 1 数据序列化-events文件
tf.summary.FileWriter(path, graph=sess.graph)
2.0版本改用:tf.compat.v1.summary.FileWriter(“…/events”, graph=sess.graph) - 2 启动tensorboard
tensorboard --logdir=“./events”
注意: - 引号里的路径到events文件所在的文件夹
- =前后不要有空格
示例
(接前面代码)
将图写入本地生成events文件
    # 开启会话
    # with tf.Session() as sess  # 2.0版本没有Session模块
    # with tf.compat.v1.Session() as sess:  # 使用这个
    sess = tf.compat.v1.Session()  # 或者使用这个
    c_t_value = sess.run(c_t)
    print("c_t_value:\n", c_t_value)
    print("sess的图属性:\n", sess.graph)
    # 尝试运行自定义图中的数据、操作(会报错,因为这个数据在自定义的图中)
    # c_new_value = sess.run(c_new)
    # print("c_new_value:\n", c_new_value)
    # 1)将图写入本地生成events文件
    # tf.summary.FileWriter("../events", graph=sess.graph)  # 2.0没有
    tf.compat.v1.summary.FileWriter("../events", graph=sess.graph)
结果:
会生成一个文件:events.out.tfevents.{timestamp} . {hostname}
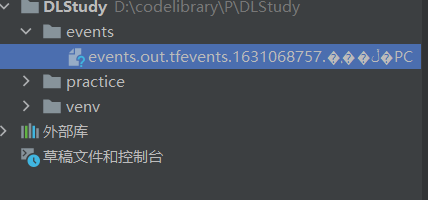
在终端输入命令:tensorboard --logdir=“./events”
D:\codelibrary\P\DLStudy> tensorboard --logdir="./events"
结果:
出现一个网页,Ctrl+鼠标左键点击可以访问

进入网页后可以看到
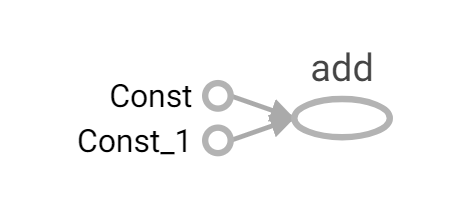
注意:
- 不知道是不是版本的问题,一开始显示的图箭头很大,需要点击add,点击add to main graph才能显示正常。
- 定义变量时可以重命名,例如:a_t = tf.constant(2, name=“a_t”)。方便看张量图。
2.2.4 OP
数据:Tensor对象
操作:Operation对象 - Op
1 常见OP
| 类型 | 实例 |
|---|---|
| 标量运算 | add,sub, mul, div, exp, log, greater, less, equal |
| 向量运算 | concat, slice, splot, constant, rank, shape, shuffle |
| 矩阵运算 | matmul,matrixinverse, matrixdateminant |
| 带状态的运算 | Variable, assgin, assginadd |
| 神经网络组件 | softmax,sigmoid, relu,convolution,max_pool |
| 存储,恢复 | Save, Restroe |
| 队列及同步运算 | Enqueue, Dequeue,MutexAcquire,MutexRelease |
| 控制流 | Merge,Switch, Enter,Leave,Nextlteration |
tf.constant()就是一个操作函数,传入参数运行以后会产生一个张量Const,就是操作对象。
| 操作函数 | 操作对象 |
|---|---|
| tf.constant(Tensor对象) | 输入Tensor对象 - Const-输出 Tensor对象 |
| tf.add(Tensor对象1, Tensor对象2) | 输入Tensor对象1, Tensor对象2 - Add对象 - 输出 Tensor对象3 |
一个操作对象(Operation)是 Tensorflow图中的一个节点,可以接收0个或者多个输入Tensor,并且可以输出0个或者多个Tensor, Operation对象是通过op构造函数(如tf.matui())创建的。
例如:c= tf.matmul(a,b)创建了ー个 Operation对象,类型为Matmul类型,它将张量a,b作为输入,c作为输出,并且输出数据,打印的时候也是打印的数
据。其中计tf.matmul()是函数,在执行matmul函数的过程中会通过Matmul类创建一个与之对应的对象。
打印con_a
Tensor("Const: 0", shape=(), dtype=float32)
打印con_b:
Tensor("Const_1: 0, shape=(), dtype=f Loat32
打印sum_C:
Tensor("Add: 0, shape=(), dtype=float32)
注意:
- 打印出来的是张量值,可以理解成OP当中包含了这个值。并且每一个OP指令都对应一个唯一的名称,如上面的 Const:0,这个在 Tensor Board上面也可以显示
- tf Tensor对象以输出该张量的tf.Operation明确命名。张量名称的形式为
“< OP NAME >:< i >”, 其中:- "< OP NAME>"是生成该张量的指令的名称
- "< i >"是一个整数它表示该张量在指令的输出中的索引
2 指令名称
一张图一个命名空间
tf.Graph对象为其包含的 tf.Operation对象定义的一个命名空间。TensorFlow 会自动为图中的每个指令选择一个唯一名称,用户也可以指定描述性名称,使程序阅读起来更轻松。我们可以以以下方式改写指令名称:
- 每个创建新的tf.Operation或返回新的tf.Tensor的 API函数可以接受可选的name 参数。
例如,tf.constant(42.0, name=“answer”)创建了一个名为““answer”的新tf.Operation并返回一个名为“answer:O”的tf.Tensor。如果默认图已包含名为"answer”的指令,则TensorFlow 会在名称上附加“1”、""2”等字符,以便让名称具有唯一性。
- 当修改好之后,我们在Tensorboard显示的名字也会被修改。
2.3 会话
2.3.1 创建会话
一个运行TensorFlow operation的类。会话包含以下两种开启方式
- tf.Session:用于完整的程序当中
- tf.InteractiveSession:用于交互式上下文中的TensorFlow ,例如shell
- TensorFlow使用tf.Session类来表示客户端程序(通常为Python程序,但也提供了使用其他语言的类似接口)与C++运行时之间的连接
- tf.Session对象使用分布式TensorFlow运行时提供对本地计算机中的设备和远程设备的访问权限
示例
tf.InteractiveSession的使用
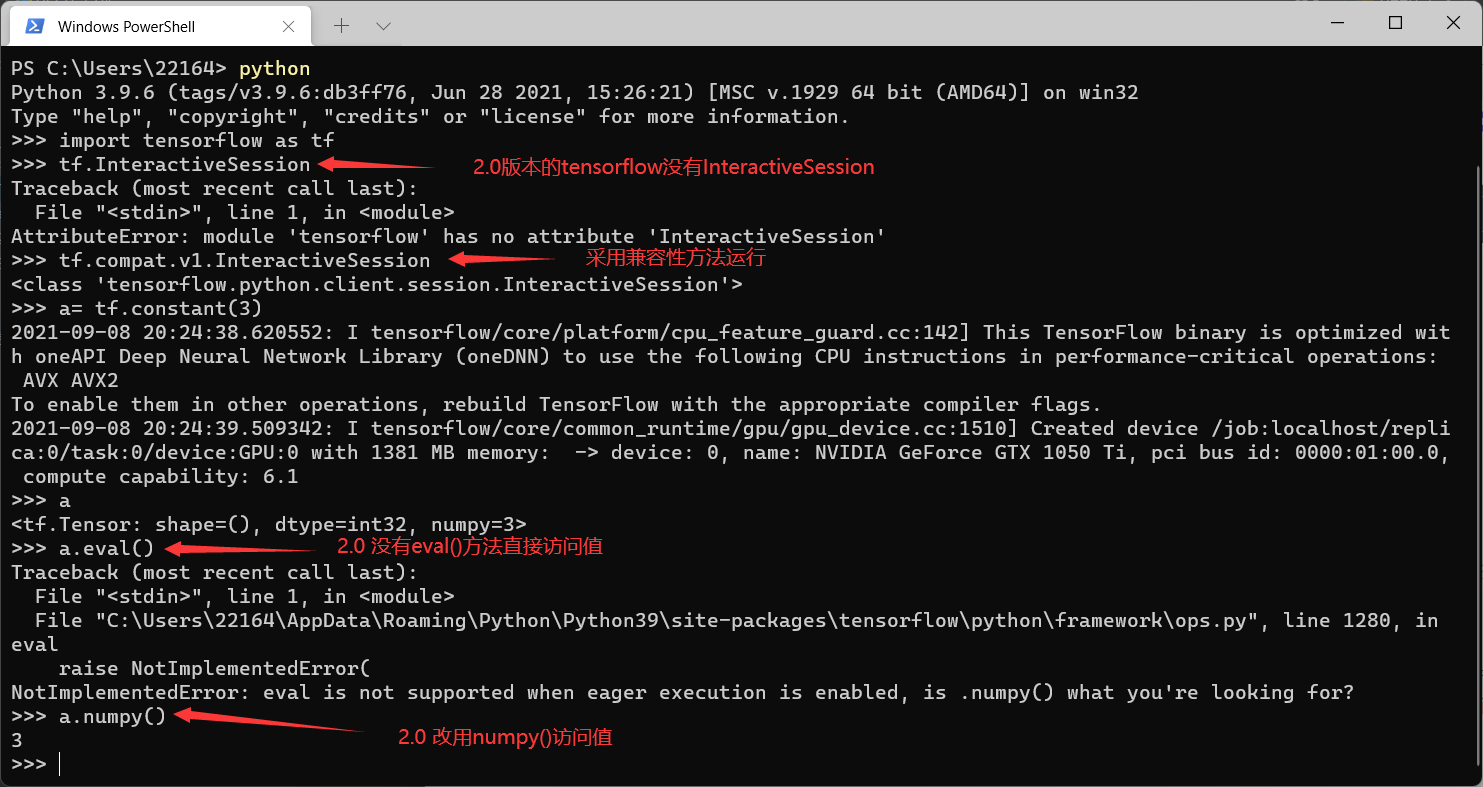
注意: 2.0版本的InteractiveSession里的eval()改用numpy()
2.3.1.1 会话掌握资源,用完要回收 - 上下文管理器
init(target=", graph=None, config=None)
会话可能拥有的资源,如tf.Variable,tf.QueueBase和tf.ReaderBase。当这些资源不再需要时,释放这些资源非常重要。因此,需要调tf.Sessioh.close会话中的方法,或将会话用作上下文管理器。以下两个例子作用是一样的(直白一点就是打开会话用完必须要关闭,就像文件读写那样):
def session_demo():
	"""
	会话演示
	:return:
	"""
    a_t = tf.constant(10)
    b_t = tf.constant(20)
    # 不提倡直接用+ - 符号直接运算
    # 推荐用tensorflow 提供的函数进行运算
    # c_t = a_t + b_t
    c_t = tf.add(a_t, b_t)
    print("tensorflow实现加法运算:\n", c_t)

    # 开启会话
    # 传统的定义会话
    sess = tf.Session()
    sum_t = sess.run(c_t)
    print("sum_t:\n", sum_t)
    sess.close()

    # 用上下文管理开启会话
    with tf.Session() as sess:
        # 同时执行多个tensor
        print(sess.run([a_t, b_t, c_t]))
        # 也可以用eval 查看值
        print('用eval查看计算的值', a_t.eval())
        print('会话的属性:\n', sess.graph)
2.3.1.2 初始化会话对象时的参数
- target:如果将此参数留空(默认设置),会话将仅使用本地计算机中的设备。可以指定grpc:/l网址,以便指定TensorFlow服务器的地址,这使得会话可以访问该服务器控制的计算机上的所有设备。
- graph:默认情况下,新的tf.Session将绑定到当前的默认图。
- config:此参数允许您指定一个tf.ConfigProto 以便控制会话的行为。例如,ConfigProto协议用于打印设备使用信息
示例
创建会话时使用config参数,用ConfigProto协议用于打印设备使用信息
def tensorflow_test():
    """
    Tensorflow的基本结构
    :return:
    """
    # tensorflow加法运算
    a_t = tf.constant(2)
    b_t = tf.constant(3)
    c_t = a_t + b_t
    print("a_t:\n", a_t)
    print("tensorflow加法运算的结果:\n", c_t)

    # 开启会话
    # with tf.Session() as sess  # 2.0版本没有Session模块
    # with tf.compat.v1.Session() as sess:  # 使用这个
    # sess = tf.compat.v1.Session()  # 或者使用这个
    # 使用config参数,ConfigProto协议用于打印设备使用信息
    with tf.compat.v1.Session(config=tf.compat.v1.ConfigProto(allow_soft_placement=True,
                                                              log_device_placement=True)) as sess:
        c_t_value = sess.run(c_t)
        print("c_t_value:\n", c_t_value)
a_t:
 Tensor("Const:0", shape=(), dtype=int32)
tensorflow加法运算的结果:
 Tensor("add:0", shape=(), dtype=int32)
2021-09-08 20:58:45.944506: I tensorflow/core/platform/cpu_feature_guard.cc:142] This TensorFlow binary is optimized with oneAPI Deep Neural Network Library (oneDNN) to use the following CPU instructions in performance-critical operations:  AVX AVX2
To enable them in other operations, rebuild TensorFlow with the appropriate compiler flags.
2021-09-08 20:58:46.743283: I tensorflow/core/common_runtime/gpu/gpu_device.cc:1510] Created device /job:localhost/replica:0/task:0/device:GPU:0 with 2778 MB memory:  -> device: 0, name: NVIDIA GeForce GTX 1050 Ti, pci bus id: 0000:01:00.0, compute capability: 6.1
2021-09-08 20:58:46.745709: I tensorflow/core/common_runtime/direct_session.cc:361] Device mapping:
/job:localhost/replica:0/task:0/device:GPU:0 -> device: 0, name: NVIDIA GeForce GTX 1050 Ti, pci bus id: 0000:01:00.0, compute capability: 6.1
2021-09-08 20:58:46.748970: I tensorflow/core/common_runtime/placer.cc:114] add: (AddV2): /job:localhost/replica:0/task:0/device:GPU:0
2021-09-08 20:58:46.749642: I tensorflow/core/common_runtime/placer.cc:114] Const: (Const): /job:localhost/replica:0/task:0/device:GPU:0
2021-09-08 20:58:46.750346: I tensorflow/core/common_runtime/placer.cc:114] Const_1: (Const): /job:localhost/replica:0/task:0/device:GPU:0
add: (AddV2): /job:localhost/replica:0/task:0/device:GPU:0
Const: (Const): /job:localhost/replica:0/task:0/device:GPU:0
Const_1: (Const): /job:localhost/replica:0/task:0/device:GPU:0
c_t_value:
 5
2.3.2 会话的run()
run(fetches, feed_dict=None, options=None, run_metadata=None)
- 通过使用 sess. run()来运行 operation
- fetches:单一的 operation,或者列表、元组(其它不属于tensorflow的类型不行)
- feed_dict:参数允许调用者覆盖图中张量的值,运行时赋值
- 与 tf.placeholder搭配使用,则会检查值的形状是否与占位符兼容。
使用tf.operation.eval()也可运行operation,但要在会话中运行
示例
同时打印a_t,b_t,c_t
def tensorflow_test():
    """
    Tensorflow的基本结构
    :return:
    """
    # tensorflow加法运算
    a_t = tf.constant(2)
    b_t = tf.constant(3)
    c_t = a_t + b_t
    print("a_t:\n", a_t)
    print("tensorflow加法运算的结果:\n", c_t)

    # 开启会话
    # with tf.Session() as sess  # 2.0版本没有Session模块
    # with tf.compat.v1.Session() as sess:  # 使用这个
    # sess = tf.compat.v1.Session()  # 或者使用这个
    # 使用config参数,ConfigProto协议用于打印设备使用信息
    with tf.compat.v1.Session(config=tf.compat.v1.ConfigProto(allow_soft_placement=True,
                                                              log_device_placement=True)) as sess:
        # c_t_value = sess.run(c_t)
        # print("c_t_value:\n", c_t_value)

        # 同时查看a_t,b_t,c_t
        abc = sess.run([a_t, b_t, c_t])
        print("abc:\n", abc)
结果:
a_t:
 Tensor("Const:0", shape=(), dtype=int32)
tensorflow加法运算的结果:
 Tensor("add:0", shape=(), dtype=int32)
2021-09-08 21:09:55.825888: I tensorflow/core/platform/cpu_feature_guard.cc:142] This TensorFlow binary is optimized with oneAPI Deep Neural Network Library (oneDNN) to use the following CPU instructions in performance-critical operations:  AVX AVX2
To enable them in other operations, rebuild TensorFlow with the appropriate compiler flags.
2021-09-08 21:09:56.792615: I tensorflow/core/common_runtime/gpu/gpu_device.cc:1510] Created device /job:localhost/replica:0/task:0/device:GPU:0 with 1467 MB memory:  -> device: 0, name: NVIDIA GeForce GTX 1050 Ti, pci bus id: 0000:01:00.0, compute capability: 6.1
2021-09-08 21:09:56.795448: I tensorflow/core/common_runtime/direct_session.cc:361] Device mapping:
/job:localhost/replica:0/task:0/device:GPU:0 -> device: 0, name: NVIDIA GeForce GTX 1050 Ti, pci bus id: 0000:01:00.0, compute capability: 6.1
2021-09-08 21:09:56.798106: I tensorflow/core/common_runtime/placer.cc:114] add: (AddV2): /job:localhost/replica:0/task:0/device:GPU:0
2021-09-08 21:09:56.798696: I tensorflow/core/common_runtime/placer.cc:114] Const: (Const): /job:localhost/replica:0/task:0/device:GPU:0
2021-09-08 21:09:56.799291: I tensorflow/core/common_runtime/placer.cc:114] Const_1: (Const): /job:localhost/replica:0/task:0/device:GPU:0
add: (AddV2): /job:localhost/replica:0/task:0/device:GPU:0
Const: (Const): /job:localhost/replica:0/task:0/device:GPU:0
Const_1: (Const): /job:localhost/replica:0/task:0/device:GPU:0
abc:
 [2, 3, 5]
2.3.3 feed操作
placeholder提供占位符,run时候通过feed_dict指定参数
可以理解为先声明一个变量,然后后面再赋值
placeholder提供占位符,run时候通过feed_dict指定参数
示例
feed操作
def session_run_demo():
    a = tf.placeholder(tf.float32)
    b = tf.placeholder(tf.float32)

    sum_ab = tf.add(a, b)
    print("sum_ab:", sum_ab)

    # 开启会话
    with tf.Session() as sess:
        print('占位符结果:', sess.run(sum_ab, feed_dict={a: 3.0, b: 4.0}))
注意: 请注意运行时候报的错误eror
- Runtimeerror:如果这 Session是无效状态(例如已关闭)
- Typeerror:如果 fetches或者feed_d1ct键的类型不合适
- Valueerror:如果 fetches或feed_dict键无效或引用 Tensor不存在的键
2.4 张量Tensor
print()
ndarray
2.4.1 张量(Tensor)
标量:一个数字 0阶张量
向量:一维数组 [2, 3, 4] 1阶张量
矩阵:二维数组 [[2, 3, 4], [2, 3, 4]] 2阶张量
……
张量:n维数组 n阶张量
2.4.1.1 张量的类型
| 数据类型 | Python 类型 | 描述 |
|---|---|---|
| DT_FLOAT | tf.float32 | 32 位浮点数. |
| DT_DOUBLE | tf.float64 | 64 位浮点数. |
| DT_INT64 | tf.int64 | 64 位有符号整型. |
| DT_INT32 | tf.int32 | 32 位有符号整型. |
| DT_INT16 | tf.int16 | 16 位有符号整型. |
| DT_INT8 | tf.int8 | 8 位有符号整型. |
| DT_UINT8 | tf.uint8 | 8 位无符号整型. |
| DT_STRING | tf.string | 可变长度的字节数组.每一个张量元素都是一个字节数组. |
| DT_BOOL | tf.bool | 布尔型. |
| DT_COMPLEX64 | tf.complex64 | 由两个32位浮点数组成的复数:实数和虚数. |
| DT_QINT32 | tf.qint32 | 用于量化Ops的32位有符号整型. |
| DT_QINT8 | tf.qint8 | 用于量化Ops的8位有符号整型. |
| DT_QUINT8 | tf.quint8 | 用于量化Ops的8位无符号整型. |
2.4.1.2 张量的阶
| 阶 | 数学实例 | python | 例子 |
|---|---|---|---|
| 0 | 纯量 | 只有大小 | s=123 |
| 1 | 向量 | 大小和方向 | v = [1,2] |
| 2 | 矩阵 | 数据表 | m= [[1,2],[3,4],[5,6]] |
| 3 | 3阶张量 | 数据立体 | … |
| n | n阶 | ||
| 示例 |
def tensor_demo():
    """
    张量的演示
    :return:
    """
    tensor1 = tf.compat.v1.constant(4.0)
    tensor2 = tf.compat.v1.constant([1, 2, 3, 4])
    linear_squares = tf.constant([[4], [9], [16], [25]], dtype=tf.int32)

    print("tensor1:\n", tensor1)
    print("tensor2:\n", tensor2)
    print("linear_squares_before:\n", linear_squares)
结果;
tensor1:
 Tensor("Const:0", shape=(), dtype=float32)
tensor2:
 Tensor("Const_1:0", shape=(4,), dtype=int32)
linear_squares_before:
 Tensor("Const_2:0", shape=(4, 1), dtype=int32)
创建张量的时候
- 如果不指定类型,默认 tf.float32
- 整型 tf.int32
- 浮点型 tf.float32
2.4.2 创建张量的指令
2.4.2.1. 固定值张量
tf.zeros(shape, dtype=tf.float32, name=None)
创建所有元素设置为零的张量。此操作返回一个dtype具有形状shape和所有元素设置为零的类型的张量。
tf.zeros_like(tensor, dtype=None, name=None)
给tensor定单张量(),此操作返回tensor与所有元素设置为零相同的类型和形状的张量。
tf.ones(shape, dtype=tf.float32, name=None)
创建一个所有元素设置为1的张量。此操作返回一个类型的张量,dtype形状shape和所有元素设置为1。
tf.ones_like(tensor, dtype=None, name=None)
给tensor定单张量(),此操作返回tensor与所有元素设置为1相同的类型和形状的张量。
tf.fill(dims, value, name=None)
创建一个填充了标量值的张量。此操作创建一个张量的形状dims并填充它value。
tf.constant(value, dtype=None, shape=None, name=‘Const’)
创建一个常数张量。
2.4.2.2. 随机值张量
一般我们经常使用的随机数函数Math.random() 产生的是服从均匀分布的随机数,能够模拟等概率出现的况,例如扔一个骰子,1到6点的概率应该相等,但现实生活中更多的随机现象是符合正态分布的,例如20岁成年人的体重分布等。
假如我们在制作一个游戏,要随机设定许许多多NPC的身高,如果还用Math.random(),生成从140到22之间的数字,就会发现每个身高段的人数是一样多的,这是比较无趣的,这样的世界也与我们习惯不同,玛实应该是特别高和特别矮的都很少,处于中间的人数最多,这就要求随机函数符合正态分布。
tf.truncated_normal[shape, mean=0.0, stddev=1.0, ctype=tf.float32, seed=None, name=None)
从截断的正态分布中输出随机值,和 tf.random_normal)一样,但是所有数字都不超过两个标准差
tf.random_normal(shape, mean=0.0, stddev=1.0, dtype=tf.float32,seed=None, name=None)
从正态分布中输出随机值,由随机正态分布的数字组成的矩阵
其它特殊的创建张量的op
- tf.Variable
- tf.placeholder
2.4.3 张量的变换
- ndarray属性的修改
类型的修改- 1)ndarray.astype(type)
tf.cast(tensor, dtype)
不会改变原始的tensor
返回新的改变类型后的tensor - 2)ndarray.tostring()
- 1)ndarray.astype(type)
- 形状的修改
- 1)ndarray.reshape(shape)
- -1 自动计算形状
- 2)ndarray.resize(shape)
- 1)ndarray.reshape(shape)
2.4.3.1 类型改变
改变张量中数值类型的函数:
- tf.string_to_number(string_tensor, out_type=None, name=None)
- tf.to_double(x, name=‘ToDouble’)
- tf.to_float(x, name=‘ToFloat’)
- tf.to_bfloat16(x, name=‘ToBFloat16’)
- tf.to_int32(x, name=‘Tolnt32’)
- tf.to_int64(x, name=‘Tolnt64’)
- tf.cast(x, dtype, name=None)
2.4.3.2 形状改变
TensorFlow的张量具有两种形状变换,动态形状和静态形状
- tf.reshape
- tf.set_shape
静态形状——初始创建张量时的形状
关于动态形状和静态形状必须符合以下规则
-
静态形状
转换静态形状的时候,1-D到1-D,2-D到2-D,不能跨阶数改变形状(比如原来形状是[None,None],可以改成[3,4],不能改成[2,2,2])
对于已经固定的张量的静态形状的张量,不能再次设置静态形状 -
动态形状
tf.reshape()动态创建新张量时,张量的元素个数必须匹配 -
1)如何改变静态形状
tensor.set_shape(shape)
只有在形状没有完全固定下来的情况下才可以改变/更新静态形状 -
2)如何改变动态形状
tf.reshape(tensor, shape)
不会改变原始的tensor
返回新的改变形状后的tensor
动态创建新张量时,张量的元素个数必须匹配
示例
- 修改张量静态形状
def tensor_demo():
    """
    张量的演示
    :return:
    """
    tensor1 = tf.compat.v1.constant(4.0)
    tensor2 = tf.compat.v1.constant([1, 2, 3, 4])
    linear_squares = tf.constant([[4], [9], [16], [25]], dtype=tf.int32)

    # print("tensor1:\n", tensor1)
    # print("tensor2:\n", tensor2)
    # print("linear_squares_before:\n", linear_squares)

    # 张量类型的修改
    l_cast = tf.cast(linear_squares, dtype=tf.float32)
    print("linear_squares:\n", linear_squares)
    print("l_cast:\n", l_cast)

    # 更新/改变静态形状
    # 定义占位符
    # 没有完全固定下来的静态形状
    a_p = tf.compat.v1.placeholder(dtype=tf.float32, shape=[None, None])
    b_p = tf.compat.v1.placeholder(dtype=tf.float32, shape=[None, 10])
    #  已经固定的静态形状
    c_p = tf.compat.v1.placeholder(dtype=tf.float32, shape=[3, 2])

    print('a_p静态形状:', a_p.get_shape())
    print('b_p静态形状:', b_p.get_shape())
    print('c_p静态形状:', c_p.get_shape())

    # 形状更新
    a_p.set_shape([2, 3])

    # 静态形状已经固定部分就不能修改了
    b_p.set_shape([3, 10])

    print('a_p修改后的静态形状:', a_p.get_shape())
    print('b_p修改后的静态形状:', b_p.get_shape())

    # 已经固定部分就不能修改
    # c_p.set_shape([2, 3])  # 会报错
    # print('c_p修改后的静态形状:', c_p.get_shape())  # 会报错
- 修改张量动态形状
c_p = tf.compat.v1.placeholder(dtype=tf.float32, shape=[3, 2, 3])

print('c_p静态形状:', c_p.get_shape())
# 形状更新
new_c_p = tf.reshape(c_p, shape=[3, 3, 2])
print('c_p更新后的静态形状:', c_p.get_shape())
print('new_c_p的静态形状:', new_c_p.get_shape())
2.4.4 张量的数学运算
- 算术运算符
- 基本数学函数
- 矩阵运算
- reduce操作
- 序列索引操作
详细请参考: TensorFlow Core v2.6.0
这些API使用,我们在使用的时候介绍,具体参考文档
2.5 变量OP
TensorFlow变量是表示程序处理的共享持久状态的最佳方法。变量通过tf.VariableOP类进行操作。变量的特点∶
- 存储持久化
- 可修改值
- 可指定被训练
变量用来保存深度学习的模型参数
2.5.1 创建变量
tf.Variable(initial_value=None,trainable=True,collections=None,name=None)
- initial_value:初始化的值
- trainable:是否被训练
- collections:新变量将添加到列出的图的集合中collections,默认为[GraphKeys.GLOBAL_VARIABLES],如果trainable是True变量也被添加到图形集合GraphKeys.TRA INABLE_VARIABLES
- 变量需要显式初始化,才能运行值
示例
def varibal_demo():
    """
    变量的演示
    :return:
    """
    # 创建变量
    a = tf.Variable(initial_value=50)
    b = tf.Variable(initial_value=40)
    c = tf.add(a, b)
    print("a:\n", a)
    print("b:\n", b)
    print("c:\n", c)

    # 初始化变量
    init = tf.compat.v1.global_variables_initializer()  # 变量需要显式初始化,才能运行值

    with tf.compat.v1.Session() as sess:
        # 运行初始化
        sess.run(init)
        a_value, b_value, c_value = sess.run([a, b, c])
        print("a_value:\n", a_value)
        print("b_value:\n", b_value)
        print("c_value:\n", c_value)
2.5.2 使用tf.variable_scope()修改变量的命名空间
会在OP的名字前面增加命名空间的指定名字,使得结构更加清晰
示例
创建一个命名空间
    # 创建变量
    with tf.compat.v1.variable_scope("my_scope"):  # 创建一个命名空间
        a = tf.Variable(initial_value=50)
        b = tf.Variable(initial_value=40)
        c = tf.add(a, b)
    print("a:\n", a)
    print("b:\n", b)
    print("c:\n", c)
结果:
原来

现在

2.6 API
关于 Tensorflow的API图示
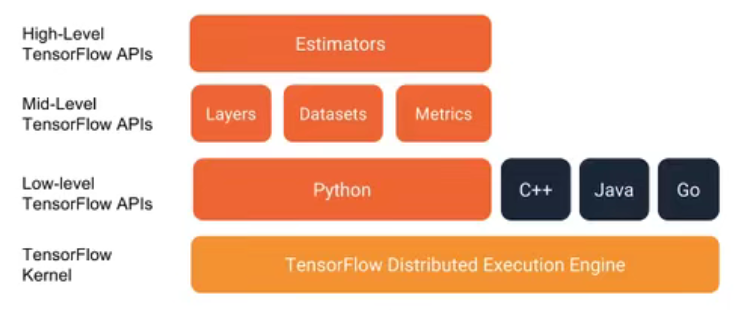
2.6.1 基础API
tf.app
这个模块相当于为TensorFlow进行的脚本提供一个main 函数入口,可以定义脚本运行的 flags。
tf.image
TensorFlow的图像处理操作。主要是一些颜色变换、变形和图像的编码和解码。
tf.gfile
提供文件操作模块
tf.summary
用来生成TensorBoard可用的统计日志,目前Summary主要提供了4种类型;audio、image、histogram.scalar
tf.python_io
用来读写TFRecords文件
tf.train
这个模块提供了一些训练器,与tf.nn组合起来,实现一些网络的优化计算。 tf.nn
这个模块提供了一些构建神经网络的底层函数。TensorFlow构建网络的核心模块。其中包含了添加各种层的函数,比如添加卷积层、池化层等。
2.6.2 高级API
tf.keras
Keras本来是一个独立的深度学习库,tensorflow将其学习过来,增加这部分模块在于快速构建模型。
tf.layers
高级API,以更高级的概念层来定义一个模型。尖似tf.Keras
tf.contrib
tf.contrib.layers提供够将计算图中的网络层、正则化、摘要操作、是构建计算图的高级操作,但是tf.contrib包含不稳定和实验代码,有可能以后API会改变。
tf.estimator
一个Estimator相当于Model + Training + Evaluate 的合体。在模块中,已经实现了几种简单的分类器和回归器,包括:Baseline,Learning 和 DNN。这里的 DNN的网络,只是全连接网络,没有提供卷积之类的。
2.7 案例:实现线性回归
2.7.1 线性回归原理复习
- 1)构建模型
y = w 1 x 1 + w 2 x 2 + … … + w n x n + b y = w_1x_1 + w_2x_2 + …… + w_nx_n + b y=w1x1+w2x2+……+wnxn+b - 2)构造损失函数
均方误差 - 3)优化损失
梯度下降
2.7.2 案例:实现线性回归的训练
案例确定
- 准备真实数据
100样本
x 特征值 形状 (100, 1)
y_true 目标值 (100, 1)
y_true = 0.8x + 0.7 - 假定x 和 y 之间的关系 满足
y = kx + b
k ≈ 0.8 b ≈ 0.7
API
运算
- 矩阵运算
tf.matmul(x, w) - 平方
tf.square(error) - 均值
tf.reduce_mean(error)
梯度下降优化
- tf.train.GradientDescentOptimizer(learning_rate)
梯度下降优化 - learning_rate:学习率,一般为0~1之间比较小的值
- method:
- minimize(loss)
- return:梯度下降op
流程分析
(
100
,
1
)
∗
(
1
,
1
)
=
(
100
,
1
)
(100, 1) * (1, 1) = (100, 1)
(100,1)∗(1,1)=(100,1)
y
_
p
r
e
d
i
c
t
=
x
∗
w
e
i
g
h
t
s
(
1
,
1
)
+
b
i
a
s
(
1
,
1
)
y\_predict = x * weights(1, 1) + bias(1, 1)
y_predict=x∗weights(1,1)+bias(1,1)
- 1)构建模型
y_predict = tf.matmul(x, weights) + bias
- 2)构造损失函数
error = tf.reduce_mean(tf.square(y_predict - y_true))
- 3)优化损失
optimizer = tf.train.GradientDescentOptimizer(learning_rate=0.01).minimize(error)
5 学习率的设置、步数的设置与梯度爆炸
示例
自实现一个线性回归
def linear_regression():
    """
    自实现一个线性回归
    :return:
    """
    # 1.准备数据
    x = tf.compat.v1.random_normal(shape=[100, 1])
    y_true = tf.matmul(x, [[0.8]]) + 0.7
    # 2.构造模型
    # 定义模型参数用变量
    weight = tf.Variable(initial_value=tf.compat.v1.random_normal(shape=[1, 1]))  # 先使用随机值对weight进行初始化
    bias = tf.Variable(initial_value=tf.compat.v1.random_normal(shape=[1, 1]))  # 先使用随机值对bias进行初始化
    y_predict = tf.matmul(x, weight) + bias
    # 3.构造损失函数
    error = tf.reduce_mean(tf.square(y_predict - y_true))
    # 4.优化损失
    optimizer = tf.compat.v1.train.GradientDescentOptimizer(learning_rate=0.01).minimize(error)

    # 显式地初始化变量
    init = tf.compat.v1.global_variables_initializer()

    # 开启会话
    with tf.compat.v1.Session() as sess:
        # 初始化变量
        sess.run(init)

        # 查看初始化模型参数之后的值
        print("训练前模型参数为:权重%f,偏置%f,损失%f" % (weight.eval(), bias.eval(), error.eval()))

        # 开始训练
        for i in range(1000):
            sess.run(fetches=optimizer)
            print("第%d次训练后模型参数为:权重%f,偏置%f,损失%f" % (i+1, weight.eval(), bias.eval(), error.eval()))
        # 查看初始化模型参数之后的值
        print("训练后模型参数为:权重%f,偏置%f,损失%f" % (weight.eval(), bias.eval(), error.eval()))
结果:
训练前模型参数为:权重-1.970245,偏置-1.167298,损失12.787583
第1次训练后模型参数为:权重-1.900054,偏置-1.120071,损失8.568954
第2次训练后模型参数为:权重-1.845930,偏置-1.085134,损失10.069593
第3次训练后模型参数为:权重-1.801681,偏置-1.054058,损失8.939274
第4次训练后模型参数为:权重-1.734405,偏置-1.007101,损失11.473066
第5次训练后模型参数为:权重-1.679682,偏置-0.980237,损失9.313668
第6次训练后模型参数为:权重-1.619766,偏置-0.943636,损失8.337710
第7次训练后模型参数为:权重-1.570481,偏置-0.905890,损失9.915030
第8次训练后模型参数为:权重-1.524673,偏置-0.874753,损失8.296886
第9次训练后模型参数为:权重-1.477295,偏置-0.834806,损失7.259823
第10次训练后模型参数为:权重-1.422785,偏置-0.804612,损失7.320126
......
第1000次训练后模型参数为:权重0.799999,偏置0.699999,损失0.000000
训练后模型参数为:权重0.799999,偏置0.699999,损失0.000000
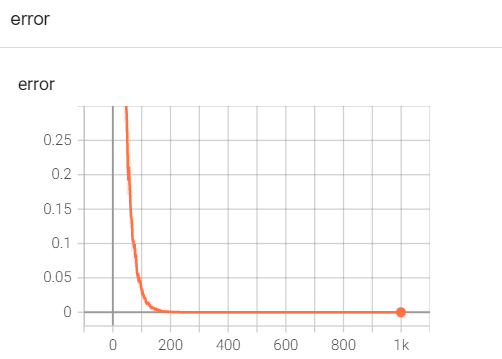
学习率的设置、步数的设置与梯度爆炸
学习率越大,训练到较好结果的步数越小;学习率越小,训练到较好结果的步数越大。
但是学习过大会出现梯度爆炸现象。关于梯度爆炸/梯度消失?
在极情况下,权重的值变得非常大,以至于滋出,导致NaN值
如何解决梯度爆炸问题(深度神经网络当中更容易出现)
- 重新设计网络
- 调整学习率
- 使用梯度載断(在训练过程中检查和限制度的大小
- 使用激活函数
变量的 trainable设置观察
trainable的参数作用,指定是否训练
weights = tf.Variable(initial_value=tf.random_normal(shape=[1, 1]), name='weight',trainable=False)
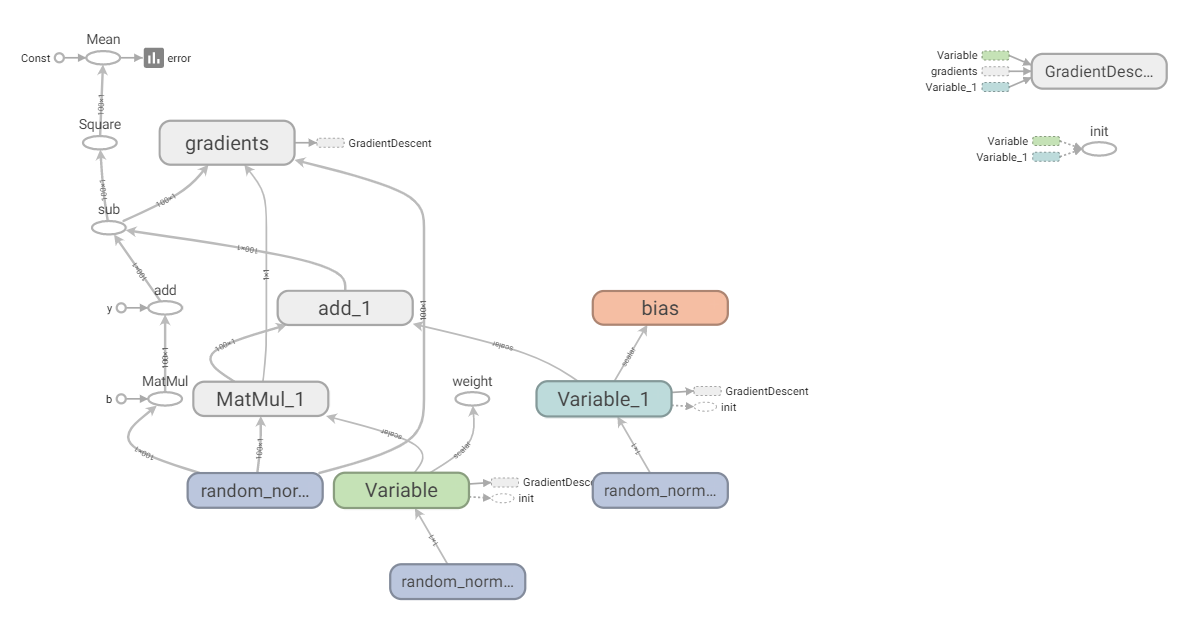
2.7.3 增加其他功能
- 变量Tensorboard显示
- 增加命名空间
- 模型保存和加载
- 命令行参数设置
2.7.3.1 增加变量显示
目的:在TensorBoard当中观察模型的参数、损失值等变量值的变化。
- 收集变量
- tf.summary.scalar(name=",tensor)收集对于损失函数和准确率等单值变量,name为变量的名字,tensor为值
- tf.summary.histogram(name=“,tensor)收集高维度的变量参数
tf.summary.image(name=”,tensor)收集输入的图片张量能显示图片
- 合并变量写入事件文件
- merged = tf.summary.merge_all()
- 运行合并: summary = sess.run(merged),每次迭代都需运行
- 添加:FileWriter.add_summary(summary,i),i表示第几次的值
增加变量显示具体步骤:
1)创建事件文件
2)收集变量
3)合并变量
4)每次送代运行一次合并变量
5)每次送代将 summary:对象写入事件文件
示例
增加了变量显示
def linear_regression():
    """
    自实现一个线性回归
    :return:
    """
    # 1.准备数据
    x = tf.compat.v1.random_normal(shape=[100, 1])
    y_true = tf.matmul(x, [[0.8]]) + 0.7
    # 2.构造模型
    # 定义模型参数用变量
    weight = tf.Variable(initial_value=tf.compat.v1.random_normal(shape=[1, 1]))  # 先使用随机值对weight进行初始化
    bias = tf.Variable(initial_value=tf.compat.v1.random_normal(shape=[1, 1]))  # 先使用随机值对bias进行初始化
    y_predict = tf.matmul(x, weight) + bias
    # 3.构造损失函数
    error = tf.reduce_mean(tf.square(y_predict - y_true))
    # 4.优化损失
    optimizer = tf.compat.v1.train.GradientDescentOptimizer(learning_rate=0.01).minimize(error)

    # 2_收集变量
    tf.compat.v1.summary.scalar("error", error)
    tf.compat.v1.summary.histogram("weight", weight)
    tf.compat.v1.summary.histogram("bias", bias)

    # 3_合并变量
    merged = tf.compat.v1.summary.merge_all()

    # 显式地初始化变量
    init = tf.compat.v1.global_variables_initializer()

    # 开启会话
    with tf.compat.v1.Session() as sess:
        # 初始化变量
        sess.run(init)

        # 1_创建事件文件
        file_writer = tf.compat.v1.summary.FileWriter("../linear", graph=sess.graph)

        # 查看初始化模型参数之后的值
        print("训练前模型参数为:权重%f,偏置%f,损失%f" % (weight.eval(), bias.eval(), error.eval()))

        # 开始训练
        for i in range(1000):
            sess.run(fetches=optimizer)
            print("第%d次训练后模型参数为:权重%f,偏置%f,损失%f" % (i+1, weight.eval(), bias.eval(), error.eval()))

            # 运行合并变量操作
            summary = sess.run(merged)
            # 将每次迭代后的变量写入事件文件
            file_writer.add_summary(summary, i)

        # 查看初始化模型参数之后的值
        print("训练后模型参数为:权重%f,偏置%f,损失%f" % (weight.eval(), bias.eval(), error.eval()))
结果:
注意:
- 2.0版本的虽然tf有summar.scalar方法,但是与tf.compat.v1.summary.scalar(“error”, error)的参数类型不一样。按照上面示例来写会出现TypeError: Fetch argument None has invalid type <class ‘NoneType’>。
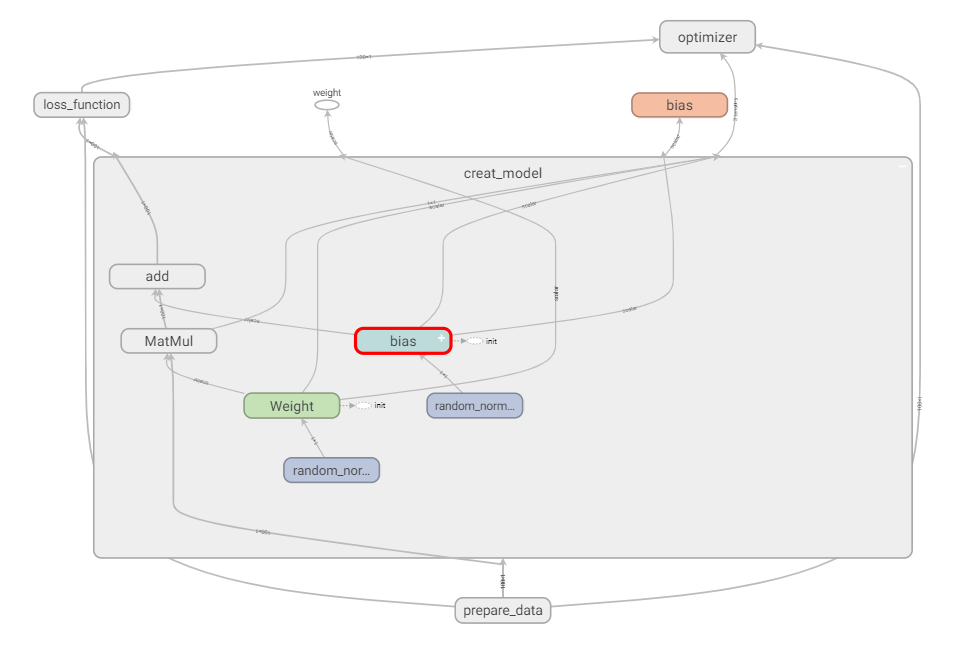
2.7.3.2 增加命名空间
使代码结构更加清晰,Tensorboard图结构清楚
例如:with tf.variable_scope( “lr_model”" ):
增加命名空间具体步骤:
1)实例化Saver
2)保存
saver.save(sess, path)
3)加载
saver.restore(sess, path)
示例
增加命名空间
def linear_regression():
    """
    自实现一个线性回归
    :return:
    """
    with tf.compat.v1.variable_scope("prepare_data"):
        # 1.准备数据
        x = tf.compat.v1.random_normal(shape=[100, 1])
        y_true = tf.matmul(x, [[0.8]]) + 0.7
    with tf.compat.v1.variable_scope("creat_model"):
        # 2.构造模型
        # 定义模型参数用变量
        weight = tf.Variable(initial_value=tf.compat.v1.random_normal(shape=[1, 1]))  # 先使用随机值对weight进行初始化
        bias = tf.Variable(initial_value=tf.compat.v1.random_normal(shape=[1, 1]))  # 先使用随机值对bias进行初始化
        y_predict = tf.matmul(x, weight) + bias
    with tf.compat.v1.variable_scope("loss_function"):
        # 3.构造损失函数
        error = tf.reduce_mean(tf.square(y_predict - y_true))
    with tf.compat.v1.variable_scope("optimizer"):
        # 4.优化损失
        optimizer = tf.compat.v1.train.GradientDescentOptimizer(learning_rate=0.01).minimize(error)

    # 2_收集变量
    tf.compat.v1.summary.scalar("error", error)
    tf.compat.v1.summary.histogram("weight", weight)
    tf.compat.v1.summary.histogram("bias", bias)

    # 3_合并变量
    merged = tf.compat.v1.summary.merge_all()

    # 显式地初始化变量
    init = tf.compat.v1.global_variables_initializer()

    # 开启会话
    with tf.compat.v1.Session() as sess:
        # 初始化变量
        sess.run(init)

        # 1_创建事件文件
        file_writer = tf.compat.v1.summary.FileWriter("../linear", graph=sess.graph)

        # 查看初始化模型参数之后的值
        print("训练前模型参数为:权重%f,偏置%f,损失%f" % (weight.eval(), bias.eval(), error.eval()))

        # 开始训练
        for i in range(1000):
            sess.run(fetches=optimizer)
            print("第%d次训练后模型参数为:权重%f,偏置%f,损失%f" % (i+1, weight.eval(), bias.eval(), error.eval()))

            # 运行合并变量操作
            summary = sess.run(merged)
            # 将每次迭代后的变量写入事件文件
            file_writer.add_summary(summary, i)

        # 查看初始化模型参数之后的值
        print("训练后模型参数为:权重%f,偏置%f,损失%f" % (weight.eval(), bias.eval(), error.eval()))

修改指令名称
    with tf.compat.v1.variable_scope("prepare_data"):
        # 1.准备数据
        x = tf.compat.v1.random_normal(shape=[100, 1], name="feature")
        y_true = tf.matmul(x, [[0.8]]) + 0.7
    with tf.compat.v1.variable_scope("creat_model"):
        # 2.构造模型
        # 定义模型参数用变量
        weight = tf.Variable(initial_value=tf.compat.v1.random_normal(shape=[1, 1]), name="Weight")  # 先使用随机值对weight进行初始化
        bias = tf.Variable(initial_value=tf.compat.v1.random_normal(shape=[1, 1]), name="bias")  # 先使用随机值对bias进行初始化
        y_predict = tf.matmul(x, weight) + bias
图结构变得更清晰
2.7.3.3 模型的保存与加载
tf.train.Saver(var_list=None,max_to_keep=5)
保存和加载模型(保存文件格式: checkpoint文件)
- var_list:指定将要保存和还原的变量。它可以作为一个dict或一个列表传递.
- max_to_keep:指示要保留的最近检查点文件的最大数量。创建新文件时,会删除较旧的文件。如果无或0,则保留所有检查点文件。默认为 5(即保留最新的5个检查点文件。)
例如:
保存与加载(指定目录+模型名字)
saver.save(sess,' /tmp/ckpt/test/myregression.ckpt ')
saver.restore(sess,'/tmp/ckpt/test/myregression.ckpt ' )
如要判断模型是否存在,直接指定目录
checkpoint =tf.train.latest_checkpoint("/tmp/model/")
saver.restore(sess, checkpoint)
模型的保存与加载具体步骤:
1)实例化Saver
2)保存
saver.save(sess, path)
3)加载
saver.restore(sess, path)
示例
在会话中保存模型
# 保存模型
       if i % 10 == 0:
           saver.save(sess, "../model/my_linear.ckpt")
加载模型
# 加载模型
        if os.path.exists("../model/checkpoint"):  # 确定文件是否存在
            saver.restore(sess, "../model/my_linear.ckpt")
2.7.3.4 命令行参数使用
-
tf.app.flags,它支持应用从命令行接受参数,可以用来指定集群配置等。在tf.app.flags下面有各种定义参数的类型
- DEFINE_string(flag_name, default_value, docstring)
- DEFINE_integer(flag_name, default_value, docstring)
- DEFINE_boolean(flag_name, default_value, docstring)
- DEFINE_float(flag_name, default_value,docstring)
-
tf.app.flags,在flags有一个FLAGS标志,它在程序中可以调用到我们前面定义的flag_name
-
通过tf.app.run() 启动main 函数。
示例
import tensorflow as tf

# 1)定义命令行参数
tf.app.flags.DEFINE_integer("max_step", 100, "训练模型的步数")
tf.app.flags.DEFINE_string("model_dir", "Unknown", "模型保存的路径+模型名字")

# 2)简化变量名
FLAGS = tf.app.flags.FLAGS


def command_demo():
    """
    命令行参数演示
    :return:
    """
    print("max_step:\n", FLAGS.max_step)
    print("model_dir:\n", FLAGS.model_dir)

    return None


def main(argv):
    print(argv)


if __name__ == '__main__':
    command_demo()
    tf.app.run()  # 会调用main函数,argv 为本文件的路径
命令行里执行
python 03-命令行参数.py --max_step=3 --model-dir=hello
结果:
max_step:
 3
model_dir:
 hello
['03-命令行参数.py']
注意:
- 通过tf.app.run()*启动main 函数时,main函数里要写参数argv。argv实际上就是.py文件的路径。
TensorFlow框架的使用总结
数据读取、神经网络
有三种获取数据到TensorFlow程序的方法:
- QueueRunner:基于队列的输入管道从TensorFlow图形开头的文件中读取数据。
- Feeding:运行每一步时,Python代码提供数据。
- 预加载数据:TensorFlow图中的张量包含所有数据(对于小数据集)。
3.1 文件读取流程
多线程 + 队列
3.1.1 文件读取流程

- 第一阶段:构造文件名队列
- 第二阶段:读取与解码
- 第三阶段:批处理
- 注:这些操作需要启动运行这些队列操作的线程,以便我们在进行文件读取的过程中能够顺利进行入队出队操作。
3.1.1.1 构造文件名队列
tf.train.string_input_producer(string_tensor,shuffle=True)
将需要读取的文件的文件名放入文件名队列。
- string_tensor:含有文件名+路径的1阶张量 [这里传一个文件路径列表就可以]
- num_epochs:过几遍数据,默认无限过数据 [一直过道训练出你满意的结果,无线循环,结果会越来越拟合]
- return文件队列
file_queue = tf.train.string_input_producer(string_tensor,shuffle=True)
3.1.1.2 读取与解码
1)读取文件内容
阅读器每次默认只读取一个样本
具体来说
- 文本文件默认一次读取一行
- 图片文件默认一次读取一张图片
- 二进制文件一次读取指定字节数(最好是一个样本的字节数)
- TFRecords默认一次读取一个example
针对不同的文件有不同的方法
- tf. TextLineReader
阅读文本文件逗号分隔值(cSV)格式,默认按行读取
return:读取器实例 - tf.WholeFileReader
用于读取图片文件
return:读取器实例 - tf.FixedLengthRecordReader(record_bytes)
要读取每个记录是固定数量字节的二进制文件
record_bytes:整型,指定每次读取(一个样本)的字节数
return:读取器实例 - tf.TFRecordReader
读取TFRecords文件
return:读取器实例
-
它们有共同的读取方法:read(file_queue),并且都会返回一个Tensors元组(key文件名字,value默认的内容(一个样本)
-
由于默认只会读取一个样本,所以如果想要进行批处理,需要使用 tf.train.batch或tf.train.shuffle_batch进行批处理操作,便于之后指定每批次多个样本的训练。
2)内容解码
读取不同类型的文件,也应该对读取到的不同类型的内容进行相对应的解码操作,解码成统一的Tensor格式
- tf.decode_csv
解码文本文件内容 - tf.image.decode _jpeg(contents)
将JPEG编码的图像解码为uint8张量
return:uint8张量,3-D形状[height, width, channels] - tf.image.decode_png(contents)
将PNG编码的图像解码为uint8张量
return:张量类型,3-D形状[height, width, channels] - tf.decode_raw
解码二进制文件内容
与tf.FixedLengthRecordReader搭配使用,二进制读取为uint8类型
解码阶段,默认所有的内容都解码成tf.uint8类型,如果之后需要转换成指定类型则可使用tf.cast()进行相应转换。
3.1.1.3 批处理队列
解码之后,可以直接获取默认的一个样本内容了,但如果想要获取多个样本,需要加入到新的队列进行批处理。
tf.train.batch(tensors, batch_size,num_threads = 1, capacity = 32,name=None)
读取指定大小(个数)的张量
- tensors:可以是包含张量的列表,批处理的内容放到列表当中
- batch_size:从队列中读取的批处理大小
- num_threads:进入队列的线程数
- capacity:整数,队列中元素的最大数量
- return:tensors
tf.train.shuffle_batch
这个方法是打乱样本顺序的其余跟上面的一样
tf.train.batch(tensors, batch_size, num_threads = 1, capacity = 32, name=None)
手动开启线程
tf.train.QueueRunner()
开启会话:
tf.train.start_queue_runners(sess=None, coord=None)
3.1.2 线程操作
以上用到的队列都是tf.train.QueueRunner对象。
每个QueueRunner都负责一个阶段,tf.train.start_queue_runners函数会要求图中的每个QueueRunner启动它的运行队列操作的线程。(这些操作需要在会话中开启)
tf.train.start_queue_runners(sess=None, coord=None)
收集图中所有的队列线程,默认同时启动线程
- sess:所在的会话
- coord:线程协调器
- return:返回所有线程
tf.train.Coordinator()
线程协调员,对线程进行管理和协调
- request_stop():请求停止
- should_stop(:询问是否结束
- join(threads=None, stop_grace_period_secs=120):回收线程
- return:线程协调员实例
3.2 图片数据
3.2.1 图像基本知识
文本 特征词 -> 二维数组
字典 one-hot -> 二维数组
图片 像素值
1 图片三要素
组成一张图片特征值是所有的像素值,有这么几个要素。图片长度、图片宽度、图片通道数。什么是图片的通道数呢,描述一个像素点,如果是灰度,那么只需要一个数值来描述它,就是单通道。如果一个像素点,有RGB三种颜色来描述它,就是三通道。
灰度图片:单通道
彩色图片:三通道
2 TensorFlow中表示图片
一张图片就是一个3D张量,[height, width, channel],height就表示高,width表示宽,channel表示通道数。我们会经常遇到3D和4D的表示
单个图片:[height, width, channel]
多个图片(4D):[batch, height, width, channel],batch表示批数量
3 图片特征值处理
[samples, features]
在进行图片识别的时候,每个图片样本的特征数量要保持相同(方便神经网络的训练)。所以需要将所有图片张量大小统一转换。另一方面如果图片的像素量太大,也可以通过这种方式适当减少像素的数量,减少训练的计算开销
tf.image.resize_images(images, size)
缩小放大图片
- images:4-D形状[batch, height, width, channels],或3-D形状的张量
- [height, width, channels]的图片数据
- size:1-D int32张量:new_height, new_width,图像的新尺寸
- 返回4-D格式或者3-D格式图片
4 数据格式
存储:uint8(节约空间)
矩阵计算:float32(提高精度)
3.2.4 案例:狗图片读取
- 1)构造文件名队列
file_queue = tf.train.string_input_producer(string_tensor,shuffle=True) - 2)读取与解码
读取:
reader = tf.WholeFileReader()
key, value = reader.read(file_queue)
解码:
image_decoded = tf.image.decode_jpeg(value) - 3)批处理队列
image_decoded = tf.train.batch([image_decoded], 100, num_threads = 2, capacity=100)
手动开启线程
示例
狗图片提取(tensorflow 1.8)
import tensorflow as tf
import os


def picture_read(filename_list):
    # 1. 构造文件名队列
    file_queue = tf.train.string_input_producer(filename_list)

    # 2. 读取与解码
    reader = tf.WholeFileReader()
    # key 文件名 value 一张图片的原始编码形式
    key, value = reader.read(file_queue)

    # 解码阶段
    image = tf.image.decode_jpeg(value)
    # 图像的形状类型修改,改成统一的宽高
    image_resized = tf.image.resize_images(image, [200, 200])
    # 静态形状修改,添加通道数
    image_resized.set_shape(shape=[200, 200, 3])
    image_batch = tf.train.batch([image_resized], batch_size=10, num_threads=1, capacity=100)
    print(image_batch)
    with tf.Session() as sess:
        # 开启线程
        # 线程协调员
        coord = tf.train.Coordinator()
        threads = tf.train.start_queue_runners(sess=sess, coord=coord)
        print(image_resized.shape)
        print(image_resized.eval())
        # 回收线程
        coord.request_stop()
        coord.join(threads)


if __name__ == "__main__":
    # 构造路径+ 文件名列表
    filename = os.listdir("dog")

    filename_list = [os.path.join('dog', i) for i in filename]
    picture_read(filename_list)
注意:
1.8的这个方法即将被舍弃。
示例
狗图片提取(tensorflow 2.6)
import tensorflow as tf
import os


batch_size = 100


def read_and_process_image(image_full_path):
    image = tf.io.read_file(image_full_path)
    image = tf.image.decode_jpeg(image, channels=3)
    image = tf.image.resize(image, [256, 256])  # 原始图片大重设为(256, 256)image = image/255.0    # 归一化到[0,1]范围
    return image


def picture_read(filepath_list: list[str]):
    """
    狗图片读取案例
    :return:
    """
    train_dataset = tf.data.Dataset.from_tensor_slices(filepath_list)  # 创建一个数据集,元素是给定的张量切片
    train_dataset = train_dataset.map(map_func=read_and_process_image)  # 将map_func映射到此数据集的元素
    train_dataset = train_dataset.shuffle(buffer_size=1000)
    train_dataset = train_dataset.batch(batch_size)
    train_dataset = train_dataset.prefetch(tf.data.experimental.AUTOTUNE)
    for img in train_dataset:
        print(img)


if __name__ == '__main__':
    #  构造路径+文件名的列表
    file_name = os.listdir("../dog")
    # print(file_name)
    #  拼接路径+文件名
    file_list = [os.path.join("../dog", file) for file in file_name]
    # print(file_list)
    picture_read(filepath_list=file_list)
结果:
tf.Tensor(
[[[[ 31.        29.        32.      ]
   [ 29.058594  27.058594  30.058594]
   [ 29.        27.        30.      ]
   ...
   [243.       243.       243.      ]
   [243.       243.       243.      ]
   [243.       243.       243.      ]]
  .......
  [[100.93945   95.93945   92.93945 ]
   [105.50391   99.50391   99.50391 ]
   [109.978516 103.978516 105.978516]
   ...
   [159.       142.       148.      ]
   [159.       142.       148.      ]
   [159.       142.       148.      ]]]], shape=(100, 256, 256, 3), dtype=float32)
3.3 二进制数据
3.3.1 CIFAR10二进制数据集介绍
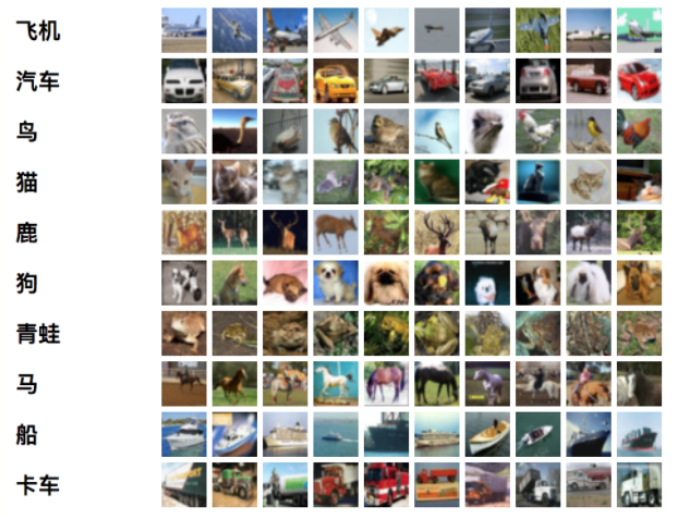
CIFAR-10数据集由10个类的60000个32x32彩色图像组成,每个类有6000个图像。
有50000个训练图像和10000个测试图像。
数据集分为五个训练批次和一个测试批次,每个批次有10000个图像。测试批次包含来自每个类的恰好1000个随机选择的图像。类的图像比另一个更多。在他们之间,训练批次包含来自每个类的正好5000张图像。 以下是数据集中的类,以及来自每个类的10个随机图像:
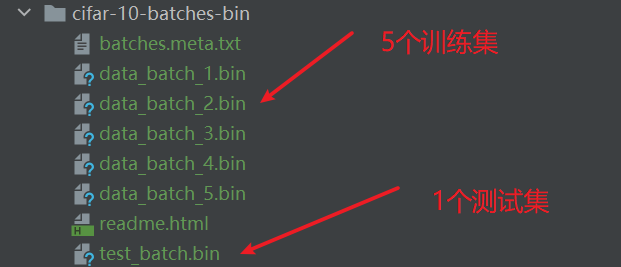
二进制版本数据文件
二进制版本包含文件data_batch_1.bin,data_batch_2.bin,…,data_batch_5.bin以及test_batch.bin。
这些文件中的每一个格式如下,数据中每个样本包含了目标值和特征值:
<1×标签> <3072×像素>
...
<1×标签> <3072×像素>
第一个字节是第一个图像的标签,它是一个0-9范围内的数字。接下来的3072个字节是图像像素的值。前1024个字节是红色通道值,下1024个绿色,最后1024个蓝色。值以行优先顺序存储,因此前32个字节是图像第一行的红色通道值。 每个文件都包含10000个这样的3073字节的“行”图像,但没有任何分隔行的限制。因此每个文件应该完全是30730000字节长。
tensor对象
shape:[height, width, channel] -> [32, 32, 3] [0, 1, 2] -> []
[[32 * 32的二维数组],
[32 * 32的二维数组],
[32 * 32的二维数组]]
–> [3, 32, 32] [channel, height, width] 三维数组的转置 [0, 1, 2] -> [1, 2, 0]
[3, 2] -转置-> [2, 3]
这里的图片形状设置从1维的排列到3维数据的时候,涉及到NHWC与NCHV的概念
T = transpose 转置
1)NHWC与NCHW
在读取设置图片形状的时候有两种格式
- 设置为"NHWC"时,排列顺序为[batch, height, width, channels];
- 设置为"NCHW"时,排列顺序为[batch, channels, height, width]。
其中N表示这批图像有几张,H表示图像在竖直方向有多少像素,W表示水平方向像素数,C表示通道数。
- Tensorflow默认的 theight, width, channe]
假设RGB三通道两种格式的区别如下图所示:

1理解
假设1,2,3,4-红色5,6,7,8-绿色9,10,11,12-蓝色
- 如果通道在最低维度0[channel, height, width],RGB三颜色分成三组,在第一维度上找到三个RGB顾色
- 如果通道在最高维度2[height, width, channel],在第三维度上找到RGB三个颜色

3.3.2 CIFAR10 二进制数据读取
流程分析:
1)构造文件名队列
2)读取与解码
3)批处理队列
开启会话
手动开启线程
示例
CIFAR10 二进制数据读取(TensorFlow 1.8)
    def __init__(self):

        # 设置图像大小
        self.height = 32
        self.width = 32
        self.channel = 3

        # 设置图像字节数
        self.image = self.height * self.width * self.channel
        self.label = 1
        self.sample = self.image + self.label

    def read_binary(self):
        """
        读取二进制文件
        :return:
        """
        # 1、构造文件名队列
        filename_list = os.listdir("./cifar-10-batches-bin")
        # print("filename_list:\n", filename_list)
        file_list = [os.path.join("./cifar-10-batches-bin/", i) for i in filename_list if i[-3:]=="bin"]
        # print("file_list:\n", file_list)
        file_queue = tf.train.string_input_producer(file_list)

        # 2、读取与解码
        # 读取
        reader = tf.FixedLengthRecordReader(self.sample)
        # key文件名 value样本
        key, value = reader.read(file_queue)

        # 解码
        image_decoded = tf.decode_raw(value, tf.uint8)
        print("image_decoded:\n", image_decoded)

        # 切片操作
        label = tf.slice(image_decoded, [0], [self.label])
        image = tf.slice(image_decoded, [self.label], [self.image])
        print("label:\n", label)
        print("image:\n", image)

        # 调整图像的形状
        image_reshaped = tf.reshape(image, [self.channel, self.height, self.width])
        print("image_reshaped:\n", image_reshaped)

        # 三维数组的转置
        image_transposed = tf.transpose(image_reshaped, [1, 2, 0])
        print("image_transposed:\n", image_transposed)

        # 3、构造批处理队列
        image_batch, label_batch = tf.train.batch([image_transposed, label], batch_size=100, num_threads=2, capacity=100)

        # 开启会话
        with tf.Session() as sess:

            # 开启线程
            coord = tf.train.Coordinator()
            threads = tf.train.start_queue_runners(sess=sess, coord=coord)

            label_value, image_value = sess.run([label_batch, image_batch])
            print("label_value:\n", label_value)
            print("image:\n", image_value)

            coord.request_stop()
            coord.join(threads)

        return image_value, label_value
示例
CIFAR10 二进制数据读取(TensorFlow 2.6)
更正
    def read_and_decode(self, file_list: list[str]):
        """
        读取和解码
        :return:
        """
        train_dataset = tf.data.Dataset.from_tensor_slices(file_list)  # 创建一个数据集,元素是给定的张量切片
        dataset = train_dataset.enumerate(start=0)
        # print(train_dataset)
        for element in dataset.as_numpy_iterator():
            print(element)
        train_dataset = train_dataset.map(map_func=self.process)  # 将map_func映射到此数据集的元素
        print(train_dataset)
        train_dataset = train_dataset.batch(batch_size=100, num_parallel_calls=tf.data.AUTOTUNE)
        train_dataset = train_dataset.prefetch(tf.data.experimental.AUTOTUNE)
        for label, image in train_dataset:
            print(label)
            print(image)
结果
tf.Tensor(
[[[6]
  [9]
  [9]
  ...
  [1]
  [3]
  [5]]
  ........
   [8]]], shape=(6, 1000, 1), dtype=uint8)
tf.Tensor(
[[[[[ 59  62  63]
    [ 43  46  45]
    [ 50  48  43
    ......
    [ 57  68  85]
    [ 71  85 103]
    [ 93 110 131]]]]], shape=(6, 1000, 32, 32, 3), dtype=uint8)
错误版本
import tensorflow as tf
import os


class Cifar(object):

    def __init__(self):
        """
        初始化
        """
        # 初始化操作
        self.height = 32
        self.width = 32
        self.channels = 3

        # 字节数
        self.image_bytes = self.height * self.width * self.channels
        self.label_bytes = 1
        self.all_bytes = self.label_bytes + self.image_bytes

    def process(self, file_path):
        """
        对数据集元素进行处理
        :return:
        """
        cifar_img = tf.io.read_file(file_path)
        cifar_img = tf.compat.v1.decode_raw(cifar_img, tf.uint8)
        label = tf.slice(cifar_img, [0], [self.label_bytes])
        image = tf.slice(cifar_img, [self.label_bytes], [self.image_bytes])
        # print(cifar_img.get_shape())

        # 调整图像的形状
        image_reshaped = tf.reshape(image, [self.channels, self.height, self.width])

        # 三维数组的转置
        image_transposed = tf.transpose(image_reshaped, [1, 2, 0])
        return  label, image_transposed

    def read_and_decode(self, file_list: list[str]):
        """
        读取和解码
        :return:
        """
        train_dataset = tf.data.Dataset.from_tensor_slices(file_list)  # 创建一个数据集,元素是给定的张量切片
        # print(train_dataset)
        train_dataset = train_dataset.map(map_func=self.process)  # 将map_func映射到此数据集的元素
        print(train_dataset)
        train_dataset = train_dataset.batch(batch_size=100, num_parallel_calls=tf.data.AUTOTUNE)
        train_dataset = train_dataset.prefetch(tf.data.experimental.AUTOTUNE)
        for label, image in train_dataset:
            print(label)
            print(image)


if __name__ == '__main__':
    file_name = os.listdir("../usingFiles/cifar-10-batches-bin")
    # print(file_name)
    # 构造文件名数据列表
    file_list = [os.path.join("../usingFiles/cifar-10-batches-bin", file) for file in file_name if file[-3:] == "bin"]
    # print("file_list", file_list)

    # 实例化Cifar
    cifar = Cifar()
    cifar.read_and_decode(file_list)
结果
tf.Tensor(
[[6]
 [1]
 [8]
 [0]
 [1]
 [3]], shape=(6, 1), dtype=uint8)
tf.Tensor(
[[[[ 59  62  63]
   [ 43  46  45]
   [ 50  48  43]
   ...
   [158 132 108]
   [152 125 102]
   [148 124 103]]
  [[ 16  20  20]
   [  0   0   0]
   [ 18   8   0]
   ...
......
   [[ 54 107 160]
   [ 56 105 149]
   [ 45  89 132]
   ...
   [ 24  77 124]
   [ 34  84 129]
   [ 21  67 110]]]], shape=(6, 32, 32, 3), dtype=uint8)
注意:
错误版本切片时只将每个文件的第一张切了出来,没有切完整。
3.4 TFRecords
3.4.1 什么是TFRecords文件
TFRecords其实是一种二进制文件,虽然它不如其他格式好理解,但是它能更好的利用内存,更方便复制和移动,并且不需要单独的标签文件。
使用步骤︰
- 1)获取数据
- 2)将数据填入到 Example协议内存块(protocol buffer)
- 3)将协议内存块序列化为字符串,并且通过 tf.python_io.TFRecordwriter写入到TFRecords文件。
- 文件格式 *.tfrecords
3.4.2 Example结构解析
以刚才的cifar10 数据集举例
Example:
	features {
		feature {
			key: "image"
			value {
				bytes_list {
					value: "\377\374\375\3721356\351\365\361\350\356\352\350'
			}
	}
}
		feature {
			key: "label"
			value {
				int64_list {
				value: 9
				}
		}
	}
}
这是一个样本,样本里有两个feature,每个feature都有key 和value
- tf.train.Example 协议内存块(protocol buffer)(协议内存块包含了字段Features)
- Features包含了一个feature字段
- feature中包含要写入的数据、并指明数据类型。
- 这是一个样本的结构,批数据需要循环存入这样的结构
 cifar10
 特征值 - image - 3072个字节
 目标值 - label - 1个字节

# 创建样本
example = tf.train.Example(features=tf.train.Features(feature={
    "image": tf.train.Feature(bytes_list=tf.train.BytesList(value=[image])),
    "label": tf.train.Feature(int64_list=tf.train.Int64List(value=[label]))
                }))

# 序列化
example.SerializeToString()
- tf.train.Example(features=None)
写入tfrecords文件- features:tf.train.Features类型的特征实例
- return:example格式协议块
- tf.train.Features(feature=None)
构建每个样本的信息键值对- feature: 字典数据, key为要保存的名字
- value为tf.train.Feature实例
- return:Features类型
- tf.train.Feature(options)
- options:例如
- bytes_list=tf.train. BytesList(value=[Bytes])
- int64_list=tf.train. Int64List(value=[Value])
- 支持存入的类型如下
tf.train.Int64List(value=[Value])
tf.train.BytesList(value=[Bytes])
tf.train.FloatList(value=[value])
3.4.3 案例:CIFAR10数据存入TFRecords文件
分析
- 构造存储实例,tf.python_io.TFRecordWriter(path)
- 写入tfrecords文件
- path: TFRecords文件的路径 + 文件名字
- return:写文件
- method方法
- write(record): 向文件中写入一个example
- close(): 关闭文件写入器
- 循环将数据填入到Example协议内存块(protocol buffer)
示例
CIFAR10数据存入TFRecords文件(tensorflow 2.6)
    def write_to_tfrecords(self, label_batch, image_batch):
        """
        将样本的特征值和目标值一起写入tfrecords文件
        :param label_batch:
        :param image_batch:
        :return:
        """
        with tf.io.TFRecordWriter("../usingFiles/tfrFiles/cifar10.tfrecords") as writer:
            # 循环构造example对象,并序列化写入文件
            for i in range(6):
                for j in range(1000):
                    label = label_batch[i][j][0]  # 要获取张量里面的内容,而不是一个张量
                    image = image_batch[i][j]  # 同上

                    image = image.numpy().tostring()  # 要先转化为numpy.ndarray,再继续转化为字符串,这样才能提取张量里面的内容
                    print("tfrecords_image:\n", image)
                    print("tfrecords_label:\n", label)

                    # 创建样本
                    feature = {"image": tf.train.Feature(bytes_list=tf.train.BytesList(value=[image])),
                               "label": tf.train.Feature(int64_list=tf.train.Int64List(value=[label]))}
                    example = tf.train.Example(features=tf.train.Features(feature=feature))
                    writer.write(example.SerializeToString())
错误记录
- with tf.io.TFRecordWriter’utf-8’ codec can’t decode byte 0xd5 in position 87
错误原因:with tf.io.TFRecordWriter处的路径错误
解决方案:检查修改路径
3.4.4 读取TFRecords文件API
1)构造文件名队列
2)读取和解码
读取
解析example
feature = tf.parse_single_example(value, features={
“image”:tf.FixedLenFeature([], tf.string),
“label”:tf.FixedLenFeature([], tf.int64)
})
image = feature[“image”]
label = feature[“label”]
解码
tf.decode_raw()
3)构造批处理队列
3.5 神经网络基础
3.5.1 神经网络
人工神经网络( Artificial Neural Network,简写为ANN)也简称为神经网络(NN).
是一种模仿生物神经网络(动物的中枢神经系统,特别是大脑)结构和功能的计算模型
经典的神经网络结构包含三个层次的神经网络。分别为输入层,输出层以及隐藏层。
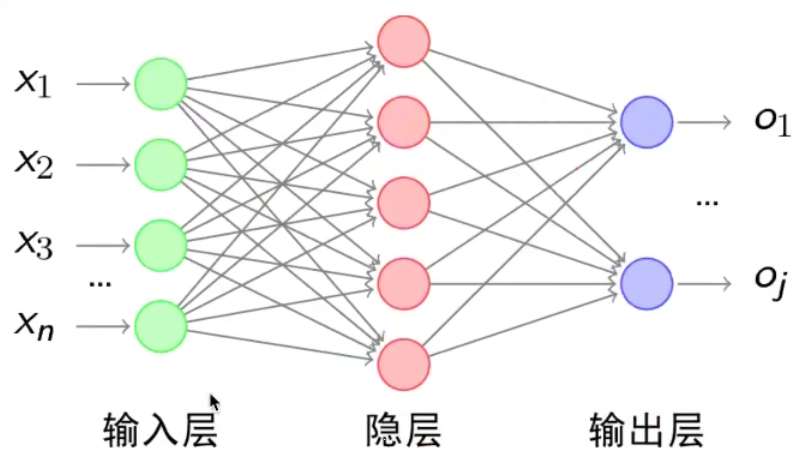
其中每层的圆圈代表一个神经元,隐藏层和输出层的神经元有输入的数据计算后输出,输入层的神经元只是输入。
- 神经网络的特点
- 每个连接都有个权值
- 同一层神经元之间没有连接
- 最后的输出结果对应的层也称之为全连接层
- 神经网络是深度学习的重要算法,在图像(如图像的分类、检测)和自然语言处理
(如文本分类、聊天等)有很多应用。
那么为什么设计这样的结构呢?首先从一个最基础的结构说起,神经元。以前也称之为感知机。神经元就是要模拟人的神经元结构
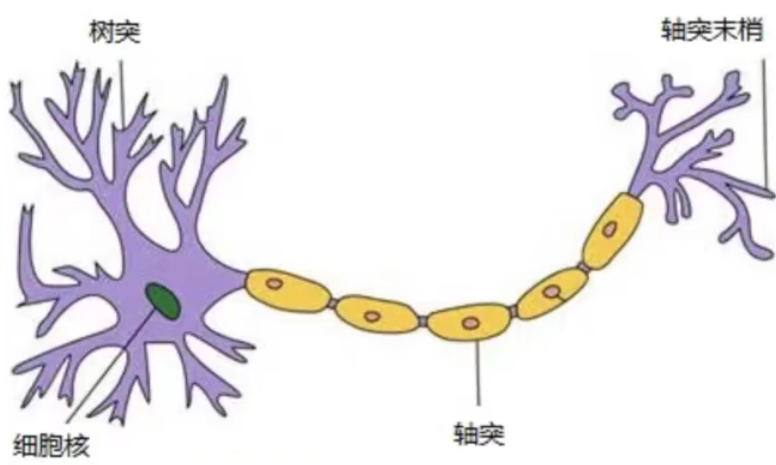
ー个神经元通常具有多个树突,主要用来接受传入信息;面轴突只有一条,轴突尾端
有许多轴突末梢可以给其他多个神经元传递信息。轴突末梢跟其他神经元的树突产生
连接,从而传递信号。这个连接的位置在生物学上叫做“突触”。
感知机(PLA: Perceptron Learning Algorithm)
感知机就是模拟这样的大脑神经网络处理数据的过程。感知机模型如下图:

感知机是一种最基础的分类模型,类似于逻辑回归,不同的是,感知机的激活函数用的sign,而逻辑回归用的是sigmoid。感知机也具有权重和偏置:
u
=
∑
i
=
1
n
w
i
x
i
+
b
y
=
sign
(
u
)
=
{
+
1
,
u
>
0
−
1
,
u
≤
0
\begin{gathered} u=\sum_{i=1}^{n} w_{i} x_{i}+b \\ y=\operatorname{sign}(u)= \begin{cases}+1, & u>0 \\ -1, & u \leq 0\end{cases} \end{gathered}
u=i=1∑nwixi+by=sign(u)={+1,−1,u>0u≤0
我们通过一个平台去演示,就是 tensorflow playground
3.5.2 playground使用
网址http://playground.tensorflow.org
感知机只能解决简单的或与问题
单个神经元不能解决一些复杂问题,解决方法:
- 多层神经元
- 增加激活函数
3.6 神经网络原理
3.6.1 softmax回归
softmax回归将神经网络转换成概率结果
softmax
(
y
)
i
=
e
y
i
∑
j
=
1
n
e
y
j
\operatorname{softmax}(y)_{i}=\frac{e^{y_{i}}}{\sum_{j=1}^{n} e^{y_{j}}}
softmax(y)i=∑j=1neyjeyi


这样就把神经网络的输出也变成了一个概率输出
类似于逻辑回归当中的 sigmoid函数, sigmoid输出的是某个类别的概率
损失函数:
线性回归——均方误差
逻辑回归——对数似然损失
3.6.2 交叉熵损失
H
y
′
(
y
)
=
−
∑
i
y
i
′
log
(
y
i
)
H_{y^{\prime}}(y)=-\sum_{i} y_{i}^{\prime} \log \left(y_{i}\right)
Hy′(y)=−i∑yi′log(yi)
为了能够衡量距离,目标值需要进行one-hot编码,能与根率值一一对应,如下图
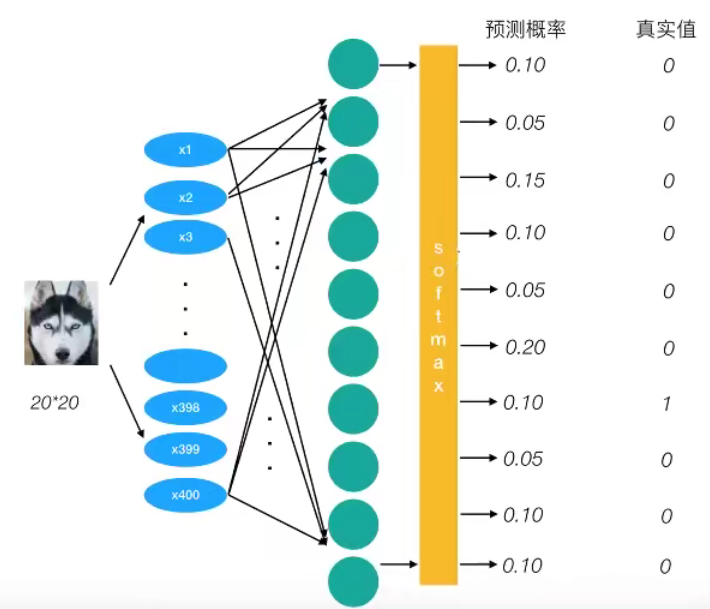
上述的结果为1log(0.10),那么为了少这一个样本的损失。神经网络应该怎么做?
所以会提高对应目标值为1的位置输出概率大小,由于 softmax公式影响,其它的概率必定会减少。只要进行这样的调整就可以预测成功了。
- 提高对应目标值为1的位置输出概率大小
总损失大小
神经网络最后的损失为平均每个样本的损失大小。
- 对所有样本的损失求和取其平均值
优化损失
- 梯度下降

3.6.4 softmax、交叉熵损失APl
-
tf.nn. softmax cross_entropy with logits(labels=None, logits=None, name=None
计算 logits和 abels.之间的交叉损失爝- labels:标签值(真实值)
- logits:样本加权之后的值
- return:返回损失值列表
-
tf reduce_mean(input_tensor)
计算张量的尺寸的元素平均值
3.7 案例:Mnist手写数字识别
3.7.1 数据集介绍
文件说明
- train-images-idx3-ubyte. gz: training set images(9912422 bytes
- train-labels-idx1-ubyte.gz: training set labels (28881 bytes)
- t10k-images-idx3-ubyte.gz: test set images(1648877 bytes)
- t10k-labels-idx1-ubyte.gz: test set labels(4542 bytes)
网址:http://yann.lecun.com/exdb/mnist/
| 文件名称 | 大小 | 内容 |
|---|---|---|
| train-images-idx3-ubyte.gz | 9,681 kb | 55000张训练集,5000张验证集 |
| train-labels-idx1-ubyte.gz | 29 kb | 训练集图片对应的标签 |
| t10k-images-idx3-ubyte.gz | 1,611 kb | 10000张测试集 |
| t10k-labels-idx1-ubyte.gz | 5 kb | 测试集图片对应的标签 |
特征值
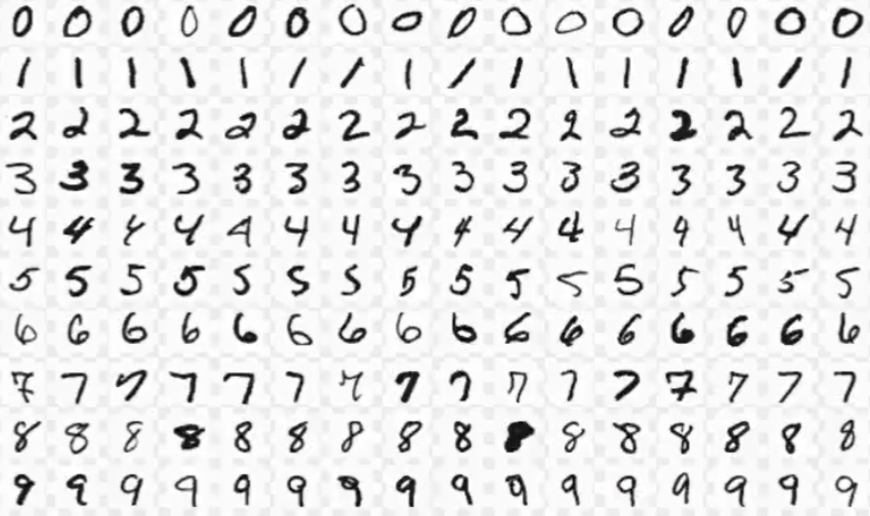
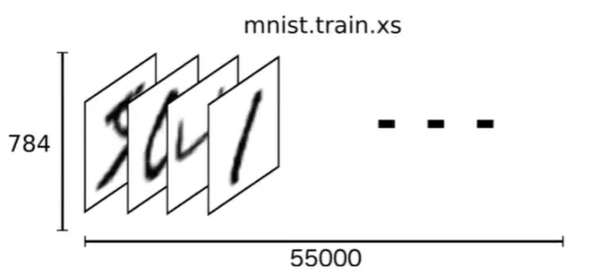
下载下来的数据集被分成两部分:55000行的训练数据集( mnist train)和10000行的测试数据集( mnist test)。
每一个 MNIST数据单元有两部分组成:一张包含手写数字的图片和一个对应的标签。我们把这些图片设为“xs",把这些标签设为"ys。训练数据集和测试据集都包含xs和ys,比如训练数据集的图片是 mnist.train.images,训练数据集的标签是 mnist.train.labels
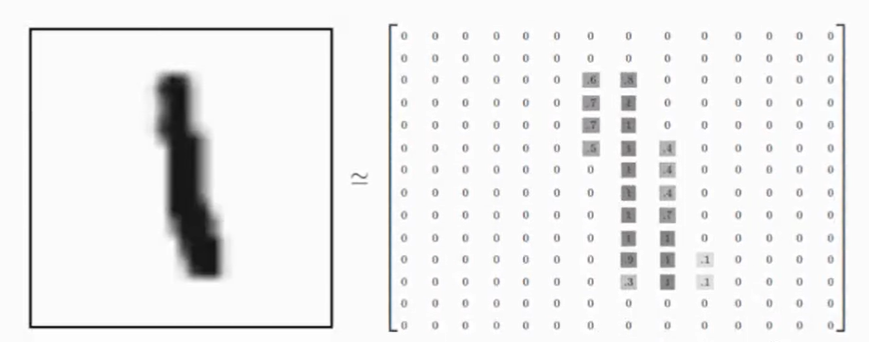
我们可以知道图片是黑白图片,每一张图片包含28像素×28像素。我们把这个数组展开成一个向量,长度是28×28=784。因此,在 MNISTT训练数据集中,mnist train. images是一个形状为[60000,784]的张量。
目标值
MNIST中的每个图像都具有相应的标签,0到9之间的数字表示图像中绘制的数字。用的是 one-hot编码nn[0,0,0, 1,0,0,0,0,0, 0] ,共有5500行,10列(mnist.train.labels [55000, 10])。

3.7.2 Mnist数据获取API
Tensorflow框架自帯了获取这个数据集的接口,所以不需要自行读取
from tensorflowexamples tutorials. mnist import input data
- mnist=input_ data read data sets(path, one hot=True)
- mnist. train. next batch(100(提供批量获取功能)
- mnist train images. labels
- mnist test images, labels
注: TensorFlow 2.0 去掉了mnist.train,使用方式上有区别
3.7.3实战:Mnist手写数字识别
1网络设计
我们采用只有一层,即最后一个输出层的神经网络,也称之为全连接( full connected)层神经网络。
    1 特征值
        [None, 784] * W[784, 10] + Bias = [None, 10]
        构建全连接层:
        y_predict = tf.matmul(x, W) + Bias
        构造损失:
        loss = tf.nn.softmax_cross_entropy_with_logits(labels=y_true, logits=y_predict,name=None)
        如何计算准确率?
        np.argmax(y_predict, axis=1)
        tf.argmax(y_true, axis=1)
            y_predict [None, 10]
            y_true [None, 10]
        tf.equal()
        如何提高准确率?
            1)增加训练次数
            2)调节学习率
            3)调节权重系数的初始化值
            4)改变优化器


 6101
6101


 被折叠的 条评论
为什么被折叠?
被折叠的 条评论
为什么被折叠?
 到【灌水乐园】发言


