


项目gitee地址
https://gitee.com/alexander1/springboot_notes.git
一、springboot入门(2.1.8)
1.导入依赖
SpringBoot的版本仲裁中心
<parent>
    <groupId>org.springframework.boot</groupId>
    <artifactId>spring-boot-starter-parent</artifactId>
    <version>2.1.8.RELEASE</version>
    <relativePath />
</parent>
spring-boot-starter-web:
spring-boot-starter:springboot的场景启动器
<dependency>
	<groupId>org.springframework.boot</groupId>
	<artifactId>spring-boot-starter-web</artifactId>
</dependency>
2.主程序入口@SpingBootApplication
@SpringBootConfiguration:Springboot的配置类;
标注在某个类上,表示这是一个springboot的配置类;
@Configuration:配置类上来标注这个注解;
配置类------配置文件;配置类也是容器中的一个组件;@Component
@EnableAutoConfiguration:开启自动配置功能
@AutoConfigurationPackage:自动配置包
@Import(AutoConfigurationPackages.Registrar.class)
Spring的底层注解@Import,给容器中导入一个组件;
将主配置类(@SpringBootApplication标注的类)的所在包及下面所有组件扫描到Spring容器中;
@Import(AutoConfigurationImportSelector.class)
给容器导入组件
AutoConfigurationImportSelector:将所有需要导入的组件 以全类名的方式返回;这些组件就会被添加到容器中
会给容器中导入非常多的自动配置类(xxxAutoConfiguration);就是给容器中导入这个场景需要的所有组件,并配置好这些组件;
有了自动配置类,免去了手动配置的任务
3.项目结构
resources文件中目录结构:
static:保存所有的静态资源;js css images;(WebContent)templates:保存所有的模板页面;(spingboot默认jar包使用嵌入式的Tomcat)application.properties:Springboot应用的配置文件
二、配置文件
1.YAML语法
K:V表示一对键值对(空格必须有)
以空格的缩进来控制层级关系;只要是左对齐的一列数据都是同一层级的
2.值的写法
字面量:普通的值(数字,字符串,布尔)
k:v:字面直接来写;
字符串默认不用加上单引号或者双引号
“”:双引号;不会转义字符串里面的特殊字符;特殊字符会作为本身想表达的意思
‘’:单引号,会转移特殊字符,特殊字符最终只是一个普通的字符串数据
对象、Map(属性和值)(键值对)
k:v:
对象还是K:V的方式
friends:
	lastName: zhangsan
	age: 13
行内写法
friends: {lastName: zhangsan,age: 18}
数组(List、Set)
pets:
	- cat
	- dog
	- pig
行内写法
pets: [cat,dog,pig]
3.配置文件注入
//必须注册为组件,才能够运用ConfigurationProperties
@Component
@ConfigurationProperties(prefix = "person")
public class Person {
    Integer id;
    String name;
}
导入spring-boot-configuration-processor,就有提示
<dependency>
    <groupId>org.springframework.boot</groupId>
    <artifactId>spring-boot-configuration-processor</artifactId>
    <optional>true</optional>
</dependency>
application.yml:
server:
  port: 8080

person:
  id: 1
  name: zhangsan
build在idea中,IDEA maven项目默认不会把src下除java文件外的文件打包到classes文件夹下包含**/*.xml,**/*.properties,**/*.yml,所以要加上build语句
<build>
    <plugins>
        <plugin>
            <groupId>org.springframework.boot</groupId>
            <artifactId>spring-boot-maven-plugin</artifactId>
        </plugin>
    </plugins>
    <!--
        IDEA maven项目默认不会把src下除java文件外的文件打包到classes文件夹下
                包含**/*.xml,**/*.properties,**/*.yml
        -->
    <resources>
        <resource>
            <directory>src/main/java</directory>
            <includes>
                <include>**/*.properties</include>
                <include>**/*.xml</include>
                <include>**/*.yml</include>
            </includes>
            <filtering>false</filtering>
        </resource>
        <resource>
            <directory>src/main/resources</directory>
            <includes>
                <include>**/*.properties</include>
                <include>**/*.xml</include>
                <include>**/*.yml</include>
            </includes>
            <filtering>false</filtering>
        </resource>
    </resources>
</build>
使用idea时,有些奇奇怪怪的错误,其实不是代码写错了,是idea有时候target下没有生成相应的编译文件
4.@Value获取值和@ConfigurationProperties的区别
| @ConfigurationProperties | @Value | |
|---|---|---|
| 功能 | 批量注入配置文件中的属性 | 一个个指定 |
| 松散绑定(松散语法) | 支持 | 不支持 |
| SpEL | 不支持 | 支持 |
| JSR303数据校验 | 支持 | 不支持 |
| 复杂类型封装 | 支持 | 不支持 |
配置文件yml和properties都能获取到值;
如果只需要配置文件中的某项值,使用@Value
如果专门编写了一个JavaBean来和配置文件进行映射时,就直接使用@ConfigurationProperties
5.@PropertySource和@ImportResource
package com.spring.config;

import com.spring.pojo.Person;
import org.springframework.context.annotation.*;
import org.springframework.stereotype.Component;

/**
 * @author: alex
 * @date: 2020/8/6 16:45
 */


@ComponentScan("com.spring")
//设置配置文件,必须配置在有@Component的类上
@PropertySource("classpath:person.properties")
@Configuration
public class MainConfig1 {

    @Primary//首选
    @Bean
    public Person person(){
        return new Person(3,"ls");
    }
}
@ImportResource:导入Spring的配置文件,让配置文件里面的内容生效。
SpringBoot里面没有Spring的配置文件,自己编写的配置文件,不能自动识别;想让Spring的配置文件键生效;@ImportResource标注在主配置类上
@ImportResource(locations = {"classpath:beans.xml"})
导入Spring的配置文件
SpringBoot推荐给容器添加组件的方式:
1.配置类==>Spring配置文件
2.使用@Bean给容器添加组件
6.Profile
1.多Profile文件
编写主配置文件时,文件名可以是 application-{profile}.properties/yml
默认使用application.properties的配置
2.yml支持多文档块方式
server:
  port: 8080


person:
  id: 1
  name: 张三${random.uuid}

spring:
  profiles:
    active: prod

#---在hexo转换.md为.html文件时会报错,所以先注释掉,---在yaml中是分页符
#---
server:
  port: 8081

spring:
  profiles: dev
#---
server:
  port: 8082

spring:
  profiles: prod
3.激活指定Profile
1.配置文件中指定spring.profiles.active=dev
2.命令行:
--spring.profiles.active=dev,可以配置在程序参数
java -jar springboot-02-config-0.0.1-SNAPSHOT.jar --spring.profiles.active=dev
可以直接在测试的时候,配置传入命令行参数
3.虚拟机参数:
-Dspring.profiles.active=dev
7.配置文件的加载位置
!!!idea没有图标,没有自动提示就删掉(包括resources),重新创建application.properties
file:./config/
file:./
classpath:./config/
classpath:./
优先级由高到低,高优先级的配置会覆盖低优先级的配置;
SpringBoot会从这四个位置加载全部主配配置文件
注意:file:./指项目路径,如果在聚合项目中,file:./指的是父项目,而不是子项目
可以通过spring.config.location改变默认文件的位置
java -jar springboot-02-config-02-0.0.1-SNAPSHOT.jar --spring.config.location=D:/
8.外部配置加载顺序
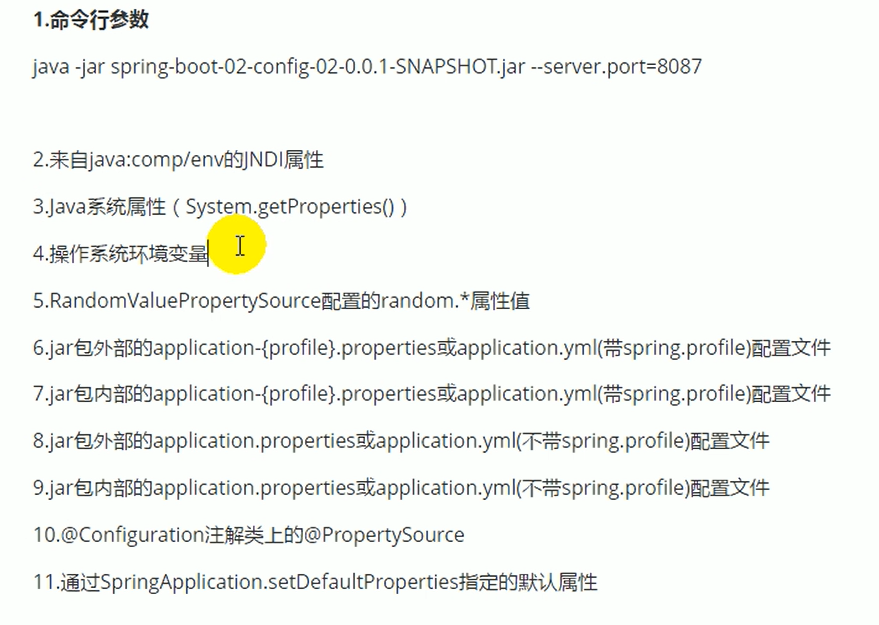
参考官方文档
9.自动配置原理
1.自动配置原理:
1)、SpringBoot启动的时候加载主配置类,开启了自动配置功能@EnableAutoConfiguration
2)、@EnableAutoConfiguration作用
-
利用
AutoConfigurationImportSelector给容器中导入一些组件 -
可以查看
selectImports().getAutoConfigurationEntry()方法的内容 -
List<String> configurations = getCandidateConfigurations(annotationMetadata, attributes);SpringFactoriesLoader.loadFactoryNames(getSpringFactoriesLoaderFactoryClass(),getBeanClassLoader());
扫描所有jar包类路径下的 META-INF/spring.factories
把扫描到的这些文件的内容包装成properties对象
从properties中获取到EnableAutoConfiguration.class类对应的值,然后把它们添加在容器中
将类路径下
META-INF/spring.factories里面配置的所有EnableAutoConfiguration的值添加到了容器中
# Auto Configure
org.springframework.boot.autoconfigure.EnableAutoConfiguration=\
org.springframework.boot.autoconfigure.admin.SpringApplicationAdminJmxAutoConfiguration,\
org.springframework.boot.autoconfigure.aop.AopAutoConfiguration,\
org.springframework.boot.autoconfigure.amqp.RabbitAutoConfiguration,\
每一个这样的xxxAutoConfiguration类都是容器中的一个组件,都加入到容器中;用他们来做自动配置
3)、每一个自动配置类进行自动配置功能;
4)、以**HttpEncodingAutoConfiguration**为例解释自动配置原理;
@Configuration //表示这是一个配置类,和配置文件一样,可以为容器中添加组件
@EnableConfigurationProperties(HttpProperties.class)//启动指定类的ConfigurationProperties功能,将配置文件中对应的值和HttpEncodingAutoConfiguration绑定起来;并把HttpProperties加入的IOC容器中
@ConditionalOnWebApplication(type = ConditionalOnWebApplication.Type.SERVLET)//Spring底层@Conditional注解,根据不同的条件,如果满足指定的条件,整个配置类里面的配置就会生效;   判断当前应用是否是web应用,如果是,当前配置类生效
@ConditionalOnClass(CharacterEncodingFilter.class)//判断当前项目有没有这个类,CharacterEncodingFilter:SpringMVC进行乱码解决的过滤器;
@ConditionalOnProperty(prefix = "spring.http.encoding", value = "enabled", matchIfMissing = true)//判断配置文件中是否存在某个配置  spring.http.encoding.enabled;如果不存在,判断也是成立的,即使不配置spring.http.encoding.enabled,也是默认生效的
public class HttpEncodingAutoConfiguration {
    private final HttpProperties.Encoding properties;

	public HttpEncodingAutoConfiguration(HttpProperties properties) {
		this.properties = properties.getEncoding();
	}

    @Bean //给容器中添加一个组件,这个组件的某些值需要从properties中获取
	@ConditionalOnMissingBean
	public CharacterEncodingFilter characterEncodingFilter() {
		CharacterEncodingFilter filter = new OrderedCharacterEncodingFilter();
		filter.setEncoding(this.properties.getCharset().name());
		filter.setForceRequestEncoding(this.properties.shouldForce(Type.REQUEST));
		filter.setForceResponseEncoding(this.properties.shouldForce(Type.RESPONSE));
		return filter;
	}
}
根据当前不同的条件判断,决定这个配置类是否生效
一旦这个配置类生效;这个配置类就会给容器中添加各种组件;这些组件的属性从对应的properties类中获取,这些类的每一个属性是和主配置文件绑定的。
5)、所有在配置文件中能配置的属性都在xxxProperties中封装着
@ConfigurationProperties(prefix = "spring.http")
public class HttpProperties {

	/**
	 * Whether logging of (potentially sensitive) request details at DEBUG and TRACE level
	 * is allowed.
	 */
	private boolean logRequestDetails;

	/**
	 * HTTP encoding properties.
	 */
	private final Encoding encoding = new Encoding();
}
精髓:
1)、Springboot启动会加载大量的自动配置类
2)、先看需要的功能有没有Springboot默认写好的自动配置类;
3)、再看自动配置类中配置了哪些组件(只要有要用的组件,就不需要配置)
4)、给容器中自动配置类添加组件的时候,会从properties类中获取某些属性,我们就可以在配置文件中指定这些属性的值;
xxxxAutoCOnfiguration:自动配置类;
给容器中自动添加组件
xxxxProperties:封装配置文件中相关属性;
2.细节
1.@Conditional派生注解(Spring注解版原生的@Conditional作用)
作用:必须是@Conditional指定的条件成立,才给容器中添加组件,配置类里面的所有内容才生效;
自动配置类必须在一定条件下才能生效;
怎么才能知道那些配置类能够生效;
debug=true
在application.properties添加debug=true
三、日志
1.日志框架
市面上的日志框架;
JUL;JCl(commons-logging);Jboss-logging;logback;log4j;slf4j;log4j2
高亮的是抽象层,其他是具体的实现
SpringBoot:底层是Spring框架,Spring框架默认是用JCL
SpringBoot选用的是slf4j和logback
2.SLF4J使用
1.如何在系统中使用SLF4J
开发的时候,不应该直接调用日志的实现类,而是调用日志抽象层的方法。
给系统导入slf4j的jar和logback的实现jar
import org.slf4j.Logger
import org.slf4j.LoggerFactory

public class HelloWorld{
	public static void main(String[] args){
        Logger logger = LoggerFactory.getLogger(HelloWorld.class);
        logger.info("hello world");
    }
}
每一个日志的实现框架都有自己的配置文件。使用slf4j后,配置文件还是做成日志实现框架本身的配置文件;
2.遗留问题
统一日志记录,即使是别的框架统一一起使用slf4j
1.将系统中其它日志框架先排除出去;
2.用中间包来替换原有的日志框架;
3.导入slf4j其他的实现
3.SpringBoot日志关系
如果要引入其他框架,一定要把这个框架的默认日志依赖移除掉;
SpringBoot能自动配置所有的日志,底层使用的是slf4j+logback方式记录日志。
4.日志使用
1.默认
Logger logger = LoggerFactory.getLogger(getClass());

@Test
public void test(){
    //        System.out.println();

    //日志的级别:
    //由低到高 trace<debug<info<warn<error
    //调整输出的日志级别:日志就只会在这个级别以后的高级别生效
    logger.trace("这是trace日志...");
    logger.debug("这是debug信息...");
    logger.info("这是info日志...");
    logger.warn("这是warn日志...");
    logger.error("这是error日志...");
}
#设置日志级别
logging.level.com.springboot=trace
#在当前项目下生成日志
logging.file=springboot.log
#在控制台输出的日志格式
logging.pattern.console=%d{yyyy-MM-dd} [%thread] %-5level %logger{50} - %msg%n
#指定文件中输出日志格式
logging.pattern.file=%d{yyyy-MM-dd} ==main== [%thread] %-5level %logger{50} - %msg%n
2.指定配置
给类路径上放上每个日志框架自己的配置文件,就不使用SpringBoot的默认配置了;
logback.xml:直接就会被日志框架识别了,所以需要改名
logback-spring.xml:日志框架就不直接加载日志的配置项,由SpringBoot解析日志配置,可以试用SpringBoot的高级Profile功能
<springProfile></springProfile>
5.切换日志框架
四、Web开发(*)
1.SpringBoot对静态资源的配置规则
@Override
public void addResourceHandlers(ResourceHandlerRegistry registry) {
    if (!this.resourceProperties.isAddMappings()) {
        logger.debug("Default resource handling disabled");
        return;
    }
    Duration cachePeriod = this.resourceProperties.getCache().getPeriod();
    CacheControl cacheControl = this.resourceProperties.getCache().getCachecontrol().toHttpCacheControl();
    if (!registry.hasMappingForPattern("/webjars/**")) {
        customizeResourceHandlerRegistration(registry.addResourceHandler("/webjars/**")
                                             .addResourceLocations("classpath:/META-INF/resources/webjars/")
                                             .setCachePeriod(getSeconds(cachePeriod)).setCacheControl(cacheControl));
    }
    String staticPathPattern = this.mvcProperties.getStaticPathPattern();
    if (!registry.hasMappingForPattern(staticPathPattern)) {
        customizeResourceHandlerRegistration(registry.addResourceHandler(staticPathPattern)
                                             .addResourceLocations(getResourceLocations(this.resourceProperties.getStaticLocations()))
                                             .setCachePeriod(getSeconds(cachePeriod)).setCacheControl(cacheControl));
    }
}

@Bean
		public WelcomePageHandlerMapping welcomePageHandlerMapping(ApplicationContext applicationContext) {
			WelcomePageHandlerMapping welcomePageHandlerMapping = new WelcomePageHandlerMapping(
					new TemplateAvailabilityProviders(applicationContext), applicationContext, getWelcomePage(),
					this.mvcProperties.getStaticPathPattern());
			welcomePageHandlerMapping.setInterceptors(getInterceptors());
			return welcomePageHandlerMapping;
		}
1)、所有/webjars/**,都去classpath:/META-INF/resources/webjars/找资源;
webjars:以jar包的方式引入静态资源
2)、"/**"访问静态资源的任何路径(静态资源的文件夹)
"classpath:/META-INF/resources/",
"classpath:/resources/",
"classpath:/static/",
"classpath:/public/",
"/":当前项目的根路径, release2.1.8没有发现根路径
优先级:
META-INF>resources>static>public
http://localhost:8080/asserts/js/jquery-3.2.1.slim.min.js
3)、欢迎页;静态资源文件夹下的所有index.html页面;被"/**"映射;
localhost:8080/ 找index
private Resource getIndexHtml(String location) {
	return this.resourceLoader.getResource(location + "index.html");
}
templates下的index.html也可以找到
"classpath:/resources/index.html",
"classpath:/static/index.html",
"classpath:/public/index.html",
"classpath:/templates/index.html"
优先级从上到下,由高到低
4)、所有的**/favicon.ico都是在静态文件夹下找
@Configuration
		@ConditionalOnProperty(value = "spring.mvc.favicon.enabled", matchIfMissing = true)
		public static class FaviconConfiguration implements ResourceLoaderAware {

			private final ResourceProperties resourceProperties;

			private ResourceLoader resourceLoader;

			public FaviconConfiguration(ResourceProperties resourceProperties) {
				this.resourceProperties = resourceProperties;
			}

			@Override
			public void setResourceLoader(ResourceLoader resourceLoader) {
				this.resourceLoader = resourceLoader;
			}

			@Bean
			public SimpleUrlHandlerMapping faviconHandlerMapping() {
				SimpleUrlHandlerMapping mapping = new SimpleUrlHandlerMapping();
				mapping.setOrder(Ordered.HIGHEST_PRECEDENCE + 1);
				mapping.setUrlMap(Collections.singletonMap("**/favicon.ico", faviconRequestHandler()));
				return mapping;
			}

			@Bean
			public ResourceHttpRequestHandler faviconRequestHandler() {
				ResourceHttpRequestHandler requestHandler = new ResourceHttpRequestHandler();
				requestHandler.setLocations(resolveFaviconLocations());
				return requestHandler;
			}

			private List<Resource> resolveFaviconLocations() {
				String[] staticLocations = getResourceLocations(this.resourceProperties.getStaticLocations());
				List<Resource> locations = new ArrayList<>(staticLocations.length + 1);
				Arrays.stream(staticLocations).map(this.resourceLoader::getResource).forEach(locations::add);
				locations.add(new ClassPathResource("/"));
				return Collections.unmodifiableList(locations);
			}

		}

	}
所有的**/favicon.ico都是在静态文件夹下找
这个功能感觉有时候会不太好使,可以再试试关闭默认图标
#关闭默认图标
#spring.mvc.favicon.enabled=false
2.模板引擎
JSP、Velocity、Freemarker、Thymeleaf
SpringBoot推荐的Thymeleaf :
语法更简单、功能更强大
1.引入Thymeleaf
<dependency>
    <groupId>org.springframework.boot</groupId>
    <artifactId>spring-boot-starter-thymeleaf</artifactId>
</dependency>
springboot2.x版本后默认使用Thymeleaf3
2.thymeleaf使用
@ConfigurationProperties(prefix = "spring.thymeleaf")
public class ThymeleafProperties {

	private static final Charset DEFAULT_ENCODING = StandardCharsets.UTF_8;

	public static final String DEFAULT_PREFIX = "classpath:/templates/";

	public static final String DEFAULT_SUFFIX = ".html";
    //只要放在classpath:/templates/下,thymeleaf就能够渲染页面了
}
使用:
1.导入thymeleaf的名称空间
<html lang="en" xmlns:th="http://www.thymeleaf.org">
3.语法规则
1)、th:任意html,替换原生的属性
2)、表达式
| 语法 | 名称 | 描述 | 作用 |
|---|---|---|---|
| ${…} | Variable Expressions | 变量表达式 | 取出上下文变量的值 |
| *{…} | Selection Variable Expressions | 选择变量表达式 | 取出选择的对象的属性值 |
| #{…} | Message Expressions | 消息表达式 | 使文字消息国际化,I18N |
| @{…} | Link URL Expressions | 链接表达式 | 用于表示各种超链接地址 |
| ~{…} | Fragment Expressions | 片段表达式 | 引用一段公共的代码片段 |
${…}:
1)、获取对象的属性、调用方法;
2)、使用内置的对象
3)、使用内置的一些工具对象
*{…}:和${…}在功能上一致
4.SpringMVC自动配置原理
SpringBoot自动配置好了SpringMVC
以下是SpringBoot对SpringMVC的默认配置:
-
自动配置了视图解析器ViewResolver(根据方法的返回值得到视图对象)
-
ContentNegotiatingViewResolver;组合了所有的视图解析器 -
如何定制:可以自己个容器中添加一个视图解析器,自动的将其组合进来
-
-
自动注册了
Converter,GenericConverter,Formatter自己添加的格式化器转换器,只需要放在容器中即可
-
HttpMessageConverter:SpringMVC用来转换http请求和相应的;user—json;自己添加的HttpMessageConverter,只需要放在容器中即可
-
MessageCodesResolver:定义错误代码生成规则 -
ConfigurableWebBindingInitializer:初始化WebDataBinder,请求数据==>JavaBean
5.如何修改SpringBoot的默认配置
模式:
1)、SpringBoot在自动配置很多组件的时候,先看容器中有没有用户自己配置的(@Bean,@Component);如果有就用用户配置的如果没有,才自动配置;如果有些组件可以有多个(VIewResolver)将用户配置的和自己默认的组合起来;
2)、扩展SpringMVC
@Configuration
public class MyMvcConfig implements WebMvcConfigurer {
//alt+shift+p快速实现
    @Override
    public void addViewControllers(ViewControllerRegistry registry) {
        registry.addViewController("/add").setViewName("success");
    }
}
容器中所有的WebMvcConfigurer都会起作用
3)、Springboot中有非常多的xxxConfigurer,用它进行额外配置
4)、Springboot中有非常多的xxxCustomizer,用它进行额外配置
6.RESTFUL crud(*)
1)、默认访问首页
@Configuration
public class MyMvcConfig implements WebMvcConfigurer {
//alt+shift+p快速实现
    @Override
    public void addViewControllers(ViewControllerRegistry registry) {
        registry.addViewController("/abc").setViewName("success");
        registry.addViewController("/").setViewName("login");
    }

    @Bean
    public WebMvcConfigurer webMvcConfigurer(){
        return new WebMvcConfigurer(){
            @Override
            public void addViewControllers(ViewControllerRegistry registry) {
                registry.addViewController("/login.html").setViewName("login");
            }
        };
    }
}
2)、国际化
SpringMVC:
1)、编写国际化配置文件;
2)、使用ResourceBundleMessageSource管理国际化资源文件
3)、在页面使用fmt:message取出国际化内容
步骤:
1)、编写国际化配置文件,抽取页面需要显示的国际化消息
2)、Springboot自动配置好了管理国际化资源文件的组件;
@Configuration
@ConditionalOnMissingBean(value = MessageSource.class, search = SearchStrategy.CURRENT)
@AutoConfigureOrder(Ordered.HIGHEST_PRECEDENCE)
@Conditional(ResourceBundleCondition.class)
@EnableConfigurationProperties
public class MessageSourceAutoConfiguration {
    @Bean
	@ConfigurationProperties(prefix = "spring.messages")
	public MessageSourceProperties messageSourceProperties() {
		return new MessageSourceProperties();
	}
}
3)、去页面获取国际化的值;
<a class="btn btn-sm" th:href="@{/login.html(l='zh_CN')}">中文</a>
<a class="btn btn-sm" th:href="@{/login.html(l='en_US')}">English</a>
4)、注册LocaleResolver
public class MyLocaleResolver implements LocaleResolver {
    @Override
    public Locale resolveLocale(HttpServletRequest request) {
        String l = request.getParameter("l");
        Locale locale = Locale.getDefault();
        if (!StringUtils.isEmpty(l)){
            String[] split = l.split("_");
            locale = new Locale(split[0],split[1]);
        }
        return locale;
    }
}


@Bean
public LocaleResolver localeResolver(){
    return new MyLocaleResolver();
}
3)、登录(*)
开发期间要想页面修改后实时生效
1.禁用模板引擎的缓存
2.ctrl+F9,重新编译
登录错误消息的提示
<p style="color:red" th:text="${msg}" th:if="${not #strings.isEmpty(msg)}"></p>
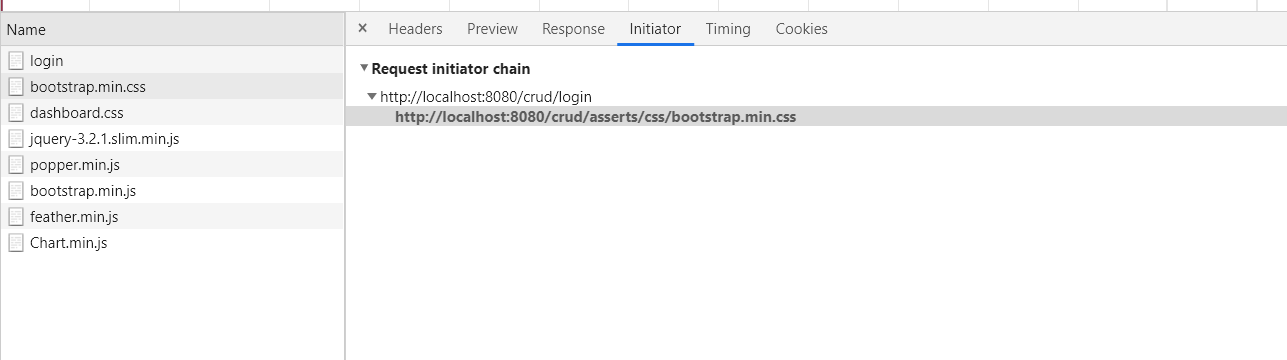
登陆成功跳转的时候应该用重定向
重定向:

重定向时,正确的静态资源访问:

重定向可以跳转到相应的静态资源包下的html文件,但跳不到templates里
项目中静态资源包:
1.classpath:/resources/
2.classpath:/static/
3.classpath:/public/
请求转发:

请求转发时,错误的静态资源访问:
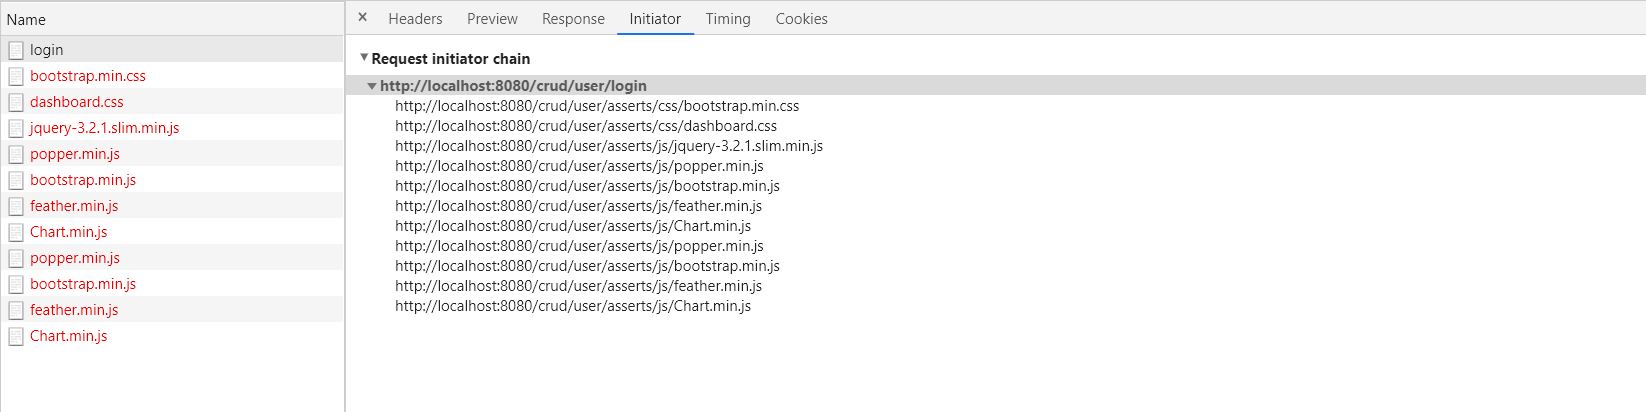
由于前面的请求是/user/login,所以不行
当只有一层时,

总结(以此次项目为例)
| 重定向 | 请求转发 | |
|---|---|---|
| 静态资源访问路径 | 无论如何都是localhost:8080/crud/xxx.css(项目路径+访问资源的路径) | 若原来的请求是/user/login,就是去掉一层目录后的目录,即localhost:8080/crud/user/xxx.css |
| 地址栏 | 会变化 | 不会变化 |
| 哪里跳转 | 在客户端即浏览器跳转 | 在服务器内部跳转 |
| 请求域中的数据是否会丢失 | 会丢失 | 不会丢失 |
| 请求次数 | 2次 | 1次 |
4)、拦截器进行登录检查
@Bean
public WebMvcConfigurer webMvcConfigurer(){
    return new WebMvcConfigurer(){
        @Override
        public void addViewControllers(ViewControllerRegistry registry) {
            registry.addViewController("/login.html").setViewName("login");
        }

        @Override
        public void addInterceptors(InterceptorRegistry registry) {
            //静态资源;
            registry.addInterceptor(new LoginHandlerInterceptor()).addPathPatterns("/**")
                .excludePathPatterns("/login.html","/","/user/login")
                .excludePathPatterns("/asserts/**","/webjars/**");
        }
    };
}
一定要注意,springboot 1.5的不需要排除静态资源也可以访问,但是springboot2.x需要排除静态资源才能够访问
.excludePathPatterns("/asserts/**","/webjars/**");
5)、CRUD-员工列表
实验要求:
1)、RestfulCRUD:CRUD满足Rest风格:
URI:/资源名称/资源标识 HTTP请求方式区分对资源CRUD操作
| 普通CRUD(URI区分操作) | RestfulCRUD | |
|---|---|---|
| 查询 | getEmp | emp—GET |
| 添加 | addEmp?xxx | emp—POST |
| 修改 | updateEmp?id=xxx&xxx | emp/{id}—PUT |
| 删除 | deleteEmp?id=1 | emp/{id}—DELETE |
2)、实验的请求架构
| 功能 | 请求URI | 请求方式 |
|---|---|---|
| 查询所有员工 | emps | GET |
| 查询某个员工 | emp/{id} | GET |
| 来到添加页面 | emp | GET |
| 添加员工 | emp | POST |
| 来到修改页面(查出员工进行信息会写) | emp/{id} | GET |
| 修改员工 | emp | PUT |
| 删除员工 | emp/{id} | DELETE |
thymeleaf公共页面抽取
1.抽取公共片段
<nav class="navbar navbar-dark sticky-top bg-dark flex-md-nowrap p-0" th:fragment="topbar"></nav>

2.使用公共片段
<div th:insert="~{dashboard::topbar}"></div>

3.默认效果
th:insert的功能片段在div标签中
如果使用th:insert等用法,可以不用写~{}
[[~{}]] ; [(~{})]
三种引入功能片段的th属性:
th:insert:将公共片段插入到div标签中
th:replace:将声明引入的元素替换为公共片段
th:include:将被引入的片段的内容包含进这个标签中
引入片段的时候传入参数
<div th:replace="commons/bar::#sidebar(activeUri='main.html')"></div>
###6)、CRUD-员工添加
提交 数据格式不对:生日 日期
2017.12.12 2017-12-12 2017/12/12
日期的格式化:SpringMVC将页面提交的值需要转换为指定的类型
2017-12-12-----Date 类型转换,格式化;
默认日期是按照/的方式,
spring.mvc.date-format=yyyy-MM-dd
更改日期格式,但还是只能有一种方式
7、错误处理机制
1、SpringBoot默认的错误处理机制
原理:
可以参照ErrorMvcAutoConfiguration的错误处理自动配置;
给容器中添加了一下组件:
1、DefaultErrorAttributes:
帮我们在页面共享信息
@Override
public Map<String, Object> getErrorAttributes(ServerRequest request, boolean includeStackTrace) {
    Map<String, Object> errorAttributes = new LinkedHashMap<>();
    errorAttributes.put("timestamp", new Date());
    errorAttributes.put("path", request.path());
    Throwable error = getError(request);
    HttpStatus errorStatus = determineHttpStatus(error);
    errorAttributes.put("status", errorStatus.value());
    errorAttributes.put("error", errorStatus.getReasonPhrase());
    errorAttributes.put("message", determineMessage(error));
    handleException(errorAttributes, determineException(error), includeStackTrace);
    return errorAttributes;
}
2、BasicErrorController:处理默认/error请求
@Controller
@RequestMapping("${server.error.path:${error.path:/error}}")
public class BasicErrorController extends AbstractErrorController {

    @RequestMapping(produces = MediaType.TEXT_HTML_VALUE)//产生html数据,浏览器发出的请求来这个方法处理
	public ModelAndView errorHtml(HttpServletRequest request, HttpServletResponse response) {
		HttpStatus status = getStatus(request);
		Map<String, Object> model = Collections
				.unmodifiableMap(getErrorAttributes(request, isIncludeStackTrace(request, MediaType.TEXT_HTML)));
		response.setStatus(status.value());

        //去哪个页面作为错误页面;包含页面地址和页面内容
		ModelAndView modelAndView = resolveErrorView(request, response, status, model);
		return (modelAndView != null) ? modelAndView : new ModelAndView("error", model);
	}

	@RequestMapping//产生json数据,其他客户端发出的请求来这个方法处理
	public ResponseEntity<Map<String, Object>> error(HttpServletRequest request) {
		Map<String, Object> body = getErrorAttributes(request, isIncludeStackTrace(request, MediaType.ALL));
		HttpStatus status = getStatus(request);
		return new ResponseEntity<>(body, status);
	}
}
3、ErrorPageCustomizer:
@Value("${error.path:/error}")
private String path = "/error";//系统出现错误以后来到error请求进行处理;(web.xml注册的错误页面规则)
4、DefaultErrorViewResolver:
@Override
	public ModelAndView resolveErrorView(HttpServletRequest request, HttpStatus status, Map<String, Object> model) {
		ModelAndView modelAndView = resolve(String.valueOf(status.value()), model);
		if (modelAndView == null && SERIES_VIEWS.containsKey(status.series())) {
			modelAndView = resolve(SERIES_VIEWS.get(status.series()), model);
		}
		return modelAndView;
	}

	private ModelAndView resolve(String viewName, Map<String, Object> model) {
        //默认SpringBoot可以去找到一个页面;error/404
		String errorViewName = "error/" + viewName;

        //模板引擎可以解析这个页面地址就用模板引擎解析errorViewName指定的视图地址
		TemplateAvailabilityProvider provider = this.templateAvailabilityProviders.getProvider(errorViewName,
				this.applicationContext);
		if (provider != null) {
            //模板引擎可用的情况下返回到errorViewName指定的视图地址
			return new ModelAndView(errorViewName, model);
		}
        //模板引擎不可用,就在静态资源文件夹下找errorViewName对应的页面     error/404.html
		return resolveResource(errorViewName, model);
	}
步骤:
一旦系统出现了4xx或5xx之类的错误;ErrorPageCustomizer就会生效(定制错误的相应规则);就会来到/error请求;就会来到BasicErrorController处理;
1)、显示页面;去哪个页面是由**DefaultErrorViewResolver**解析得到的
protected ModelAndView resolveErrorView(HttpServletRequest request, HttpServletResponse response, HttpStatus status,
			Map<String, Object> model) {
    //所有的ErrorViewResolver得到ModelAndView
		for (ErrorViewResolver resolver : this.errorViewResolvers) {
			ModelAndView modelAndView = resolver.resolveErrorView(request, status, model);
			if (modelAndView != null) {
				return modelAndView;
			}
		}
		return null;
	}
2)、如果定制错误响应
1)、如何定制错误的页面:
1)、有模板引擎的情况下;error/状态码;
将错误页面命名为 错误状态码.html放在模板引擎文件下的error文件夹下;
发生此错误码的错误就会来到对应的页面;
可以试用4xx和5xx作为错误页面的文件名来匹配这种类型的所有错误,精确优先(优先寻找精确的状态码.html)
也可以将error.html放在templates下
页面能获取的信息:
timestamp:时间戳
status:状态码
error:错误提示
exception:错误对象
message:异常消息
errors:JSR303数据校验的错误都在这里
2)、没有模板引擎(不用模板引擎),静态资源文件加下找;
3)、以上都没有,就是默认来到SpringBoot的error页面;
2)、定制错误的json数据;
1)、自定义异常处理&返回定制json数据;
@ControllerAdvice
public class MyExceptionHandler {

    //浏览器和客户端返回的都是json
    @ResponseBody
    @ExceptionHandler(UserNotExistException.class)
    public Map<String,Object> handleException(Exception e){
        Map<String,Object> map = new HashMap<>();
        map.put("code","user,not exist");
        map.put("message",e.getMessage());
        return map;
    }
}

//没有自适应效果
2)、转发到/error进行自适应相应效果处理
@ExceptionHandler(UserNotExistException.class)
public String handleException(Exception e){
    Map<String,Object> map = new HashMap<>();
    map.put("code","user,not exist");
    map.put("message",e.getMessage());
    //转发到/error
    return "forward:/error";
}
3)、定制额外的相应数据,参照P44
@ExceptionHandler(UserNotExistException.class)
public String handleException(Exception e, HttpServletRequest request){
    Map<String,Object> map = new HashMap<>();
    //传入我们自己的错误状态码 4xx 5xx 否则就不会进入定制错误页面的解析流程
    request.setAttribute("javax.servlet.error.status_code",400);
    map.put("code","user,not exist");
    map.put("message",e.getMessage());
    //转发到/error
    //        return "forward:/error";
    //可以调到自定义的页面
    return "error";
}
可以自定义页面跳转,也能够实现收到额外的相应数据
8、配置嵌入式Servlet容器
SpringBoot默认是用的嵌入的Servlet容器(Tomcat);
问题?
1)、如何定制和修改Servlet容器的相关配置;
1、修改和server有关的配置(ServerProperties[也是EmbeddedServletContainerCustomizer])
server.xxx  #通用的Servlet容器设置
server.tomcat.xxx #tomcat的设置
2、编写一个~~EmbeddedServletContainerCustomizer~~,2.x后改为WebServerFactoryCustomizer,注入到IOC容器中
@Bean
public WebServerFactoryCustomizer webServerFactoryCustomizer(){
    return new WebServerFactoryCustomizer<ConfigurableWebServerFactory>() {
        //定制嵌入式的Servlet容器的相关规则
        @Override
        public void customize(ConfigurableWebServerFactory factory) {
            factory.setPort(8080);
        }
    };
}
2)、注册Servlet三大组件【Servlet、Filter、Listener】
由于Springboot默认是以jar包的方式启动嵌入式的Servlet容器来启动Springboot的web应用,没有web.xml文件。
注册三大组件用以下方式
ServletRegistrationBean
@Bean
public ServletRegistrationBean servletRegistrationBean(){
    ServletRegistrationBean servletRegistrationBean = new ServletRegistrationBean(new MyServlet(),"/myServlet");
    return servletRegistrationBean;
}
FilterRegistrationBean
@Bean
public FilterRegistrationBean filterRegistration(){
    FilterRegistrationBean register = new FilterRegistrationBean(new MyFilter());
    //        register.setFilter(new MyFilter());
    register.setUrlPatterns(Arrays.asList("/hello","/myServlet"));
    return  register;
}
ServletListenerRegistrationBean
@Bean
public ServletListenerRegistrationBean mylistener(){
    ServletListenerRegistrationBean servletListenerRegistrationBean = new ServletListenerRegistrationBean(new MyListener());
    return servletListenerRegistrationBean;
}
SpringBoot帮我们自动SpringMVC的时候,自动注册SpringMVC的前端控制器;DispatcherServlet
2)、SpringBoot能不能支持其他的Servlet容器;
3)、替换为其他Servlet容器
Tomcat(SpringBoot默认使用)
jetty
<dependency>
    <groupId>org.springframework.boot</groupId>
    <artifactId>spring-boot-starter-web</artifactId>
    <exclusions>
        <exclusion>
            <artifactId>spring-boot-starter-tomcat</artifactId>
            <groupId>org.springframework.boot</groupId>
        </exclusion>
    </exclusions>
</dependency>

<dependency>
    <artifactId>spring-boot-starter-jetty</artifactId>
    <groupId>org.springframework.boot</groupId>
</dependency>
undertow
<dependency>
    <groupId>org.springframework.boot</groupId>
    <artifactId>spring-boot-starter-web</artifactId>
    <exclusions>
        <exclusion>
            <artifactId>spring-boot-starter-tomcat</artifactId>
            <groupId>org.springframework.boot</groupId>
        </exclusion>
    </exclusions>
</dependency>

<dependency>
    <artifactId>spring-boot-starter-undertow</artifactId>
    <groupId>org.springframework.boot</groupId>
</dependency>
4)、原理
9、使用外置的Servlet容器
嵌入式Servlet容器:应用打成可执行的jar
优点:简单、便携;
缺点:默认不支持JSP、优化定制比较复杂
外置的Servlet容器:外面安装Tomcat–应用war包的方式打包
使用步骤:
1)、必须创建一个war项目
2)、嵌入式的Tomcat指定为provided;
<dependency>
    <artifactId>spring-boot-starter-tomcat</artifactId>
    <groupId>org.springframework.boot</groupId>
    <!--打包的时候不会放入-->
    <scope>provided</scope>
</dependency>
3)、编写一个SpringBootServletInitializer,并调用configure方法
public class ServletInitializer extends SpringBootServletInitializer {
    @Override
    protected SpringApplicationBuilder configure(SpringApplicationBuilder builder) {
        //传入SpringBoot应用的主程序
        return builder.sources(SpringbootWebJspApplication.class);
    }
}
原理:
jar包:执行SpringBoot主类的main方法,启动IOC容器,创建嵌入式的Servlet容器;
war包:启动服务器,服务器启动Springboot应用【SpringBootServletInitializer】,启动IOC容器;
Servlet3.0新规范
规则:
1)、服务器启动(web应用启动)会创建当前web应用里面每一个jar包里面ServletContainerInitializer实例;
2)、ServletContainerInitializer的实现放在jar包的META-INF/services文件夹下,有一个名为javax.servlet.ServletContainerInitializer的文件,内容就是ServletContainerInitializer的实现类的全类名
3)、还可以使用@HandlesTypes,在应用启动的时候加载我们感兴趣的类
流程:
1)、启动Tomcat
2)、org\springframework\spring-web\5.1.9.RELEASE\spring-web-5.1.9.RELEASE.jar!\META-INF\services\javax.servlet.ServletContainerInitializer:
Spring的Web模块里面有这个文件:org.springframework.web.SpringServletContainerInitializer
3)、SpringServletContainerInitializer将@HandlesTypes(WebApplicationInitializer.class)必做主的所有这个类型的类传入到onStartup方法的Set<Class<?>>;为这些WebApplicationInitializer类型的类创建实例;
4)、每一个WebApplicationInitializer都调用自己的onStartup;【SpringBootServletInitializer】
5)、相当于SpringBootServletInitializer的类会被创建对象,并执行onStartup方法;
6)、SpringBootServletInitializer执行onStartup会createRootApplicationContext创建容器;
protected WebApplicationContext createRootApplicationContext(ServletContext servletContext) {
    //1.创建SpringApplicationBuilder
    SpringApplicationBuilder builder = createSpringApplicationBuilder();
    builder.main(getClass());
    ApplicationContext parent = getExistingRootWebApplicationContext(servletContext);
    if (parent != null) {
        this.logger.info("Root context already created (using as parent).");
        servletContext.setAttribute(WebApplicationContext.ROOT_WEB_APPLICATION_CONTEXT_ATTRIBUTE, null);
        builder.initializers(new ParentContextApplicationContextInitializer(parent));
    }
    builder.initializers(new ServletContextApplicationContextInitializer(servletContext));
    builder.contextClass(AnnotationConfigServletWebServerApplicationContext.class);

    //2.调用configure,子类重写了这个方法,将SpringBoot的主程序类传了进来
    builder = configure(builder);
    builder.listeners(new WebEnvironmentPropertySourceInitializer(servletContext));

    //3.使用builder创建一个Spring应用
    SpringApplication application = builder.build();
    if (application.getAllSources().isEmpty()
        && AnnotationUtils.findAnnotation(getClass(), Configuration.class) != null) {
        application.addPrimarySources(Collections.singleton(getClass()));
    }
    Assert.state(!application.getAllSources().isEmpty(),
                 "No SpringApplication sources have been defined. Either override the "
                 + "configure method or add an @Configuration annotation");
    // Ensure error pages are registered
    if (this.registerErrorPageFilter) {
        application.addPrimarySources(Collections.singleton(ErrorPageFilterConfiguration.class));
    }

    //4.启动SpringBootApplication
    return run(application);
}
7)、Spring的应用就启动了,并创建IOC容器
public ConfigurableApplicationContext run(String... args) {
    StopWatch stopWatch = new StopWatch();
    stopWatch.start();
    ConfigurableApplicationContext context = null;
    Collection<SpringBootExceptionReporter> exceptionReporters = new ArrayList<>();
    configureHeadlessProperty();
    SpringApplicationRunListeners listeners = getRunListeners(args);
    listeners.starting();
    try {
        ApplicationArguments applicationArguments = new DefaultApplicationArguments(args);
        ConfigurableEnvironment environment = prepareEnvironment(listeners, applicationArguments);
        configureIgnoreBeanInfo(environment);
        Banner printedBanner = printBanner(environment);
        context = createApplicationContext();
        exceptionReporters = getSpringFactoriesInstances(SpringBootExceptionReporter.class,
                                                         new Class[] { ConfigurableApplicationContext.class }, context);
        prepareContext(context, environment, listeners, applicationArguments, printedBanner);
        refreshContext(context);
        afterRefresh(context, applicationArguments);
        stopWatch.stop();
        if (this.logStartupInfo) {
            new StartupInfoLogger(this.mainApplicationClass).logStarted(getApplicationLog(), stopWatch);
        }
        listeners.started(context);
        callRunners(context, applicationArguments);
    }
    catch (Throwable ex) {
        handleRunFailure(context, ex, exceptionReporters, listeners);
        throw new IllegalStateException(ex);
    }

    try {
        listeners.running(context);
    }
    catch (Throwable ex) {
        handleRunFailure(context, ex, exceptionReporters, null);
        throw new IllegalStateException(ex);
    }
    return context;
}
10、日期处理+后台数据返回前台(*)
1)、多写一个get方法
person.java
public class Person {
    Integer id;
    String name;
    Date birth;

    @Override
    public String toString() {
        return "Person{" +
                "id=" + id +
                ", name='" + name + '\'' +
                ", birth=" + birth +
                '}';
    }

    public Person(Integer id, String name, Date birth) {
        this.id = id;
        this.name = name;
        this.birth = birth;
    }

    public Person() {
    }

    public Integer getId() {
        return id;
    }

    public void setId(Integer id) {
        this.id = id;
    }

    public String getName() {
        return name;
    }

    public void setName(String name) {
        this.name = name;
    }

    public Date getBirth_test() {
        return birth;
    }

    public String getBirth() {
        return new SimpleDateFormat("yyyy-MM-dd HH:mm:ss").format(this.birth);
    }

    public void setBirth(Timestamp birth) {
        this.birth = birth;
    }
}
PersonController.java
@Controller
public class PersonController {

    @Autowired
    PersonServiceImpl personService;

    @ResponseBody
    @RequestMapping("/getAllPersons")
    public List<Person> getAllPersons(){
        return personService.getAllPersons();
    }
}
返回给浏览器的数据
[{"id":1,"name":"zs","birth":"2020-08-11 00:00:00","birth_test":1597075200000},{"id":2,"name":"ls","birth":"2020-08-20 00:00:00","birth_test":1597852800000},{"id":3,"name":"ww","birth":"2020-08-28 00:00:00","birth_test":1598544000000}]
可以发现,返回的数据名和pojo中的get方法有关,有几个get方法就有几个返回的属性
例:getBirth_test返回birth_test
2)、现在可以直接在属性名上加上
上面是以前的处理方法
现在的Person.java
public class Person {
    Integer id;
    String name;

    @JsonFormat(timezone = "GMT+8", pattern = "yyyy-MM-dd HH:mm:ss")
    Date birth;

    @Override
    public String toString() {
        return "Person{" +
                "id=" + id +
                ", name='" + name + '\'' +
                ", birth=" + birth +
                '}';
    }

    public Person(Integer id, String name, Date birth) {
        this.id = id;
        this.name = name;
        this.birth = birth;
    }

    public Person() {
    }

    public Integer getId() {
        return id;
    }

    public void setId(Integer id) {
        this.id = id;
    }

    public String getName() {
        return name;
    }

    public void setName(String name) {
        this.name = name;
    }

    public Date getBirth() {
        return birth;
    }

//    public String getBirth() {
//        return new SimpleDateFormat("yyyy-MM-dd HH:mm:ss").format(this.birth);
//    }

    public void setBirth(Timestamp birth) {
        this.birth = birth;
    }
}
@JsonFormat(timezone = "GMT+8", pattern = "yyyy-MM-dd HH:mm:ss")
或者在配置文件中配置
spring.jackson.date-format=yyyy-MM-dd HH:mm:ss
spring.jackson.time-zone=GMT+8
3)、sql语句转换
SELECT DATE_FORMAT( b.book_start_time,'%Y-%m-%d %H:%i:%s') book_start_time
4)、前台转换
templet: '<div>{{ layui.laytpl.toDateString(d.createTime) }}</div>'
###5)、常用日期时间类
java.sql.Date date1 = new java.sql.Date(new java.util.Date().getTime());
LocalDate localDate = date1.toLocalDate();
System.out.println(localDate);//2020-08-12

//Calendar日期类
Calendar calendar = Calendar.getInstance();
SimpleDateFormat dateFormat = new SimpleDateFormat("yyyy-MM-dd HH:mm:ss");
String format = dateFormat.format(calendar.getTimeInMillis());
Timestamp timestamp = Timestamp.valueOf(format);
System.out.println(timestamp);//2020-08-12 13:35:57.0

//最新的日期类LocalDateTime、LocalDate、LocalTime
LocalDateTime localDateTime = LocalDateTime.now();
System.out.println(localDateTime);//2020-08-12T13:35:57.127
DateTimeFormatter dateTimeFormatter = DateTimeFormatter.ofPattern("yyyy-MM-dd HH:mm:ss");
String format1 = dateTimeFormatter.format(localDateTime);
System.out.println(format1);//2020-08-12 13:35:57
Timestamp timestamp1 = Timestamp.valueOf(format1);
Timestamp timestamp2 = Timestamp.valueOf(localDateTime);

System.out.println(timestamp1);//2020-08-12 13:35:57.0
System.out.println(timestamp2);//2020-08-12 13:35:57.127
11、日期处理+前台的数据传给后台(*)
前台传给后台日期的字符串,后台是无法用Date来映射的,要自己编写一个类型转换器,放入容器中
package com.custhitachi.managerment.converter;

import java.util.Date;
import java.text.ParseException;
import java.text.SimpleDateFormat;

import org.springframework.context.annotation.Configuration;
import org.springframework.core.convert.converter.Converter;

@Configuration
public class StringToDateConverter implements Converter<String, Date>{

	@Override
	public Date convert(String source) {
		if (source.equals("")) {
			System.out.println(1);
			return null;
		}else {
			SimpleDateFormat simpleDateFormat = new SimpleDateFormat("yyyy-MM-dd");
			Date date = null;
			try {
				date = simpleDateFormat.parse(source);
			} catch (ParseException e) {
				e.printStackTrace();
			}
			return date;
		}
	}

}
或者入参的时候加上@DateTimeFormat
也可以直接加在属性上
@DateTimeFormat(pattern = "yyyy-MM-dd")
@JsonFormat(pattern = "yyyy-MM-dd HH:mm:ss",timezone="GMT+8")
private Date symstarttime;
12、在tomcat运行war
1、带项目名(静态文件可能会不好使)
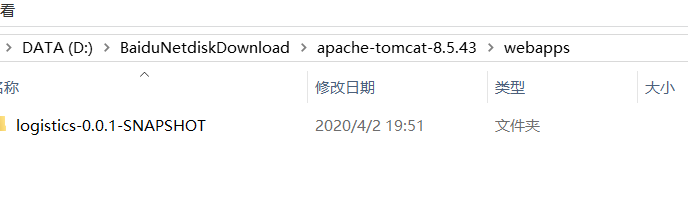
2、不带项目名


 200
200


 被折叠的 条评论
为什么被折叠?
被折叠的 条评论
为什么被折叠?
 到【灌水乐园】发言


