


haproxy实现7层的负载均衡[haproxy+pacemaker]
一、haproxy
1.框架搭建及测试
(1)安装及配置
[root@server1 ~]# yum install -y haproxy.x86_64 #安装haproxy
[root@server1 ~]# cd /etc/haproxy/ #进入安装好的目录
[root@server1 haproxy]# ls #列出配置文件
haproxy.cfg
[root@server1 haproxy]# vim haproxy.cfg #配置haproxy文件
#---------------------------------------------------------------------
# common defaults that all the 'listen' and 'backend' sections will
# use if not designated in their block
#---------------------------------------------------------------------
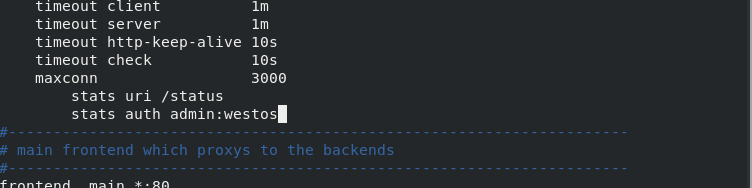
stats uri /status #添加
#---------------------------------------------------------------------
# main frontend which proxys to the backends
#---------------------------------------------------------------------
frontend main *:80 #端口改为80
#---------------------------------------------------------------------
# round robin balancing between the various backends
#---------------------------------------------------------------------
backend app
balance roundrobin
server app1 172.25.15.2:80 check #设置
server app2 172.25.15.3:80 check
[root@server1 haproxy]# id haproxy #查看用户id
uid=188(haproxy) gid=188(haproxy) groups=188(haproxy)
[root@server1 haproxy]# sysctl -a | grep file
fs.file-max = 183592
fs.file-nr = 1024 0 183592
fs.xfs.filestream_centisecs = 3000
sysctl: reading key "net.ipv6.conf.all.stable_secret"
sysctl: reading key "net.ipv6.conf.default.stable_secret"
sysctl: reading key "net.ipv6.conf.eth0.stable_secret"
sysctl: reading key "net.ipv6.conf.lo.stable_secret"
[root@server1 haproxy]# free -m
total used free shared buff/cache available
Mem: 1837 80 1532 16 224 1589
Swap: 2047 0 2047
[root@server1 haproxy]# vim /etc/security/limits.conf #配置文件
[root@server1 haproxy]# tail -n2 /etc/security/limits.conf #配置内容
# End of file
haproxy - nofile 4096
[root@server1 haproxy]# systemctl start haproxy.service
安装服务


(2)测试:浏览器访问

启动server2和server3的http服务
[root@server2 ~]# systemctl start httpd.service
[root@server3 ~]# systemctl start httpd.service

(3)负载均衡
浏览器访问172.25.15.1


2.default_backend和use_backend的使用
修改配置文件
[root@server1 haproxy]# vim haproxy.cfg

#---------------------------------------------------------------------
# static backend for serving up images, stylesheets and such
#---------------------------------------------------------------------
backend static
    balance     roundrobin
    server      static 172.25.15.3:80 check		#修改

[root@server1 haproxy]# systemctl reload haproxy.service


浏览器访问http://172.25.15.1/status

[root@foundation15 ~]# curl 172.25.15.1		#命令访问
server2
[root@foundation15 ~]# curl 172.25.15.1
server3
[root@foundation15 ~]# curl 172.25.15.1
server2
[root@foundation15 ~]# curl 172.25.15.1
server3
负载均衡

3.不同的app 负载均衡算法
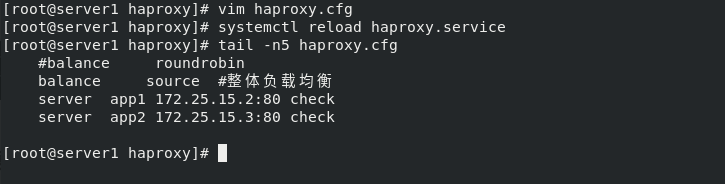
(1)整体负载均衡
[root@server1 haproxy]# vim haproxy.cfg
[root@server1 haproxy]# systemctl reload haproxy.service
[root@server1 haproxy]# tail -n5 haproxy.cfg
    #balance     roundrobin
    balance	source	#整体负载均衡
    server  app1 172.25.15.2:80 check
    server  app2 172.25.15.3:80 check
[root@server1 haproxy]#

访问只在server2
[root@foundation15 ~]# curl 172.25.15.1
server2
[root@foundation15 ~]# curl 172.25.15.1
server2
[root@foundation15 ~]# curl 172.25.15.1
server2
[root@foundation15 ~]# curl 172.25.15.1
server2

[root@server2 ~]# systemctl stop httpd.service 	#关闭server2的http服务,访问切换到server3
[root@foundation15 ~]# curl 172.25.15.1
server3
[root@foundation15 ~]# curl 172.25.15.1
server3
[root@foundation15 ~]# curl 172.25.15.1
server3
[root@foundation15 ~]# curl 172.25.15.1
server3
[root@foundation15 ~]#


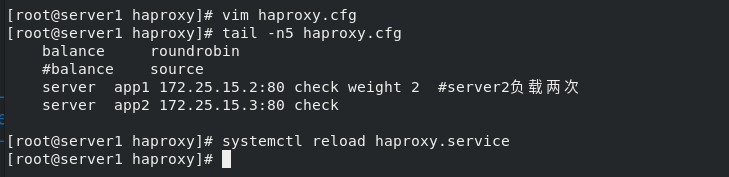
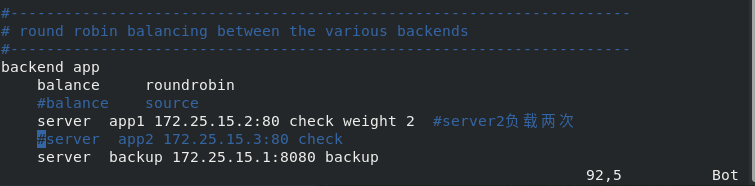
(2)server2负载两次
server2:server3=2:1
[root@server1 haproxy]# vim haproxy.cfg
[root@server1 haproxy]# tail -n5 haproxy.cfg
    balance     roundrobin
    #balance	source
    server  app1 172.25.15.2:80 check weight 2	#server2负载两次
    server  app2 172.25.15.3:80 check

[root@server1 haproxy]# systemctl reload haproxy.service
[root@foundation15 ~]# curl 172.25.15.1
server2
[root@foundation15 ~]# curl 172.25.15.1
server2
[root@foundation15 ~]# curl 172.25.15.1
server3
[root@foundation15 ~]# curl 172.25.15.1
server2
[root@foundation15 ~]# curl 172.25.15.1
server2
[root@foundation15 ~]# curl 172.25.15.1
server3
[root@foundation15 ~]#

(3)备机设置server1
[root@server1 haproxy]# vim haproxy.cfg
[root@server1 haproxy]# tail -n6 haproxy.cfg
backend app
balance roundrobin
#balance source
server app1 172.25.15.2:80 check weight 2 #server2负载两次
server app2 172.25.15.3:80 check
server backup 172.25.15.1:8080 backup
[root@server1 haproxy]# systemctl reload haproxy.service
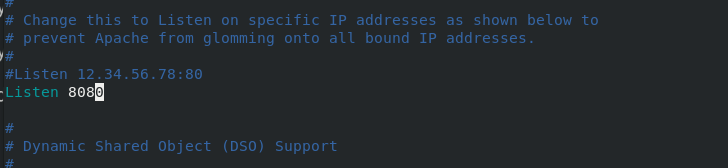
[root@server1 haproxy]# vim /etc/httpd/conf/httpd.conf #修改http默认端口为8080
[root@server1 haproxy]# systemctl start httpd #启动server1的http服务
[root@server1 haproxy]# netstat -antlp #查看端口haproxy:80 http:8080不冲突
[root@foundation15 ~]# curl 172.25.15.1
server2
[root@foundation15 ~]# curl 172.25.15.1
server2
[root@foundation15 ~]# curl 172.25.15.1
server3
[root@foundation15 ~]#
关闭server2和server3的http服务,背机生效
[root@server2 ~]# systemctl stop httpd.service
[root@server3 ~]# systemctl stop httpd.service
[root@foundation15 ~]# curl 172.25.15.1
server1


浏览器查看
server1备用机
server2和server3关闭

4.设置日志信息的存放和访问密码
[root@server1 haproxy]# vim /etc/rsyslog.conf
[root@server1 haproxy]# vim haproxy.cfg
		stats auth admin:westos	#用户名为admin密码westos
[root@server1 haproxy]# systemctl restart rsyslog.service
[root@server1 haproxy]# systemctl reload haproxy.service
[root@server1 haproxy]# cat /var/log/haproxy.log

vim /etc/rsyslog.conf


vim haproxy.cfg
查看存放的日志

浏览器访问http://172.25.15.1/status,需要密码

5.设置黑名单及自动跳转网址
(1)设置黑名单,屏蔽172.25.15.250
自动跳转到百度
[root@server1 haproxy]# vim haproxy.cfg
[root@server1 haproxy]# systemctl reload haproxy.service

(2)跳转成功

6.读写分离
- (读的时候是默认的app,在server2上,写的时候的在server3上
- 数据存储在server3上,server2和server3上需要同样的文件,实现读写分离)
(1)配置完成
server2和server3相同操作
server2和server3安装php
[root@server2 ~]# yum install -y php.x86_64
[root@server3 ~]# yum install -y php.x86_64

放入写好的php代码文件 index.php  upload_file.php
[root@server3 ~]# ll /var/www/html/upload/
total 8
-rw-r--r-- 1 root root 257 Jul 11 00:17 index.php
-rw-r--r-- 1 root root 927 Jul 11 00:17 upload_file.php
[root@server3 ~]# systemctl restart httpd.service
[root@server3 ~]# vim /var/www/html/upload/upload_file.php 	#修改文件
&& ($_FILES["file"]["size"] < 2000000))		#上传文件大小增大
[root@server3 ~]# chmod 777 /var/www/html/upload/	#给予目录权限,方便读写分离
[root@server3 ~]# cd /var/www/html/upload/
[root@server3 upload]# ls
index.php  upload_file.php
[root@server3 upload]#
[root@server3 upload]# mv * ..		#移动到/var/www/html/目录下
[root@server3 upload]# ls
[root@server3 upload]# cd ..
[root@server3 html]# ls
index.html  index.php  upload  upload_file.php
[root@server3 html]# systemctl restart httpd.service
[root@server2 html]# systemctl restart httpd.service

server1
[root@server1 haproxy]# vim haproxy.cfg 	#修改配置文件
[root@server1 haproxy]# systemctl reload haproxy.service


(2)测试
浏览器访问172.25.15.1/index.php
会读到server2的index.php

上传图片

成功
[root@server1 haproxy]# cat /var/log/messages #查看日志,可以看到在server2上上传,存储到server3上

[root@server3 html]# cd upload/
[root@server3 upload]# ls
698fe78fbf03669110fdf6199bb5e73a.jpg
[root@server3 upload]#

读写分离实现
二、haproxy+pacemaker高可用
1.pacemaker集群搭建
[root@server1 haproxy]# vim /etc/yum.repos.d/westos.repo
[root@server1 haproxy]# cat /etc/yum.repos.d/westos.repo
[wan]
name="wan"
baseurl=http://172.25.15.250/rhel7
gpgcheck=0

[HighAvailability]
name=HighAvailability
baseurl=http://172.25.15.250/rhel7/addons/HighAvailability
gpgcheck=0
[root@server1 haproxy]# yum repolist 	#查看仓库
repo id                               repo name                              status
HighAvailability                      HighAvailability                          51
wan                                   "wan"                                  5,152
repolist: 5,203
[root@server1 haproxy]# scp  /etc/yum.repos.d/westos.repo  root@172.25.15.4:/etc/yum.repos.d/

安装pacemker
[root@server1 yum.repos.d]# yum install -y pacemaker pcs psmisc policycoreutils-python.x86_64
#免密Server1和server4
[root@server1 ~]# ssh-keygen
[root@server1 ~]# ssh-copy-id 172.25.15.4
[root@server1 yum.repos.d]# ssh server4 yum install -y pacemaker pcs psmisc policycoreutils-python.x86_64

## server1 和4 安装并开启pacemaker服务,
[root@server1 yum.repos.d]# systemctl enable --now pcsd.service
[root@server1 yum.repos.d]# ssh server4 systemctl enable --now pcsd.service

## 安装后会自动生成一个用户hacluster,需要为他设置一个密码。
[root@server1 ~]# echo westos | passwd --stdin hacluster
[root@server1 ~]# ssh server4 "echo westos | passwd --stdin hacluster"

## 将server1 4 设置成管理用户
[root@server1 ~]# pcs cluster auth server1 server4
Username: hacluster
Password: westos
server4: Authorized
server1: Authorized


创建名为mycluster的集群,生成并同步server1 4 两个节点
[root@server1 ~]# pcs cluster setup --name mycluster server1 server4
[root@server1 ~]# pcs cluster enable --all
server1: Cluster Enabled
server4: Cluster Enabled
[root@server1 ~]# pcs cluster start --all
server1: Starting Cluster (corosync)...
server4: Starting Cluster (corosync)...
server4: Starting Cluster (pacemaker)...
server1: Starting Cluster (pacemaker)...
[root@server1 ~]# pcs property set stonith-enabled=false
[root@server1 ~]# crm_verify -L
[root@server1 ~]# pcs status
[root@server1 haproxy]# pcs resource standards  ##查看系统自带标准脚本
[root@server1 haproxy]# pcs status corosync
[root@server1 haproxy]# pcs resource providers ## 查看资源的提供者
[root@server1 haproxy]# pcs resource create vip ocf:heartbeat:IPaddr2 ip=172.25.15.100 op monitor interval=30s ##创建一个名为vip的资源。
[root@server1 haproxy]# ip addr


2.standy节点的使用
[root@server1 ~]# pcs status	#状态查看server1和server4都在集群vip是server1
[root@server1 ~]# pcs node standby 	#挂掉server1
[root@server1 ~]# pcs status	#状态查看server4在集群,vip转换到server4
转换成standy节点 server4状态变成了standy,资源跳转到server1,接管成功。
[root@server1 ~]# pcs node unstandby 	#恢复server1
[root@server1 ~]# pcs status		#状态查看server1和server4都在集群,vip还是server4


3.禁止掉haproxy服务
配置自动自动启动haproxy服务
[root@server4 ~]# yum install -y haproxy
[root@server1 haproxy]# systemctl disable --now haproxy
[root@server1 haproxy]# cd /etc/haproxy/
[root@server1 haproxy]# scp haproxy.cfg server4:/etc/haproxy/

[root@server4 ~]# systemctl start haproxy.service
[root@foundation15 mnt]# curl 172.25.15.4
server3
[root@server4 ~]# systemctl stop haproxy.service
[root@server1 haproxy]# pcs resource standards
[root@server1 haproxy]# systemctl status haproxy.service
dead
[root@server1 haproxy]# pcs resource create haproxy systemd:haproxy op monitor interval=30s
[root@server1 haproxy]# pcs status


4.stonith的设置(fencing设备)
(1)配置fence
真机172.25.254.15,提前安装好了fence
[root@foundation15 ~]# rpm -qa | grep fence
fence-virtd-multicast-0.4.0-4.el8.x86_64
fence-virtd-libvirt-0.4.0-4.el8.x86_64
libxshmfence-1.3-2.el8.x86_64
fence-virtd-0.4.0-4.el8.x86_64
[root@foundation15 ~]# systemctl restart fence_virtd.service
[root@foundation15 ~]# netstat -anulp | grep :1229
udp        0      0 0.0.0.0:1229            0.0.0.0:*                           19438/fence_virtd
[root@foundation15 ~]#

server1和server4相同操作
[root@server1 ~]# yum install  -y fence-virt
[root@server1 ~]# ssh server4 yum install  -y fence-virt
[root@server1 ~]# rpm -qa | grep fence
fence-virt-0.3.2-13.el7.x86_64
[root@server1 ~]# ssh server4 rpm -qa | grep fence
fence-virt-0.3.2-13.el7.x86_64
[root@server1 ~]# mkdir  /etc/cluster

将真机的密钥传给server1和server4
[root@foundation15 ~]# cd /etc/cluster/
[root@foundation15 cluster]# ls
fence_xvm.key
[root@foundation15 cluster]# scp fence_xvm.key root@172.25.15.1:/etc/cluster/
root@172.25.15.1's password:
fence_xvm.key                                    100%  128   141.9KB/s   00:00
[root@foundation15 cluster]# scp fence_xvm.key root@172.25.15.4:/etc/cluster/


查看Server1
[root@server1 ~]# ls /etc/cluster/
fence_xvm.key
[root@server1 ~]# ssh server4 ls /etc/cluster/
fence_xvm.key
[root@server1 ~]# stonith_admin -I
 fence_xvm
 fence_virt
2 devices found

[root@server1 ~]# pcs stonith create vmfence fence_xvm pcmk_host_map="server1:vm1;server4:vm4" op monitor interval=60s
[root@server1 ~]# pcs property set stonith-enabled=true
[root@server1 ~]# crm_verify -LV ##检测没有错误

(2)破环server4内核
- 可以实现摧毁内核,然后自动重启。
- 注意点:如果stonith设备老是自动停止,可能是真机的防火墙和selinux设置问题。
- 可以关闭防火墙,将selinux配置文件改为disabled。
[root@server4 haproxy]# echo c > /proc/sysrq-trigger		#内核破怀,断电重启
[root@server4 ~]# pcs status

(3)server4重启

(4)查看状态server4断电,节点断掉

(5)重启完成,节点恢复


 2475
2475


 被折叠的 条评论
为什么被折叠?
被折叠的 条评论
为什么被折叠?
 到【灌水乐园】发言


