文章目录
Assignment Table
| The Link Your Class | https://bbs.csdn.net/forums/ssynkqtd-04 |
|---|---|
| The Link of Requirement of This Assignment | https://bbs.csdn.net/topics/617378696 |
| The Aim of This Assignment | Added new algorithms and history |
| MU STU ID and FZU STU ID | 21125783_832102229 |
PSP Table
| Personal Software Process Stages | Estimated Time(minutes) | Actual Time(minutes) |
|---|---|---|
| Planning | 20 | 30 |
| • Estimate | 20 | 30 |
| Development | 490 | 725 |
| • Analysis | 120 | 100 |
| • Design Spec | 30 | 20 |
| • Design Review | 20 | 20 |
| • Coding Standard | 15 | 20 |
| • Design | 30 | 35 |
| • Coding | 180 | 260 |
| • Code Review | 20 | 30 |
| • Test | 120 | 240 |
| Reporting | 190 | 230 |
| • Test Repor | 120 | 130 |
| • Size Measurement | 10 | 10 |
| • Postmortem & Process Improvement Plan | 60 | 90 |
| Sum | 700 | 985 |
flow chat

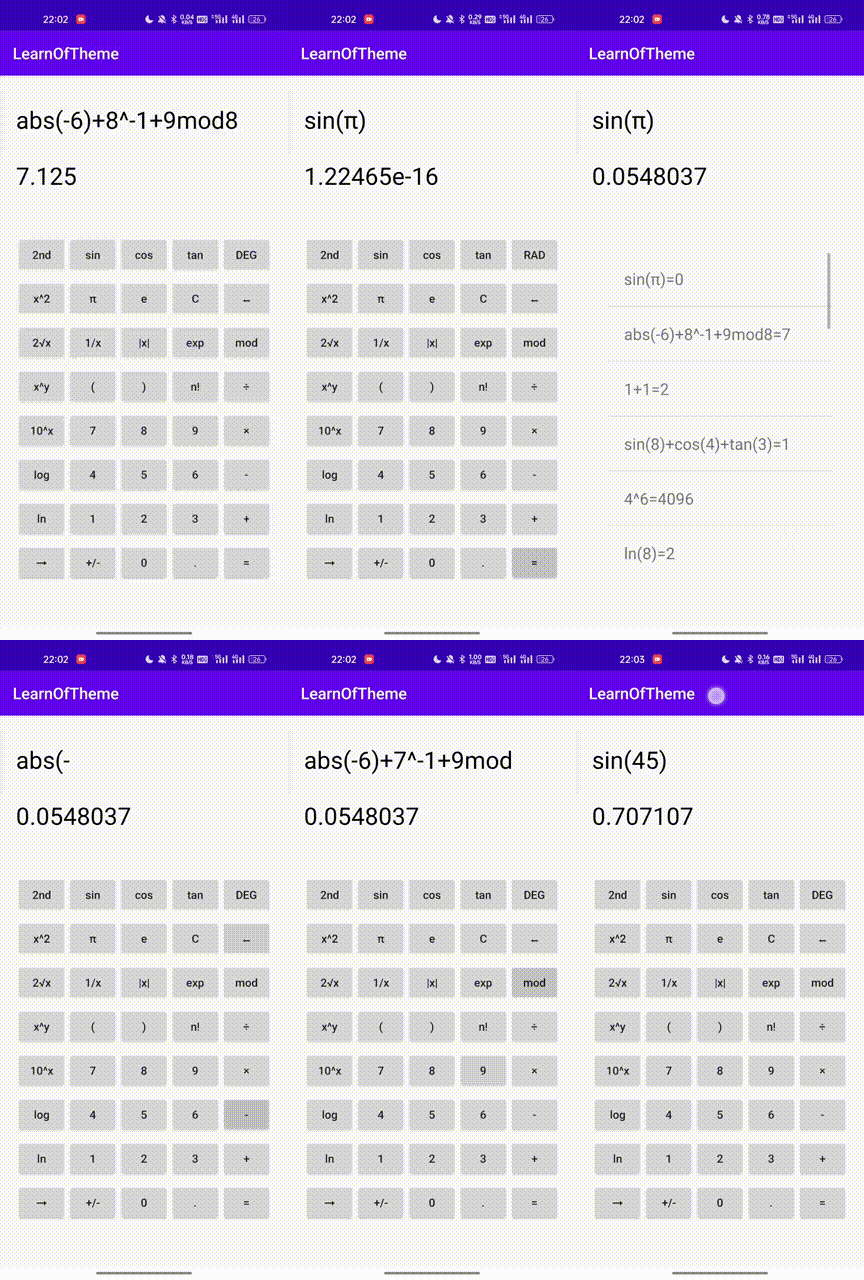
show

Code Description
Front_end
布局介绍
主要activity中
       <LinearLayout
        android:layout_width="match_parent"
        android:layout_height="match_parent"
        android:orientation="vertical"
        android:padding="20dp"
        tools:context=".module.maintwo.MainActivityTwo">

        <TextView
            android:id="@+id/tv_process"
            android:layout_width="match_parent"
            android:layout_height="50dp"
            android:layout_marginTop="10sp"
            android:gravity="center_vertical"
            android:textColor="@color/black"
            android:textSize="30dp" />

        <TextView
            android:id="@+id/tv_result"
            android:layout_width="match_parent"
            android:layout_height="50dp"
            android:layout_marginTop="20dp"
            android:gravity="center_vertical"
            android:textColor="@color/black"
            android:textSize="30dp" />

        <androidx.viewpager2.widget.ViewPager2
            android:id="@+id/vp_main"
            android:layout_width="match_parent"
            android:layout_height="0dp"
            android:layout_marginTop="20dp"
            android:layout_weight="1"
            android:paddingTop="30sp"
            android:paddingBottom="30sp"/>
      </LinearLayout>
Nest our calculator and history in viewpager2 to achieve sliding effects
calculator
    <LinearLayout
        android:layout_width="match_parent"
        android:layout_height="wrap_content"
        android:orientation="vertical"
        tools:context=".module.keyboard.KeyboardFragment">

        <LinearLayout
            android:layout_width="match_parent"
            android:layout_height="0dp"
            android:layout_weight="1"
            android:orientation="horizontal">

            <Button
                android:id="@+id/bt_2nd"
                android:layout_width="0dp"
                android:layout_height="wrap_content"
                android:layout_weight="1"
                android:onClick="@{(view)->kb_click.click(view)}"
                android:text="2nd"
                android:textAllCaps="false" />
            <Button
                android:id="@+id/bt_sin"
                android:layout_width="0dp"
                android:layout_height="wrap_content"
                android:layout_weight="1"
                android:onClick="@{(view)->kb_click.click(view)}"
                android:text="sin"
                android:textAllCaps="false" />
            <Button
                android:id="@+id/bt_cos"
                android:layout_width="0dp"
                android:layout_height="wrap_content"
                android:layout_weight="1"
                android:onClick="@{(view)->kb_click.click(view)}"
                android:text="cos"
                android:textAllCaps="false" />
            <Button
                android:id="@+id/bt_tan"
                android:layout_width="0dp"
                android:layout_height="wrap_content"
                android:layout_weight="1"
                android:onClick="@{(view)->kb_click.click(view)}"
                android:text="tan"
                android:textAllCaps="false" />
            <Button
                android:id="@+id/bt_DEG"
                android:layout_width="0dp"
                android:layout_height="wrap_content"
                android:layout_weight="1"
                android:onClick="@{(view)->kb_click.click(view)}"
                android:text="DEG"
                android:textAllCaps="false" />

        </LinearLayout>
This is the layout of one row, which can be linearly laid out through linear layout
History
<FrameLayout
        android:layout_width="match_parent"
        android:layout_height="match_parent"
        tools:context=".module.history.HistoryFragment">

        <ListView
            android:layout_margin="20sp"
            android:id="@+id/lv_history"
            android:layout_width="match_parent"
            android:layout_height="match_parent" />

    </FrameLayout>
Front and rear docking, we use Gengen Okhttp
    @RequiresApi(Build.VERSION_CODES.P)
    private fun getResult(view: View, deg: String) {

        val okHttpClient = OkHttpClient.Builder()
            .build()

        val body = FormBody.Builder().add("formula", input)
            .add("deg", deg)
            .build()

        val request =
            Request.Builder().url("http://8.130.110.171:80/get_result/").post(body)
                .build()

        val call = okHttpClient?.newCall(request)

        var bean: DataBean = DataBean()
        var thread = Thread {
            val response = call?.execute()
            bean =
                Gson().fromJson<DataBean>(response!!.body()!!.string(), DataBean::class.java)

            activity?.runOnUiThread {
                viewModel.result.value =
                    bean.result
            }
        }.start()
    }
This is a method of asynchronously obtaining calculation results, as well as using Gson to transform JSON data on its own, and sharing the data when entering the main thread
data sharing
Using viewModel to complete data sharing of activity and fragments
class MainSharedViewModel : ViewModel() {

    var input:MutableLiveData<String> = MutableLiveData<String>()

    var history: MutableLiveData<List<String>> = MutableLiveData()

    var result: MutableLiveData<String> = MutableLiveData()
}
Here, simply set variables in the viewModel
Obtain the viewModel in the activity and fragment
By designing an observer for each variable to monitor data changes and complete real-time UI updates
viewModel.input.observe(this
            ) {
                println("input has changed to " +viewModel.input.value )

                binding.tvProcess.text = viewModel.input.value }
            viewModel.result.observe(this) {

                println("result has changed " + viewModel.result.value)
                binding.tvResult.text = viewModel.result.value
                binding.tvResult.text = viewModel.result.value

            }
Back-end
src/main.py
To run the calculator,we just need to run this file to start the back-end server.
from model.model import app,db
from calculate.cal import cal_api
app.register_blueprint(cal_api)
if __name__ == '__main__':
    app.run(host="0.0.0.0", port=80, debug=True)
src/model/configs.py
This file have some information of the Mysql,for example,the password and the username.
HOST = '127.0.0.1'
PORT = '3306'
DATABASE = 'softsecond'
USERNAME = 'root'
PASSWORD = 'csh1q2w3e4r'

DB_URI = "mysql+pymysql://{username}:{password}@{host}:{port}/{db}?charset=utf8".format(username=USERNAME,password=PASSWORD, host=HOST,port=PORT, db=DATABASE)

SQLALCHEMY_DATABASE_URI = DB_URI
SQLALCHEMY_TRACK_MODIFICATIONS = False
SQLALCHEMY_ECHO = True
src/model/model.py
This file create the table for the database in Mysql and define the releation between the datas.
from flask import Flask,request,jsonify
from sqlalchemy import create_engine, Column, Integer, String, DateTime, Date
from flask_cors import CORS, cross_origin
from flask_sqlalchemy import SQLAlchemy
import sys
from model import configs
app = Flask(__name__)


cors = CORS(app)
# 加载配置文件
app.config.from_object(configs)
# db绑定app
db = SQLAlchemy(app)

class History(db.Model):
    __tablename__ = 'History'
    id = db.Column(db.Integer, primary_key=True)  # 设置主键, 默认自增
    number=db.Column(db.Integer)
    formula=db.Column(db.String(100))
src/calculate/cal.py
This file create the calculate function inorder to help the front-end to calculate the number fo the formular.
In addition, it can add the result to Mysql automatically.
from flask import Flask,request,jsonify
import re
import numpy as np
import math
from flask_sqlalchemy import SQLAlchemy
from model.model import app,db,History
from flask import Blueprint
cal_api = Blueprint('user_app', __name__)

@app.route('/get_result/',methods=['POST'])
def get_result():
    data = request.form.get("formula")
    dx = request.form.get("deg")
    fx=data
    data=data.replace("^","**")
    if dx=='yes':
        data=data.replace("atan(", "np.atan(np.pi/180*")
    else:
        data=data.replace("atan(", "np.atan(")
    if dx=='yes':
        data=data.replace("asin(", "np.asin(np.pi/180*")
    else:
        data=data.replace("asin(", "np.asin(")
    if dx=='yes':
        data=data.replace("acos(", "np.acos(np.pi/180*")
    else:
        data=data.replace("acos(", "np.acos(")
    if dx=='yes':
        data=data.replace("tan(", "np.tan(np.pi/180*")
    else:
        data=data.replace("tan(", "np.tan(")
    if dx=='yes':
        data=data.replace("sin(", "np.sin(np.pi/180*")
    else:
        data=data.replace("sin(", "np.sin(")
    if dx=='yes':
        data=data.replace("cos(", "np.cos(np.pi/180*")
    else:
        data=data.replace("cos(", "np.cos(")
    data=data.replace("π", "np.pi")
    data=data.replace("e", "np.exp(1)")
    data=re.sub("\|(\d+)\|",lambda x: "np.abs("+str(x.group(1))+")",data)
    data=data.replace("mod", "%")
    data=data.replace("log(", "np.log10(")
    data=data.replace("ln(", "np.log(")
    data=re.sub("(\d+)!",lambda x: "math.factorial("+str(x.group(1))+")",data)
    data=re.sub("√(\d+)",lambda x: "math.sqrt("+str(x.group(1))+")",data)
    data=re.sub("log(\d+)\((\d+)\)",lambda x: "np.log("+str(x.group(2))+")/np.log("+str(x.group(1))+")",data)
    f=0
    try:
        data=eval(data)
    except (ZeroDivisionError):
        data=str('Error: 除零错误')
        f=1
    except NameError:
        data=str('Error: 请加上括号')
        f=1
    except SyntaxError:
        data=str('Error: 语法错误,请正确输入')
        f=1
    if f==0:
        if len(data>10):
            data=str('{:g}'.format(float(data)))
        new_history=History(number=data,formula=fx)
        db.session.add(new_history)
        db.session.commit()
    return jsonify({'result': data, 'message': 'success'})

@app.route('/read_history/',methods=['POST'])
def read_history():
    idd=request.form.get('id')
    h=History.query.get(idd)
    data={
        "number":h.number,
        "formula":h.formula
    }
    return jsonify({'result': data, 'message': 'success'})

@app.route('/read_all_history/',methods=['POST'])
def read_all_history():
    h=History.query.order_by(History.id)
    data=""
    for hh in h:
        data=data+str(hh.formula)+"="+str(hh.number)+","
    return jsonify({'result': data, 'message': 'success'})

@app.route('/delete_history/',methods=['POST'])
def delete_history():
    idd=request.form.get('id')
    h=History.query.get(idd)
    db.session.delete(h)
    db.session.commit()
    return jsonify({'result': 'success'})

@app.route('/delete_all_history/',methods=['POST'])
def delete_all_history():
    db.session.query(History).delete()
    db.session.commit()
Summary and possible future improvements
Through this assignment, I successfully achieved the separation of the front and back ends and completed a scientific calculator based on it. In the method of separating the front and back ends, I can focus on page design in the front end and data computing and storage in the back end. I can therefore choose a language that is more suitable for the corresponding task to write in. In this task, I learned a lot, which made me more proficient in the following projects.
github link
https://github.com/wearecomming/calcutator_for_software/


 45
45


 被折叠的 条评论
为什么被折叠?


