


进入Face++官网:Face⁺⁺
注冊自己的账号,然后创建一个免费的应用,得到自己的API Key:

然后去封装请求Face++接口进行人脸检测的工具类:
我们主要用到这三个接口:
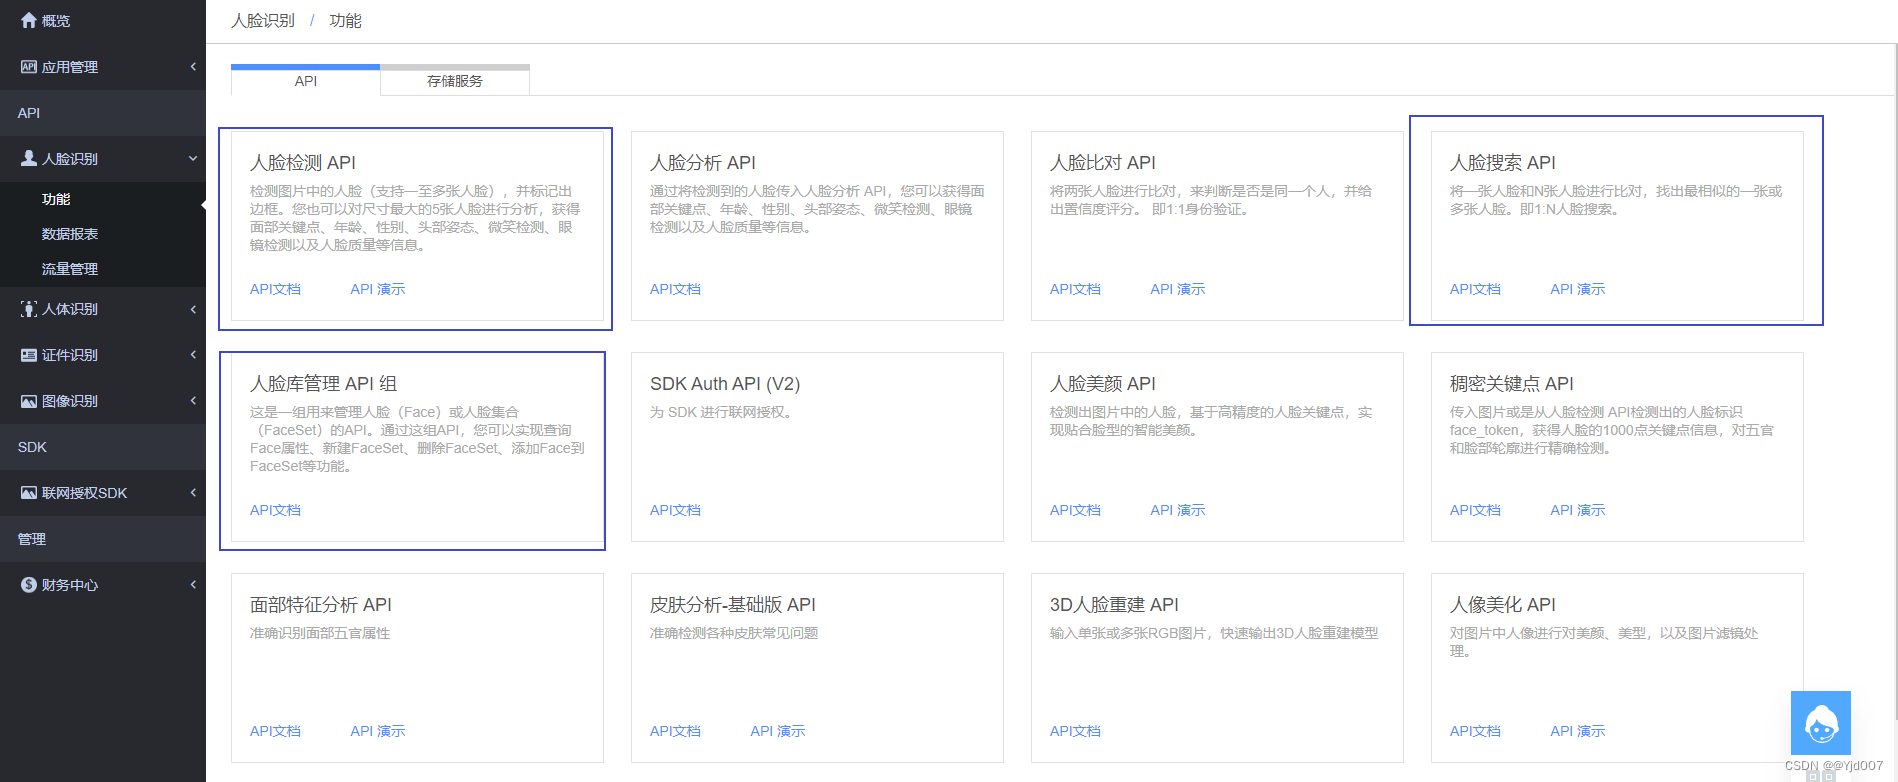
点开相应的接口可以看到详细的介绍,已经使用方式。
首先是人脸检测API,它可以识别一张图片中的人脸,并且得到这个人脸数据,返回一个face_token,这个face_token就代表了我们这个图片的关键信息。
然后点开人脸检测的API文档可以看到详细的信息,比如请求的接口地址,携带的参数等等。
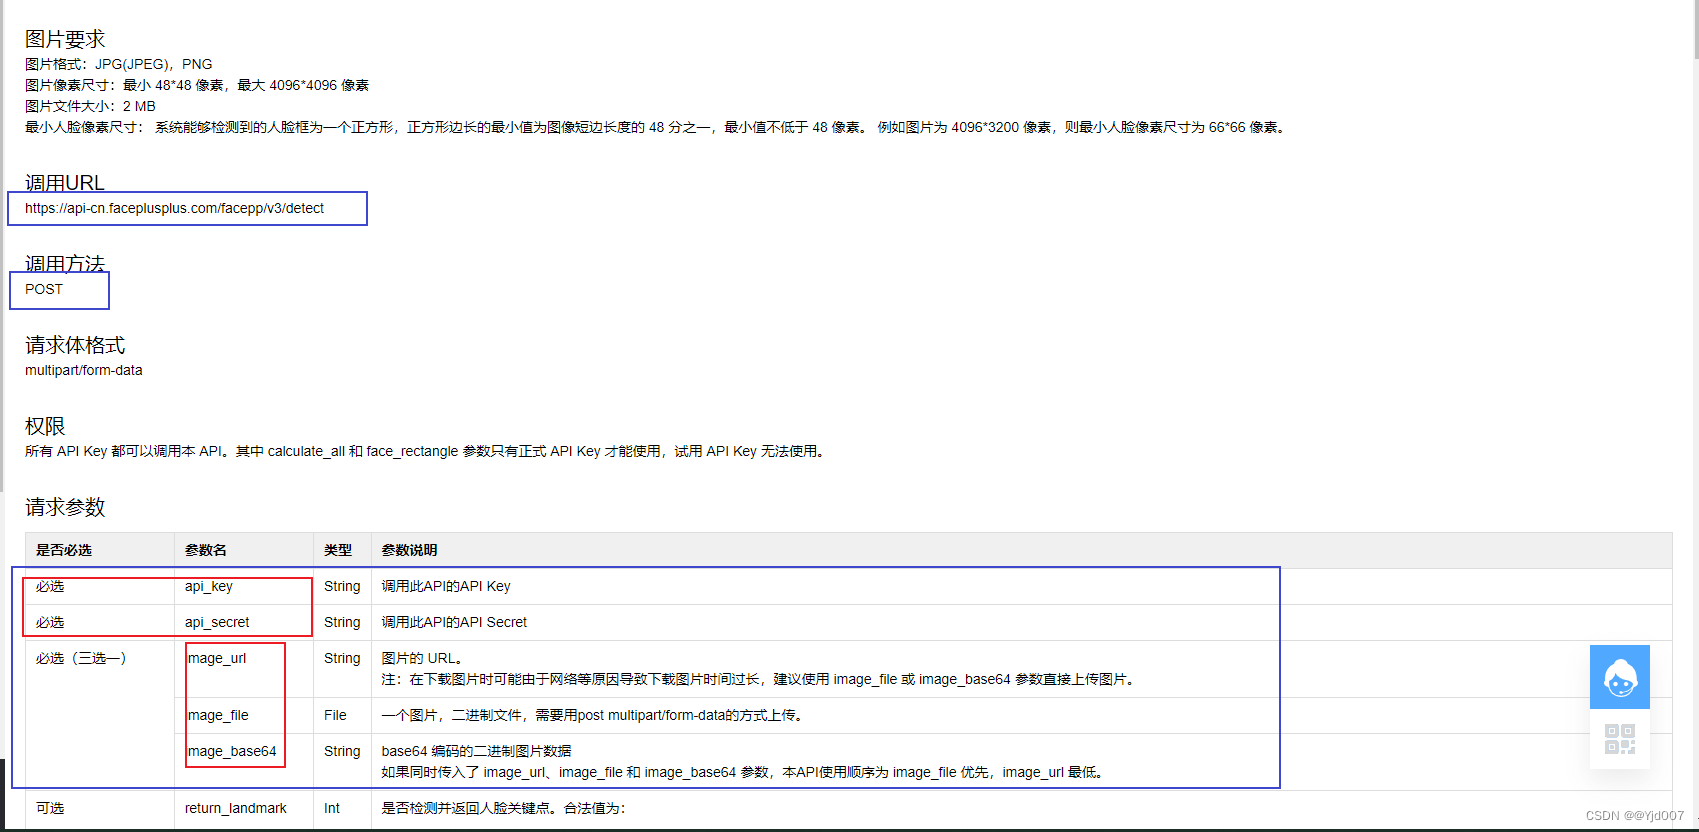
我们可以看到它的接口地址,请求方式,还有参数,其中的API_key和api_secret是任何接口都必须需要的携带的参数,也就是我们创建应用的API Key。
接下来开始封装工具类:
1.请求工具类,这是直接从官网扒拉下来的,直接用就行。
package com.dong.server.utils.FactUtil;

import javax.net.ssl.SSLException;
import java.io.*;
import java.net.HttpURLConnection;
import java.net.URL;
import java.net.URLEncoder;
import java.util.HashMap;
import java.util.Iterator;
import java.util.Map;
import java.util.Random;

/**
 * Http的请求工具類
 */
public class HttpUtils {
    private final static int CONNECT_TIME_OUT = 30000;
    private final static int READ_OUT_TIME = 50000;
    private static String boundaryString = getBoundary();
    protected static byte[] post(String url, HashMap<String, String> map, HashMap<String, byte[]> fileMap) throws Exception {
        HttpURLConnection conne;
        URL url1 = new URL(url);
        conne = (HttpURLConnection) url1.openConnection();
        conne.setDoOutput(true);
        conne.setUseCaches(false);
        conne.setRequestMethod("POST");
        conne.setConnectTimeout(CONNECT_TIME_OUT);
        conne.setReadTimeout(READ_OUT_TIME);
        conne.setRequestProperty("accept", "*/*");
        conne.setRequestProperty("Content-Type", "multipart/form-data; boundary=" + boundaryString);
        conne.setRequestProperty("connection", "Keep-Alive");
        conne.setRequestProperty("user-agent", "Mozilla/4.0 (compatible;MSIE 6.0;Windows NT 5.1;SV1)");
        DataOutputStream obos = new DataOutputStream(conne.getOutputStream());
        Iterator iter = map.entrySet().iterator();
        while(iter.hasNext()){
            Map.Entry<String, String> entry = (Map.Entry) iter.next();
            String key = entry.getKey();
            String value = entry.getValue();
            obos.writeBytes("--" + boundaryString + "\r\n");
            obos.writeBytes("Content-Disposition: form-data; name=\"" + key
                    + "\"\r\n");
            obos.writeBytes("\r\n");
            obos.writeBytes(value + "\r\n");
        }
        if(fileMap != null && fileMap.size() > 0){
            Iterator fileIter = fileMap.entrySet().iterator();
            while(fileIter.hasNext()){
                Map.Entry<String, byte[]> fileEntry = (Map.Entry<String, byte[]>) fileIter.next();
                obos.writeBytes("--" + boundaryString + "\r\n");
                obos.writeBytes("Content-Disposition: form-data; name=\"" + fileEntry.getKey()
                        + "\"; filename=\"" + encode(" ") + "\"\r\n");
                obos.writeBytes("\r\n");
                obos.write(fileEntry.getValue());
                obos.writeBytes("\r\n");
            }
        }
        obos.writeBytes("--" + boundaryString + "--" + "\r\n");
        obos.writeBytes("\r\n");
        obos.flush();
        obos.close();
        InputStream ins = null;
        int code = conne.getResponseCode();
        try{
            if(code == 200){
                ins = conne.getInputStream();
            }else{
                ins = conne.getErrorStream();
            }
        }catch (SSLException e){
            e.printStackTrace();
            return new byte[0];
        }
        ByteArrayOutputStream baos = new ByteArrayOutputStream();
        byte[] buff = new byte[4096];
        int len;
        while((len = ins.read(buff)) != -1){
            baos.write(buff, 0, len);
        }
        byte[] bytes = baos.toByteArray();
        ins.close();
        return bytes;
    }
    private static String getBoundary() {
        StringBuilder sb = new StringBuilder();
        Random random = new Random();
        for(int i = 0; i < 32; ++i) {
            sb.append("ABCDEFGHIJKLMNOPQRSTUVWXYZabcdefghijklmnopqrstuvwxyz0123456789_-".charAt(random.nextInt("ABCDEFGHIJKLMNOPQRSTUVWXYZabcdefghijklmnopqrstuvwxyz0123456789_".length())));
        }
        return sb.toString();
    }
    private static String encode(String value) throws Exception{
        return URLEncoder.encode(value, "UTF-8");
    }
    public static byte[] getBytesFromFile(File f) {
        if (f == null) {
            return null;
        }
        try {
            FileInputStream stream = new FileInputStream(f);
            ByteArrayOutputStream out = new ByteArrayOutputStream(1000);
            byte[] b = new byte[1000];
            int n;
            while ((n = stream.read(b)) != -1)
                out.write(b, 0, n);
            stream.close();
            out.close();
            return out.toByteArray();
        } catch (IOException e) {
        }
        return null;
    }
}
2.接下是具体的工具类,里面包含了人脸检测,人脸搜索,创建人脸库,添加图片到人脸库中。
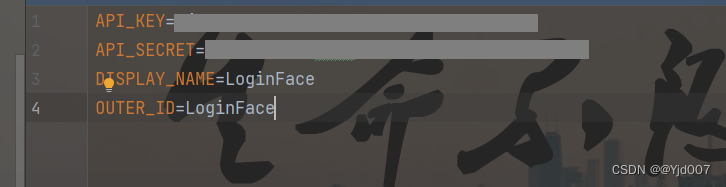
注意一点,由于我的API Key是通过配置文件读取的,所以得创建一个配置文件,在里面填入自己API Key的相关信息。
封装的代码如下:
package com.dong.server.utils.FactUtil;

import com.alibaba.fastjson.JSON;
import com.alibaba.fastjson.JSONArray;
import com.alibaba.fastjson.JSONObject;
import springfox.documentation.spring.web.plugins.Docket;

import java.io.File;
import java.io.IOException;
import java.io.InputStream;
import java.util.HashMap;
import java.util.Properties;

import static com.dong.server.utils.FactUtil.HttpUtils.getBytesFromFile;

/**
 *人脸识别工具类
 */
public class FaceUtils {
    //这个Map用于保存我们请求接口的参数。
     private static HashMap<String, String> map = new HashMap<>();
//     通过静态代码块,读取配置文件的信息,设置api_key和api_secret,
    //并保存在Map中,作为参数使用
    static {
        //读取配置文件的内容
        Properties properties = new Properties();
        //注意读取的配置文件的地址,一定要正确。
        InputStream inputStream = FaceUtils.class.getResourceAsStream("/config/api.properties");
        try {
            properties.load(inputStream);
            //这两个参数是Face++任何一个接口都需要的参数,所以我们直接在静态代码块张赋值
            //让后面的每一个请求都携带者两个参数
            map.put("api_key",properties.getProperty("API_KEY") );
            map.put("api_secret",properties.getProperty("API_SECRET") );
            //这里是你创建人脸库的的名字,只有请求创建人脸库的接口时才会用到,
            //总之就是你后面用于保存人脸的库的名字
            map.put("displaly_name",properties.getProperty("DISPLAY_NAME") );
            map.put("outer_id",properties.getProperty("OUTER_ID") );
        } catch (IOException e) {
            e.printStackTrace();
            System.out.println("配置文件读取错误");
        }
    }
    /**
     * 人脸检测,根据我们传入的图片
     * 传入一张图片,通过face++的接口获取人脸的face_token
     * @param file 传入的图片
     * @return 返回人脸的face_token
     * @throws Exception
     */
    public static String getFaceToken(File file) throws Exception {
        //拿到图片,通过封装的Http请求的工具类,拿到这个图片的字节数据
        byte[] buff = getBytesFromFile(file);
        //定义要请求接口的地址
        String url = "https://api-cn.faceplusplus.com/facepp/v3/detect";
        HashMap<String, byte[]> byteMap = new HashMap<>();
        byteMap.put("image_file", buff);
        //请求Face++人脸检测的图片,拿到Face++接口返回的数据
        byte[] bacd = HttpUtils.post(url, map, byteMap);
        //拿到接口返回的Json数据,提取出Face_Token
        String str = new String(bacd);
        System.out.println(str);
        //判断接口返回的数据是否出错
        if(str.indexOf("error_message")!=-1){
            System.out.println("请求发送错误!");
            return null;
        }
        //转换为Json对象
        JSONObject jsonObject = JSONObject.parseObject(str);
        Integer face_num = jsonObject.getInteger("face_num");
        if(face_num==1){
            //存在人脸,取出face_token
            JSONArray facesArray = (JSONArray)jsonObject.get("faces");
            JSONObject faceJson=(JSONObject)facesArray.get(0);
            String face_token = faceJson.getString("face_token");
            return face_token;
        }
        return  null;
    }

    /**
     * 查询人脸
     * @param face_token
     * @return
     * @throws Exception
     */
    public static boolean searchFace(String face_token) throws Exception {
        String url = "https://api-cn.faceplusplus.com/facepp/v3/search";
        HashMap<String, byte[]> byteMap = new HashMap<>();
        map.put("face_token",face_token);
        byte[] bacd = HttpUtils.post(url, map, null);
        String str = new String(bacd);
        System.out.println("str = " + str);
        //转为为对象,获取检索的置信度
        if(str.indexOf("error_message")!=-1){
            return false;
        }
        JSONObject jsonObject = JSONObject.parseObject(str);
        JSONObject thresholds = (JSONObject)jsonObject.get("thresholds");
        //获取到十万份之一的阈值
         Double le5= thresholds.getDoubleValue("le-5");
         //获取置信率
        JSONArray resultsArray = (JSONArray)jsonObject.get("results");
        if (resultsArray!=null && resultsArray.size()>=1) {
            JSONObject result=(JSONObject)resultsArray.get(0);
            double confidence=result.getDoubleValue("confidence");
            //获取到图片的置信率,将它和le5进行比对,得到是否是同一个脸的依据
            if(confidence>le5){
                //说明存在这个人脸,比对成功
                return true;
            }
        }
        return false;
    }

    /**
     * 创建人脸识别库,在本系统中,用于存放要识别的人脸,只有存在改集合中的人脸
     * 才能通过人脸验证
     * @return
     * @throws Exception
     */
    public static boolean createFaceSet() throws Exception {
        //只有该人脸集合不存在时才回去创建新的人脸集合
        if( isFaceSet()==false) {
            String url = "https://api-cn.faceplusplus.com/facepp/v3/faceset/create";
            HashMap<String, byte[]> byteMap = new HashMap<>();
            byte[] bacd = HttpUtils.post(url, map, null);
            String str = new String(bacd);
            System.out.println("str = " + str);
            //转为为对象,获取检索的置信度
            if (str.indexOf("error_message") != -1) {
                return false;
            }
            return true;
        }
        return true;
    }

    /**
     * 根据outer_id去查看是否存在该人脸集合
     * @return
     * @throws Exception
     */
    public static boolean isFaceSet() throws Exception {
        String url = "https://api-cn.faceplusplus.com/facepp/v3/faceset/getdetail";
        HashMap<String, byte[]> byteMap = new HashMap<>();
        byte[] bacd = HttpUtils.post(url, map, null);
        String str = new String(bacd);
        System.out.println("str = " + str);
        if(str.indexOf("error_message")!=-1){
            return false;
        }
        return true;
    }

    /**
     * 添加人脸到检测集中
     * @return
     * @throws Exception
     */
    public static boolean addFaceWithSet(String face_token) throws Exception {
        //在添加之前先创建人脸集合
        boolean faceSet = createFaceSet();
        if (faceSet==false){
            return false;
        }
        String url = " https://api-cn.faceplusplus.com/facepp/v3/faceset/addface";
        HashMap<String, byte[]> byteMap = new HashMap<>();
        map.put("face_tokens",face_token);
        byte[] bacd = HttpUtils.post(url, map, null);
        String str = new String(bacd);
        System.out.println("str = " + str);
        if(str.indexOf("error_message")!=-1){
            return false;
        }
        return true;
    }
}
工具类封装好了,有兴趣的小伙伴可以结合官网和这个代码研究一下,稍加研究其实很简单。
注意:该工具类只是实现人脸识别,并没有将人脸和登录账户绑定,要实现具体的人脸识别登录功能,请继续关注我的下一篇文章。


 930
930


 被折叠的 条评论
为什么被折叠?
被折叠的 条评论
为什么被折叠?
 到【灌水乐园】发言


