


文章目录
1.TensorRT的安装
1.1 cuda/cudnn以及虚拟环境的创建
https://blog.csdn.net/qq_44747572/article/details/122453926?spm=1001.2014.3001.5502
1.2 根据cuda版本安装相对应版本的tensorRT
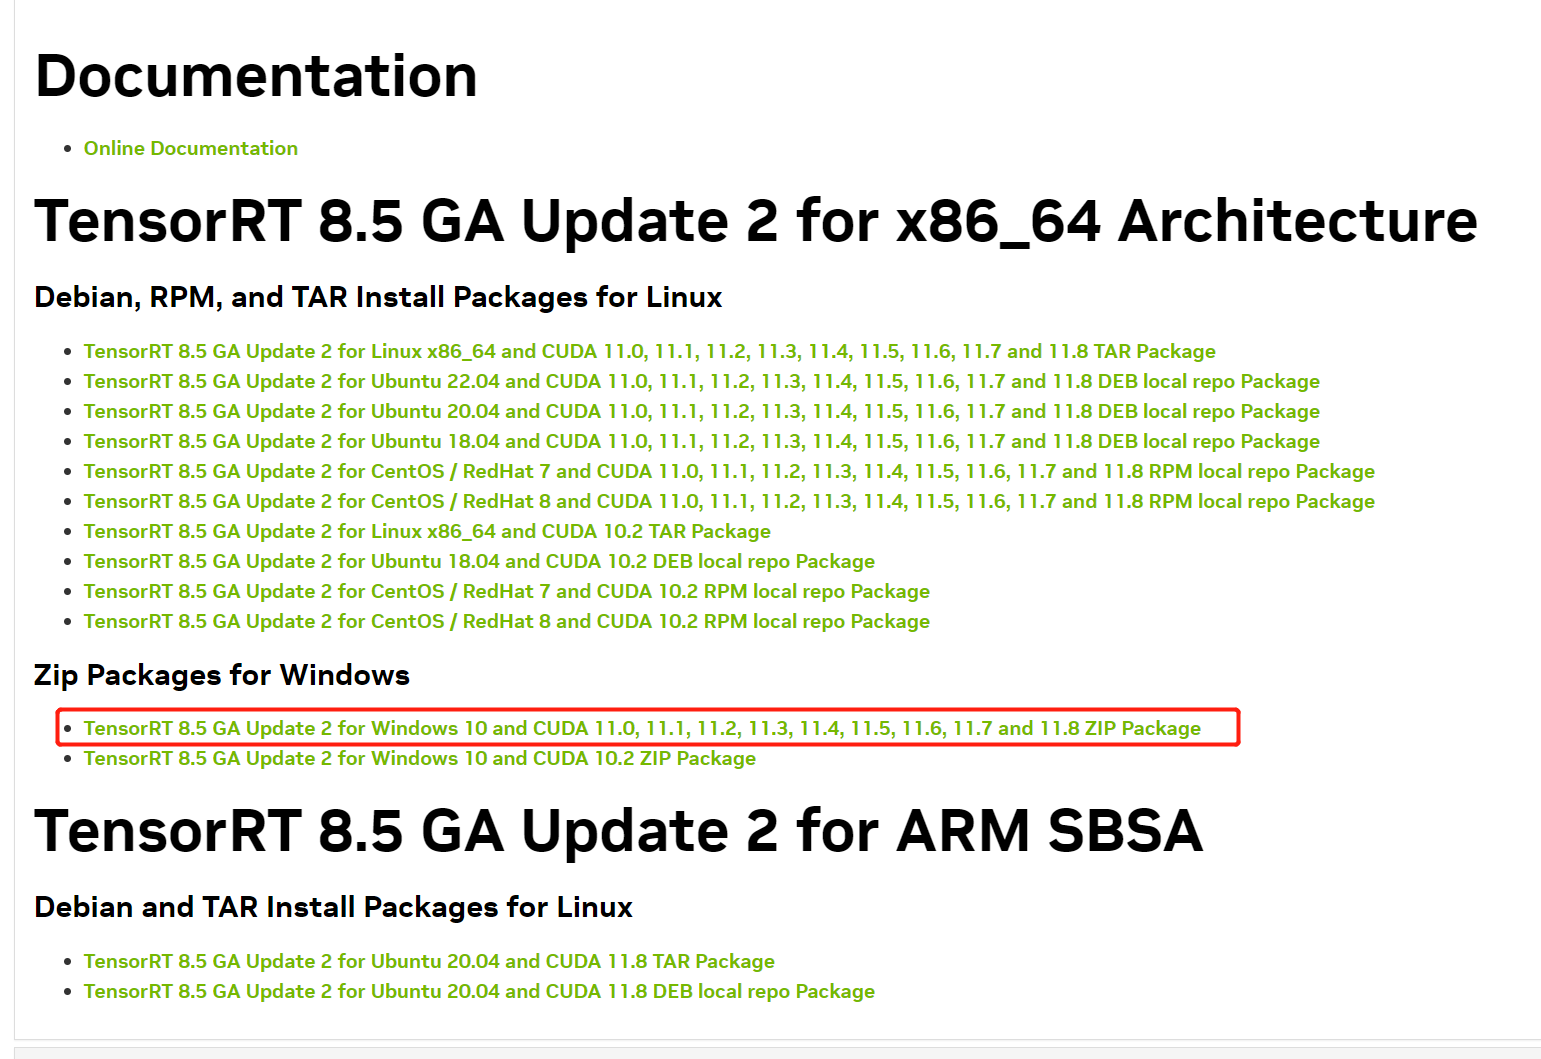
下载链接:https://developer.nvidia.com/nvidia-tensorrt-8x-download
我的cuda版本是11.0,因此下面以此做演示:
下载tensorRT的zip文件

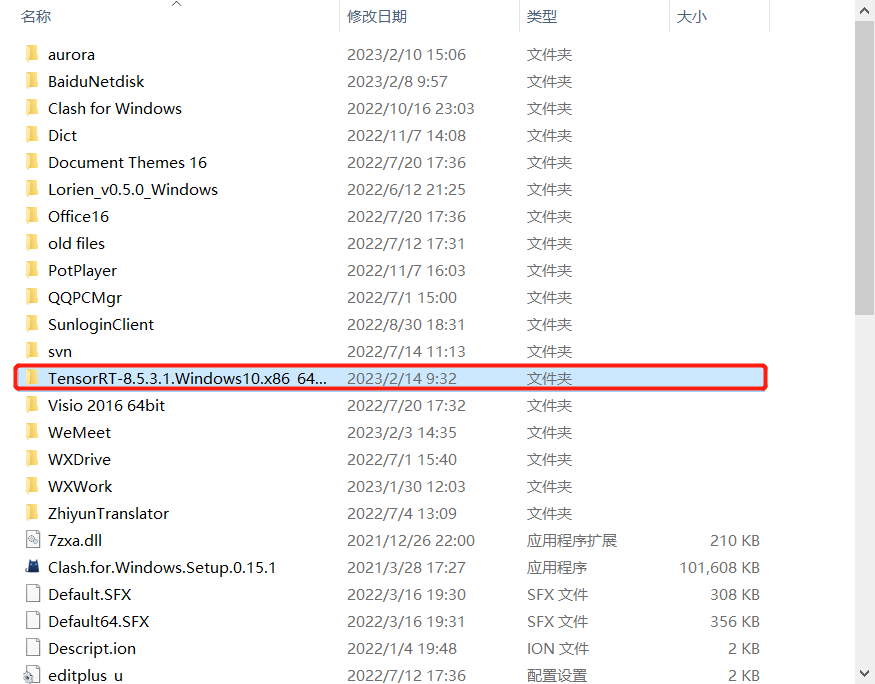
将下载好的文件夹进行解压:
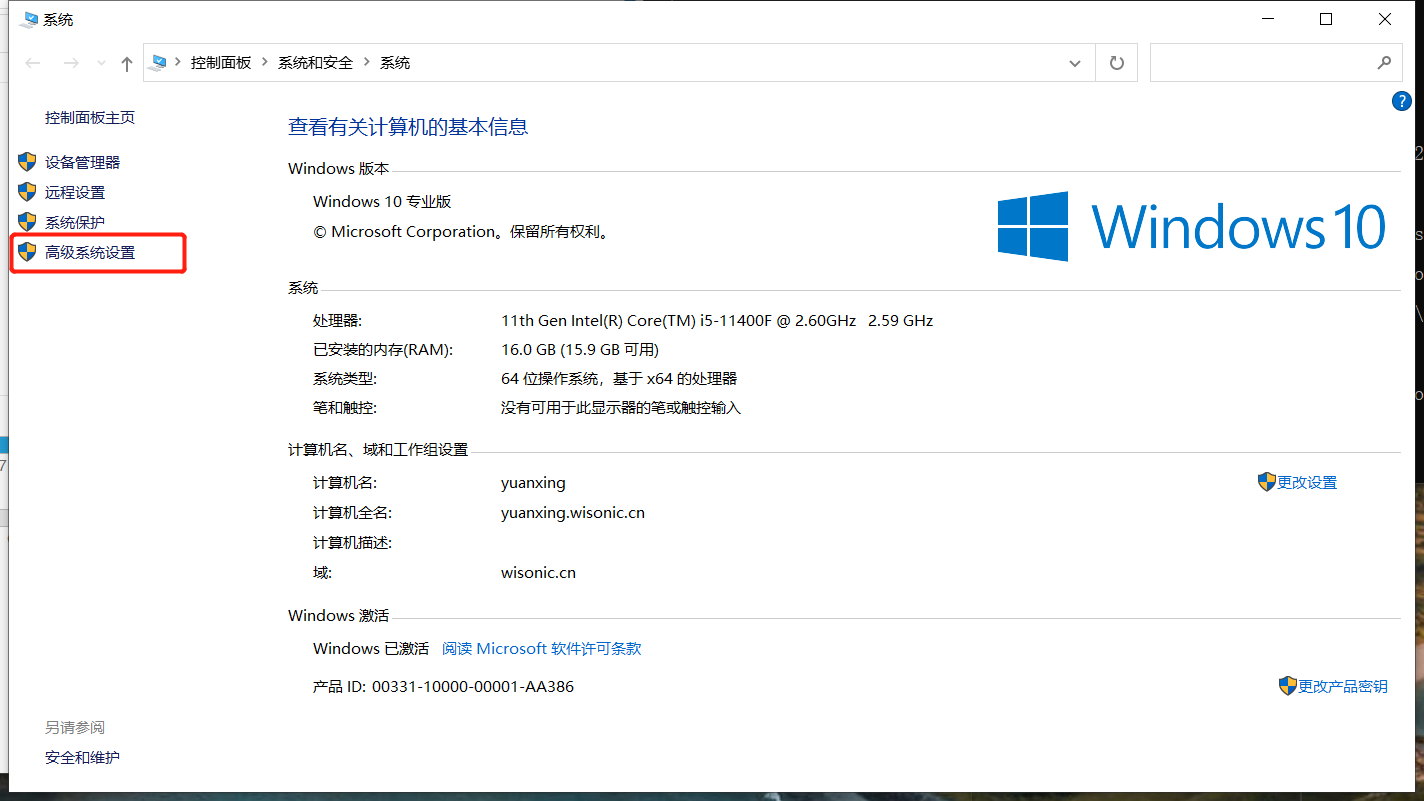
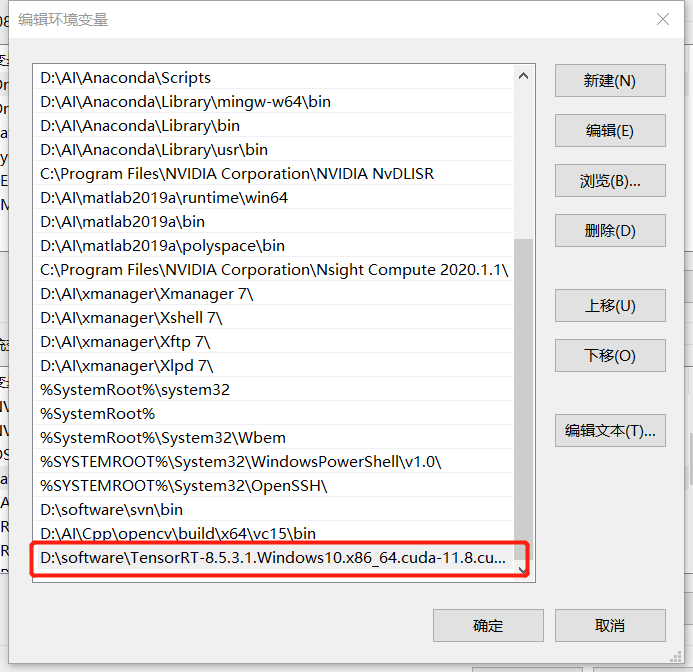
系统环境配置:
高级系统环境–>环境变量–>系统变量–>Path(添加tensorRT的lib路径)
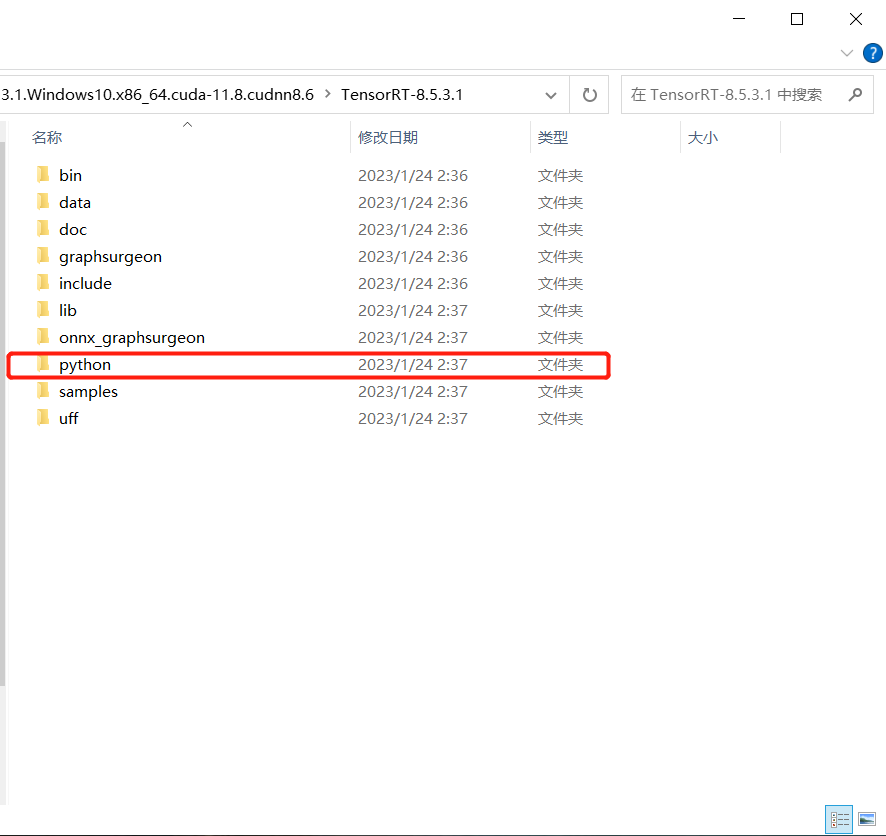
安装 TensorRT Python wheel 文件
(注:uff、graphsurgeon和onnx_graphsurgeon也进行类似安装)
激活虚拟环境,并切换路径(trnsorRT下的python文件)

再根据python版本,使用pip进行下载,我的是python3.7

验证是否成功
python -c "import tensorrt;print(tensorrt.__version__)"

2. TensorRT的使用
2.1 直接构建
利用 TensorRT 的 API 逐层搭建网络,这一过程类似使用一般的训练框架,如使用 Pytorch 或者TensorFlow 搭建网络。需要注意的是对于权重部分,如卷积或者归一化层,需要将权重内容赋值到 TensorRT 的网络中。
2.2 使用 Python API 构建
首先是使用 Python API 直接搭建 TensorRT 网络,这种方法主要是利用 tensorrt.Builder 的 create_builder_config 和 create_network 功能,分别构建 config 和 network,前者用于设置网络的最大工作空间等参数,后者就是网络主体,需要对其逐层添加内容。此外,需要定义好输入和输出名称,将构建好的网络序列化,保存成本地文件。值得注意的是:如果想要网络接受不同分辨率的输入输出,需要使用 tensorrt.Builder 的 create_optimization_profile 函数,并设置最小、最大的尺寸。
代码如下:
import tensorrt as trt

verbose = True
IN_NAME = 'input'
OUT_NAME = 'output'
IN_H = 224
IN_W = 224
BATCH_SIZE = 1

EXPLICIT_BATCH = 1 << (int)(
    trt.NetworkDefinitionCreationFlag.EXPLICIT_BATCH)

TRT_LOGGER = trt.Logger(trt.Logger.VERBOSE) if verbose else trt.Logger()
with trt.Builder(TRT_LOGGER) as builder, builder.create_builder_config(
) as config, builder.create_network(EXPLICIT_BATCH) as network:
    # define network
    input_tensor = network.add_input(
        name=IN_NAME, dtype=trt.float32, shape=(BATCH_SIZE, 3, IN_H, IN_W))
    pool = network.add_pooling(
        input=input_tensor, type=trt.PoolingType.MAX, window_size=(2, 2))
    pool.stride = (2, 2)
    pool.get_output(0).name = OUT_NAME
    network.mark_output(pool.get_output(0))

    # serialize the model to engine file
    profile = builder.create_optimization_profile()
    profile.set_shape_input('input', *[[BATCH_SIZE, 3, IN_H, IN_W]]*3)
    builder.max_batch_size = 1
    config.max_workspace_size = 1 << 30
    engine = builder.build_engine(network, config)
    with open('model_python_trt.engine', mode='wb') as f:
        f.write(bytearray(engine.serialize()))
        print("generating file done!")
2.3 使用 C++ API 构建
2.3.1 属性配置
-
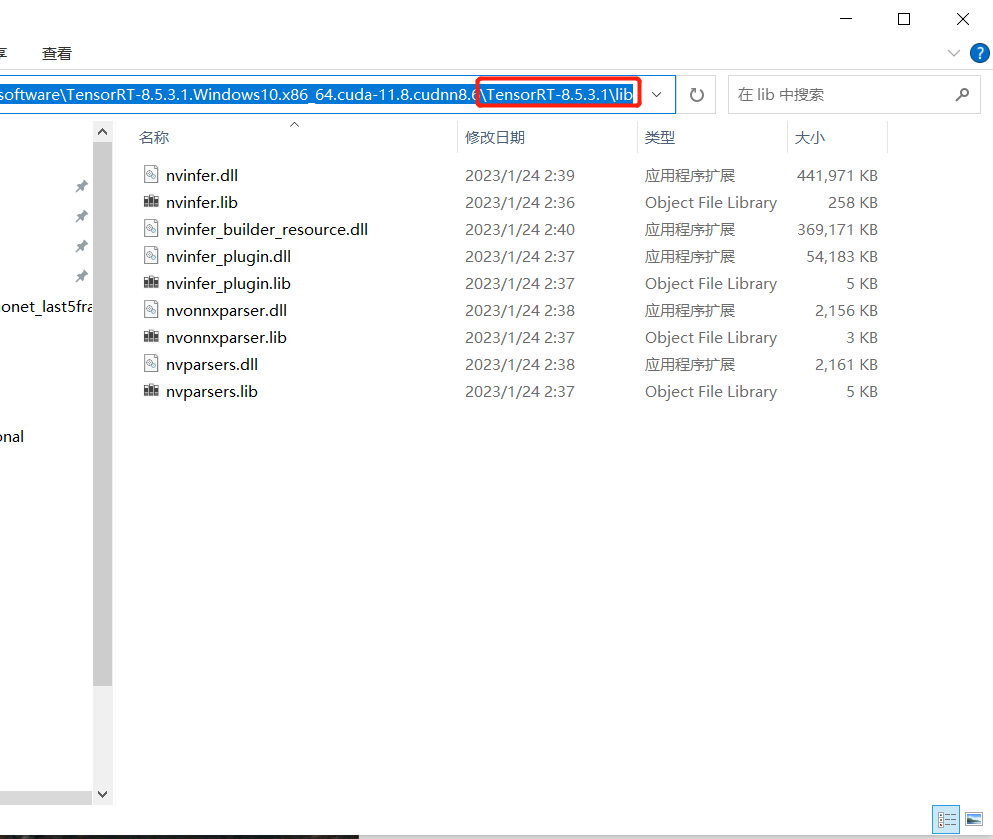
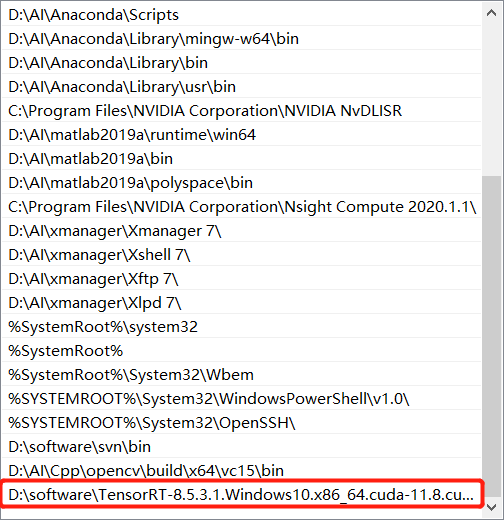
这里下载的是 TensorRT-8.5.3.1.Windows10.x86_64.cuda-11.8.cudnn8.6.zip,解压后,将文件夹中的 lib 目录加入到系统环境变量 PATH 中
-
同时将 lib 下的文件拷贝到 cuda 安装目录下的 bin 文件夹下,比如我这里的 C:\Program Files\NVIDIA GPU Computing Toolkit\CUDA\v11.0\bin
-
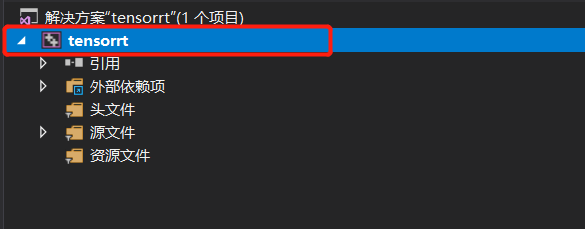
创建一个工程项目,并进行属性配置
-
在 可执行文件目录 中添加 tensorrt中的 lib 目录
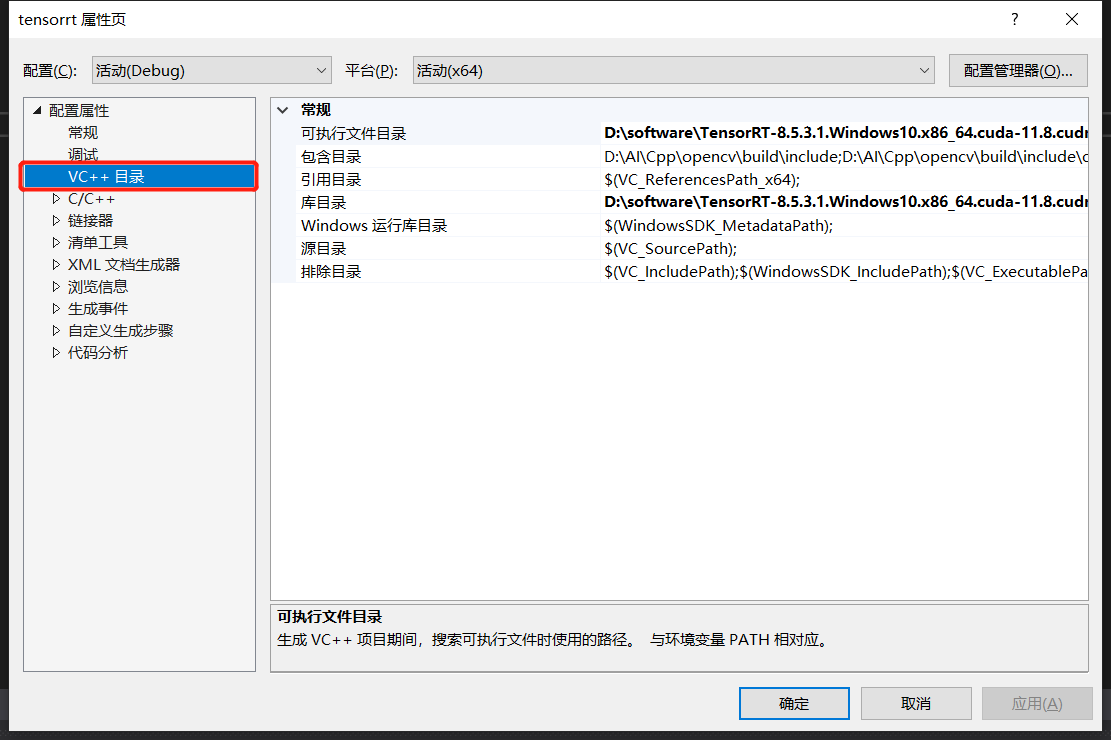
注意:如果出现无法打开文件“nvinfer.lib”的错误,在上面截图所示的库目录中添加 tensorrt中的 lib 目录。(或者添加C:\Program Files\NVIDIA GPU Computing Toolkit\CUDA\v11.0\lib\x64) -
然后在 C/C++ --> 常规 --> 附加包含目录 (添加 tensorrt 中的 include 目录)
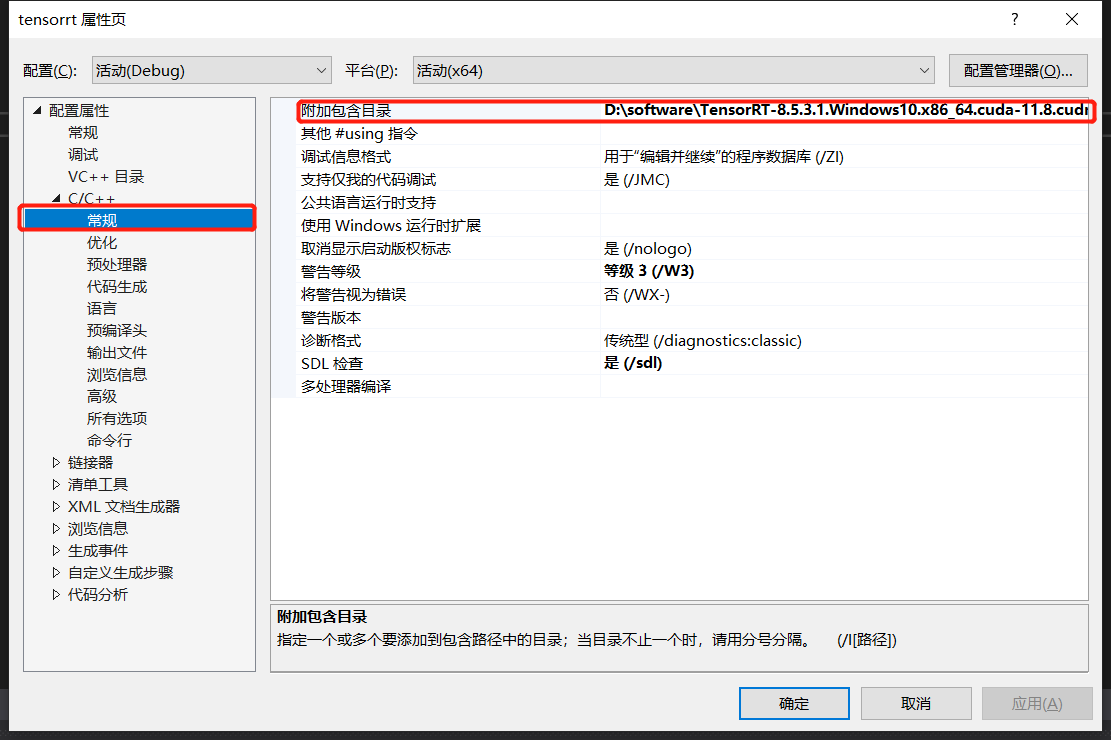
注意:如果在运行中出现头文件cuda_runtime_api.h找不到的情况,就在上面的 附加包含目录 中添加 cuda 中的 inlcude 目录
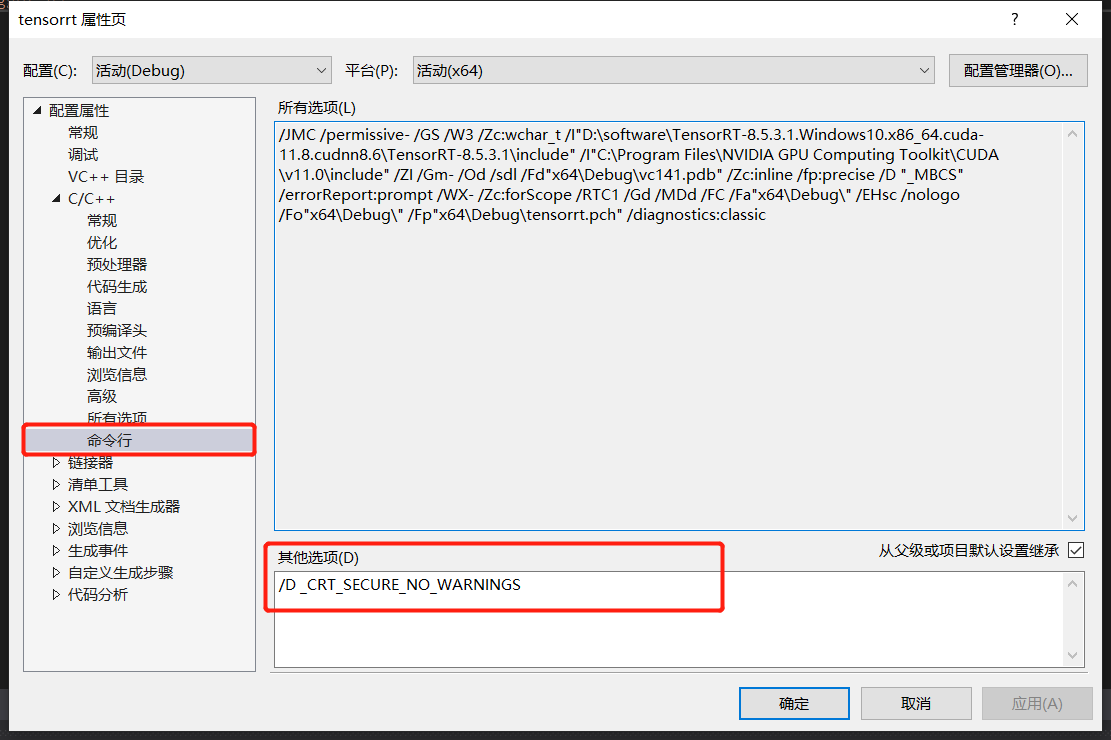
报错:错误 C4996 ‘localtime‘:This function or variable may be unsafe.
解决:项目——属性——C/C++——命令行——其它选项 输入 /D _CRT_SECURE_NO_WARNINGS
 https://blog.csdn.net/yaodaoji/article/details/124839241
2.3.2 验证
整个流程和上述 Python 的执行过程非常类似,需要注意的点主要有:
- nvinfer1:: createInferBuilder 对应 Python 中的 tensorrt.Builder,需要传入 ILogger 类的实例,但是 ILogger 是一个抽象类,需要用户继承该类并实现内部的虚函数。不过此处我们直接使用了 TensorRT 包解压后的 samples 文件夹 …/samples/common/logger.h 文件里的实现 Logger 子类。
- 设置 TensorRT 模型的输入尺寸,需要多次调用 IOptimizationProfile 的 setDimensions 方法,比 Python 略繁琐一些。IOptimizationProfile 需要用 createOptimizationProfile 函数,对应 Python 的 create_builder_config 函数。
代码如下:
#include <fstream>
#include <iostream>

#include <NvInfer.h>
#include <../samples/common/logger.h>

using namespace nvinfer1;
using namespace sample;

const char* IN_NAME = "input";
const char* OUT_NAME = "output";
static const int IN_H = 224;
static const int IN_W = 224;
static const int BATCH_SIZE = 1;
static const int EXPLICIT_BATCH = 1 << (int)(NetworkDefinitionCreationFlag::kEXPLICIT_BATCH);

int main(int argc, char** argv)
{
        // Create builder
        Logger m_logger;
        IBuilder* builder = createInferBuilder(m_logger);
        IBuilderConfig* config = builder->createBuilderConfig();

        // Create model to populate the network
        INetworkDefinition* network = builder->createNetworkV2(EXPLICIT_BATCH);
        ITensor* input_tensor = network->addInput(IN_NAME, DataType::kFLOAT, Dims4{ BATCH_SIZE, 3, IN_H, IN_W });
        IPoolingLayer* pool = network->addPoolingNd(*input_tensor, PoolingType::kMAX, DimsHW{ 2, 2 });
        pool->setStrideNd(DimsHW{ 2, 2 });
        pool->getOutput(0)->setName(OUT_NAME);
        network->markOutput(*pool->getOutput(0));

        // Build engine
        IOptimizationProfile* profile = builder->createOptimizationProfile();
        profile->setDimensions(IN_NAME, OptProfileSelector::kMIN, Dims4(BATCH_SIZE, 3, IN_H, IN_W));
        profile->setDimensions(IN_NAME, OptProfileSelector::kOPT, Dims4(BATCH_SIZE, 3, IN_H, IN_W));
        profile->setDimensions(IN_NAME, OptProfileSelector::kMAX, Dims4(BATCH_SIZE, 3, IN_H, IN_W));
        config->setMaxWorkspaceSize(1 << 20);
        ICudaEngine* engine = builder->buildEngineWithConfig(*network, *config);

        // Serialize the model to engine file
        IHostMemory* modelStream{ nullptr };
        assert(engine != nullptr);
        modelStream = engine->serialize();

        std::ofstream p("model.engine", std::ios::binary);
        if (!p) {
                std::cerr << "could not open output file to save model" << std::endl;
                return -1;
        }
        p.write(reinterpret_cast<const char*>(modelStream->data()), modelStream->size());
        std::cout << "generating file done!" << std::endl;

        // Release resources
        modelStream->destroy();
        network->destroy();
        engine->destroy();
        builder->destroy();
        config->destroy();
        return 0;
}
2.4 IR 转换模型
除了直接通过 TensorRT 的 API 逐层搭建网络并序列化模型,TensorRT 还支持将中间表示的模型(如 ONNX)转换成
TensorRT 模型。
2.4.1 使用 Python API 转换
首先使用 Pytorch 实现一个和上文一致的模型,即只对输入做一次池化并输出;然后将 Pytorch 模型转换成 ONNX 模型;最后将 ONNX 模型转换成 TensorRT 模型。这里主要使用了 TensorRT 的 OnnxParser 功能,它可以将 ONNX 模型解析到 TensorRT 的网络中。最后我们同样可以得到一个 TensorRT 模型,其功能与上述方式实现的模型功能一致。
import torch
import onnx
import tensorrt as trt


onnx_model = 'model.onnx'

class NaiveModel(torch.nn.Module):
    def __init__(self):
        super().__init__()
        self.pool = torch.nn.MaxPool2d(2, 2)

    def forward(self, x):
        return self.pool(x)

device = torch.device('cuda:0')

# generate ONNX model
torch.onnx.export(NaiveModel(), torch.randn(1, 3, 224, 224), onnx_model, input_names=['input'], output_names=['output'], opset_version=11)
onnx_model = onnx.load(onnx_model)

# create builder and network
logger = trt.Logger(trt.Logger.ERROR)
builder = trt.Builder(logger)
EXPLICIT_BATCH = 1 << (int)(
    trt.NetworkDefinitionCreationFlag.EXPLICIT_BATCH)
network = builder.create_network(EXPLICIT_BATCH)

# parse onnx
parser = trt.OnnxParser(network, logger)

if not parser.parse(onnx_model.SerializeToString()):
    error_msgs = ''
    for error in range(parser.num_errors):
        error_msgs += f'{parser.get_error(error)}\n'
    raise RuntimeError(f'Failed to parse onnx, {error_msgs}')

config = builder.create_builder_config()
config.max_workspace_size = 1<<20
profile = builder.create_optimization_profile()

profile.set_shape('input', [1,3 ,224 ,224], [1,3,224, 224], [1,3 ,224 ,224])
config.add_optimization_profile(profile)
# create engine
with torch.cuda.device(device):
    engine = builder.build_engine(network, config)

with open('model.engine', mode='wb') as f:
    f.write(bytearray(engine.serialize()))
    print("generating file done!")
IR 转换时,如果有多 Batch、多输入、动态 shape 的需求,都可以通过多次调用 set_shape函数进行设置。set_shape 函数接受的传参分别是:输入节点名称,可接受的最小输入尺寸,最优的输入尺寸,可接受的最大输入尺寸。一般要求这三个尺寸的大小关系为单调递增。
2.4.2 使用 C++ API 转换
#include <fstream>
#include <iostream>

#include <NvInfer.h>
#include <NvOnnxParser.h>
#include <../samples/common/logger.h>

using namespace nvinfer1;
using namespace nvonnxparser;
using namespace sample;

int main(int argc, char** argv)
{
        // Create builder
        Logger m_logger;
        IBuilder* builder = createInferBuilder(m_logger);
        const auto explicitBatch = 1U << static_cast<uint32_t>(NetworkDefinitionCreationFlag::kEXPLICIT_BATCH);
        IBuilderConfig* config = builder->createBuilderConfig();

        // Create model to populate the network
        INetworkDefinition* network = builder->createNetworkV2(explicitBatch);

        // Parse ONNX file
        IParser* parser = nvonnxparser::createParser(*network, m_logger);
        bool parser_status = parser->parseFromFile("model.onnx", static_cast<int>(ILogger::Severity::kWARNING));

        // Get the name of network input
        Dims dim = network->getInput(0)->getDimensions();
        if (dim.d[0] == -1)  // -1 means it is a dynamic model
        {
                const char* name = network->getInput(0)->getName();
                IOptimizationProfile* profile = builder->createOptimizationProfile();
                profile->setDimensions(name, OptProfileSelector::kMIN, Dims4(1, dim.d[1], dim.d[2], dim.d[3]));
                profile->setDimensions(name, OptProfileSelector::kOPT, Dims4(1, dim.d[1], dim.d[2], dim.d[3]));
                profile->setDimensions(name, OptProfileSelector::kMAX, Dims4(1, dim.d[1], dim.d[2], dim.d[3]));
                config->addOptimizationProfile(profile);
        }


        // Build engine
        config->setMaxWorkspaceSize(1 << 20);
        ICudaEngine* engine = builder->buildEngineWithConfig(*network, *config);

        // Serialize the model to engine file
        IHostMemory* modelStream{ nullptr };
        assert(engine != nullptr);
        modelStream = engine->serialize();

        std::ofstream p("model.engine", std::ios::binary);
        if (!p) {
                std::cerr << "could not open output file to save model" << std::endl;
                return -1;
        }
        p.write(reinterpret_cast<const char*>(modelStream->data()), modelStream->size());
        std::cout << "generate file success!" << std::endl;

        // Release resources
        modelStream->destroy();
        network->destroy();
        engine->destroy();
        builder->destroy();
        config->destroy();
        return 0;
}
(注:如果出现报错,注释掉Release resources这段代码)
2.5 模型推理
使用了两种构建 TensorRT 模型的方式,分别用 Python 和 C++ 两种语言共生成了四个 TensorRT模型,这四个模型的功能理论上是完全一致的。
2.5.1 使用 Python API 推理
首先是使用 Python API 推理 TensorRT 模型,这里部分代码参考了 MMDeploy。运行下面代码,可以发现输入一个1x3x224x224 的张量,输出一个 1x3x112x112 的张量,完全符合我们对输入池化后结果的预期。
from typing import Union, Optional, Sequence,Dict,Any

import torch
import tensorrt as trt

class TRTWrapper(torch.nn.Module):
    def __init__(self,engine: Union[str, trt.ICudaEngine],
                 output_names: Optional[Sequence[str]] = None) -> None:
        super().__init__()
        self.engine = engine
        if isinstance(self.engine, str):
            with trt.Logger() as logger, trt.Runtime(logger) as runtime:
                with open(self.engine, mode='rb') as f:
                    engine_bytes = f.read()
                self.engine = runtime.deserialize_cuda_engine(engine_bytes)
        self.context = self.engine.create_execution_context()
        names = [_ for _ in self.engine]
        input_names = list(filter(self.engine.binding_is_input, names))
        self._input_names = input_names
        self._output_names = output_names

        if self._output_names is None:
            output_names = list(set(names) - set(input_names))
            self._output_names = output_names

    def forward(self, inputs: Dict[str, torch.Tensor]):
        assert self._input_names is not None
        assert self._output_names is not None
        bindings = [None] * (len(self._input_names) + len(self._output_names))
        profile_id = 0
        for input_name, input_tensor in inputs.items():
            # check if input shape is valid
            profile = self.engine.get_profile_shape(profile_id, input_name)
            assert input_tensor.dim() == len(
                profile[0]), 'Input dim is different from engine profile.'
            for s_min, s_input, s_max in zip(profile[0], input_tensor.shape,
                                             profile[2]):
                assert s_min <= s_input <= s_max, 'Input shape should be between ' + f'{profile[0]} and {profile[2]}' + f' but get {tuple(input_tensor.shape)}.'
            idx = self.engine.get_binding_index(input_name)

            # All input tensors must be gpu variables
            assert 'cuda' in input_tensor.device.type
            input_tensor = input_tensor.contiguous()
            if input_tensor.dtype == torch.long:
                input_tensor = input_tensor.int()
            self.context.set_binding_shape(idx, tuple(input_tensor.shape))
            bindings[idx] = input_tensor.contiguous().data_ptr()

        # create output tensors
        outputs = {}
        for output_name in self._output_names:
            idx = self.engine.get_binding_index(output_name)
            dtype = torch.float32
            shape = tuple(self.context.get_binding_shape(idx))

            device = torch.device('cuda')
            output = torch.empty(size=shape, dtype=dtype, device=device)
            outputs[output_name] = output
            bindings[idx] = output.data_ptr()
        self.context.execute_async_v2(bindings,
                                      torch.cuda.current_stream().cuda_stream)
        return outputs

model = TRTWrapper('model.engine', ['output'])
output = model(dict(input = torch.randn(1, 3, 224, 224).cuda()))
print(output)
2.5.2 使用 C++ API 推理
#include <fstream>
#include <iostream>

#include <NvInfer.h>
#include <../samples/common/logger.h>

#define CHECK(status) \
    do\
    {\
        auto ret = (status);\
        if (ret != 0)\
        {\
            std::cerr << "Cuda failure: " << ret << std::endl;\
            abort();\
        }\
    } while (0)

using namespace nvinfer1;
using namespace sample;

const char* IN_NAME = "input";
const char* OUT_NAME = "output";
static const int IN_H = 224;
static const int IN_W = 224;
static const int BATCH_SIZE = 1;
static const int EXPLICIT_BATCH = 1 << (int)(NetworkDefinitionCreationFlag::kEXPLICIT_BATCH);


void doInference(IExecutionContext& context, float* input, float* output, int batchSize)
{
        const ICudaEngine& engine = context.getEngine();

        // Pointers to input and output device buffers to pass to engine.
        // Engine requires exactly IEngine::getNbBindings() number of buffers.
        assert(engine.getNbBindings() == 2);
        void* buffers[2];

        // In order to bind the buffers, we need to know the names of the input and output tensors.
        // Note that indices are guaranteed to be less than IEngine::getNbBindings()
        const int inputIndex = engine.getBindingIndex(IN_NAME);
        const int outputIndex = engine.getBindingIndex(OUT_NAME);

        // Create GPU buffers on device
        CHECK(cudaMalloc(&buffers[inputIndex], batchSize * 3 * IN_H * IN_W * sizeof(float)));
        CHECK(cudaMalloc(&buffers[outputIndex], batchSize * 3 * IN_H * IN_W /4 * sizeof(float)));

        // Create stream
        cudaStream_t stream;
        CHECK(cudaStreamCreate(&stream));

        // DMA input batch data to device, infer on the batch asynchronously, and DMA output back to host
        CHECK(cudaMemcpyAsync(buffers[inputIndex], input, batchSize * 3 * IN_H * IN_W * sizeof(float), cudaMemcpyHostToDevice, stream));
        context.enqueue(batchSize, buffers, stream, nullptr);
        CHECK(cudaMemcpyAsync(output, buffers[outputIndex], batchSize * 3 * IN_H * IN_W / 4 * sizeof(float), cudaMemcpyDeviceToHost, stream));
        cudaStreamSynchronize(stream);

        // Release stream and buffers
        cudaStreamDestroy(stream);
        CHECK(cudaFree(buffers[inputIndex]));
        CHECK(cudaFree(buffers[outputIndex]));
}

int main(int argc, char** argv)
{
        // create a model using the API directly and serialize it to a stream
        char *trtModelStream{ nullptr };
        size_t size{ 0 };

        std::ifstream file("model.engine", std::ios::binary);
        if (file.good()) {
                file.seekg(0, file.end);
                size = file.tellg();
                file.seekg(0, file.beg);
                trtModelStream = new char[size];
                assert(trtModelStream);
                file.read(trtModelStream, size);
                file.close();
        }

        Logger m_logger;
        IRuntime* runtime = createInferRuntime(m_logger);
        assert(runtime != nullptr);
        ICudaEngine* engine = runtime->deserializeCudaEngine(trtModelStream, size, nullptr);
        assert(engine != nullptr);
        IExecutionContext* context = engine->createExecutionContext();
        assert(context != nullptr);

        // generate input data
        float data[BATCH_SIZE * 3 * IN_H * IN_W];
        for (int i = 0; i < BATCH_SIZE * 3 * IN_H * IN_W; i++)
                data[i] = 1;

        // Run inference
        float prob[BATCH_SIZE * 3 * IN_H * IN_W /4];
        doInference(*context, data, prob, BATCH_SIZE);

        // 验证的输入数据为1,所以输出结果也为1 (因此,这里的验证结果与python的不同)
	    cout << *prob << endl;

        // Destroy the engine
        context->destroy();
        engine->destroy();
        runtime->destroy();
        return 0;
}
3. 参考
https://zhuanlan.zhihu.com/p/547624036
https://docs.nvidia.com/deeplearning/tensorrt/install-guide/index.html#installing-zip
https://blog.csdn.net/djstavaV/article/details/125195569


 476
476


 被折叠的 条评论
为什么被折叠?
被折叠的 条评论
为什么被折叠?
 到【灌水乐园】发言


