


一、精度控制
- 输出时使用setprecision()和fixed进行精度控制和补0
- 函数 setprecision() 控制输出流的输出精度(精度控制采用四舍五入)
- setprecision单独使用是控制有效位数的,与fixed合用才是控制小数点后位数的
- 需要保留几位小数,就将 setprecision(n) 的括号里n换成几
- 在使用时,可以提前声明,也可以直接写在输出流中
float a=0.123;
cout<<a<<endl;//输出 0.123

cout<<setprecision(5)<<a<<endl;//输出 0.123
方法一:
//方法一:
cout<<setiosflags(ios::fixed)<<setprecision(5);
cout<<a<<endl;//输出 0.12300
方法二:
//方法二:
cout.setf(ios::fixed);
cout<<setprecision(5);
cout<<a<<endl;//输出 0.12300
方法三:
//方法三:
cout<<fixed<<setprecision(5)<<a;//输出 0.12300
- 需要保留几位小数,就将 setprecision(n) 的括号里n换成几
- 上面的语句写一次就够了,对之后的数字都有效
- 函数 setprecision() 控制输出流的输出精度(精度控制采用四舍五入)
注意:setprecision单独使用是控制有效位数的,与fixed合用才是控制小数点后位数的
	float a=12.123456;
	cout<<setprecision(3)<<a; //输出12.1
	cout<<fixed<<setprecision(3)<<a;//输出12.123
- fixed是设置补0,以下三种写法任选其一即可
	cout<<setiosflags(ios::fixed);
	cout.setf(ios::fixed);
	cout<fixed;
如果不想补0,可以设置关闭fixed
cout.unsetf(ios::fixed);
二、宽度控制
- 使用setw(n)函数。n表示宽度
- 使用setw()函数需要的头文件:
#include<iomanip>。记来记去太麻烦了,建议直接使用万能头文件#include <bits/stdc++.h>
- 当字段长度大于想要输出的长度时
#include <bits/stdc++.h>

using namespace std;

int main()
{
	cout<<setw(6)<<1234<<endl;
	return 0;
}
输出效果:
- 当字段长度小于想要输出的长度时,setw()失效
#include <bits/stdc++.h>
using namespace std;
int main()
{
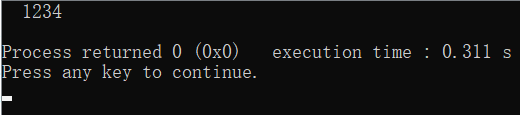
cout<<setw(2)<<1234<<endl;
return 0;
}
输出效果:

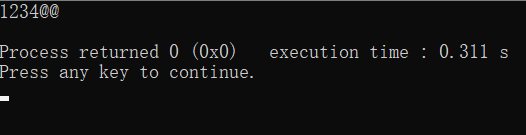
- 借助setfill(‘X’),占位
#include <bits/stdc++.h>

using namespace std;

int main()
{
	cout<<setw(6)<<setfill('@')<<1234<<endl;
	return 0;
}
输出效果:

- setw()默认的是输出右对齐,而当你想要左对齐时,便需要另外添加setiosflags(ios::left)来实现输出左对齐
#include <bits/stdc++.h>

using namespace std;

int main()
{
	cout<<setw(6)<<setiosflags(ios::left)<<setfill('@')<<1234<<endl;
	return 0;
}
输出效果
参考:https://blog.csdn.net/gyxx1998/article/details/103337790
https://blog.csdn.net/weixin_44091134/article/details/88372309


 228
228


 被折叠的 条评论
为什么被折叠?
被折叠的 条评论
为什么被折叠?
 到【灌水乐园】发言


