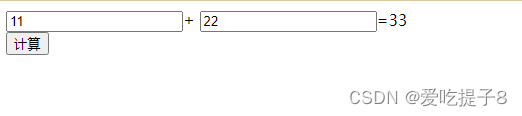
1.计算器
<body>
<input id="tx1" placeholder="111"  />+
<input id="tx2"  placeholder="222"  />=<span id="s1"></span><br/>
<button onclick="jis()">计算</button>
<script>
function jis(){
    var t1=document.getElementById("tx1").value;
    console.log(t1.value);
    var t2=document.getElementById("tx2").value;
    console.log(t2);
    document.getElementById("s1").innerHTML=parseFloat(t1)+parseFloat(t2);
}
</script>
</body>
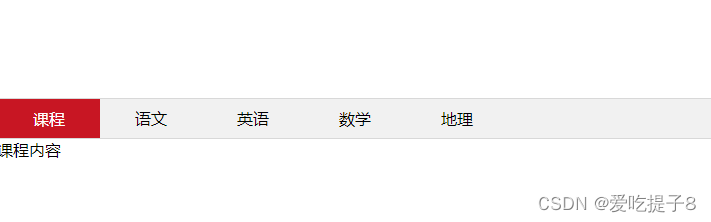
2.导航页
<!DOCTYPE html>
<html>
<head>
<title></title>
<style>
*{
margin: 0;
padding: 0;
}
li{
list-style-type: none;
}
.tab{
width: 850px;
margin: 100px auto;
}
.tab_list{
height: 39px;
border: 1px solid rgb(216, 216, 216);
background-color: #f1f1f1;
}
.tab_list li{
float: left;
height: 39px;
line-height: 39px;
padding: 0 35px;
text-align: center;
cursor: pointer;
}
.tab_list .current{
background-color: #c81623;
color: #fff;
}
.item{
display: none;
}
</style>
</head>
<body>
<div class="tab">
<div class="tab_list">
<ul>
<li class="current">课程</li>
<li>语文</li>
<li>英语</li>
<li>数学</li>
<li>地理</li>
</ul>
</div>
<div class="tab_con">
<div class="item" style="display: block;">课程内容</div>
<div class="item">语文内容</div>
<div class="item">英语内容</div>
<div class="item">数学内容</div>
<div class="item">地理内容</div>
</div>
</div>
<script>
var tab_list=document.querySelector(".tab_list");
var lis=tab_list.querySelectorAll("li");
var items=document.querySelectorAll(".item");
for(var i=0;i<lis.length;i++){
lis[i].setAttribute('index',i);
lis[i].onclick = function(){
for(var j=0;j<lis.length;j++){
lis[j].className = '';
}
this.className = 'current';
var index = this.getAttribute('index');
for(var k=0;k<items.length;k++){
items[k].style.display = 'none';
}
items[index].style.display = 'block';
}
}
</script>
</body>
</html>
3.按钮变色
<!DOCTYPE html>
<html>
<head>
<title>按钮变色</title>
<style type="text/css">
button {
background-color: #4CAF50;
color: white;
padding: 10px 20px;
border: none;
cursor: pointer;
}
button.clicked {
background-color: #f44336;
}
</style>
</head>
<body>
<button onclick="changeColor()">点击我变色</button>
<script type="text/javascript">
function changeColor() {
var btn = document.getElementsByTagName('button')[0];
btn.className = 'clicked';
}
</script>
</body>
</html>


4.发送验证码
<!DOCTYPE html>
<html>
<head>
<meta charset="utf-8">
<title>按钮禁用</title>
</head>
<body>
<button onclick="sendCode()" id="sendBtn">发送验证码</button>
<script type="text/javascript">
var waitTime = 5;
var t;
function sendCode() {
t = setInterval(decTime, 1000);
}
function decTime() {
var btn = document.getElementById('sendBtn');
btn.disabled = true;
waitTime = waitTime - 1;
btn.innerText = waitTime + 'S后重新获取';
if (waitTime == 0) {
clearInterval(t);
btn.disabled = false;
btn.innerText = '发送验证码';
location.reload();
}
}
</script>
</body>
</html>
5.计算年龄
<!DOCTYPE html>
<html>
<head>
<meta charset="utf-8">
<title>我的生命</title>
</head>
<body>
<h2>我的出生日期是:2000-2-6</h2>
<h3></h3>
<h3></h3>
<h3></h3>
<h3></h3>
<h3></h3>
<h3></h3>
<h3></h3>
<script type="text/javascript">
function myInfo() {
var date = new Date();
var time1 = date.getTime();
time1 = time1 / 1000;
var time2 = Date.parse('2/6/2000')
time2 = time2 / 1000;
var seconds = time1 - time2;
var h3 = document.getElementsByTagName('h3');
h3[0].innerText = '我已经在这个世界上生活了 ' + Math.floor(seconds) + ' 秒';
h3[1].innerText = '我已经在这个世界上生活了 ' + Math.floor(seconds / 60) + ' 分钟';
h3[2].innerText = '我已经在这个世界上生活了 ' + Math.floor(seconds / 60 / 60) + ' 小时';
h3[3].innerText = '我已经在这个世界上生活了 ' + Math.floor(seconds / 60 / 60 / 24) + ' 天';
h3[4].innerText = '我已经在这个世界上生活了 ' + Math.floor(seconds / 60 / 60 / 24 / 7) + ' 周';
h3[5].innerText = '我已经在这个世界上生活了 ' + Math.floor(seconds / 60 / 60 / 24 / 30) + ' 个月';
h3[6].innerText = '我已经在这个世界上生活了 ' + Math.floor(seconds / 60 / 60 / 24 / 30 / 12) + ' 年';
}
setInterval(myInfo, 1000);
</script>
</body>
</html>
6.显示时间
<!DOCTYPE html>
<html>
<head>
<meta charset="utf-8">
<title>网页时钟</title>
</head>
<body>
<h1 id="clock"></h1>
<script type="text/javascript">
function showTime() {
setInterval(function () {
var date = new Date();
var time = date.toLocaleString();
var h1 = document.getElementById('clock');
h1.innerText = time;
}, 1000);
}
showTime();
</script>
</body>
</html>
7.摇号
<!DOCTYPE html>
<html>
<head>
<meta charset="utf-8">
<title>摇号</title>
</head>
<body>
<h1 id="num"></h1>
<button type="button" onclick="start()">开始</button>
<button type="button" onclick="stop()">停止</button>
<script type="text/javascript">
function createRandNum() {
var randNum = Math.floor(Math.random() * 50) + 1;
document.getElementById('num').innerText = randNum
}
var t;
function start() {
t = setInterval(createRandNum, 50);
}
function stop() {
clearInterval(t);
}
</script>
</body>
</html>
8.json 数据用表格显示
<!DOCTYPE html>
<html>
	<head>
		<meta charset="utf-8">
		<title>显示学生信息</title>
	</head>
	<body>


		<script type="text/javascript">

			var students = [
				{
					"id": 1,
					"name": "学生1",
					"sex": "男",
					"age": 21
				},
				{
					"id": 2,
					"name": "学生2",
					"sex": "女",
					"age": 20
				},
				{
					"id": 3,
					"name": "学生3",
					"sex": "男",
					"age": 23
				},
				{
					"id": 4,
					"name": "学生4",
					"sex": "女",
					"age": 22
				}
			]

			document.write('<table border="1" cellspacing="0" cellpadding="10">')

				document.write('<tr>')
					document.write('<th>序号</th>')
					document.write('<th>姓名</th>')
					document.write('<th>性别</th>')
					document.write('<th>年龄</th>')
				document.write('</tr>')

				for (var i = 0; i < students.length; i++) {
					document.write('<tr>')
						document.write("<td>" + students[i].id + "</td>")
						document.write("<td>" + students[i].name + "</td>")
						document.write("<td>" + students[i].sex + "</td>")
						document.write("<td>" + students[i].age + "</td>")
					document.write('</tr>')
				}

			document.write('</table>')
			document.write('<div style="margin: 10px 0;">共 ' + students.length + ' 条数据</div>')
		</script>

	</body>
</html>
9.进度条
<!DOCTYPE html>
<html lang="en">
<head>
<meta charset="UTF-8">
<meta name="viewport" content="width=device-width, initial-scale=1.0">
<title>进度条功能</title>
<style>
.fa {
width: 400px;
margin-bottom: 30px;
border: 1px solid red;
}
.son {
width: 0;
height: 40px;
background: #f0f;
text-align: center;
line-height: 40px;
}
</style>
</head>
<body>
<div class="fa">
<div class="son"><span>0</span><span>%</span></div>
</div>
<button id="btn">安装</button>
<script>
let aBtn = document.getElementById('btn');
let oDiv = document.getElementsByTagName('div');
let oSpan = document.getElementsByTagName('span');
let timer = null;
aBtn.onclick = function () {
let num = 0;
if (timer == null) {
timer = setInterval(function () {
num += 10;
oDiv[1].style.width = num + 'px';
oSpan[0].innerText=Math.floor(num/400*100);
if (num == 400) {
clearInterval(timer)
}
}, 100)
}
}
</script>
</body>
</html>
10.关闭小广告
<!DOCTYPE html>
<html lang="en">

<head>
    <meta charset="UTF-8">
    <meta name="viewport" content="width=device-width, initial-scale=1.0">
    <title>Document</title>
    <style>
        * {
            margin: 0;
            padding: 0;
        }

        #box {
            width: 100px;
            height: 100px;
            background-color: burlywood;
        }
    </style>
</head>

<body>
    <div id="box">
        <a href="#">X</a>
    </div>
    <script>
        var aDiv=document.getElementById('box');
        var aA=aDiv.getElementsByTagName('a')[0];

        aA.onclick=function()
        {
            aDiv.style.display="none";
        }
    </script>
</body>

</html>
11.鼠标导航器
<!DOCTYPE html>
<html lang="en">
<head>
<meta charset="UTF-8">
<meta name="viewport" content="width=device-width, initial-scale=1.0">
<title>鼠标导航器</title>
<style>
div{
width: 100px;
height: 100px;
background-color: #f0f;
position: absolute;
top: 0;
left: 0;
}
</style>
</head>
<body>
<h2>鼠标绑定小盒子</h2>
<div></div>
<script>
aDiv=document.getElementsByTagName('div')[0];
document.onmousemove=function(e)
{
let event= e|| window.event;
aDiv.style.left=event.clientX-aDiv.clientWidth/2+"px";
aDiv.style.top=event.clientY-aDiv.clientWidth/2+"px";
}
</script>
</body>
</html>
12.密码显隐
<!DOCTYPE html>
<html lang="en">
<head>
<meta charset="UTF-8">
<meta name="viewport" content="width=device-width, initial-scale=1.0">
<title>密码显隐</title>
<style>
.box{
width: 300px;
border-bottom: 1px solid rgb(180, 164, 164);
margin: 10px auto;
padding: 0px;
}
.box1{
width: 300px;
border-bottom: 1px solid rgb(180, 164, 164);
margin: 25px auto;
}
.box1 input{
width: 100px;
height: 30px;
border: 0px;
outline: none;
}
.box input{
width: 100px;
height: 30px;
border: 0px;
outline: none;
}
</style>
</head>
<body>
<div class="box1">
<input type="text" name="" id="" placeholder = "请输入用户名">
</div>
<div class="box">
<!-- 此处<label>标签内的button可换成img图标 -->
<label><input type="button" value="显示/隐藏" id="xy"></label>
<input id="pwd" type="password" placeholder = "请输入密码"></div>
<div style="margin:10px auto;width:300px;">
<input type="submit" value="登录">
</div>
<script>
var pw=document.getElementById("pwd");
var xy=document.getElementById("xy")
var flag = 0;
xy.onclick=function(){
if(flag==0){
pw.type="text";
flag=1;
}else{
pw.type="password";
flag=0;
}
}
</script>
</body>
</html>
13.数据双向绑定
<!doctype html>
<html lang="en">
 <head>
  <meta charset="UTF-8">
  <meta name="viewport" content="width=device-width, initial-scale=1.0, maximum-scale=1.0, user-scalable=0">
  <meta name="Keywords" content="">
  <meta name="Description" content="">
  <title>Document</title>
  <style type="text/css"></style>
 </head>
 <body>
	<input type="text" name="" id="txt" />
	<h1 id="content"></h1>
	<script type="text/javascript">
		let oTxt = document.getElementById('txt');
		let oContent = document.getElementById('content');
		var obj = {};
		Object.defineProperty(obj,'data', {
			set: function(val) {
				oContent.innerHTML = val;
			},
			get: function(){

			}
		})
		oTxt.addEventListener('input', function() {
			obj.data = this.value;
		})
	</script>
 </body>
</html>
14.弹窗
<!DOCTYPE html>
<html lang="en">
<head>
<meta charset="UTF-8">
<title>Document</title>
<style>
*{
padding: 0px;
margin: 0px;
}
#btn{
width:80px;
height: 30px;
border: none;
background: coral;
color: white;
text-align: center;
}
#btn:hover{
background: #f90;
}
.alert{
display: none;
position: fixed;
left: 0px;
top:0px;
z-index: 1;
width: 100%;
height: 100%;
background: rgba(0,0,0,0.5);
animation: move 1s;
}
.container{
width:80%;
margin: 15% auto;
box-shadow: 10px 10px 10px rgba(0,0,0,0.2)
}
.header{
background: coral;
padding: 15px;
color: white;
}
.header span{
float: right;
font-size: 30px;
line-height: 30px;
cursor: pointer;
}
.content{
padding: 15px;
background: white;
}
.content p{
margin: 15px auto;
}
.footer{
padding: 15px;
color: white;
background: coral;
text-align: center;
}
@keyframes move{
from{opacity:0;}
to{opacity:1;}
}
</style>
</head>
<body>
<input type="button" value="点击弹窗" id="btn">
<div class="alert" id="alert">
<div class="container">
<div class="header">
<span class="closebtn">×</span>
<h2>弹窗头部</h2>
</div>
<div class="content">
<h4>弹窗内容</h4>
<p>
Lorem ipsum dolor sit amet, consectetur adipisicing elit. Obcaecati adipisci repellendus aliquam porro, quos. Aliquid, deleniti enim dignissimos veniam iusto quia quam suscipit molestiae quis tempore reiciendis, doloremque dolorem obcaecati.
</p>
</div>
<div class="footer">
<h2>弹窗脚部</h2>
</div>
</div>
</div>
<script>
var oBtn=document.getElementById('btn');
var oAlert=document.getElementById('alert');
var oClose=document.querySelector('.closebtn');
oBtn.addEventListener('click',openAlert);
function openAlert(){
oAlert.style.display='block';
}
oClose.addEventListener('click',closeAlert);
function closeAlert(){
oAlert.style.display='none';
}
window.addEventListener('click',fadeOut);
function fadeOut(e){
if(e.target==oAlert){
console.log(e.target)
oAlert.style.display='none'
}
}
</script>
</body>
</html>
15.前后端交互-登录
<!DOCTYPE html>
<html lang="en">
<head>
<meta charset="UTF-8">
<title>案例:登录</title>
<style>
*{
margin: 0;
padding: 0;
}
body{
background-image: url(../static/img/background-img.jpg);
background-size:100% 100%;
background-repeat:no-repeat;
}
form{
background-color: #fbf9ff;
width: 350px;
padding: 20px;
margin: 180px auto;
border: 2px solid #7267b6;
display: flex;
flex-direction: column;
font-size: 25px;
padding-top: 50px;
position: relative;
border-radius: 8px;
}
form > span {
position: absolute;
left: 50%;
top: 5px;
transform: translateX(-50%);
width: 100%;
text-align: center;
color: red;
display: none;
}
form > label {
height: 35px;
}
form > label >input{
font-size: 18px;
height: 25px;
padding-left: 10px;
}
button {
margin: 15px auto;
width: 80px;
height: 35px;
background-color: #e4e2ff;
border-color: #b5bce6;
border-radius: 5px;
}
</style>
</head>
<body>
<form>
<span class="error">用户名或者密码错误</span>
<label>
账号:<input class="username" type="text">
</label>
<label>
密码:<input class="password" type="password">
</label>
<button>登录</button>
</form>
<script>
var loginForm = document.querySelector('form')
var nameInp = document.querySelector('.username')
var pwdInp = document.querySelector('.password')
var errBox = document.querySelector('.error')
loginForm.onsubmit = function (e) {
e.preventDefault()
var name = nameInp.value
var pwd = pwdInp.value
if(!name) return alert('请填写账号!')
if(!pwd) return alert('请填写密码!')
var xhr = new XMLHttpRequest()
xhr.open('POST', 'http://localhost:8080/user/login', true)
xhr.onload = function (){
console.log(JSON.parse(xhr.responseText))
if(res.code === 0){
errBox.style.display = 'block'
}else {
window.location.href = './home.html'
}
}
xhr.setRequestHeader('content-type', 'application/x-www-form-urlencoded')
xhr.send('username=' + name + '&password=' + pwd)
console.log(name, pwd)
}
</script>
</body>
</html>
16.定时跳转
<body>
 <div style="text-align: center;">
             <h1>定时跳转</h1>
             <a href="https://www.baidu.com/">
                 <span id="sec">5</span>秒后自动跳转页面或点击链接跳转
             </a>
 </div>

<script>
   function jump(sec,url){
                   var sec=document.getElementById("sec").innerHTML=--sec;
                   if(sec>0){
                       setTimeout('jump('+sec+',\''+url+'\') ',1000)
                   }else{
                       location.href=url;
                   }
   }
   jump(5,"https://www.baidu.com/")
   </script>
</body>
17.跟随鼠标指针移动
<html>

<head>
    <title>跟随鼠标指针移动</title>
    <meta name="viewport" content="width=device-width, initial-scale=1.0, maximum-scale=1.0, user-scalable=0">
<style>
          img {
              position: absolute;
              top: 0;
              left: 0;
              width: 100px;
              height: 100px;
          }
      </style>
</head>
    <body>
       <img src="1.jpg" alt="">
          <script>
              var img = document.querySelector('img')
              document.addEventListener('mousemove', function (e) {
                  var x = e.pageX;
                  var y = e.pageY;
                  img.style.top = y+'px';
                  img.style.left = x+'px';

              })
          </script>
</body>
</html>
18.改变盒子大小
<html>
<head>
<title>改变盒子大小</title>
<meta name="viewport" content="width=device-width, initial-scale=1.0, maximum-scale=1.0, user-scalable=0">
<style>
#box{
width:100px;
height:100px;
background:burlywood;
}
</style>
</head>
<body>
<div id="box" >点击发生变化</div>
<script>
var box = document.getElementById('box');
var num = 0;
box.onclick = function() {
num++;
if (num % 2) {
this.style.width = '250px';
this.style.height = '250px';
this.innerHTML = '大盒子';
} else {
this.style.width = '100px';
this.style.height = '100px';
this.innerHTML = '小盒子';
}
};
</script>
</body>
</html>
19.可拖动边框
<!DOCTYPE html>
<html lang="en">
<head>
  <meta charset="UTF-8">
  <meta http-equiv="X-UA-Compatible" content="IE=edge">
  <meta name="viewport" content="width=device-width, initial-scale=1.0">
  <title>拖动左侧边栏</title>
  <style>
    * {
      margin: 0;
      padding: 0;
    }
    body {
      display: flex;
      height: 100vh;
    }
    .sidebar {
      position: relative;
      min-width: 200px;
      height: 100%;
      background-color: aquamarine;
    }
    .senarator {
      display: flex;
      align-items: center;
      justify-content: center;
      position: absolute;
      right: 0;
      height: 100%;
      width: 20px;
      background-color: #fff;
      cursor: col-resize;
    }
    .main {
      width: 0;
      flex: 1;
      background-color: orange;
    }
    .sidebar .senarator i {
      width: 2px;
      height: 20px;
      background-color: #e9e9e9;
      margin-right: 4px;
    }
  </style>
</head>
<body>
  <!-- 左侧边栏 -->
  <div class="sidebar">
    <!-- 用来调整拖动 -->
    <div class="senarator">
      <i></i>
      <i></i>
    </div>
  </div>
  <div class="main"></div>
</body>
<script>
  let senarator = document.querySelector('.senarator');
  let sidebar = document.querySelector('.sidebar');
  let startX, startWidth;

  function getWidth() {
    return parseInt(window.getComputedStyle(sidebar).width);
  }

  senarator.addEventListener('mousedown', function(e) {
    startX = e.clientX;
    startWidth = getWidth();
    document.documentElement.addEventListener('mousemove', onDrag);
    document.documentElement.addEventListener('mouseup', onStopDrag);
  });

  function onDrag(e) {
    let newWidth = e.clientX - startX + startWidth;
    sidebar.style.width = `${newWidth}px`;
  };

  function onStopDrag() {
    document.documentElement.removeEventListener('mousemove', onDrag);
    document.documentElement.removeEventListener('mouseup', onStopDrag);
  }
</script>
</html>
20.围棋
<!DOCTYPE html>
<html lang="en">
<head>
<meta charset="UTF-8" />
<meta http-equiv="X-UA-Compatible" content="IE=edge" />
<meta name="viewport" content="width=device-width, initial-scale=1.0" />
<title>五子棋</title>
<style>
#container {
border: 1px solid rgb(207, 188, 188);
width: 500px;
height: 500px;
margin: 50px auto;
display: flex;
align-items: center;
justify-content: center;
background-color: #f7e6b7;
}
#container .checkerboard {
width: 92%;
height: 92%;
border-collapse: collapse;
}
tbody td {
border: 1px black solid;
position: relative;
}
.piece {
border-radius: 50%;
position: absolute;
border: 1px lightgrey solid;
width: 90%;
height: 90%;
color: lightgrey;
font-weight: bold;
display: flex;
align-items: center;
justify-content: center;
}
.piece[player='black'] {
background-color: black;
}
.piece[player='white'] {
background-color: #fff;
}
.win {
border: 1px solid red;
box-shadow: 0 0 3px 2px red;
}
</style>
</head>
<body>
<div id="container"></div>
<script >
const rowNum = 14;
let container = document.getElementById('container');
let step = 1;
let squareWidth;
let pieceCoordinateArr = [];
function $(selector) {
return document.querySelector(selector);
}
function init() {
const table = document.createElement('table');
table.className = 'checkerboard';
const tbody = document.createElement('tbody');
for (let i = 0; i < rowNum; i++) {
let tr = document.createElement('tr');
for (let j = 0; j < rowNum; j++) {
let td = document.createElement('td');
td.setAttribute('data-row', i);
td.setAttribute('data-column', j);
tr.appendChild(td);
}
tbody.appendChild(tr);
}
table.appendChild(tbody);
container.appendChild(table);
squareWidth = $('td').clientWidth;
}
init();
function createPiece() {
let piece = document.createElement('div');
piece.className = 'piece';
if (step % 2 === 1) piece.setAttribute('player', 'black');
if (step % 2 === 0) piece.setAttribute('player', 'white');
return piece;
}
function bindEvent() {
$('.checkerboard').onclick = function (e) {
if (e.target.tagName != 'TD') return;
let tempObj = Object.assign({}, e.target.dataset);
let isChangeX = e.offsetX > squareWidth / 2;
let isChangeY = e.offsetY > squareWidth / 2;
let positionX = isChangeX ? parseInt(tempObj.column) + 1 : parseInt(tempObj.column);
let positionY = isChangeY ? parseInt(tempObj.row) + 1 : parseInt(tempObj.row);
let piece = createPiece();
piece.style.left = isChangeX ? '50%' : '-50%';
piece.style.top = isChangeY ? '50%' : '-50%';
piece.setAttribute('x', positionX);
piece.setAttribute('y', positionY);
let existRes = pieceCoordinateArr.find((item) => item.x === positionX && item.y === positionY);
if (existRes) return;
e.target.appendChild(piece);
pieceCoordinateArr.push({
x: positionX,
y: positionY,
player: piece.getAttribute('player'),
});
step++;
if (checkGame()) {
this.onclick = null;
return;
}
};
}
bindEvent();
function checkGame() {
for (let i = 0; i < pieceCoordinateArr.length; i++) {
let piece1 = pieceCoordinateArr[i];
let piece2, piece3, piece4, piece5;
piece2 = pieceCoordinateArr.find(
(item) => item.x === piece1.x + 1 && item.y === piece1.y && item.player === piece1.player
);
piece3 = pieceCoordinateArr.find(
(item) => item.x === piece1.x + 2 && item.y === piece1.y && item.player === piece1.player
);
piece4 = pieceCoordinateArr.find(
(item) => item.x === piece1.x + 3 && item.y === piece1.y && item.player === piece1.player
);
piece5 = pieceCoordinateArr.find(
(item) => item.x === piece1.x + 4 && item.y === piece1.y && item.player === piece1.player
);
if (piece1 && piece2 && piece3 && piece4 && piece5) {
end(piece1, piece2, piece3, piece4, piece5);
return true;
}
piece2 = pieceCoordinateArr.find(
(item) => item.y === piece1.y + 1 && item.x === piece1.x && item.player === piece1.player
);
piece3 = pieceCoordinateArr.find(
(item) => item.y === piece1.y + 2 && item.x === piece1.x && item.player === piece1.player
);
piece4 = pieceCoordinateArr.find(
(item) => item.y === piece1.y + 3 && item.x === piece1.x && item.player === piece1.player
);
piece5 = pieceCoordinateArr.find(
(item) => item.y === piece1.y + 4 && item.x === piece1.x && item.player === piece1.player
);
if (piece1 && piece2 && piece3 && piece4 && piece5) {
end(piece1, piece2, piece3, piece4, piece5);
return true;
}
piece2 = pieceCoordinateArr.find(
(item) => item.x === piece1.x + 1 && item.y === piece1.y + 1 && item.player === piece1.player
);
piece3 = pieceCoordinateArr.find(
(item) => item.x === piece1.x + 2 && item.y === piece1.y + 2 && item.player === piece1.player
);
piece4 = pieceCoordinateArr.find(
(item) => item.x === piece1.x + 3 && item.y === piece1.y + 3 && item.player === piece1.player
);
piece5 = pieceCoordinateArr.find(
(item) => item.x === piece1.x + 4 && item.y === piece1.y + 4 && item.player === piece1.player
);
if (piece1 && piece2 && piece3 && piece4 && piece5) {
end(piece1, piece2, piece3, piece4, piece5);
return true;
}
piece2 = pieceCoordinateArr.find(
(item) => item.x === piece1.x + 1 && item.y === piece1.y - 1 && item.player === piece1.player
);
piece3 = pieceCoordinateArr.find(
(item) => item.x === piece1.x + 2 && item.y === piece1.y - 2 && item.player === piece1.player
);
piece4 = pieceCoordinateArr.find(
(item) => item.x === piece1.x + 3 && item.y === piece1.y - 3 && item.player === piece1.player
);
piece5 = pieceCoordinateArr.find(
(item) => item.x === piece1.x + 4 && item.y === piece1.y - 4 && item.player === piece1.player
);
if (piece1 && piece2 && piece3 && piece4 && piece5) {
end(piece1, piece2, piece3, piece4, piece5);
return true;
}
}
}
function end(piece1, piece2, piece3, piece4, piece5) {
for (let i = 0; i < pieceCoordinateArr.length; i++) {
$(`.piece[x='${pieceCoordinateArr[i].x}'][y='${pieceCoordinateArr[i].y}']`).innerText = i;
}
for (let i = 0; i < arguments.length; i++) {
$(`.piece[x='${arguments[i].x}'][y='${arguments[i].y}']`).classList.add('win');
}
}
</script>
</body>
</html>
21.css波纹
<!DOCTYPE html>
<html lang="en">
<head>
<meta charset="UTF-8">
<meta http-equiv="X-UA-Compatible" content="IE=edge">
<meta name="viewport" content="width=device-width, initial-scale=1.0">
<title>css 动态发光波纹</title>
<!-- 引入 ionicons 字体图标库 -->
<script type="module" src="https://unpkg.com/ionicons@7.1.0/dist/ionicons/ionicons.esm.js"></script>
<script nomodule src="https://unpkg.com/ionicons@7.1.0/dist/ionicons/ionicons.js"></script>
<style>
body {
height: 100vh;
margin: 0;
display: flex;
justify-content: center;
align-items: center;
gap: 9rem;
background: #333
}
.pulse ion-icon {
font-size: 35px;
position: absolute;
padding: 7px;
}
.pulse {
width: 3rem;
color: #fff;
transition: all .5s ease;
background: #35D1E6;
}
.pulse,
.pulse::before,
.pulse::after {
content: "";
display: grid;
grid-area: 1/1;
aspect-ratio: 1;
border-radius: 50%;
box-shadow: 0 0 0 0 #35D1E633;
animation: pulsing 3s linear infinite;
}
.pulse:hover,
.pulse:focus {
animation: none;
background: #35D1E633;
color: #ffffff99;
opacity: 0.5;
transition: all 0.5s ease-in-out;
}
.pulse:hover::before,
.pulse:focus::before,
.pulse:hover::after,
.pulse:focus::after {
animation: none;
opacity: 0.5;
transition: all 0.5s ease-in-out;
}
@keyframes pulsing {
to {
box-shadow: 0 0 0 6rem #0000;
}
}
</style>
</head>
<body>
<!-- 创建三个带有波纹效果的链接 -->
<a href="#" class="pulse">
<ion-icon name="finger-print-outline"></ion-icon>
</a>
<!-- filter: hue-rotate(120deg) 使用滤镜效果 从而阴影也会发生改变-->
<a href="#" class="pulse" style="filter: hue-rotate(120deg);">
<ion-icon name="radio-outline"></ion-icon>
</a>
<a href="#" class="pulse" style="filter:grayscale()">
<ion-icon name="ribbon-outline" ;></ion-icon>
</a>
</body>
</html>
22.文字自适应
<!DOCTYPE html>
<html lang="en">
<head>
<meta charset="UTF-8">
<meta http-equiv="X-UA-Compatible" content="IE=edge">
<meta name="viewport" content="width=device-width, initial-scale=1.0">
<title>文字自适应</title>
<style>
.clampSize{
width: 100%;
height: 40px;
margin: 30px;
line-height: 40px;
text-align: center;
border: 1px solid red;
font-size:clamp(0.7rem, 0.489rem + 1.05vw, 1.2rem);
}
</style>
</head>
<body>
<h1 class="clampSize">文字自适应</h1>
</body>
</html>
n边形绘制
<!DOCTYPE html>
<html>
<head>
	<title>n边形绘制</title>
	<script>
		function drawPolygon() {
			var canvas = document.getElementById("polygonCanvas");
			var context = canvas.getContext("2d");

			var sidesInput = document.getElementById("sidesInput");
			var sides = parseInt(sidesInput.value);

			var centerX = canvas.width / 2;
			var centerY = canvas.height / 2;
			var radius = 100;

			context.clearRect(0, 0, canvas.width, canvas.height);
			context.beginPath();
			context.moveTo(centerX + radius, centerY);

			for (var i = 1; i <= sides; i++) {
				var angle = i * (Math.PI * 2) / sides;
				var x = centerX + radius * Math.cos(angle);
				var y = centerY + radius * Math.sin(angle);
				context.lineTo(x, y);
			}

			context.closePath();
			context.stroke();
		}
	</script>
</head>
<body>
	<label for="sidesInput">输入边数:</label>
	<input type="number" id="sidesInput" value="3" min="3" max="12">
	<button onclick="drawPolygon()">绘制</button>
	<canvas id="polygonCanvas" width="400" height="400"></canvas>
</body>
</html>


 665
665

 被折叠的 条评论
为什么被折叠?
被折叠的 条评论
为什么被折叠?
 到【灌水乐园】发言


