


基于poi动态合并表格
-首先看下效果图
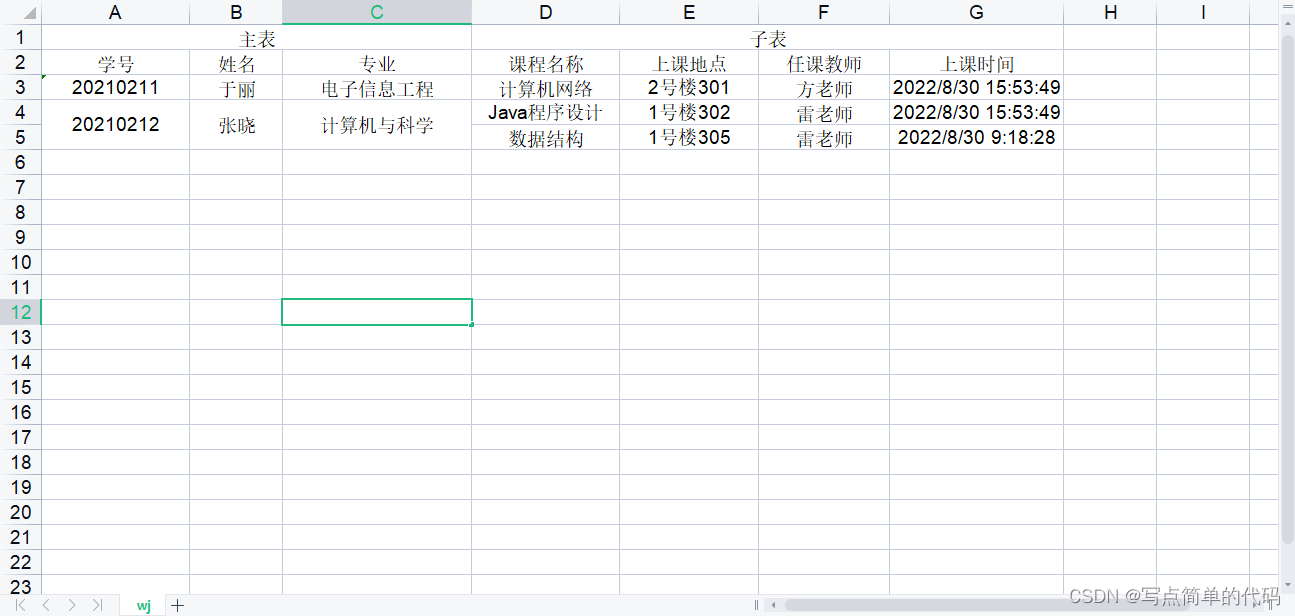
左边为主表数据,右边为子表数据,可以根据自己的需求进行修改,下面来看下代码。
- 引入依赖
		<!--poi-->
		<dependency>
			<groupId>org.apache.poi</groupId>
			<artifactId>poi-ooxml</artifactId>
			<version>4.1.0</version>
		</dependency>
- 创建一个PoiExcel类
先构造数据,根据表格,主子表是有相关联的,所以将主子表数据存入一个map集合中,主表的值作为map的key,value对应子表的list集合,可参考下面代码:
        String[] masterHead = {"学号","姓名","专业"};
        String[] childHead = {"课程名称","上课地点","任课教师","上课时间"};
        List<String[]> childList = new ArrayList<>();
        childList.add(new String[]{"Java程序设计","1号楼302","雷老师","2022/8/30 15:53:49"});
        childList.add(new String[]{"数据结构","1号楼305","雷老师","2022/8/30 9:18:28"});
        List<String[]> childList1 = new ArrayList<>();
        childList1.add(new String[]{"计算机网络","2号楼301","方老师","2022/8/30 15:53:49"});
        List<Map<String,List<String[]>>> masterList = new ArrayList<>();
        Map<String,List<String[]>> map = new HashMap();
        map.put("20210211-张晓-计算机与科学",childList);
        map.put("20210212-于丽-电子信息工程",childList1);
        masterList.add(map);
然后创建一个Excel工作薄对象
 		//创建Excel工作薄对象
        HSSFWorkbook workbook=new HSSFWorkbook();
        //创建Excel工作表对象
        HSSFSheet sheet = workbook.createSheet("wj");
        //设置单元格居中
        HSSFCellStyle cellStyle = workbook.createCellStyle();
        cellStyle.setAlignment(HorizontalAlignment.CENTER);
然后根据需求一行行来给工作表格填充数据,首先是复杂表头,第一行是主表和子表,主表和子表的是合并列,根据主子表头的长度来确定,合并的列数;第二行是表头,根据主子表头的数组来填充。
		//创建行的单元格,从0开始
        HSSFRow row = sheet.createRow(0);

        //创建统计单元格
        HSSFCell masterCell=row.createCell(0);
        //赋值
        masterCell.setCellValue("主表");
        masterCell.setCellStyle(cellStyle);
        //合并列
        CellRangeAddress region=new CellRangeAddress(0, 0, 0, masterHead.length-1);
        sheet.addMergedRegion(region);

        //创建详情单元格  从统计单元格的后一格开始创建
        HSSFCell childCell = row.createCell(masterHead.length);
        //赋值
        childCell.setCellValue("子表");
        childCell.setCellStyle(cellStyle);
        //合并列
        region=new CellRangeAddress(0, 0, masterHead.length, masterHead.length+childHead.length-1);
        sheet.addMergedRegion(region);

        //表头 从1开始
        HSSFRow titleRow = sheet.createRow(1);
        //主表头
        for (int i = 0; i < masterHead.length ; i++) {
            HSSFCell msCell = titleRow.createCell(i);
            msCell.setCellStyle(cellStyle);
            msCell.setCellValue(masterHead[i]);
        }
        //子表头
        for (int i = 0; i < childHead.length; i++) {
            HSSFCell chcell = titleRow.createCell(masterHead.length+i);
            chcell.setCellStyle(cellStyle);
            chcell.setCellValue(childHead[i]);
        }
这样就将第一行和第二行的表头填充上了,然后再填充对应的数据,先填充的是主表,主表的值我是用“-”来进行分隔的,所以用字符串进行切割成数组,然后拿到主表数据和对应的子表数据,工作簿的前2行都是表头,所以填充数据是从第三行开始,所以行下标为2,然后从第三行开始创建行,填充主表的数据,填充时要判断下子表的list的大小,大于一才需要进行合并,填充完主表后再填充子表,子表不需要合并,就一行行填充,代码如下:
        //填充数据
        int lastRowIndex = 2; //记录最后行位置
        for (Map<String,List<String[]>> m : masterList){
            for (String key : m.keySet()){
                String[] ms = key.split("-");
                List<String[]> chlist = m.get(key);
                HSSFRow valueRow = sheet.createRow(lastRowIndex);
                for (int i = 0; i < ms.length ; i++) {
                    HSSFCell mscell = valueRow.createCell(i);
                    mscell.setCellStyle(cellStyle);
                    mscell.setCellValue(ms[i]);
                    if (chlist.size()>1){ //子表数量大于1才进行 行合并
                        region=new CellRangeAddress(lastRowIndex, lastRowIndex+chlist.size()-1, i, i);
                        sheet.addMergedRegion(region);
                    }
                }
                for (int i = 0; i < chlist.size(); i++) {
                    String[] chstrs = chlist.get(i);
                    HSSFRow chRow;
                    if (i == 0){ //避免重复创建 覆盖主表数据
                        chRow = valueRow;
                    }else {
                        chRow  = sheet.createRow(lastRowIndex);
                    }
                    lastRowIndex++;
                    for (int j = 0; j < chstrs.length; j++) {
                        HSSFCell chcell = chRow.createCell(ms.length+j);
                        chcell.setCellStyle(cellStyle);
                        chcell.setCellValue(chstrs[j]);
                    }
                }
            }
        }
其中最重要的一句代码就是:
new CellRangeAddress(int firstRow, int lastRow, int firstCol, int lastCol)
这句代码就是合并单元格,参数1:起始行 参数2:终止行 参数3:起始列 参数4:终止列
- 最后看下PoiExcel类的完整代码
import org.apache.poi.hssf.usermodel.*;
import org.apache.poi.ss.usermodel.HorizontalAlignment;
import org.apache.poi.ss.util.CellRangeAddress;

import javax.servlet.http.HttpServletResponse;
import java.io.OutputStream;
import java.net.URLEncoder;
import java.util.*;

/**
 * @author huao
 * @Date 2022/8/31 13:50
 * @description:
 */
public class PoiExcel {

    public static void excelport(HttpServletResponse response) throws Exception {

        //数据来源 通过参数传入
        String[] masterHead = {"学号","姓名","专业"};
        String[] childHead = {"课程名称","上课地点","任课教师","上课时间"};
        List<String[]> childList = new ArrayList<>();
        childList.add(new String[]{"Java程序设计","1号楼302","雷老师","2022/8/30 15:53:49"});
        childList.add(new String[]{"数据结构","1号楼305","雷老师","2022/8/30 9:18:28"});
        List<String[]> childList1 = new ArrayList<>();
        childList1.add(new String[]{"计算机网络","2号楼301","方老师","2022/8/30 15:53:49"});
        List<Map<String,List<String[]>>> masterList = new ArrayList<>();
        Map<String,List<String[]>> map = new HashMap();
        map.put("20210211-张晓-计算机与科学",childList);
        map.put("20210212-于丽-电子信息工程",childList1);
        masterList.add(map);

        //创建Excel工作薄对象
        HSSFWorkbook workbook=new HSSFWorkbook();
        //创建Excel工作表对象
        HSSFSheet sheet = workbook.createSheet("wj");
        //设置单元格居中
        HSSFCellStyle cellStyle = workbook.createCellStyle();
        cellStyle.setAlignment(HorizontalAlignment.CENTER);

        //创建行的单元格,从0开始
        HSSFRow row = sheet.createRow(0);

        //创建统计单元格
        HSSFCell masterCell=row.createCell(0);
        //赋值
        masterCell.setCellValue("主表");
        masterCell.setCellStyle(cellStyle);
        //合并列
        CellRangeAddress region=new CellRangeAddress(0, 0, 0, masterHead.length-1);
        sheet.addMergedRegion(region);

        //创建详情单元格  从统计单元格的后一格开始创建
        HSSFCell childCell = row.createCell(masterHead.length);
        //赋值
        childCell.setCellValue("子表");
        childCell.setCellStyle(cellStyle);
        //合并列
        region=new CellRangeAddress(0, 0, masterHead.length, masterHead.length+childHead.length-1);
        sheet.addMergedRegion(region);

        //表头 从1开始
        HSSFRow titleRow = sheet.createRow(1);
        //主表头
        for (int i = 0; i < masterHead.length ; i++) {
            HSSFCell msCell = titleRow.createCell(i);
            msCell.setCellStyle(cellStyle);
            msCell.setCellValue(masterHead[i]);
        }
        //子表头
        for (int i = 0; i < childHead.length; i++) {
            HSSFCell chcell = titleRow.createCell(masterHead.length+i);
            chcell.setCellStyle(cellStyle);
            chcell.setCellValue(childHead[i]);
        }

        //填充数据
        int lastRowIndex = 2; //记录最后行位置
        for (Map<String,List<String[]>> m : masterList){
            for (String key : m.keySet()){
                String[] ms = key.split("-");
                List<String[]> chlist = m.get(key);
                HSSFRow valueRow = sheet.createRow(lastRowIndex);
                for (int i = 0; i < ms.length ; i++) {
                    HSSFCell mscell = valueRow.createCell(i);
                    mscell.setCellStyle(cellStyle);
                    mscell.setCellValue(ms[i]);
                    if (chlist.size()>1){ //子表数量大于1才进行 行合并
                        region=new CellRangeAddress(lastRowIndex, lastRowIndex+chlist.size()-1, i, i);
                        sheet.addMergedRegion(region);
                    }
                }
                for (int i = 0; i < chlist.size(); i++) {
                    String[] chstrs = chlist.get(i);
                    HSSFRow chRow;
                    if (i == 0){ //避免重复创建 覆盖主表数据
                        chRow = valueRow;
                    }else {
                        chRow  = sheet.createRow(lastRowIndex);
                    }
                    lastRowIndex++;
                    for (int j = 0; j < chstrs.length; j++) {
                        HSSFCell chcell = chRow.createCell(ms.length+j);
                        chcell.setCellStyle(cellStyle);
                        chcell.setCellValue(chstrs[j]);
                    }
                }
            }
        }

        String fileName = URLEncoder.encode("POIExcel下载测试","UTF-8");
        response.setContentType("application/octet-stream;charset=UTF-8");
        response.setHeader("Content-Disposition","attachment;filename="+fileName+".xls");
        OutputStream os = response.getOutputStream();
        workbook.write(os);
        os.flush();
        os.close();
        workbook.close();
    }
}
然后controller层的代码:
import com.example.demo.utils.PoiExcel;
import org.springframework.web.bind.annotation.RequestMapping;
import org.springframework.web.bind.annotation.RestController;

import javax.servlet.http.HttpServletResponse;

/**
 * @author huao
 * @Date 2022/8/31 13:56
 * @description:
 */
@RestController
@RequestMapping("/demo")
public class DemoWeb {

    @RequestMapping("/download")
    public void download(HttpServletResponse response) throws Exception {
        PoiExcel.excelport(response);
    }
}
导入依赖后代码复制过去可直接使用。
写作原因:看着网上很多动态合并单元格的例子,但是都看不懂,可能是我太菜了,所以自己撸了一个,这个代码量算是很少了吧,如果有什么不清楚的欢迎评论区留言或者私信我。


 5390
5390


 被折叠的 条评论
为什么被折叠?
被折叠的 条评论
为什么被折叠?
 到【灌水乐园】发言


