图像分割:
`提示:计算机视觉五大技术:图像分类、图像检测、目标跟踪、语义分割、实例分割
计算机视觉—图像分割:
提示:选择任意图片,分别采用以下技术进行图像分割Image Segmentation
题目要求:
- 通过filter bank提取的纹理特征进行图像分割
- 结合像素值与坐标的k-means聚类,进行图像分割
- 结合像素值与坐标的mean shift聚类,进行图像分割
- 通过graph partition图分割的方式进行图像分割
–
实验流程:
1)纹理特征提取和进行图像分割
import cv2 as cv
import numpy as np
from matplotlib import pyplot as plt
plt.rcParams['font.sans-serif']=['SimHei']
# print_imshow用于输出标题、图片信息
def print_imshow(title,image):
plt.title(title)
plt.imshow(image)
plt.colorbar()
plt.show()
# 读取图片
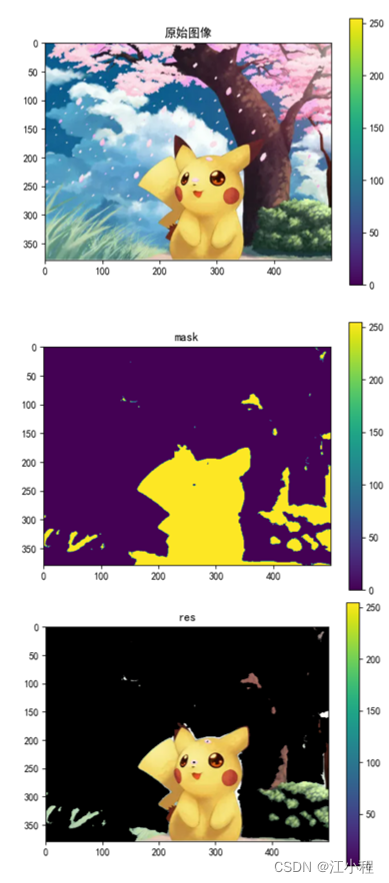
image = cv.imread("pkpk.jpg")[:,:,[2,1,0]]
print_imshow("原始图像",image)
# 进行预处理操作
blur = cv.blur(image,(5,5))
blur0=cv.medianBlur(blur,5)
# 把BGR格式转为HSV格式
hsv = cv.cvtColor(blur0, cv.COLOR_BGR2HSV)
# 进行阈值分割,以确定需要提取的像素阈值
low_blue = np.array([55, 0, 0])
high_blue = np.array([118, 255, 255])
mask = cv.inRange(hsv, low_blue, high_blue)
print_imshow("mask",mask)
# 显示由Mask作为边界的图像
res = cv.bitwise_and(image,image, mask= mask)
print_imshow("res",res)
2)进行聚类。
import cv2
import numpy as np
import matplotlib.pyplot as plt
#读取原始图像
image = cv2.imread('pkpk.jpg')
print(image.shape)
#图像二维像素转换为一维
data = image.reshape((-1,3))
data = np.float32(data)
#定义中心 (type,max_iter,epsilon)
criteria = (cv2.TERM_CRITERIA_EPS +
cv2.TERM_CRITERIA_MAX_ITER, 10, 1.0)
#设置标签
flags = cv2.KMEANS_RANDOM_CENTERS
#K-Means聚类 聚集成2类
compactness, labels2, centers2 = cv2.kmeans(data, 2, None, criteria, 10, flags)
#K-Means聚类 聚集成4类
compactness, labels4, centers4 = cv2.kmeans(data, 4, None, criteria, 10, flags)
#K-Means聚类 聚集成8类
compactness, labels8, centers8 = cv2.kmeans(data, 8, None, criteria, 10, flags)
#K-Means聚类 聚集成16类
compactness, labels16, centers16 = cv2.kmeans(data, 16, None, criteria, 10, flags)
#K-Means聚类 聚集成64类
compactness, labels64, centers64 = cv2.kmeans(data, 64, None, criteria, 10, flags)
#图像转换回uint8二维类型
centers2 = np.uint8(centers2)
res = centers2[labels2.flatten()]
dst2 = res.reshape((image.shape))
centers4 = np.uint8(centers4)
res = centers4[labels4.flatten()]
dst4 = res.reshape((image.shape))
centers8 = np.uint8(centers8)
res = centers8[labels8.flatten()]
dst8 = res.reshape((image.shape))
centers16 = np.uint8(centers16)
res = centers16[labels16.flatten()]
dst16 = res.reshape((image.shape))
centers64 = np.uint8(centers64)
res = centers64[labels64.flatten()]
dst64 = res.reshape((image.shape))
#图像转换为RGB显示
img = cv2.cvtColor(image, cv2.COLOR_BGR2RGB)
dst2 = cv2.cvtColor(dst2, cv2.COLOR_BGR2RGB)
dst4 = cv2.cvtColor(dst4, cv2.COLOR_BGR2RGB)
dst8 = cv2.cvtColor(dst8, cv2.COLOR_BGR2RGB)
dst16 = cv2.cvtColor(dst16, cv2.COLOR_BGR2RGB)
dst64 = cv2.cvtColor(dst64, cv2.COLOR_BGR2RGB)
#用来正常显示中文标签
plt.rcParams['font.sans-serif']=['SimHei']
#显示图像
titles = [u'原始图像', u'聚类图像 K=2', u'聚类图像 K=4',
u'聚类图像 K=8', u'聚类图像 K=16', u'聚类图像 K=64']
images = [img, dst2, dst4, dst8, dst16, dst64]
for i in range(6):
plt.subplot(2,3,i+1), plt.imshow(images[i], 'gray'),
plt.title(titles[i])
plt.xticks([]),plt.yticks([])
plt.show()
3)mean shift
import cv2
import numpy as np
def generate(filename,mode,sp,sr,postfix):
return filename+"_"+mode+"_"+str(sp)+"_"+str(sr)+postfix
def fill_image(image):
copyImage = image.copy() # 复制原图像
h, w = image.shape[:2] # 读取图像的宽和高
mask = np.zeros([h+2, w+2], np.uint8) # 新建图像矩阵 +2是官方函数要求
# image 输出
# mask 每当一个原始图上一个点位(x,y)被填充之后,该点位置对应的mask上的点(x+1,y+1)的灰度值随机被设置为1(原本该点的灰度值为0),代表该点已经被填充处理过。
# seedPoint 漫水填充的起始种子点
# newVal 被填充的色彩值
# loDiff 定义跟种子点相比色彩的下限值和上限值,介于种子点减去loDiff和种子点加上upDiff的值会被填充为跟种子点同样的颜色。
# 定义漫水填充的模式,用于连通性、扩展方向等的定义
cv2.floodFill(copyImage, mask, (0, 80), (0, 100, 255), (100, 100, 50), (50, 50, 50), cv2.FLOODFILL_FIXED_RANGE)
return copyImage
filename = 'pkpk'
postfix = ".jpg"
sp = 10
sr = 255
src = cv2.imread(filename+postfix)
# src:待分割的输入图像,必须是三通道CU_8U的彩色图像
# dst:分割后的输出图像,与输入图像具有相同的尺寸和数据类型
# sp:滑动窗口的半径
# sr:滑动窗口颜色幅度
# maxLevel:分割金字塔缩放层数
# termcrit:迭代算法终止条件。
dst = cv2.pyrMeanShiftFiltering(src, sp, sr, None, 2)
cv2.imwrite(generate(filename,"tmp",sp,sr,postfix),dst)
cv2.imwrite(generate(filename,"fill",sp,sr,postfix),fill_image(dst))
4)通过graph partition图分割的方式进行图像分割
import numpy as np
import cv2 as cv
from matplotlib import pyplot as plt
# 读取图像
img = cv.imread('pkpk.jpg')
plt.imshow(img[:,:,[2,1,0]]),plt.colorbar(),plt.show()
# 创建一个掩膜(与图像同大小)
mask = np.zeros(img.shape[:2],np.uint8)
# 创建以0填充的前景和背景模型
bgdModel = np.zeros((1,65),np.float64)
fgdModel = np.zeros((1,65),np.float64)
# 划定一个区域,
rect = (150,150,370,400)
# 执行图分割
cv.grabCut(img,mask,rect,bgdModel,fgdModel,5,cv.GC_INIT_WITH_RECT)
mask2 = np.where((mask==2)|(mask==0),0,1).astype('uint8')
img = img*mask2[:,:,np.newaxis]
plt.imshow(img[:,:,[2,1,0]]),plt.colorbar(),plt.show()
`提示:图像分割!!!
Tips:
- 技术笔记
- CSDN 技术