


1、拓扑图

2、R1配置
- 进入特权模式:Router>en
- 进入全局模式:Router#conf t
- 修改设备名称:Router(config)#hostname R1
- 进入接口:R1(config)#int g0/0
- 配置ip:R1(config-if)#ip add 192.168.1.1 255.255.255.0
- 开启接口:R1(config-if)#no shutdown
- 进入全局模式:R1(config-if)#exit
- 配置ospf:R1(config)#router ospf 1
- 宣告网段与区域:R1(config-router)#network 192.168.1.0 0.0.0.255 area 1
- 进入特权模式: R1(config-router)#end
- 保存:R1#wr
3、R2配置
- 进入特权模式:Router>en
- 进入全局模式:Router#conf t
- 修改设备名称:Router(config)#hostname R2
- 进入接口:R2(config)#int g0/0
- 配置ip:R2(config-if)#ip add 192.168.1.2 255.255.255.0
- 开启接口:R2(config-if)#no shutdown
- 进入接口:R2(config-if)#int g0/1
- 配置ip:R2(config-if)#ip add 192.168.10.1 255.255.255.0
- 开启接口:R2(config-if)#no shutdown
- 进入全局模式: R2(config-if)#exit
- 配置ospf:R2(config)#router ospf 1
- 宣告网段与区域:R2(config-router)#network 192.168.1.0 0.0.0.255 area 1
- 宣告网段与区域:R2(config-router)#network 192.168.10.0 0.0.0.255 area 1
- 进入特权模式:R2(config-router)#end
- 保存:R2(config-router)#end
4、R3配置
- 进入特权模式:Router>en
- 进入全局模式:Router#conf t
- 修改设备名称:Router(config)#hostname R3
- 进入接口:R3(config)#int g0/1
- 配置ip:R3(config-if)#ip add 192.168.10.2 255.255.255.0
- 开启接口:R3(config-if)#no shutdown
- 进入全局模式:R3(config-if)#exit
- 配置ospf:R3(config)#router ospf 1
- 宣告网段与区域:R3(config-router)#network 192.168.10.0 0.0.0.255 area 1
- 进入特权模式: R3(config-router)#end
- 保存:R3#wr
5、测试
- R1查看路由表:

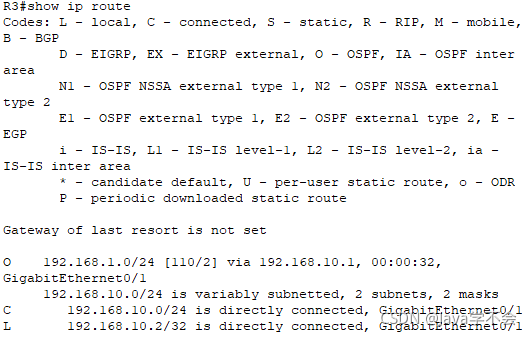
- R3查看路由表:


 615
615


 被折叠的 条评论
为什么被折叠?
被折叠的 条评论
为什么被折叠?
 到【灌水乐园】发言


