


AOP,即面向切面编程,它是oop(面向对象编程)的一种补充,
在传统的业务处理代码中,通常会进行事务处理,日志记录等操作,虽然使用OOP可以通过组合的形式或者继承的方式来达到代码的重用,但如果要实现某个功能(如日志记录),同样的代码会分散到各个方法中。这样,如果想要关闭某个功能,或者进行修改,就必须要修改所有的相关方法。
为了解决这个问题,AOP思想随之产生,AOP采用横向抽取机制,将分散在各个方法中的重复代码抽取出来,然后在程序编译或者运行时,再将这些提前出来的代码应用到需要执行的地方。
AOP相关概念
方面(Aspect):一个关注点的模块化,这个关注点实现可能另外横切多个对象。事务管理是J2EE应用中一个很好的横切关注点例子。方面用Spring的 Advisor或拦截器实现。
连接点(Joinpoint): 程序执行过程中明确的点,如方法的调用或特定的异常被抛出。
通知(Advice): 在特定的连接点,AOP框架执行的动作。各种类型的通知包括“around”、“before”和“throws”通知。通知类型将在下面讨论。许多AOP框架包括Spring都是以拦截器做通知模型,维护一个“围绕”连接点的拦截器链。Spring中定义了四个advice: BeforeAdvice, AfterAdvice, ThrowAdvice和DynamicIntroductionAdvice
切入点(Pointcut): 指定一个通知将被引发的一系列连接点的集合。AOP框架必须允许开发者指定切入点:例如,使用正则表达式。 Spring定义了Pointcut接口,用来组合MethodMatcher和ClassFilter,可以通过名字很清楚的理解, MethodMatcher是用来检查目标类的方法是否可以被应用此通知,而ClassFilter是用来检查Pointcut是否应该应用到目标类上
引入(Introduction): 添加方法或字段到被通知的类。 Spring允许引入新的接口到任何被通知的对象。例如,你可以使用一个引入使任何对象实现 IsModified接口,来简化缓存。Spring中要使用Introduction, 可有通过DelegatingIntroductionInterceptor来实现通知,通过DefaultIntroductionAdvisor来配置Advice和代理类要实现的接口
目标对象(Target Object): 包含连接点的对象。也被称作被通知或被代理对象。POJO
AOP代理(AOP Proxy): AOP框架创建的对象,包含通知。 在Spring中,AOP代理可以是JDK动态代理或者CGLIB代理。
织入(Weaving): 组装方面来创建一个被通知对象。这可以在编译时完成(例如使用AspectJ编译器),也可以在运行时完成。Spring和其他纯Java AOP框架一样,在运行时完成织入。
原文链接:https://blog.csdn.net/MoreeVan/article/details/11977115
AspectJ开发;
它是一个基于java语言的aop框架,它提供了强大的AOP功能。使用AspectJ实现AOP有二种方式:一种是基于xml的声明式AspectJ,另一种是基于注解的声明式AspectJ。
接下来看代码。
这是我们进行增强处理代码
import java.util.Arrays;
import org.apache.log4j.Logger;
import org.aspectj.lang.JoinPoint;
public class UserServiceLogger {
private static final Logger log = Logger.getLogger(UserServiceLogger.class);
//前置增强 JoinPoint 连接点
public void before(JoinPoint jp) {
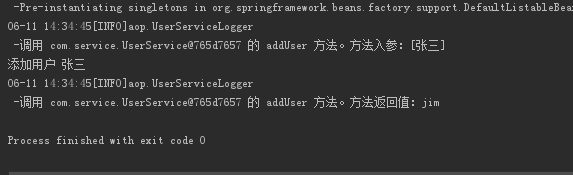
log.info("调用 " + jp.getTarget() + " 的 " + jp.getSignature().getName()
+ " 方法。方法入参:" + Arrays.toString(jp.getArgs()));
}
public void afterReturning(JoinPoint jp, Object result) {
log.info("调用 " + jp.getTarget() + " 的 " + jp.getSignature().getName()
+ " 方法。方法返回值:" + result);
}
}
这是我们需要增强处理的方法。
import org.springframework.stereotype.Service;

@Service
public class UserService {

   public String addUser(String name){

       System.out.println("添加用户 " + name);
       return "jim";
   }
}
配置我们的applicationcontext.xml文件
<?xml version="1.0" encoding="UTF-8"?>
<!--suppress ALL -->
<beans xmlns="http://www.springframework.org/schema/beans"
    xmlns:xsi="http://www.w3.org/2001/XMLSchema-instance"
    xmlns:context="http://www.springframework.org/schema/context"
    xmlns:aop="http://www.springframework.org/schema/aop"
    xsi:schemaLocation="http://www.springframework.org/schema/beans
	http://www.springframework.org/schema/beans/spring-beans-3.2.xsd
	http://www.springframework.org/schema/aop
	http://www.springframework.org/schema/aop/spring-aop-3.2.xsd
    http://www.springframework.org/schema/context
	http://www.springframework.org/schema/context/spring-context.xsd">
    <!-- 声明增强方法所在的Bean -->
    <!-- 也就是定义切面 -->
    <bean id="theLogger" class="aop.UserServiceLogger"></bean>
    <!-- 配置切面 -->
    <aop:config>
        <!-- 定义切入点 -->
        <aop:pointcut id="pointcut"
            expression="execution(* com.service..*.*(..))" />
        <!-- 引用包含增强方法的Bean -->
        <aop:aspect ref="theLogger">
            <!-- 将before()方法定义为前置增强并引用pointcut切入点 -->
            <aop:before method="before" pointcut-ref="pointcut"></aop:before>
            <!-- 将afterReturning()方法定义为后置增强并引用pointcut切入点 -->
            <!-- 通过returning属性指定为名为result的参数注入返回值 -->
            <aop:after-returning method="afterReturning"
                pointcut-ref="pointcut" returning="result" />
        </aop:aspect>
    </aop:config>
    <!--扫描基础包-->
    <context:component-scan base-package="com.service" />
</beans>
最后是我们的测试类。
import com.service.UserService;
import org.springframework.context.ApplicationContext;
import org.springframework.context.support.ClassPathXmlApplicationContext;

public class Test {
    public static void main(String[] args) {
        // 通过ClassPathXmlApplicationContext实例化Spring的上下文
        ApplicationContext context = new ClassPathXmlApplicationContext(
                "applicationContext.xml");
        // 通过ApplicationContext的getBean()方法,根据id来获取bean的实例
        UserService u = (UserService) context.getBean("userService");
        u.addUser("张三");
    }
}


 321
321


 被折叠的 条评论
为什么被折叠?
被折叠的 条评论
为什么被折叠?
 到【灌水乐园】发言


