一、安装使用
- 下载
yarn add vue-quill-editor

yarn add quill
- 导入
import { quillEditor } from "vue-quill-editor";
import 'quill/dist/quill.core.css';
import 'quill/dist/quill.snow.css';
import 'quill/dist/quill.bubble.css';
- 注册
export default {
	components: {
    	quillEditor
  },
}
- 使用
<quill-editor v-model="content" :options="editorOption" ref="QuillEditor"></quill-editor>
二、自定义工具栏
- 定义工具栏
const toolbarOptions = [
['bold', 'italic', 'underline', 'strike'],
['blockquote', 'code-block'],
[{ 'header': 1 }, { 'header': 2 }],
[{ 'list': 'ordered'}, { 'list': 'bullet' }],
[{ 'script': 'sub'}, { 'script': 'super' }],
[{ 'indent': '-1'}, { 'indent': '+1' }],
[{ 'direction': 'rtl' }],
[{ 'size': ['small', false, 'large', 'huge'] }],
[{ 'header': [1, 2, 3, 4, 5, 6, false] }],
[{ 'color': [] }, { 'background': [] }],
[{ 'font': [] }],
[{ 'align': [] }],
['clean']
];
- 配置
export default {
placeholder: '',
theme: 'snow',
modules: {
toolbar: {
container: toolbarOptions ,
handlers: {
'link': function(value) {
if (value) {
var href = prompt('Enter the URL');
this.quill.format('link', href);
} else {
this.quill.format('link', false);
}
}
}
}
}
}
三、自定义按钮
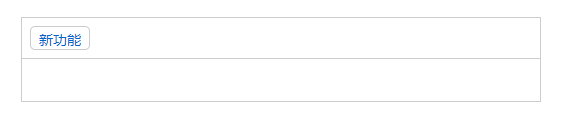
- 在工具栏添加自定义的按钮,并添加对应的处理函数
const toolbarOptions = [
['newFunction']
];
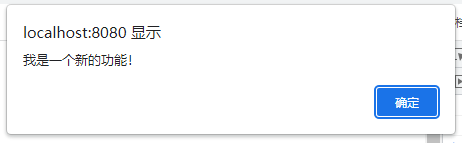
const handlers = {
newFunction: function () {
alert('我是一个新的功能!');
}
};
- 配置
import { quillEditor } from "vue-quill-editor";
import 'quill/dist/quill.core.css';
import 'quill/dist/quill.snow.css';
import 'quill/dist/quill.bubble.css';
export default {
components: {
quillEditor
},
mounted() {
const newFunctionButton = document.querySelector('.ql-newFunction');
newFunctionButton.style.cssText = "width:60px; border:1px solid #ccc; border-radius:5px;";
newFunctionButton.innerText = "新功能";
},
data() {
return {
quillOption: {
placeholder: '',
theme: 'snow',
modules: {
toolbar: {
container: toolbarOptions,
handlers: handlers
}
},
},
content: ''
}
}
};
- 使用
<template>
  <div class="box">
    <quill-editor ref="myEditor" v-model="content" :options="quillOption"></quill-editor>
  </div>
</template>
- 效果图
- 完整代码
<template>
<div class="box">
<quill-editor ref="myEditor" v-model="content" :options="quillOption"></quill-editor>
</div>
</template>
<script>
import { quillEditor } from "vue-quill-editor";
import 'quill/dist/quill.core.css';
import 'quill/dist/quill.snow.css';
import 'quill/dist/quill.bubble.css';
const toolbarOptions = [
['newFunction']
];
const handlers = {
newFunction: function () {
alert('我是一个新的功能!');
}
};
export default {
components: {
quillEditor
},
mounted() {
const newFunctionButton = document.querySelector('.ql-newFunction');
newFunctionButton.style.cssText = "width:60px; border:1px solid #ccc; border-radius:5px;";
newFunctionButton.innerText = "新功能";
},
data() {
return {
quillOption: {
placeholder: '',
theme: 'snow',
modules: {
toolbar: {
container: toolbarOptions,
handlers: handlers
}
},
},
content: ''
}
}
};
</script>
<style>
.box {
width: 520px;
margin: 50px;
}
</style>
四、获取富文本编辑器的光标位置,并插入内容或图片
- 富文本编辑器的定义
<quill-editor v-model="content" :options="editorOption" ref="QuillEditor"></quill-editor>
- 获取富文本编辑器
let quill = this.$refs.QuillEditor.quill
- 获取光标位置
let index = quill.selection.savedRange.index
- 插入文本或图片
quill.insertEmbed(index, 'text', '这里是要插入的文字')
quill.insertEmbed(index, 'image', '这里是图片的url')
- 光标移到插入内容后面
quill.setSelection(index + 1)
- 获取编辑区的内容
let editorContent = quill.getContents();
五、获取选中的内容
let range = this.quill.getSelection(true)
let delta = this.quill.getContents(range.index, range.length)
六、官方文档
Quill官方文档


 1373
1373


 被折叠的 条评论
为什么被折叠?
被折叠的 条评论
为什么被折叠?
 到【灌水乐园】发言


