


由前面的学习可以知道,SS的默认的拦截规则很简单,我们在项目中实际使用的时候往往需要更加复杂的拦截规则,这个时候就需要自定义一些拦截规则。
自定义拦截规则
在我们的项目中,资源往往是需要不同的权限才能操作的,可以分为下面几种:
- 公共资源:可以随意访问
- 认证访问:只有登录了之后的用户才能访问。
- 授权访问:登录的用户必须具有响应的权限才能够访问。
我们想要自定义认证逻辑,就需要创建一些原来不存在的bean,这个时候就可以使@ConditionalOnMissingBean注解发现创建默认的实现类失效。
测试环境搭建
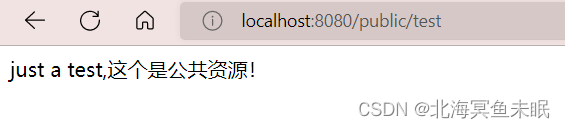
@RequestMapping("/public/test")
public String justatest(){
return "just a test,这个是公共资源!";
}
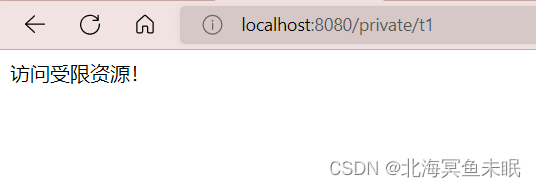
@RequestMapping("/private/t1")
public String t1(){
return "访问受限资源!";
}
下面我们重写一个配置类去替换内部默认的配置类
@Configuration
public class WebSecurityConfiguration extends WebSecurityConfigurerAdapter {
    @Override
    protected void configure(HttpSecurity http) throws Exception {
       //ss里面要求放行的资源要写在任何请求的前面
        http.authorizeRequests()//开启请求的权限管理
                .mvcMatchers("/public/**").permitAll()
                .anyRequest().authenticated()
                .and()
                .formLogin();//表单验证的方式
    }
}
下面测试,访问公共资源
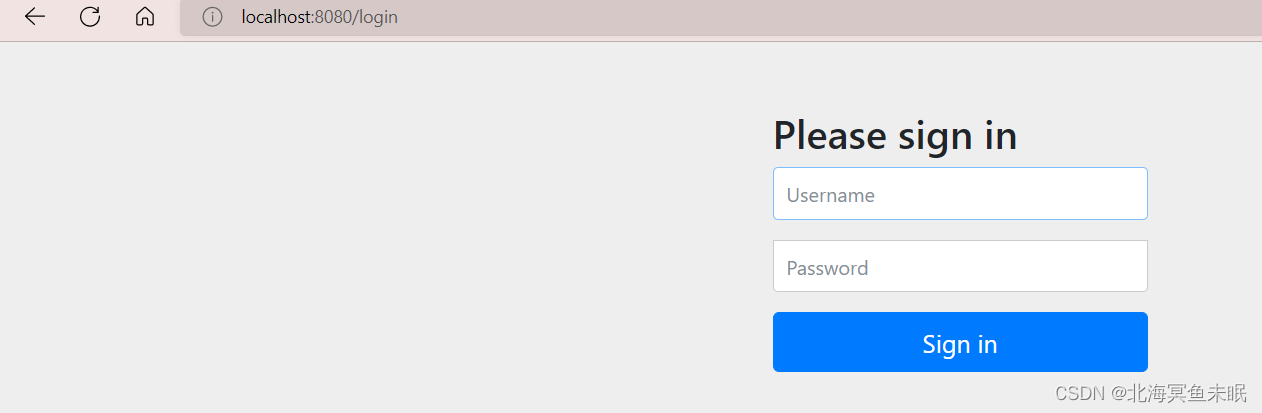
访问/private/t1跳转到
输入账号密码之后访问到
自定义登录界面
在前面的学习中我们知道了默认的登录界面是在过滤器DefaultLoginPageGeneratingFilter里面实现的,现在我们想要自定义一个登录界面。
- 首先引入thymeleaf依赖
		<dependency>
            <groupId>org.springframework.boot</groupId>
            <artifactId>spring-boot-starter-thymeleaf</artifactId>
        </dependency>
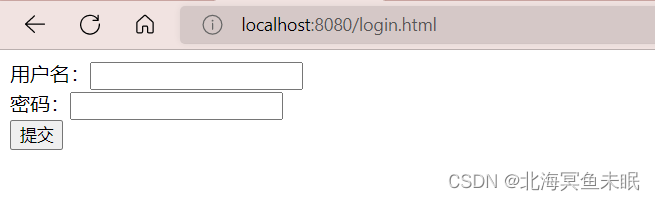
- 在templates目录下面创建一个login的html页面
<!DOCTYPE html>
<html lang="en" xmlns:th="http://www.thymeleaf.org">
<head>
    <meta charset="UTF-8">
    <title>冬木自定义用户登录</title>

</head>
<body>
    <form th:action="@{/login}" method="post">
        用户名:<input type="text" name="username"><br>
        密码:<input type="text" name="password"><br>
        <input type="submit" name="登录">

    </form>
</body>
</html>
编写一个controller接口用于跳转到我们自己写的登录页面,


这里的前缀默认就是在templates下面因此我下面直接return login
package com.dongmu.controller;

import org.springframework.stereotype.Controller;
import org.springframework.web.bind.annotation.RequestMapping;

@Controller
public class LoginController {

    @RequestMapping("/login.html")
    public String login(){
        return "login";
    }
}
添加配置路径,
spring:
  thymeleaf:
    cache: false #可以让我们的修改立即生效
另外把认证相关的接口放行
@Override
protected void configure(HttpSecurity http) throws Exception {
//ss里面要求放行的资源要写在任何请求的前面
http.authorizeRequests()//开启请求的权限管理
.mvcMatchers("/public/**").permitAll()
.mvcMatchers("/login.html").permitAll()
.anyRequest().authenticated()
.and()
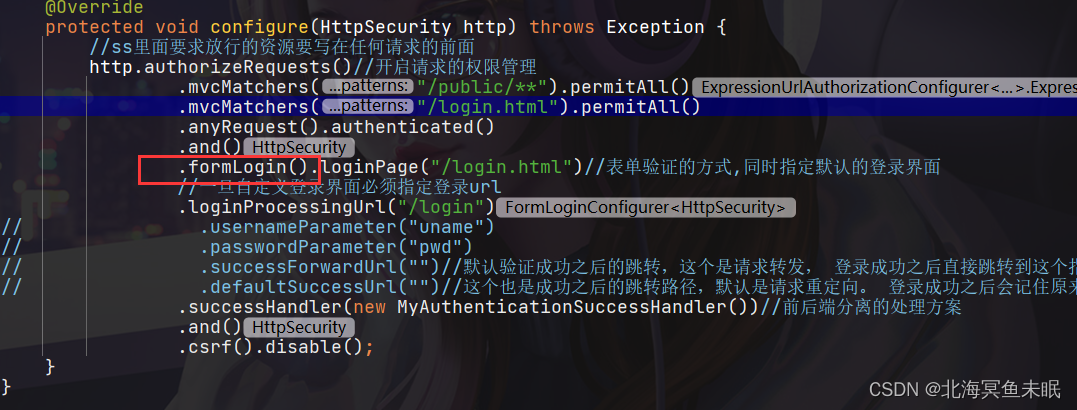
.formLogin().loginPage("/login");//表单验证的方式,同时指定默认的登录界面
}
这个时候再去访问页面就会跳转到下面这个页面
这个时候登录会发现还是条状到登录页面,这里要注意,一旦指自定义了登录页面就需要指定登录的url,所以我们在接口里面添加下面的代码
//ss里面要求放行的资源要写在任何请求的前面
        http.authorizeRequests()//开启请求的权限管理
                .mvcMatchers("/public/**").permitAll()
                .mvcMatchers("/login.html").permitAll()
                .anyRequest().authenticated()
                .and()
                .formLogin().loginPage("/login.html")//表单验证的方式,同时指定默认的登录界面
                //一旦自定义登录界面必须指定登录url
                .loginProcessingUrl("/login")
                .and()
                .csrf().disable();
这个时候就可以登录成功了。
但是这时候要注意源码中指定了登录的参数名,只能是username和password。
这个时候可以进行修改如下
http.authorizeRequests()//开启请求的权限管理
                .mvcMatchers("/public/**").permitAll()
                .mvcMatchers("/login.html").permitAll()
                .anyRequest().authenticated()
                .and()
                .formLogin().loginPage("/login.html")//表单验证的方式,同时指定默认的登录界面
                //一旦自定义登录界面必须指定登录url
                .loginProcessingUrl("/login")
                .usernameParameter("uname")//指定登录的参数
                .passwordParameter("pwd")
//                .successForwardUrl("")//默认验证成功之后的跳转,这个是请求转发, 登录成功之后
				//直接跳转到这个指定的地址,原来的地址不跳转了。
                .defaultSuccessUrl("")//这个也是成功之后的跳转路径,默认是请求重定向。 登录成功之
                //后会记住原来访问的路径,也可以再传递一个boolean参数指定地址默认false
                .and()
                .csrf().disable();
前后端分离项目路径跳转
前面介绍了前后端不分离项目的登录认证成功之后的路径跳转,但是针对于前后端分离项目,比如有的时候可能会发送AJAX请求,这个时候怎么处理呢?
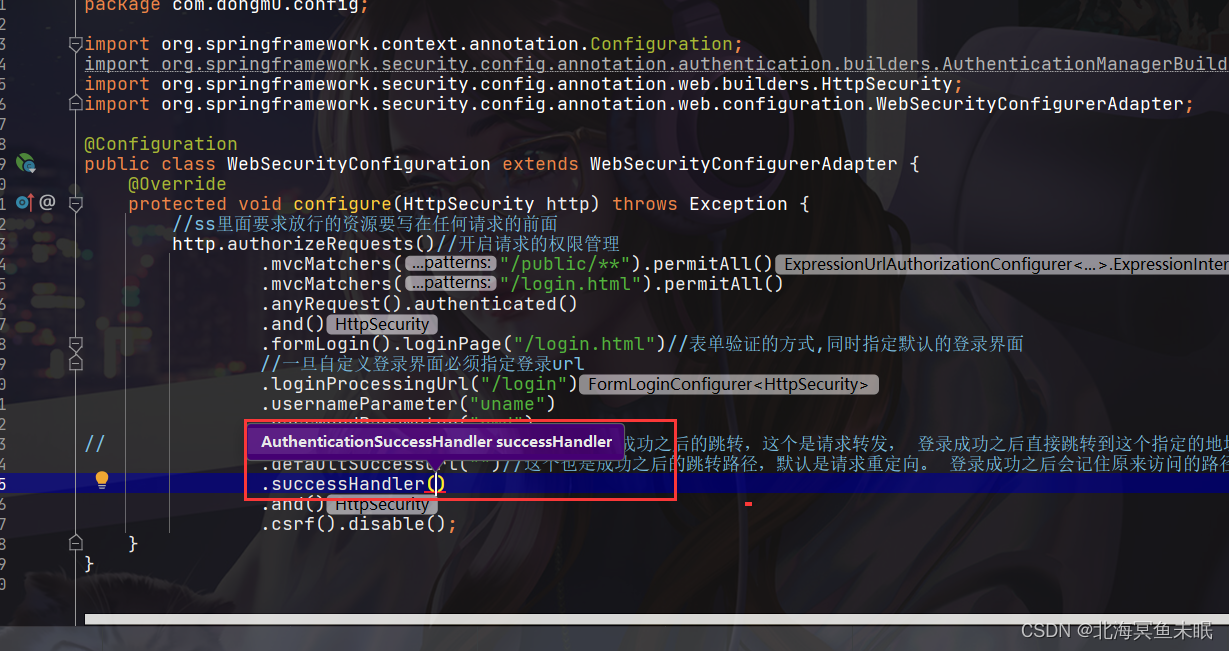
我们可以自定义一个类实现AuthenticationSuccessHandler接口即可。
package com.dongmu.config;

import com.fasterxml.jackson.databind.ObjectMapper;
import org.springframework.security.core.Authentication;
import org.springframework.security.web.authentication.AuthenticationSuccessHandler;

import javax.servlet.ServletException;
import javax.servlet.http.HttpServletRequest;
import javax.servlet.http.HttpServletResponse;
import java.io.IOException;
import java.util.HashMap;

public class MyAuthenticationSuccessHandler implements AuthenticationSuccessHandler {
    @Override
    public void onAuthenticationSuccess(HttpServletRequest request, HttpServletResponse response, Authentication authentication) throws IOException, ServletException {
        HashMap<String,Object> hashMap = new HashMap<>();
        hashMap.put("msg","登录成功");
        hashMap.put("code",200);
        hashMap.put("auth",authentication);
        response.setContentType("application/json;charset=utf-8");
        String s = new ObjectMapper().writeValueAsString(hashMap);
        response.getWriter().write(s);

    }
}
在successHandler里面配置即可
//ss里面要求放行的资源要写在任何请求的前面
        http.authorizeRequests()//开启请求的权限管理
                .mvcMatchers("/public/**").permitAll()
                .mvcMatchers("/login.html").permitAll()
                .anyRequest().authenticated()
                .and()
                .formLogin().loginPage("/login.html")//表单验证的方式,同时指定默认的登录界面
                //一旦自定义登录界面必须指定登录url
                .loginProcessingUrl("/login")
//                .usernameParameter("uname")
//                .passwordParameter("pwd")
//                .successForwardUrl("")//默认验证成功之后的跳转,这个是请求转发, 登录成功之后直接跳转到这个指定的地址,原来的地址不跳转了。
//                .defaultSuccessUrl("")//这个也是成功之后的跳转路径,默认是请求重定向。 登录成功之后会记住原来访问的路径
                .successHandler(new MyAuthenticationSuccessHandler())//前后端分离的处理方案
                .and()
                .csrf().disable();
这个时候登录成功返回的是一个json字符串。

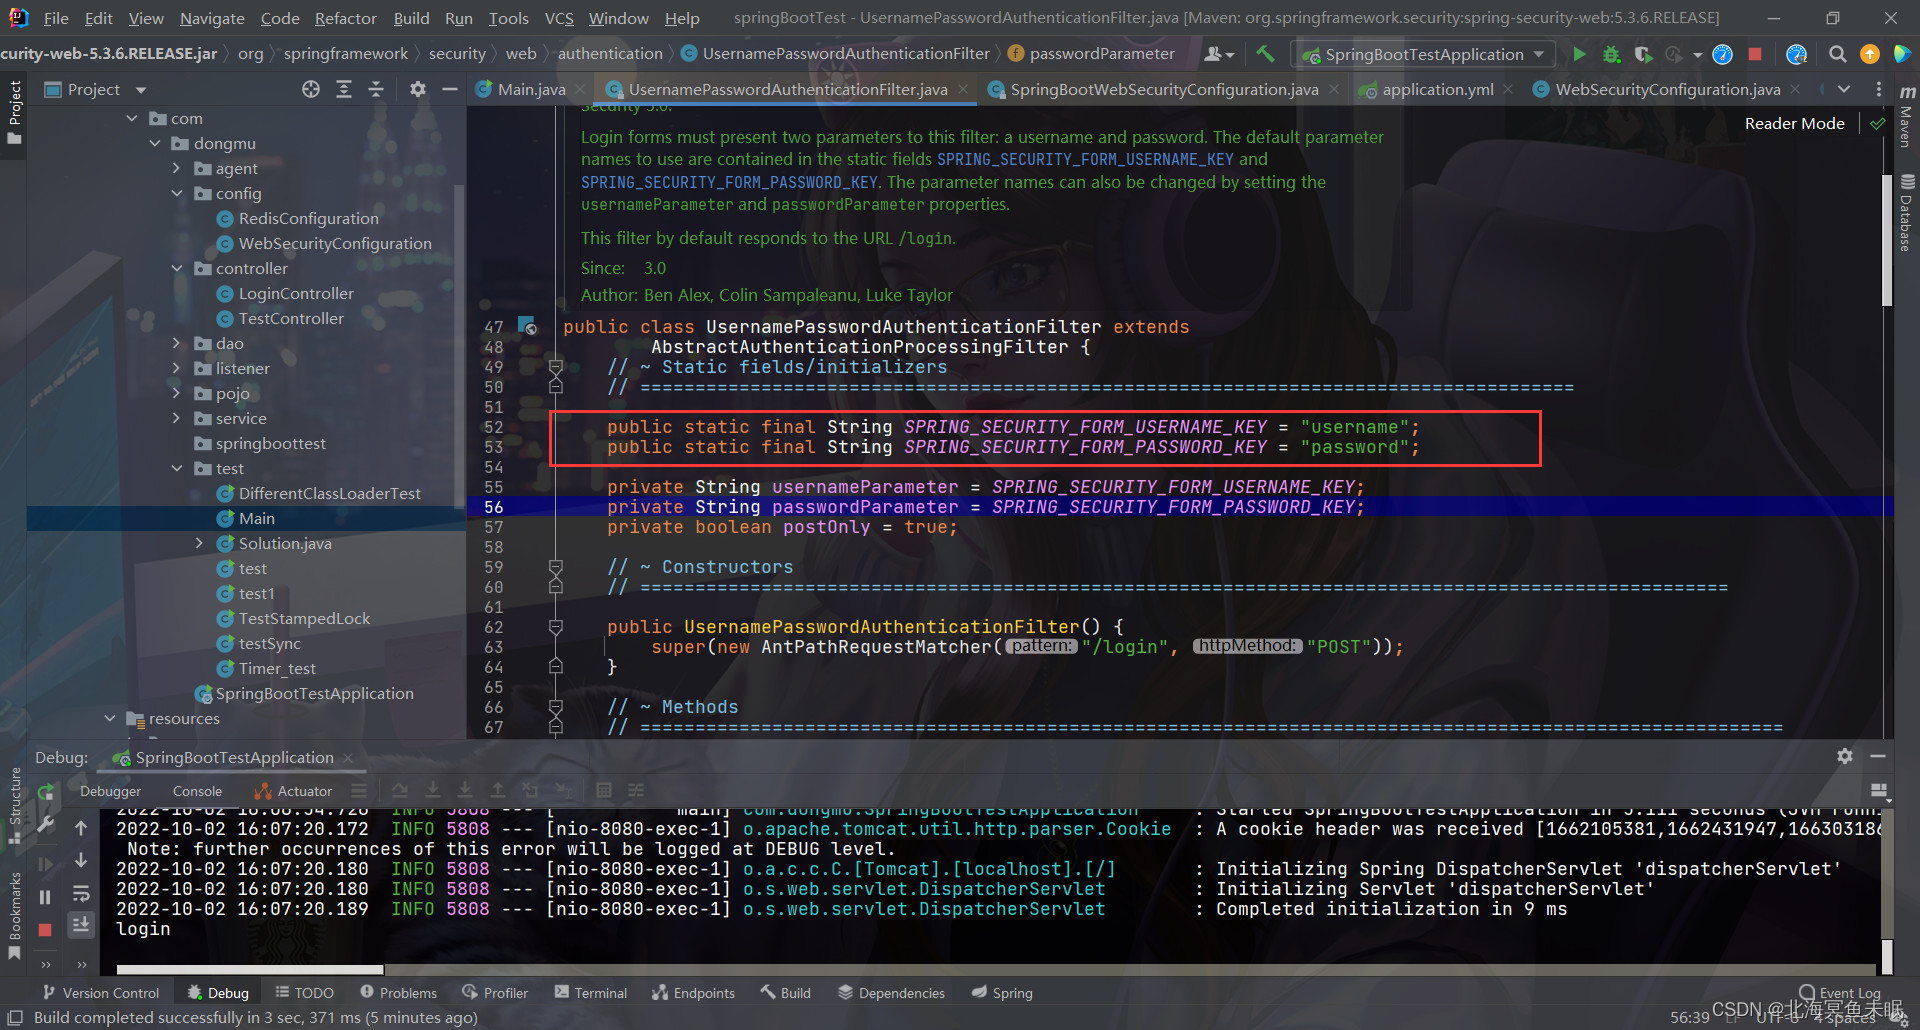
身份验证失败跳转
首先点进


UsernamePasswordAuthenticationFilter这个类里面由一个方法attemptAuthentication进行身份的验证
public Authentication attemptAuthentication(HttpServletRequest request,
			HttpServletResponse response) throws AuthenticationException {
		if (postOnly && !request.getMethod().equals("POST")) {
			throw new AuthenticationServiceException(
					"Authentication method not supported: " + request.getMethod());
		}

		String username = obtainUsername(request);
		String password = obtainPassword(request);

		if (username == null) {
			username = "";
		}

		if (password == null) {
			password = "";
		}

		username = username.trim();

		UsernamePasswordAuthenticationToken authRequest = new UsernamePasswordAuthenticationToken(
				username, password);

		// Allow subclasses to set the "details" property
		setDetails(request, authRequest);

		return this.getAuthenticationManager().authenticate(authRequest);
	}
然后最后一句代码authenticate(authRequest)会进入
public Authentication authenticate(Authentication authentication)
			throws AuthenticationException {
		Class<? extends Authentication> toTest = authentication.getClass();
		AuthenticationException lastException = null;
		AuthenticationException parentException = null;
		Authentication result = null;
		Authentication parentResult = null;
		boolean debug = logger.isDebugEnabled();

		for (AuthenticationProvider provider : getProviders()) {
			if (!provider.supports(toTest)) {
				continue;
			}

			if (debug) {
				logger.debug("Authentication attempt using "
						+ provider.getClass().getName());
			}

			try {
				result = provider.authenticate(authentication);

				if (result != null) {
					copyDetails(authentication, result);
					break;
				}
			}
			catch (AccountStatusException | InternalAuthenticationServiceException e) {
				prepareException(e, authentication);
				// SEC-546: Avoid polling additional providers if auth failure is due to
				// invalid account status
				throw e;
			} catch (AuthenticationException e) {
				lastException = e;
			}
		}

		if (result == null && parent != null) {
			// Allow the parent to try.
			try {
				result = parentResult = parent.authenticate(authentication);
			}
			catch (ProviderNotFoundException e) {
				// ignore as we will throw below if no other exception occurred prior to
				// calling parent and the parent
				// may throw ProviderNotFound even though a provider in the child already
				// handled the request
			}
			catch (AuthenticationException e) {
				lastException = parentException = e;
			}
		}

		if (result != null) {
			if (eraseCredentialsAfterAuthentication
					&& (result instanceof CredentialsContainer)) {
				// Authentication is complete. Remove credentials and other secret data
				// from authentication
				((CredentialsContainer) result).eraseCredentials();
			}

			// If the parent AuthenticationManager was attempted and successful then it will publish an AuthenticationSuccessEvent
			// This check prevents a duplicate AuthenticationSuccessEvent if the parent AuthenticationManager already published it
			if (parentResult == null) {
				eventPublisher.publishAuthenticationSuccess(result);
			}
			return result;
		}

		// Parent was null, or didn't authenticate (or throw an exception).

		if (lastException == null) {
			lastException = new ProviderNotFoundException(messages.getMessage(
					"ProviderManager.providerNotFound",
					new Object[] { toTest.getName() },
					"No AuthenticationProvider found for {0}"));
		}

		// If the parent AuthenticationManager was attempted and failed then it will publish an AbstractAuthenticationFailureEvent
		// This check prevents a duplicate AbstractAuthenticationFailureEvent if the parent AuthenticationManager already published it
		if (parentException == null) {
			prepareException(lastException, authentication);
		}

		throw lastException;
	}
上面代码中
try {
				result = provider.authenticate(authentication);

				if (result != null) {
					copyDetails(authentication, result);
					break;
				}
			}
这一块会进入
public Authentication authenticate(Authentication authentication)
			throws AuthenticationException {
		Assert.isInstanceOf(UsernamePasswordAuthenticationToken.class, authentication,
				() -> messages.getMessage(
						"AbstractUserDetailsAuthenticationProvider.onlySupports",
						"Only UsernamePasswordAuthenticationToken is supported"));

		// Determine username
		String username = (authentication.getPrincipal() == null) ? "NONE_PROVIDED"
				: authentication.getName();

		boolean cacheWasUsed = true;
		UserDetails user = this.userCache.getUserFromCache(username);

		if (user == null) {
			cacheWasUsed = false;

			try {
				user = retrieveUser(username,
						(UsernamePasswordAuthenticationToken) authentication);
			}
这里面user = retrieveUser(username, (UsernamePasswordAuthenticationToken) authentication);的实现
protected final UserDetails retrieveUser(String username,
			UsernamePasswordAuthenticationToken authentication)
			throws AuthenticationException {
		prepareTimingAttackProtection();
		try {
			UserDetails loadedUser = this.getUserDetailsService().loadUserByUsername(username);
			if (loadedUser == null) {
				throw new InternalAuthenticationServiceException(
						"UserDetailsService returned null, which is an interface contract violation");
			}
			return loadedUser;
		}
		catch (UsernameNotFoundException ex) {
			mitigateAgainstTimingAttack(authentication);
			throw ex;
		}
		catch (InternalAuthenticationServiceException ex) {
			throw ex;
		}
		catch (Exception ex) {
			throw new InternalAuthenticationServiceException(ex.getMessage(), ex);
		}
	}
可以发现这里就是去一开始我们学习的map里面找到对应用户名和密码,这里面应该会报出异常。这个异常后面会被这个方法接收
private void doAuthenticate(HttpServletRequest request, HttpServletResponse response) throws IOException, ServletException {
		Authentication authResult;

		Object principal = getPreAuthenticatedPrincipal(request);
		Object credentials = getPreAuthenticatedCredentials(request);

		if (principal == null) {
			if (logger.isDebugEnabled()) {
				logger.debug("No pre-authenticated principal found in request");
			}

			return;
		}

		if (logger.isDebugEnabled()) {
			logger.debug("preAuthenticatedPrincipal = " + principal
					+ ", trying to authenticate");
		}

		try {
			PreAuthenticatedAuthenticationToken authRequest = new PreAuthenticatedAuthenticationToken(
					principal, credentials);
			authRequest.setDetails(authenticationDetailsSource.buildDetails(request));
			authResult = authenticationManager.authenticate(authRequest);
			successfulAuthentication(request, response, authResult);
		}
		catch (AuthenticationException failed) {
			unsuccessfulAuthentication(request, response, failed);

			if (!continueFilterChainOnUnsuccessfulAuthentication) {
				throw failed;
			}
		}
	}
执行unsuccessfulAuthentication
protected void unsuccessfulAuthentication(HttpServletRequest request,
			HttpServletResponse response, AuthenticationException failed) throws IOException, ServletException {
		SecurityContextHolder.clearContext();

		if (logger.isDebugEnabled()) {
			logger.debug("Cleared security context due to exception", failed);
		}
		//这里会把异常信息放到request作用域当中
		request.setAttribute(WebAttributes.AUTHENTICATION_EXCEPTION, failed);

		if (authenticationFailureHandler != null) {
			authenticationFailureHandler.onAuthenticationFailure(request, response, failed);
		}
	}
这里配置请求转发
protected void configure(HttpSecurity http) throws Exception {
        //ss里面要求放行的资源要写在任何请求的前面
        http.authorizeRequests()//开启请求的权限管理
                .mvcMatchers("/public/**").permitAll()
                .mvcMatchers("/login.html").permitAll()
                .anyRequest().authenticated()
                .and()
                .formLogin().loginPage("/login.html")//表单验证的方式,同时指定默认的登录界面
                //一旦自定义登录界面必须指定登录url
                .loginProcessingUrl("/login")
//                .usernameParameter("uname")
//                .passwordParameter("pwd")
//                .successForwardUrl("")//默认验证成功之后的跳转,这个是请求转发, 登录成功之后直接跳转到这个指定的地址,原来的地址不跳转了。
//                .defaultSuccessUrl("")//这个也是成功之后的跳转路径,默认是请求重定向。 登录成功之后会记住原来访问的路径
                .successHandler(new MyAuthenticationSuccessHandler())//前后端分离的处理方案
                .failureForwardUrl("/login.html")//登录失败之后的请求转发页面
//                .failureUrl("/login.html")//登录失败之后的重定向页面
                .and()
                .csrf().disable();
    }
可以直接从request作用域中获取异常
<!DOCTYPE html>
<html lang="en" xmlns:th="http://www.thymeleaf.org">
<head>
    <meta charset="UTF-8">
    <title>冬木自定义用户登录</title>

</head>
<h2>
    <div th:text="${SPRING_SECURITY_LAST_EXCEPTION}"></div>
</h2>
<body>
    <form th:action="@{/login}" method="post">
        用户名:<input type="text" name="username"><br>
        密码:<input type="text" name="password"><br>
        <input type="submit" name="登录">

    </form>
</body>
</html>

如果是在重定向就会放在session作用域中。如果是请求转发就会放到reques作用域中。
前后端分离项目认证失败处理
实现接口AuthenticationFailureHandler
package com.dongmu.config;

import com.fasterxml.jackson.databind.ObjectMapper;
import org.springframework.security.core.Authentication;
import org.springframework.security.core.AuthenticationException;
import org.springframework.security.web.authentication.AuthenticationFailureHandler;
import org.springframework.security.web.authentication.AuthenticationSuccessHandler;

import javax.servlet.ServletException;
import javax.servlet.http.HttpServletRequest;
import javax.servlet.http.HttpServletResponse;
import java.io.IOException;
import java.util.HashMap;

public class MyAuthenticationHandler implements AuthenticationSuccessHandler, AuthenticationFailureHandler {
    @Override
    public void onAuthenticationSuccess(HttpServletRequest request, HttpServletResponse response, Authentication authentication) throws IOException, ServletException {
        HashMap<String,Object> hashMap = new HashMap<>();
        hashMap.put("msg","登录成功");
        hashMap.put("code",200);
        hashMap.put("auth",authentication);
        response.setContentType("application/json;charset=utf-8");
        String s = new ObjectMapper().writeValueAsString(hashMap);
        response.getWriter().write(s);
    }


    @Override
    public void onAuthenticationFailure(HttpServletRequest request, HttpServletResponse response, AuthenticationException exception) throws IOException, ServletException {
        HashMap<String,Object> hashMap = new HashMap<>();
        hashMap.put("code",403);
        hashMap.put("msg",exception.getMessage());
        response.setContentType("application/json;charset=utf-8");
        String s = new ObjectMapper().writeValueAsString(hashMap);
        response.getWriter().write(s);
    }
}
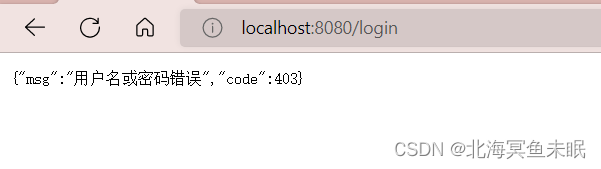
配置认证失败接口实现类
protected void configure(HttpSecurity http) throws Exception {
        //ss里面要求放行的资源要写在任何请求的前面
        http.authorizeRequests()//开启请求的权限管理
                .mvcMatchers("/public/**").permitAll()
                .mvcMatchers("/login.html").permitAll()
                .anyRequest().authenticated()
                .and()
                .formLogin().loginPage("/login.html")//表单验证的方式,同时指定默认的登录界面
                //一旦自定义登录界面必须指定登录url
                .loginProcessingUrl("/login")
//                .usernameParameter("uname")
//                .passwordParameter("pwd")
//                .successForwardUrl("")//默认验证成功之后的跳转,这个是请求转发, 登录成功之后直接跳转到这个指定的地址,原来的地址不跳转了。
//                .defaultSuccessUrl("")//这个也是成功之后的跳转路径,默认是请求重定向。 登录成功之后会记住原来访问的路径
//                .successHandler(new MyAuthenticationSuccessHandler())//前后端分离的处理方案
//                .failureForwardUrl("/login.html")//登录失败之后的请求转发页面
                .failureUrl("/login.html")//登录失败之后的重定向页面
                .failureHandler(new MyAuthenticationHandler())
                .and()
                .csrf().disable();
    }


 1万+
1万+


 被折叠的 条评论
为什么被折叠?
被折叠的 条评论
为什么被折叠?
 到【灌水乐园】发言


