


旧版jsoncpp编译
1、预备条件:
JsonCPP类库http://sourceforge.net/projects/jsoncpp/?source=dlp
SCONS编译器http://sourceforge.net/projects/scons/?source=dlp
Pythonhttp://www.python.org/
JsonCPP类库需要Scons编译器来编译,而Scons需要Python安装了才能使用。具体安装步骤请参见文件夹下的ReadMe文件。
2、
安装scons:
sudo apt-get install scons
解包jsoncpp:
tar -zxf jsoncpp-src-0.5.0.tar.gz
jsoncpp安装:
解包后进入其目录。输入以下命令:
scons platform=linux-gcc 就会安装成功
3、
上述已经完成jsoncpp的编译,在解压目录jsoncpp-src-0.5.0/libs/linux-gcc-7/下可以看到生成了两个文件:
libjson_linux-gcc-7_libmt.a

libjson_linux-gcc-7_libmt.so
把.a 和.so 文件拷贝到/usrl/lib 目录下(参考了不同资料,说法并不统一,有的是拷贝到/lib下,有的则是/usr/local/lib),可以为了方便编译给它改个名字libjsoncpp.a
同样,将解包目录下的(jsoncpp-src-0.5.0)的include拷贝到/usr/lib下面。
sudo mv include/json/ /usr/include/
代码测试:
#include<json/json.h>
#include<iostream>
using namespace std;

int main(int argc, char** argv)
{

Json::Value root;
Json::FastWriter fast;
root["ModuleType"]= Json::Value("你好");
root["ModuleCode"]= Json::Value("22");
root["ModuleDesc"]= Json::Value("33");
root["DateTime"]= Json::Value("44");
root["LogType"]= Json::Value("55");
cout<<fast.write(root)<<endl;
return 0;
}
编译的语句:
huqin@ubuntu:~/bstr/json$ g++ main.cpp -o main -L/home/huqin/bstr/json/Deps/lib32/libjsoncpp.a /home/huqin/bstr/json/Deps/lib32/libjsoncpp.a运行结果:
huqin@ubuntu:~/bstr/json$ ./main
{"DateTime":"44","LogType":"55","ModuleCode":"22","ModuleDesc":"33","ModuleType":"▒▒▒"}

huqin@ubuntu:~/bstr/json$
新版jsoncpp编译
github地址:GitHub - open-source-parsers/jsoncpp: A C++ library for interacting with JSON.
## 使用源文件编译未编库
在github上下载好以后,在命令行下进入该项目所在的地址,直接执行python amalgamate.py命令,会在dist目录下生成两个头文件和一个源文件json-forwards.h 、json.h和jsoncpp.cpp。因为jsoncpp源码就四五千行,直接放在jsconcpp.cpp中和工程中其他代码一起编译也比较方便。
huqin@ubuntu:~/bstr/json/jsoncpp-master$ ./amalgamate.py#include <iostream>
#include "json/json.h"
using namespace std;
//封装json类
class JsonParse
{
public:
JsonParse(Json::Value J)
:m_json(J)
{};
JsonParse(const void *V)
:m_str(V ? (const char*)V : "")
{};
JsonParse(const char *S)
:m_str(S ? S : "")
{};
JsonParse(const char *S, int L)
:m_str(S ? S : "", S ? L : 0)
{};
JsonParse(std::string S)
:m_str(S)
{};
virtual ~JsonParse(){};
public:
std::string toString(const char* indent="")
{
if(m_json.isObject() && m_json.getMemberNames().size() == 0)
return "";
else if(m_json.isString())
return m_json.asString();
Json::StreamWriterBuilder builder;
if(indent)
builder["indentation"] = indent; //The JSON document is written in a single line if indent == ""
return Json::writeString(builder, m_json);
};
const char* toCString(const char* indent="")
{
m_str = toString(indent);
return m_str.c_str();
};
bool toJson(Json::Value &J)
{
bool ret = false;
JSONCPP_STRING errs;
Json::CharReaderBuilder builder;
Json::CharReaderBuilder::strictMode(&builder.settings_);
//builder["collectComments"] = false; // true = 允许在反序列化的时候保存注释,然后在序列化的时候写回注释
Json::CharReader* reader = builder.newCharReader();
ret = reader->parse(m_str.data(), m_str.data() + m_str.size(), &J, &errs);
if(!ret || !errs.empty())
cout<<"error、"<<endl;
if(reader){delete reader;reader = NULL;}
return ret;
}
std::string formatMinSize()
{
/*
* 仅支持构造入参为字符串的形式
* 如果是Json::Value的构造形式,可以直接格式化成指定的indent
*/
if(!m_str.empty())
toJson(m_json);
return toString();
}
private:
std::string m_str;
Json::Value m_json;
};
int main(int argc, char *argv[])
{
Json::Value boot;
/* const char* / std::string -> JSON (除了首尾的分号其他分号必须加转义字符否则格式错误)*/
JsonParse("{ \"datatype\":1,\"sessionId\" : 55,\"streamId\" : 55 ,\"string\" : \"sting recv\" }").toJson(boot);
cout<<"string:" <<boot["string"].asCString() <<endl;
return 0;
}
//运行结果:
huqin@ubuntu:~/bstr/json$ g++ main.cpp jsoncpp.cpp -o newmain
huqin@ubuntu:~/bstr/json$ ./newmain
string:sting recv## 使用源码编译库使用
准备工作下载cmake编译工具
卸载旧版cmake: $ sudo apt-get autoremove cmake
文件下载:$ wget https://cmake.org/files/v3.12/cmake-3.12.2-Linux-x86_64.tar.gz
解压:$ tar zxvf cmake-3.12.2-Linux-x86_64.tar.gz
创建软连接:先检查解压后的cmake文件路径,我的在/home/huqin/bstr/json/下:
sudo ln -sf /home/huqin/bstr/json/cmake-3.12.2-Linux-x86_64/bin/*  /usr/bin/
能检查出cmake --version说明cmake安装成功: $ cmake --version
下载camke可以编译版本: GitHub - open-source-parsers/jsoncpp at 00.11.z
//解压
unzip jsoncpp-00.11.z.zip
//进入目录使用cmake生成Makefile
cd jsoncpp-00.11.z/
cmake CMakeLists.txt
//编译生成库
make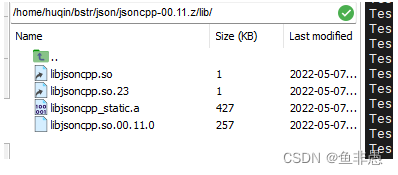
编译上面测试用例:
使用静态库直接连接动态库路径
g++ main.cpp -o libmain /home/huqin/bstr/json/jsoncpp-00.11.z/lib/libjsoncpp_static.a
使用动态库首先将动态库拷贝到可检测目录
sudo cp /home/huqin/bstr/json/jsoncpp-00.11.z/lib/libjsoncpp.so /usr/local/lib/
g++ main.cpp -o libmain -ljsoncpp
huqin@ubuntu:~/bstr/json$ ./libmain
string:sting recv
整体测试demo包含生成的库及jsoncpp、cmake源码:
链接:https://pan.baidu.com/s/1xeS4OTGfvDKsTrqkmraJgg
提取码:ykju


 3366
3366


 被折叠的 条评论
为什么被折叠?
被折叠的 条评论
为什么被折叠?
 到【灌水乐园】发言


