


centos7.9源码安装zabbix7.12-全网独有
- 3.CentOS7_Zabbix7.0LTS
- 4.yum源安装Mysql
- 5.安装Apache服务
- 6.安装第三方源-remi源
- 6.配置zabbix
- 7.支持nginx脚本
- 创作不易,小小的支持一下吧!
- endl-版权所有,转发请说出处,制作不易
3.CentOS7_Zabbix7.0LTS
里面的包已下载,在此处下载
https://wwqz.lanzouw.com/b00q0lr2mf
密码:bk2o
3.1.安装环境
3.1.1.环境一
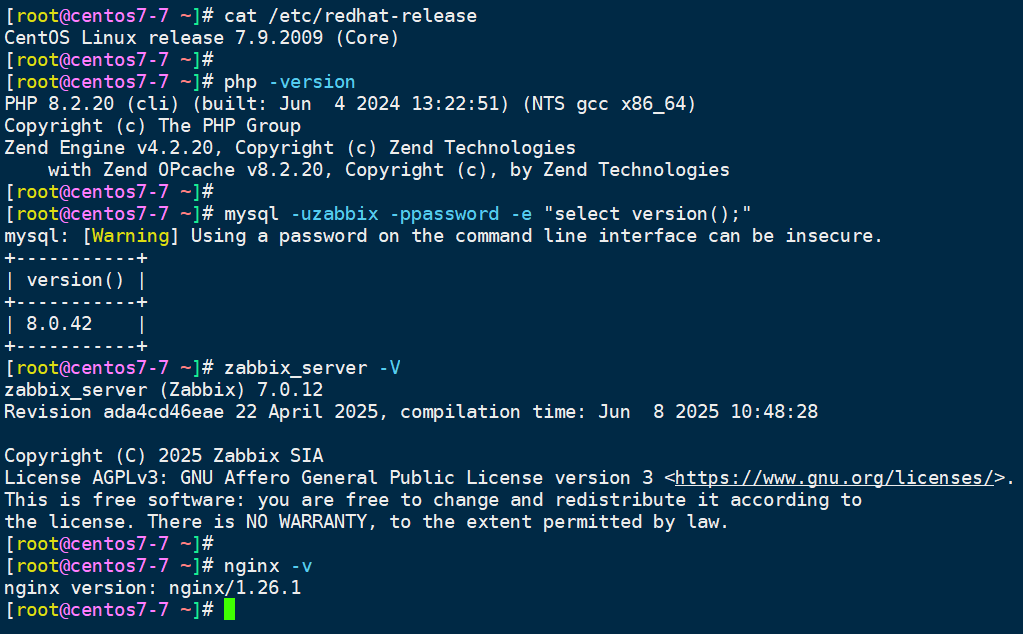
系统:centos7.9
php版本:php8.2.20
mysql版本:mysql8.0.42
zabbix版本:7.0.12
appache:

关闭系统防火墙
selinux

3.1.2.环境二
系统:centos7.9
php版本:php8.2.20
mysql版本:mysql8.0.42
zabbix版本:7.0.12
nginx版本:nginx/1.26.1

关闭系统防火墙
selinux
3.2.换成阿里源
备份源信息
mkdir /etc/yum.repos.d/bak
mv /etc/yum.repos.d/*.repo /etc/yum.repos.d/bak
下载centos源信息
curl -o /etc/yum.repos.d/CentOS-Base.repo https://mirrors.aliyun.com/repo/Centos-7.repo
sed -i -e '/mirrors.cloud.aliyuncs.com/d' -e '/mirrors.aliyuncs.com/d' /etc/yum.repos.d/CentOS-Base.repo
安装epel源
wget -O /etc/yum.repos.d/epel.repo https://mirrors.aliyun.com/repo/epel-7.repo
3.3.安装相关依赖包
3.3.1.直接安装依赖
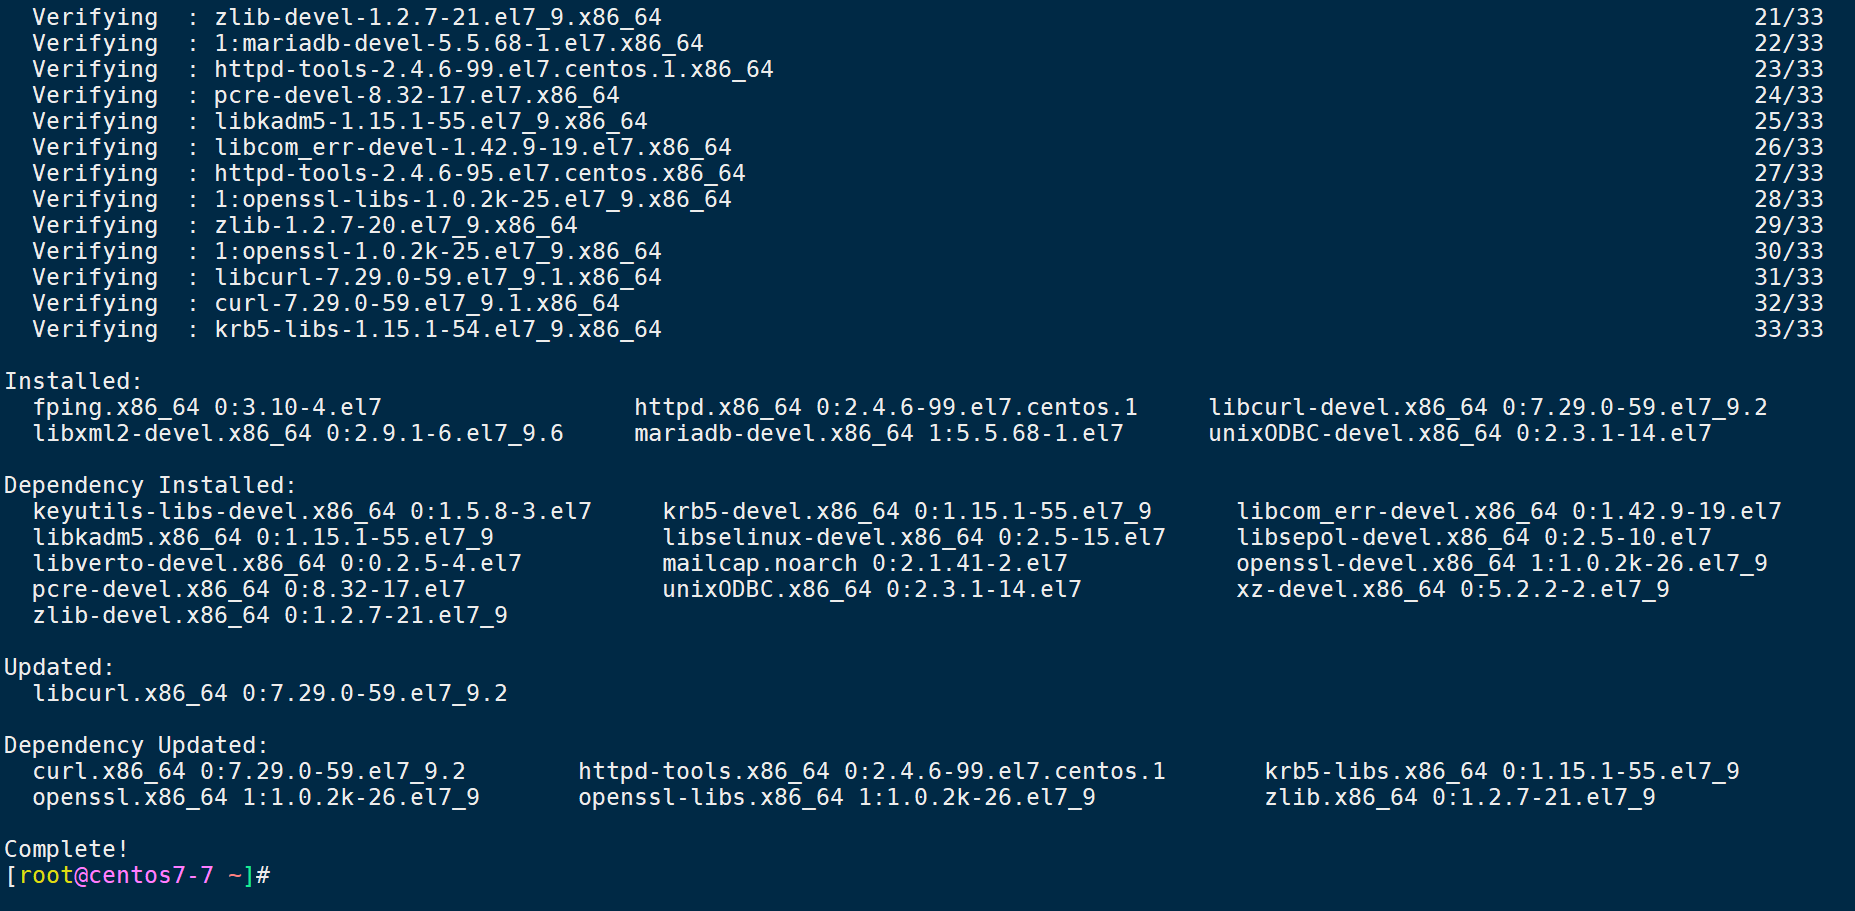
[root@centos7-7 ~]# yum -y install gcc gcc-c++ unixODBC-devel httpd mysql-devel libcurl libcurl-devel fping curl-devel libxml2 libxml2-devel perl-ExtUtils-MakeMaker libssh2 libssh2-devel pcre2-devel openssl11-libs java-11-openjdk-devel
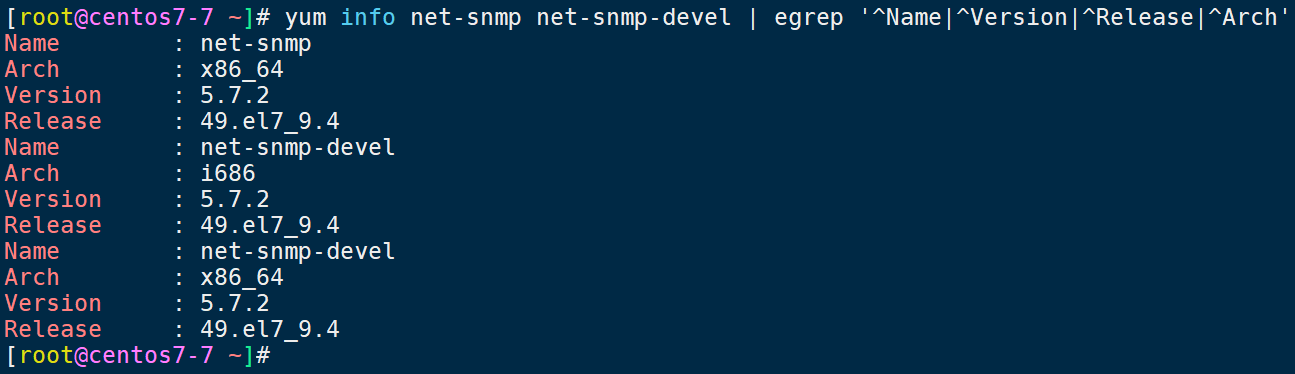
3.3.2.编译安装-遇到问题01-net-snmp
1️⃣ 其他注意事项:有可能遇到的问题及解决办法
Zabbix 7.0 需要 Net-SNMP 5.9 或更高版本,而 CentOS 7 默认的 net-snmp 是 5.7.x,太旧了。
net-snmp net-snmp-devel
[root@centos7-7 ~]# yum info net-snmp net-snmp-devel | egrep '^Name|^Version|^Release|^Arch'
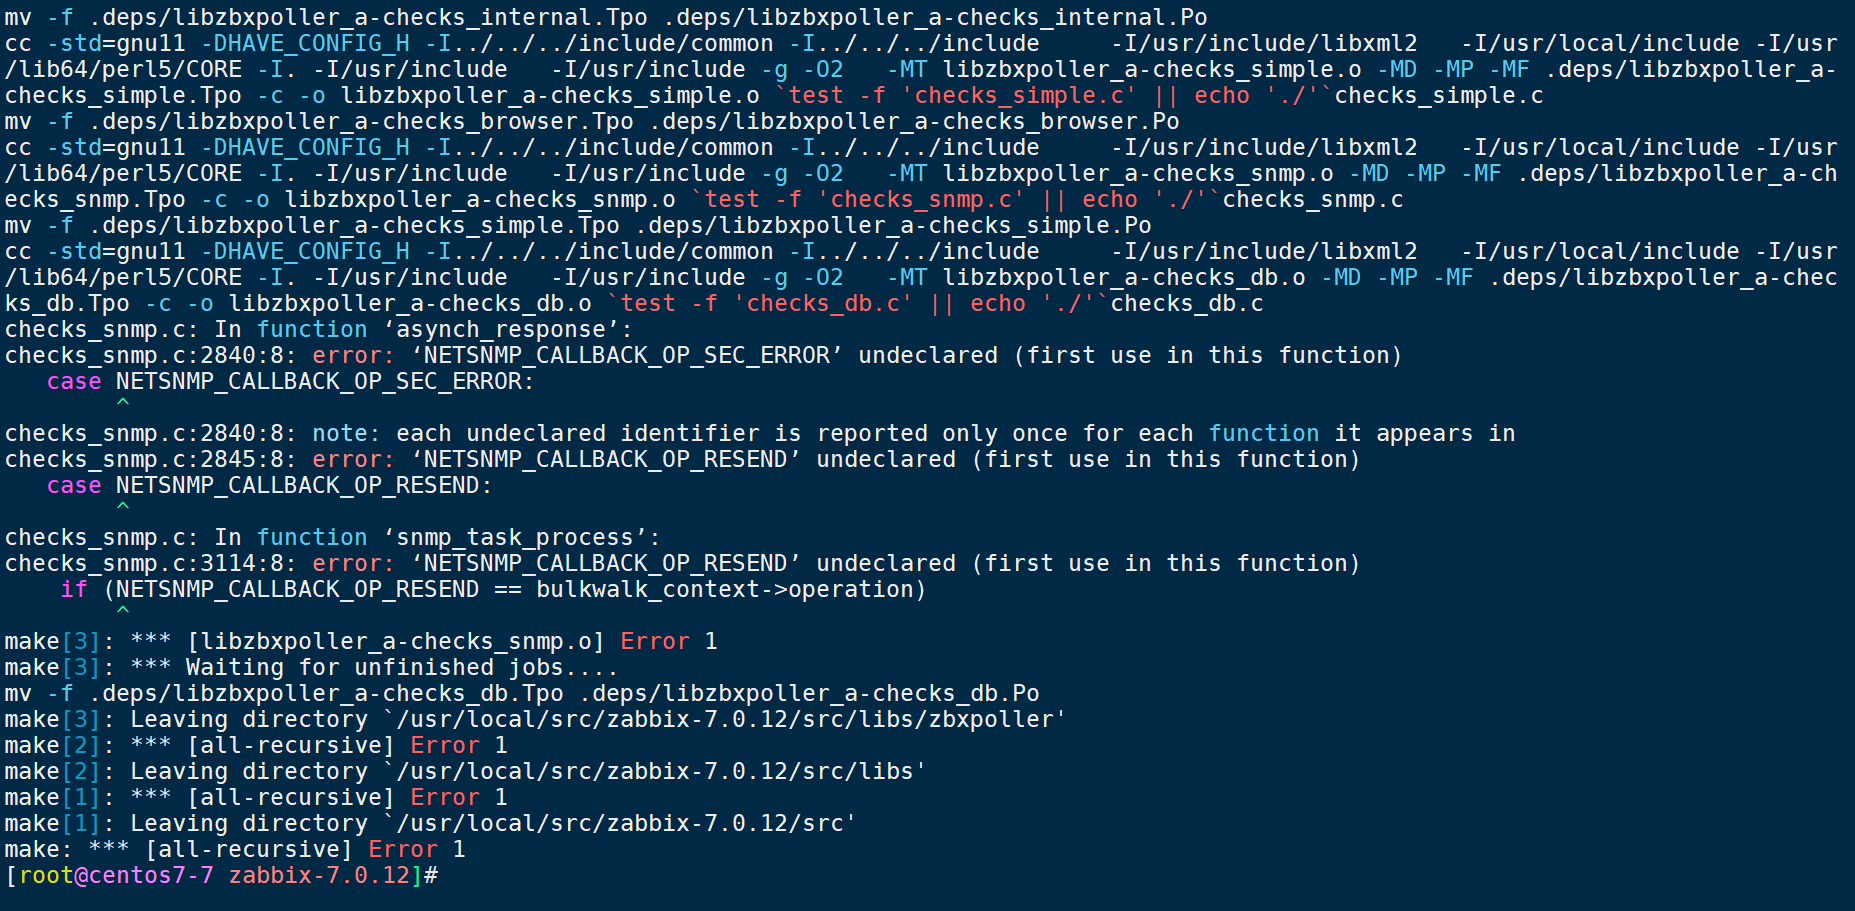
2️⃣ 遇到的问题
下面就是遇到的问题:

Zabbix 使用了 NET-SNMP 中的一些新宏(如 NETSNMP_CALLBACK_OP_SEC_ERROR、NETSNMP_CALLBACK_OP_RESEND),但你当前系统中安装的 net-snmp 版本太老,缺少这些定义,导致编译失败。
这些宏出现在 net-snmp 5.8 或更高版本中,而你当前使用的是:net-snmp 5.7.2-49.el7_9.4
[root@centos7-7 ~]# yum remove -y net-snmp net-snmp-devel
3️⃣ 下载源码包并解压:
cd /usr/local/src
wget https://sourceforge.net/projects/net-snmp/files/net-snmp/5.9.1/net-snmp-5.9.1.tar.gz
tar xf net-snmp-5.9.1.tar.gz
cd /usr/local/src/net-snmp-5.9.1
4️⃣ 编译安装
./configure --prefix=/usr/local/net-snmp --with-defaults

使用所有 CPU 核心进行编译并安装
make -j$(nproc) && make install
5️⃣ 设置环境变量,让 Zabbix 使用新的 net-snmp
cat >/etc/profile.d/net-snmp.sh<<-eof
export PATH=/usr/local/net-snmp/bin:\$PATH
export LD_LIBRARY_PATH=/usr/local/net-snmp/lib:\$LD_LIBRARY_PATH
export PKG_CONFIG_PATH=/usr/local/net-snmp/lib/pkgconfig:\$PKG_CONFIG_PATH
eof

source /etc/profile.d/net-snmp.sh
6️⃣ 验证
[root@centos7-7 net-snmp-5.9.1]# which snmpget
/usr/local/net-snmp/bin/snmpget
[root@centos7-7 net-snmp-5.9.1]# snmpget --version
NET-SNMP version: 5.9.1

验证动态库是否找到
[root@centos7-7 net-snmp-5.9.1]# ldd $(which snmpget) | grep net-snmp
        libnetsnmp.so.40 => /usr/local/net-snmp/lib/libnetsnmp.so.40 (0x00007f7e3b342000)

验证 pkg-config 配置
[root@centos7-7 net-snmp-5.9.1]# pkg-config --modversion netsnmp
5.9.1
3.3.3.编译安装-遇到问题02-libevent
1️⃣ 遇到问题
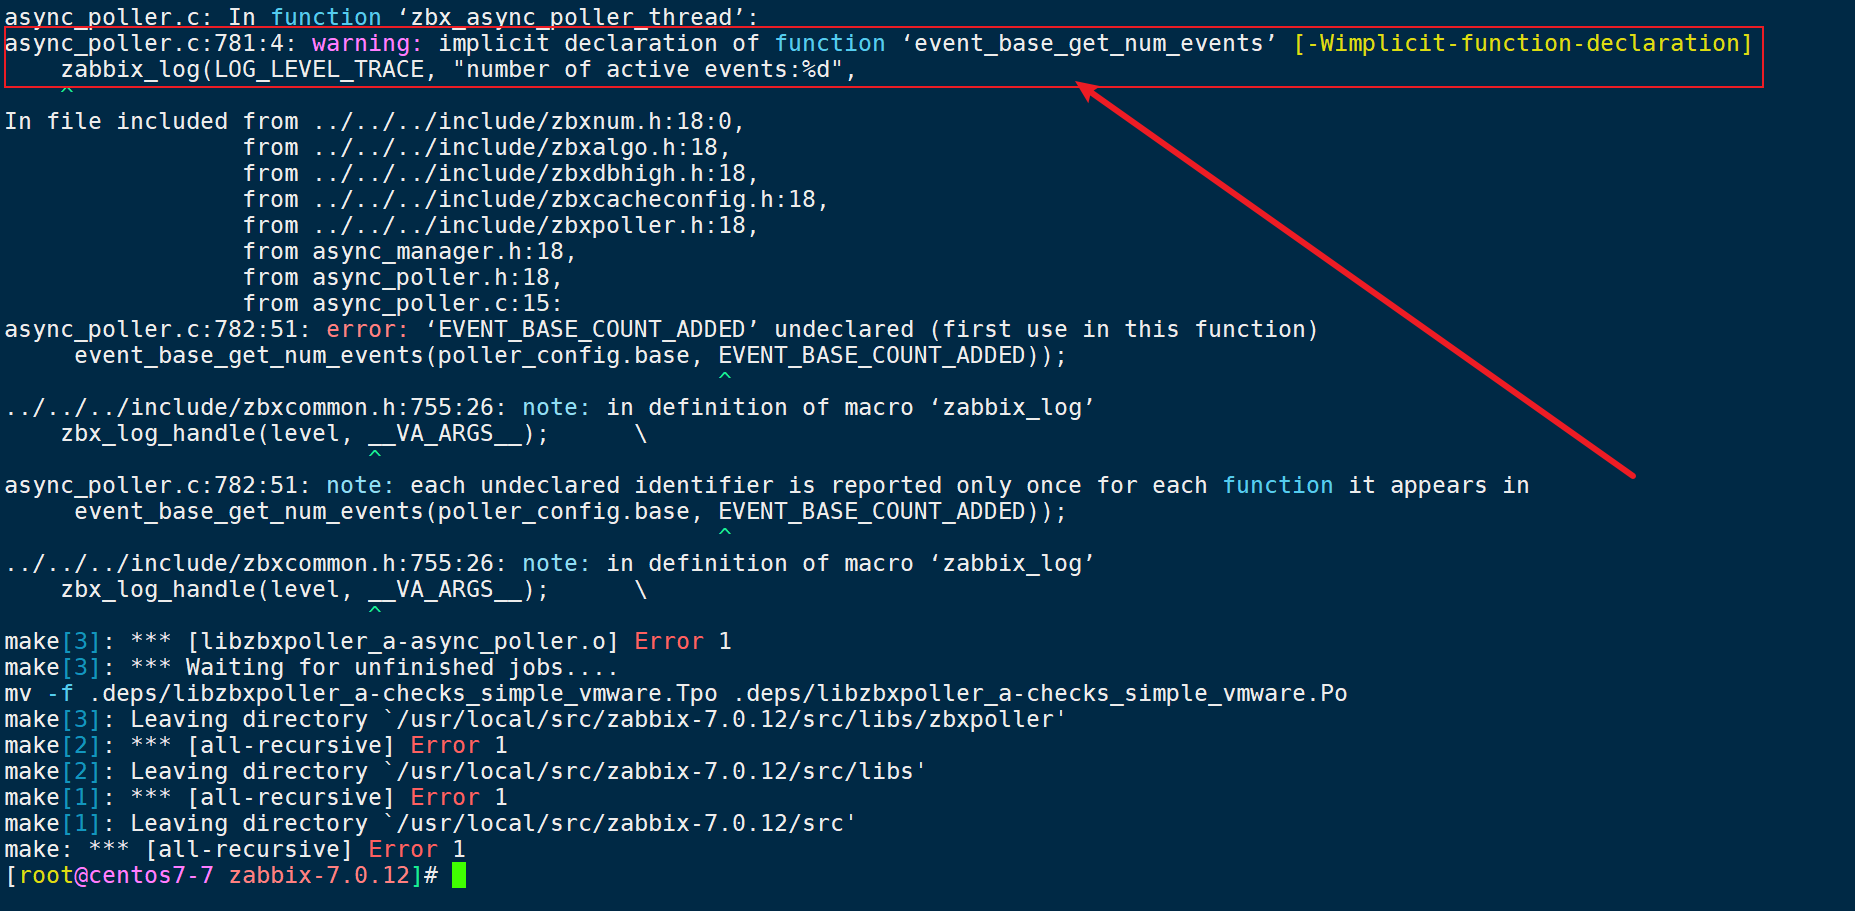
你当前问题的具体分析
event_base_get_num_events 是 libevent 2.1 以后才引入的函数
EVENT_BASE_COUNT_ADDED 是 libevent 2.1+ 中的宏

解决方案总结:升级或安装 libevent 2.1+
2️⃣ 移除旧的安装包
yum -y remove libevent libevent-devel
3️⃣ 下载 libevent 2.1.x 源码
cd /usr/local/src/
wget https://github.com/libevent/libevent/releases/download/release-2.1.12-stable/libevent-2.1.12-stable.tar.gz
可能下载失败,手动下载并上传

tar xf libevent-2.1.12-stable.tar.gz
cd /usr/local/src/libevent-2.1.12-stable/
4️⃣ 编译安装
配置编译,开启 pkg-config 支持
./configure --prefix=/usr/local/libevent2 --disable-static --enable-shared

使用所有 CPU 核心进行编译并安装
make -j$(nproc) && make install
5️⃣ 设置环境变量让编译器找到新版本 libevent
cat >/etc/profile.d/libevent.sh<<-eof
export CPPFLAGS="-I/usr/local/libevent2/include"
export LDFLAGS="-L/usr/local/libevent2/lib"
export LD_LIBRARY_PATH="/usr/local/libevent2/lib:\$LD_LIBRARY_PATH"
export CPPFLAGS="-I/usr/local/openssl/include -I/usr/local/libevent2/include"
export LDFLAGS="-L/usr/local/openssl/lib -L/usr/local/libevent2/lib"
eof

source /etc/profile.d/libevent.sh
6️⃣ 查看当前版本信息
[root@centos7-7 libevent-2.1.12-stable]# pkg-config --modversion libevent
2.1.12-stable
7️⃣ 让系统识别自定义 libevent 的库路径
添加库路径
[root@centos7-7 ~]# echo "/usr/local/libevent2/lib" > /etc/ld.so.conf.d/libevent2.conf
刷新库缓存
[root@centos7-7 ~]# ldconfig
验证
[root@centos7-7 ~]# ldconfig -p | grep libevent_core
        libevent_core-2.1.so.7 (libc6,x86-64) => /usr/local/libevent2/lib/libevent_core-2.1.so.7
        libevent_core-2.0.so.5 (libc6,x86-64) => /lib64/libevent_core-2.0.so.5
3.3.4.编译安装-遇到问题03-安装openssl
官网旧版本:https://openssl-library.org/source/old/index.html
1️⃣ 下载源码包,并解压
cd /usr/local/src
wget https://github.com/openssl/openssl/releases/download/OpenSSL_1_1_1k/openssl-1.1.1k.tar.gz
tar -xzf openssl-1.1.1k.tar.gz
cd /usr/local/src/openssl-1.1.1k

安装依赖包
yum -y install zlib-devel.x86_64
2️⃣ 配置编译
./config --prefix=/usr/local/openssl --openssldir=/usr/local/openssl shared zlib
3️⃣ 使用所有 CPU 核心进行编译并安装
make -j$(nproc) && make install
4️⃣ 查看当前版本新
[root@centos7-7 openssl-1.1.1k]# /usr/local/openssl/bin/openssl version
OpenSSL 1.1.1k  FIPS 25 Mar 2021
5️⃣ 导入环境变量
cat >/etc/profile.d/openssl.sh<<-eof
export PATH=/usr/local/openssl/bin:\$PATH
export LD_LIBRARY_PATH=/usr/local/openssl/lib:\$LD_LIBRARY_PATH
export PKG_CONFIG_PATH=/usr/local/openssl/lib/pkgconfig:\$PKG_CONFIG_PATH
export CPPFLAGS="-I/usr/local/openssl/include"
export LDFLAGS="-L/usr/local/openssl/lib"
eof

source /etc/profile.d/openssl.sh
6️⃣ 配置动态库搜索路径(让系统找到它的 .so 库)
echo "/usr/local/openssl/lib" > /etc/ld.so.conf.d/openssl.conf
ldconfig
5️⃣ 验证结果
[root@centos7-7 openssl-1.1.1k]# which openssl
/usr/bin/openssl
[root@centos7-7 openssl-1.1.1k]# openssl version
OpenSSL 1.1.1k  25 Mar 2021
3.4.创建用户和组
getent group zabbix || groupadd zabbix && useradd -r -g zabbix -m -s /sbin/nologin zabbix
3.5.下载上传源码包
https://cdn.zabbix.com/zabbix/sources/stable/7.0/zabbix-7.0.12.tar.gz
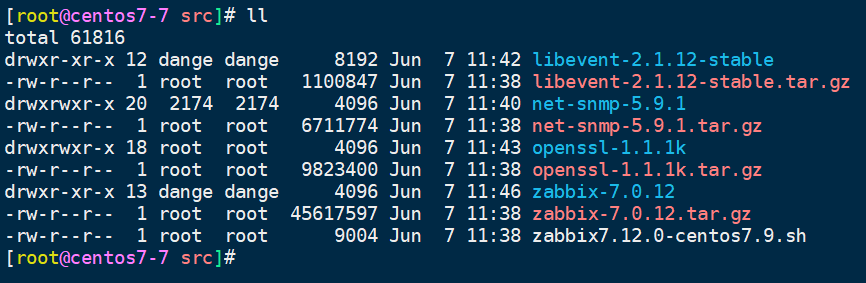
[root@centos7-7 ~]# cd /usr/local/src/
[root@centos7-7 src]# ls
zabbix-7.0.12.tar.gz
[root@centos7-7 src]# tar xf zabbix-7.0.12.tar.gz
[root@centos7-7 src]# cd /usr/local/src/zabbix-7.0.12/
[root@centos7-7 zabbix-7.0.12]# mkdir -p /apps/zabbix
3.6.源码编译安装zabbix-server、zabbix-agentd、zabbix-proxy
自动配置脚本,所有依赖都指定路径,防止报错
time ./configure \
    --prefix=/apps/zabbix \
    --enable-server \
    --enable-agent \
    --enable-proxy \
    --enable-java \
    --with-agent \
    --with-mysql \
    --with-libpcre2 \
    --with-ssh2 \
    --with-libcurl \
    --with-libxml2 \
    --with-unixodbc \
    --with-libevent=/usr/local/libevent2 \
    --with-net-snmp=/usr/local/net-snmp \
    --with-openssl=/usr/local/openssl \
    CPPFLAGS="-I/usr/local/libevent2/include -I/usr/local/openssl/include -I/usr/local/net-snmp/include" \
    LDFLAGS="-L/usr/local/libevent2/lib -L/usr/local/openssl/lib -Wl,-rpath=/usr/local/openssl/lib -L/usr/local/net-snmp/lib"
编译安装
使用所有 CPU 核心进行编译并安装
time make -j$(nproc) && make install
如果编译报错执行此命令,清理环境
make distclean
3.7.创建软链接与环境变量
ln -s /apps/zabbix/sbin/* /usr/sbin/
ln -s /apps/zabbix/bin/* /usr/bin/
创建环境变量
echo 'PATH=/apps/zabbix/bin:$PATH' >/etc/profile.d/zabbix.sh
加载环境变量
source /etc/profile.d/zabbix.sh
3.8.授权
chown -R zabbix:zabbix /apps/zabbix/
[root@centos7-7 ~]# tree /apps/zabbix/
/apps/zabbix/
├── bin
│   ├── zabbix_get
│   ├── zabbix_js
│   └── zabbix_sender
├── etc
│   ├── zabbix_agentd.conf
│   ├── zabbix_agentd.conf.d
│   ├── zabbix_proxy.conf
│   ├── zabbix_proxy.conf.d
│   ├── zabbix_server.conf
│   └── zabbix_server.conf.d
├── lib
│   └── modules
├── sbin
│   ├── zabbix_agentd
│   ├── zabbix_java
│   │   ├── bin
│   │   │   └── zabbix-java-gateway-7.0.12.jar
│   │   ├── lib
│   │   │   ├── android-json-4.3_r3.1.jar
│   │   │   ├── logback-classic-1.5.16.jar
│   │   │   ├── logback-console.xml
│   │   │   ├── logback-core-1.5.16.jar
│   │   │   ├── logback.xml
│   │   │   └── slf4j-api-2.0.16.jar
│   │   ├── settings.sh
│   │   ├── shutdown.sh
│   │   └── startup.sh
│   ├── zabbix_proxy
│   └── zabbix_server
└── share
    ├── man
    │   ├── man1
    │   │   ├── zabbix_get.1
    │   │   └── zabbix_sender.1
    │   └── man8
    │       ├── zabbix_agentd.8
    │       ├── zabbix_proxy.8
    │       └── zabbix_server.8
    └── zabbix
        ├── alertscripts
        └── externalscripts

18 directories, 24 files
3.9.修改 Zabbix Server 配置文件
[root@Rocky9-15:~]# grep '^[^#]' /apps/zabbix/etc/zabbix_server.conf
ListenPort=10051
LogFile=/tmp/zabbix_server.log
DBHost=localhost
DBName=zabbix
DBUser=zabbix
JavaGateway=127.0.0.1
JavaGatewayPort=10052
StartJavaPollers=5
DBPassword=password
DBPort=3306
Timeout=4
LogSlowQueries=3000
# 允许访问统计信息的 IP 地址为 127.0.0.1(仅本机)
StatsAllowedIP=127.0.0.1,10.0.0.0/24
# 是否启用“全局脚本”功能,0 表示不启用
EnableGlobalScripts=0
cat >/apps/zabbix/etc/zabbix_server.conf<<-eof
ListenPort=10051
LogFile=/tmp/zabbix_server.log
DBHost=localhost
DBName=zabbix
DBUser=zabbix
JavaGateway=127.0.0.1
JavaGatewayPort=10052
StartJavaPollers=5
DBPassword=password
DBPort=3306
Timeout=4
LogSlowQueries=3000
# 允许访问统计信息的 IP 地址为 127.0.0.1(仅本机)
StatsAllowedIP=127.0.0.1,10.0.0.0/24
# 是否启用“全局脚本”功能,0 表示不启用
EnableGlobalScripts=0
eof
grep -q '^JavaGateway=' /apps/zabbix/etc/zabbix_server.conf \
  && sed -i 's/^JavaGateway=.*/JavaGateway=127.0.0.1/' /apps/zabbix/etc/zabbix_server.conf \
  || echo 'JavaGateway=127.0.0.1' >> /apps/zabbix/etc/zabbix_server.conf

grep -q '^JavaGatewayPort=' /apps/zabbix/etc/zabbix_server.conf \
  && sed -i 's/^JavaGatewayPort=.*/JavaGatewayPort=10052/' /apps/zabbix/etc/zabbix_server.conf \
  || echo 'JavaGatewayPort=10052' >> /apps/zabbix/etc/zabbix_server.conf

grep -q '^StartJavaPollers=' /apps/zabbix/etc/zabbix_server.conf \
  && sed -i 's/^StartJavaPollers=.*/StartJavaPollers=5/' /apps/zabbix/etc/zabbix_server.conf \
  || echo 'StartJavaPollers=5' >> /apps/zabbix/etc/zabbix_server.conf
if grep -q '^JavaGateway=' /apps/zabbix/etc/zabbix_server.conf; then
    echo "JavaGateway 配置项已存在"
else
    echo "未设置 JavaGateway,现在添加"
    echo "JavaGateway=127.0.0.1" >> /apps/zabbix/etc/zabbix_server.conf
fi
3.10.创建Zabbix Server的服务文件⭐️
cat >/usr/lib/systemd/system/zabbix-server.service<<-eof
[Unit]
Description=Zabbix Server
After=syslog.target
After=network.target

[Service]
Environment="LD_LIBRARY_PATH=/usr/local/libevent2/lib"
Type=forking
Restart=on-failure
PIDFile=/tmp/zabbix_server.pid
KillMode=control-group
ExecStart=/apps/zabbix/sbin/zabbix_server -c /apps/zabbix/etc/zabbix_server.conf
ExecStop=/bin/kill -SIGTERM \$MAINPID
RestartSec=10s
User=zabbix
Group=zabbix

[Install]
WantedBy=multi-user.target
eof
systemctl daemon-reload
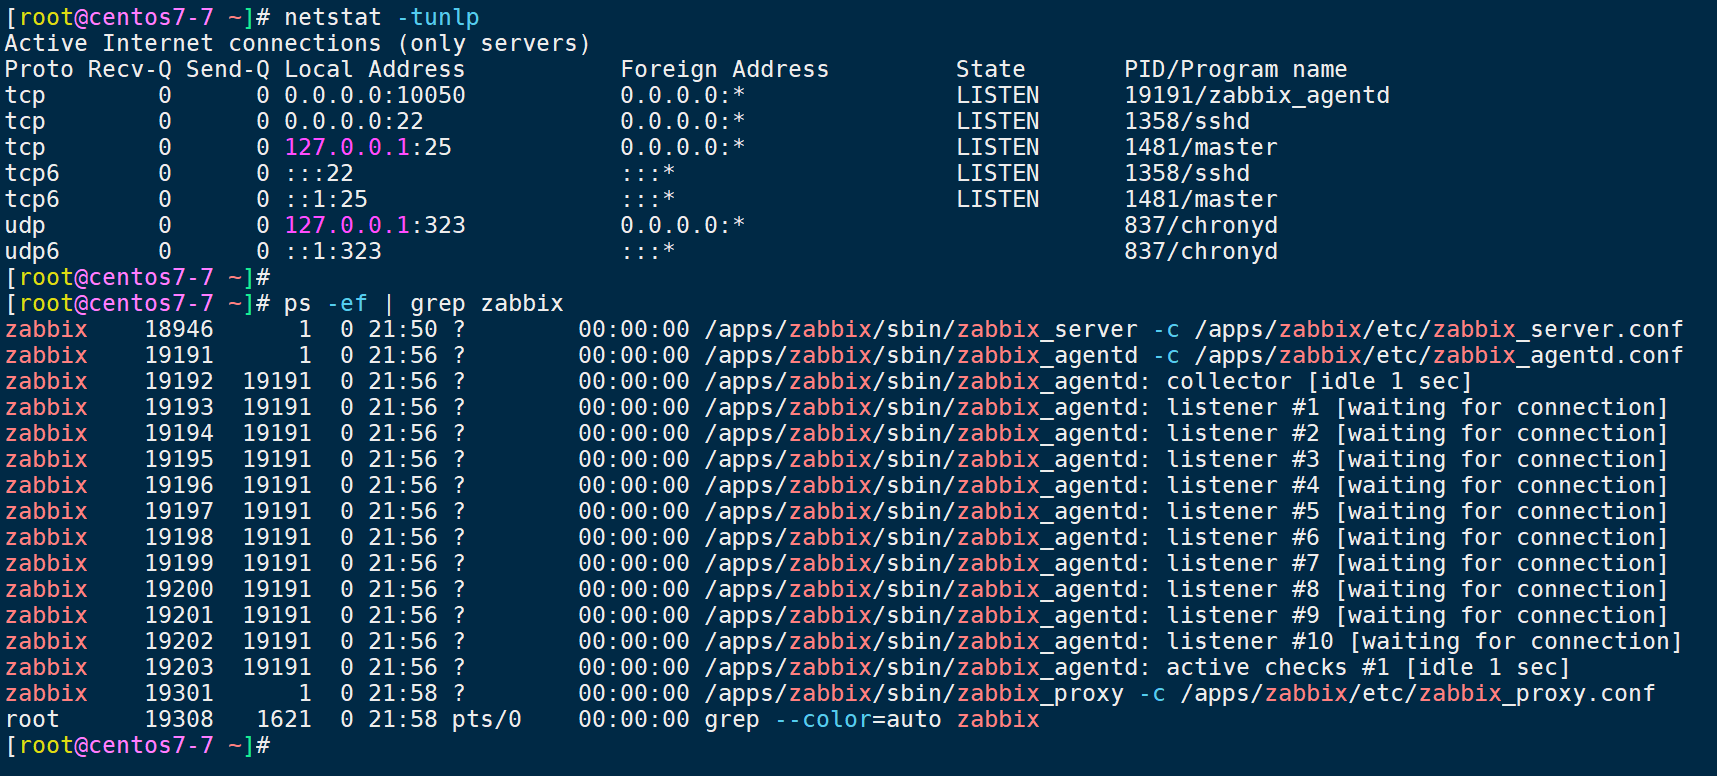
systemctl enable --now zabbix-server.service
3.11.修改 Zabbix Agented配置文件
sed -i.bak \
-e "s/Server=127.0.0.1/Server=10.0.0.7/" \
-e "s/Hostname=Zabbix server/Hostname=Zabbix server/" \
/apps/zabbix/etc/zabbix_agentd.conf

[root@centos7-7 ~]# grep '^[^#]' /apps/zabbix/etc/zabbix_agentd.conf
LogFile=/tmp/zabbix_agentd.log
Server=10.0.0.7
ServerActive=127.0.0.1
Hostname=Zabbix server
3.12.Zabbix agentd的服务文件⭐️
cat >/usr/lib/systemd/system/zabbix-agent.service<<-eof
[Unit]
Description=Zabbix Agent
After=syslog.target
After=network.target

[Service]
Type=forking
Restart=on-failure
PIDFile=/tmp/zabbix_agentd.pid
KillMode=control-group
ExecStart=/apps/zabbix/sbin/zabbix_agentd -c /apps/zabbix/etc/zabbix_agentd.conf
ExecStop=/bin/kill -SIGTERM \$MAINPID
RestartSec=10s
User=zabbix
Group=zabbix

[Install]
WantedBy=multi-user.target
eof
systemctl daemon-reload
systemctl enable --now zabbix-agent.service
3.13.Zabbix proxy的服务文件⭐️
cat >/usr/lib/systemd/system/zabbix-proxy.service<<-eof
[Unit]
Description=Zabbix Proxy
After=syslog.target
After=network.target

[Service]
Type=forking
Restart=on-failure
PIDFile=/tmp/zabbix_proxy.pid
KillMode=control-group
ExecStart=/apps/zabbix/sbin/zabbix_proxy -c /apps/zabbix/etc/zabbix_proxy.conf
ExecStop=/bin/kill -SIGTERM \$MAINPID
RestartSec=10s
User=zabbix
Group=zabbix

[Install]
WantedBy=multi-user.target
eof
systemctl daemon-reload
systemctl enable --now zabbix-proxy.service
3.14.Zabbix Java Gateway的服务文件⭐️
创建日志文件
touch /tmp/zabbix_java.log
chown zabbix:zabbix /tmp/zabbix_java.log
chmod 644 /tmp/zabbix_java.log
创建服务文件
cat >/usr/lib/systemd/system/zabbix-java-gateway.service<<-eof
[Unit]
Description=Zabbix Java Gateway
After=network.target
Requires=network.target

[Service]
Type=forking
PrivateTmp=true
User=zabbix
Group=zabbix
Environment=JAVA_HOME=/usr/lib/jvm/java-11-openjdk/
# 启动脚本(建议脚本内处理后台化与日志输出)
ExecStart=/apps/zabbix/sbin/zabbix_java/startup.sh
# 优雅关闭:脚本应支持 SIGTERM 捕获
ExecStop=/apps/zabbix/sbin/zabbix_java/shutdown.sh

[Install]
WantedBy=multi-user.target
eof
启动服务
systemctl daemon-reload
systemctl enable --now zabbix-java-gateway.service

4.yum源安装Mysql
4.1.安装Mysql的yum源
# linux7 yum源
wget https://dev.mysql.com/get/mysql80-community-release-el7-11.noarch.rpm
rpm -ivh mysql80-community-release-el7-11.noarch.rpm
4.2.默认安装Mysql8.0
vi /etc/yum.repos.d/mysql-community.repo
4.3.安装mysql-server
yum -y install mysql-server
4.4.启动mysql-server
# 查看Mysql版本信息
mysql --version

# 启动mysql
systemctl enable --now mysqld

# 查看mysql状态信息
systemctl status mysqld
4.5.获取mysql-server初始登陆的密码
grep 'temporary password' /var/log/mysqld.log

MYSQL_TEMP_PASS=$(grep 'temporary password' /var/log/mysqld.log | tail -1 | awk '{print $NF}')

mysqladmin -uroot -p"(i(ALaf>_4VS" password 'Mysql.123456'
mysql -uroot -p"(i(ALaf>_4VS"
ALTER  USER  'root'@'localhost'  IDENTIFIED BY 'Mysql.123456';

# 设置密码的验证强度等级
#Mysql 8.0 版本
# 将密码复杂度校验调整简单类型
# set global validate_password.policy=MEDIUM;
set global validate_password.policy=LOW;
# 设置密码最少位数限制为 4 位
set global validate_password.length=4;
# 查看 mysql 初始的密码策略
SHOW VARIABLES LIKE 'validate_password%';
ALTER  USER  'root'@'localhost'  IDENTIFIED BY 'password';
4.6.创建数据库
[root@centos7-7 ~]# mysql -uroot -p"password"

创建 Zabbix 数据库
mysql> create database zabbix character set utf8mb4 collate utf8mb4_bin;
创建 Zabbix 用户
mysql> create user zabbix@'localhost' identified with mysql_native_password by 'password';
授予数据库权限
mysql> grant all privileges on zabbix.* to zabbix@'localhost';
创建 Zabbix 用户
mysql> create user zabbix@'10.0.0.%' identified with mysql_native_password by 'password';
授予数据库权限
mysql> grant all privileges on zabbix.* to zabbix@'10.0.0.%';
允许创建函数时不检查权限
mysql> set global log_bin_trust_function_creators = 1;
授予 SUPER 权限,不一定使用
mysql> GRANT SUPER ON *.* TO zabbix@'localhost';
mysql> GRANT SUPER ON *.* TO zabbix@'10.0.0.%';
mysql> FLUSH PRIVILEGES;
mysql> exit
4.7.初始化数据库
[root@centos7-7 ~]# ls /usr/local/src/zabbix-7.0.12/database/mysql/*.sql -1
/usr/local/src/zabbix-7.0.12/database/mysql/data.sql
/usr/local/src/zabbix-7.0.12/database/mysql/images.sql
/usr/local/src/zabbix-7.0.12/database/mysql/schema.sql
依次执行
mysql -uzabbix -ppassword -D zabbix < /usr/local/src/zabbix-7.0.12/database/mysql/schema.sql
mysql -uzabbix -ppassword -D zabbix < /usr/local/src/zabbix-7.0.12/database/mysql/images.sql
mysql -uzabbix -ppassword -D zabbix < /usr/local/src/zabbix-7.0.12/database/mysql/data.sql
4.8.验证数据库和相关表
[root@centos7-7 ~]# mysql -uzabbix -ppassword -D zabbix -e 'show tables;'
mysql: [Warning] Using a password on the command line interface can be insecure.
+----------------------------+
| Tables_in_zabbix           |
+----------------------------+
| acknowledges               |
| actions                    |
| alerts                     |
| auditlog                   |
| autoreg_host               |
| changelog                  |
| conditions                 |
| config                     |
| config_autoreg_tls         |
| connector                  |
| connector_tag              |
5.安装Apache服务
yum -y install httpd
systemctl enable --now httpd mysqld
6.安装第三方源-remi源
6.1.获取源信息
官方网站:https://rpms.remirepo.net/enterprise/
yum install -y https://rpms.remirepo.net/enterprise/remi-release-7.rpm
yum install -y yum-utils
yum-config-manager --enable remi-php82
6.2.配置php和初始化登录WEB页面
mkdir -p /var/www/html/zabbix
cp -a /usr/local/src/zabbix-7.0.12/ui/* /var/www/html/zabbix/

chown -R zabbix:zabbix /var/www/html/zabbix

6.3.安装php依赖包
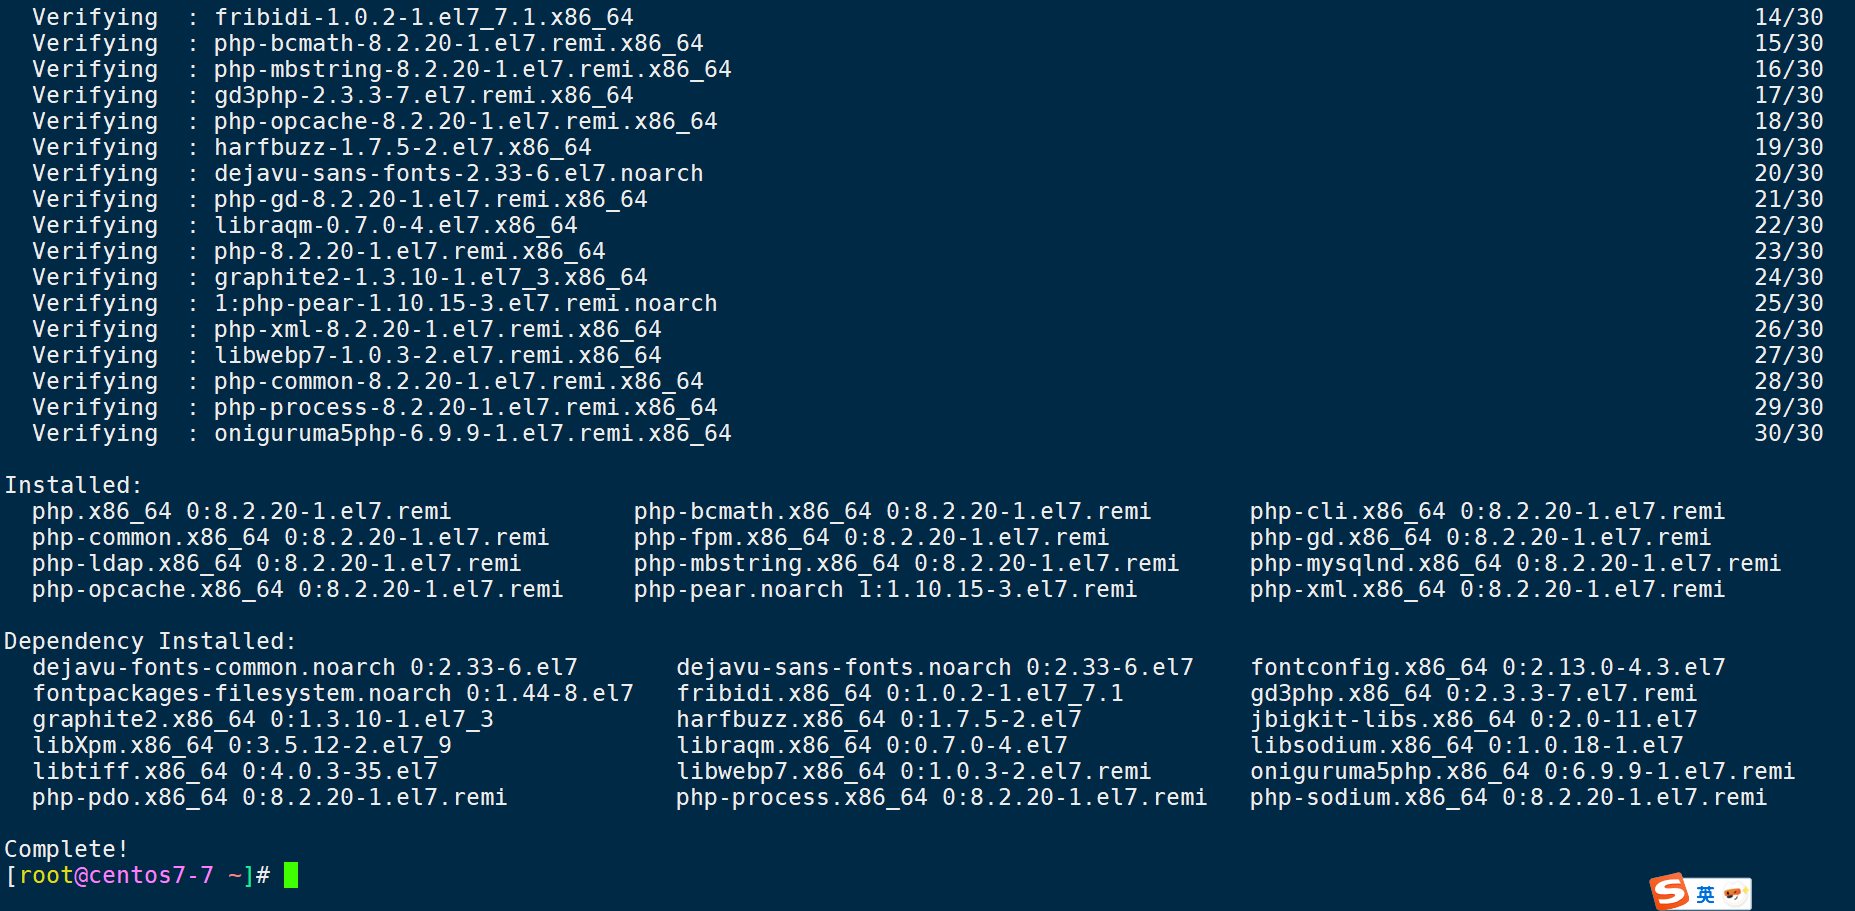
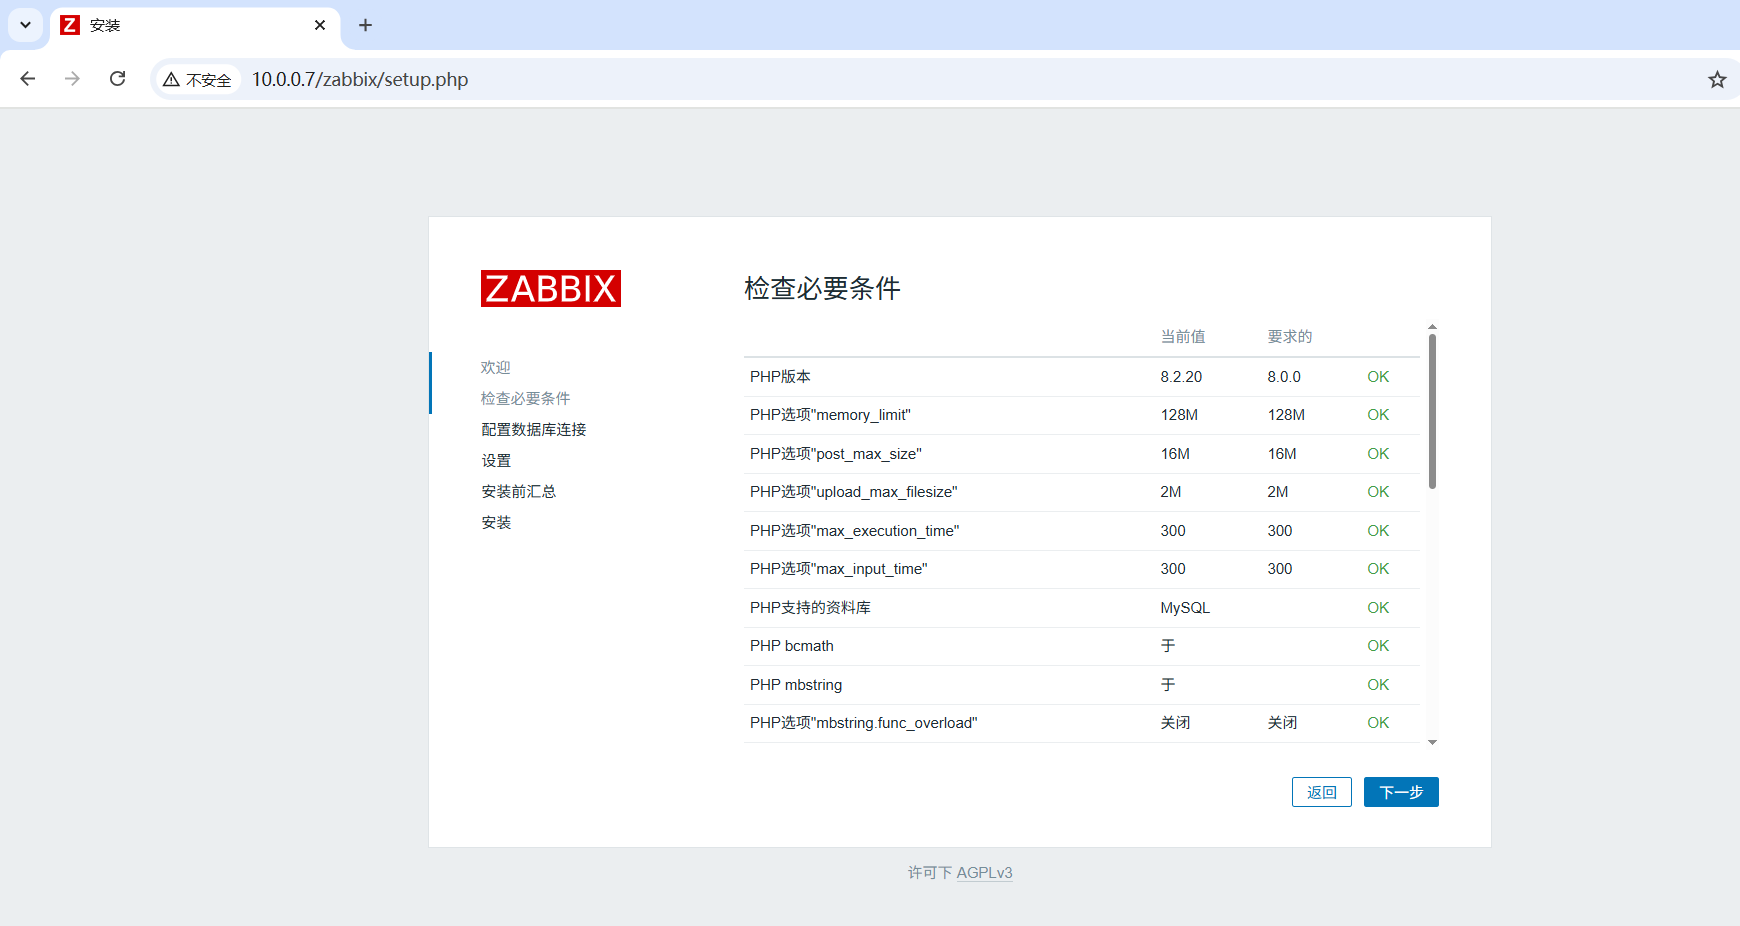
yum -y install php-gd php-xml php-cli php-json php-mysqlnd php php-ldap php-mbstring php-bcmath php-fpm php-opcache php-pear openssl-devel
6.4.查看php版本信息
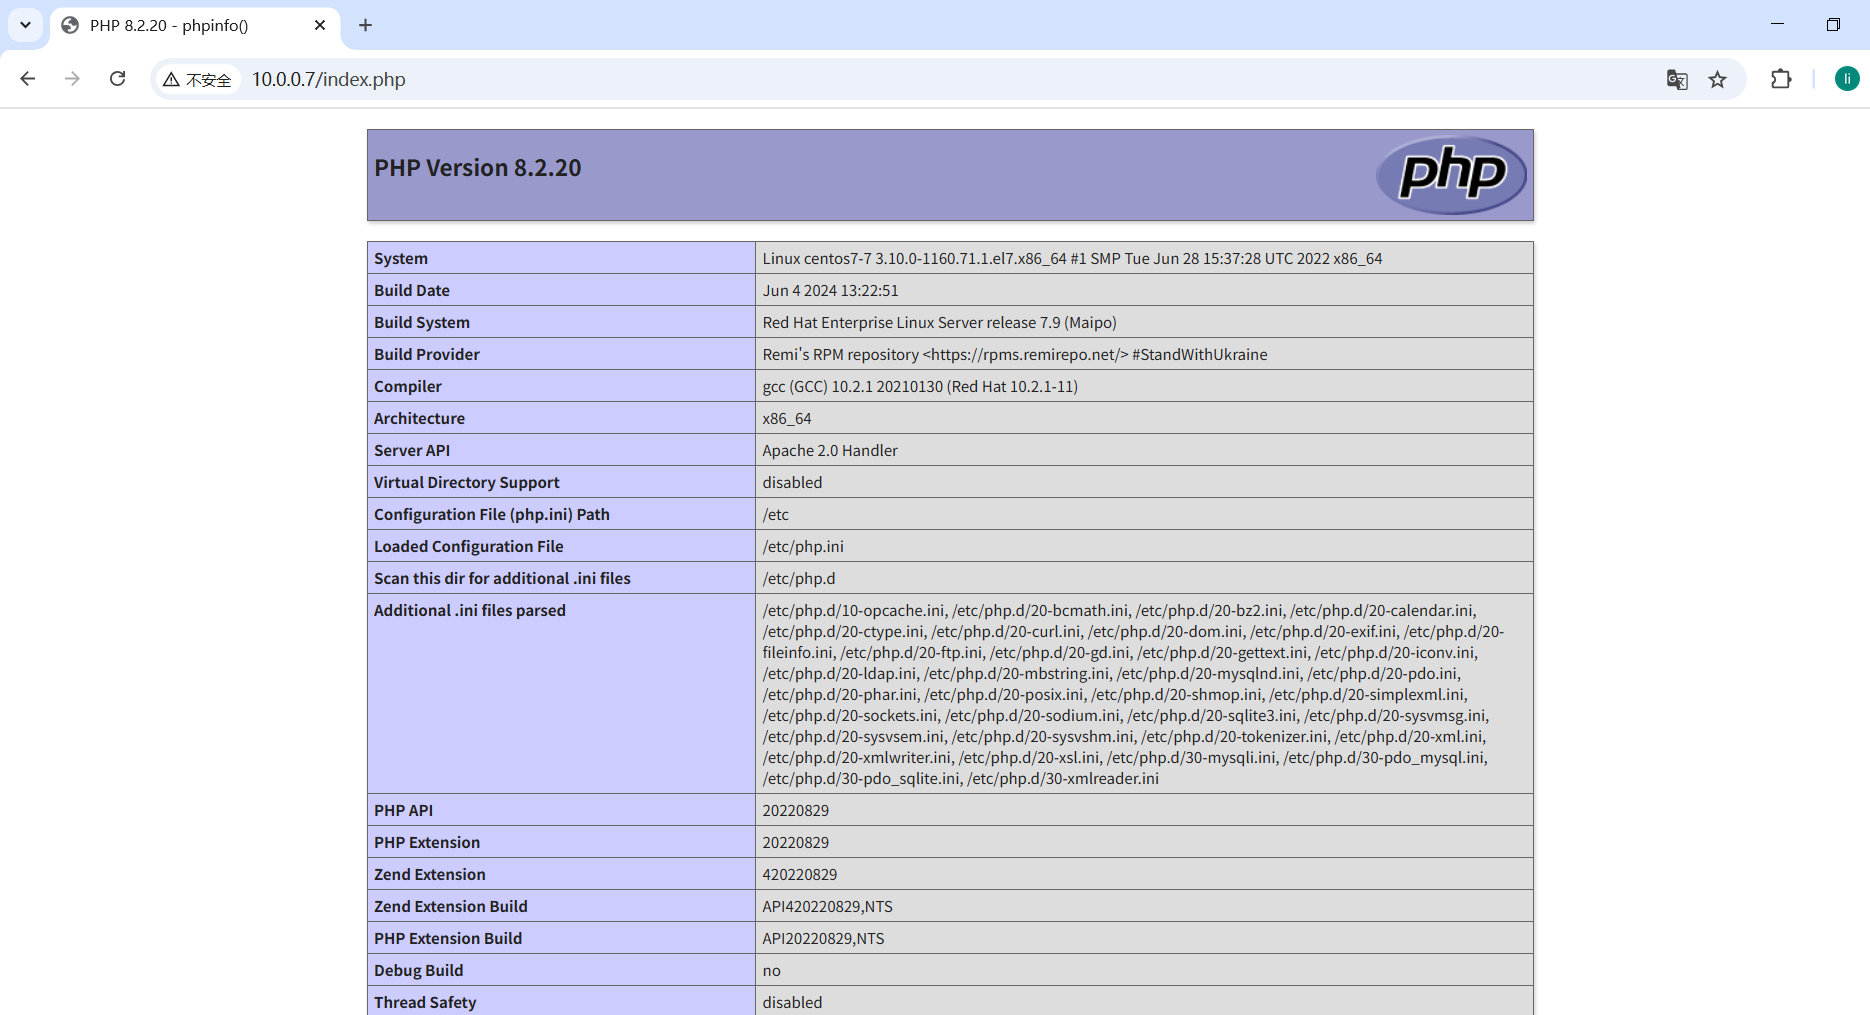
查看php版本信息

[root@centos7-7 ~]# php -v
PHP 8.2.20 (cli) (built: Jun  4 2024 13:22:51) (NTS gcc x86_64)
Copyright (c) The PHP Group
Zend Engine v4.2.20, Copyright (c) Zend Technologies
    with Zend OPcache v8.2.20, Copyright (c), by Zend Technologies
6.5.编辑配置文件
[root@centos7-7 ~]# vim /etc/php.ini
post_max_size = 16M
max_execution_time = 300
max_input_time = 300
date.timezone = Asia/Shanghai
重启服务
[root@centos7-7 ~]# systemctl restart php-fpm.service
[root@centos7-7 ~]# systemctl enable php-fpm.service
[root@centos7-7 ~]# systemctl restart httpd.service
6.6.测试
[root@centos7-7 ~]# cat >/var/www/html/index.php<<-eof
<?php phpinfo();
?>
eof
6.配置zabbix
6.1.安装中文包
安装中文包,再修改语言,否则无法选择
yum -y install kde-l10n-Chinese glibc-common
6.2.zabbix界面配置
用户名:zabbix
密码:password
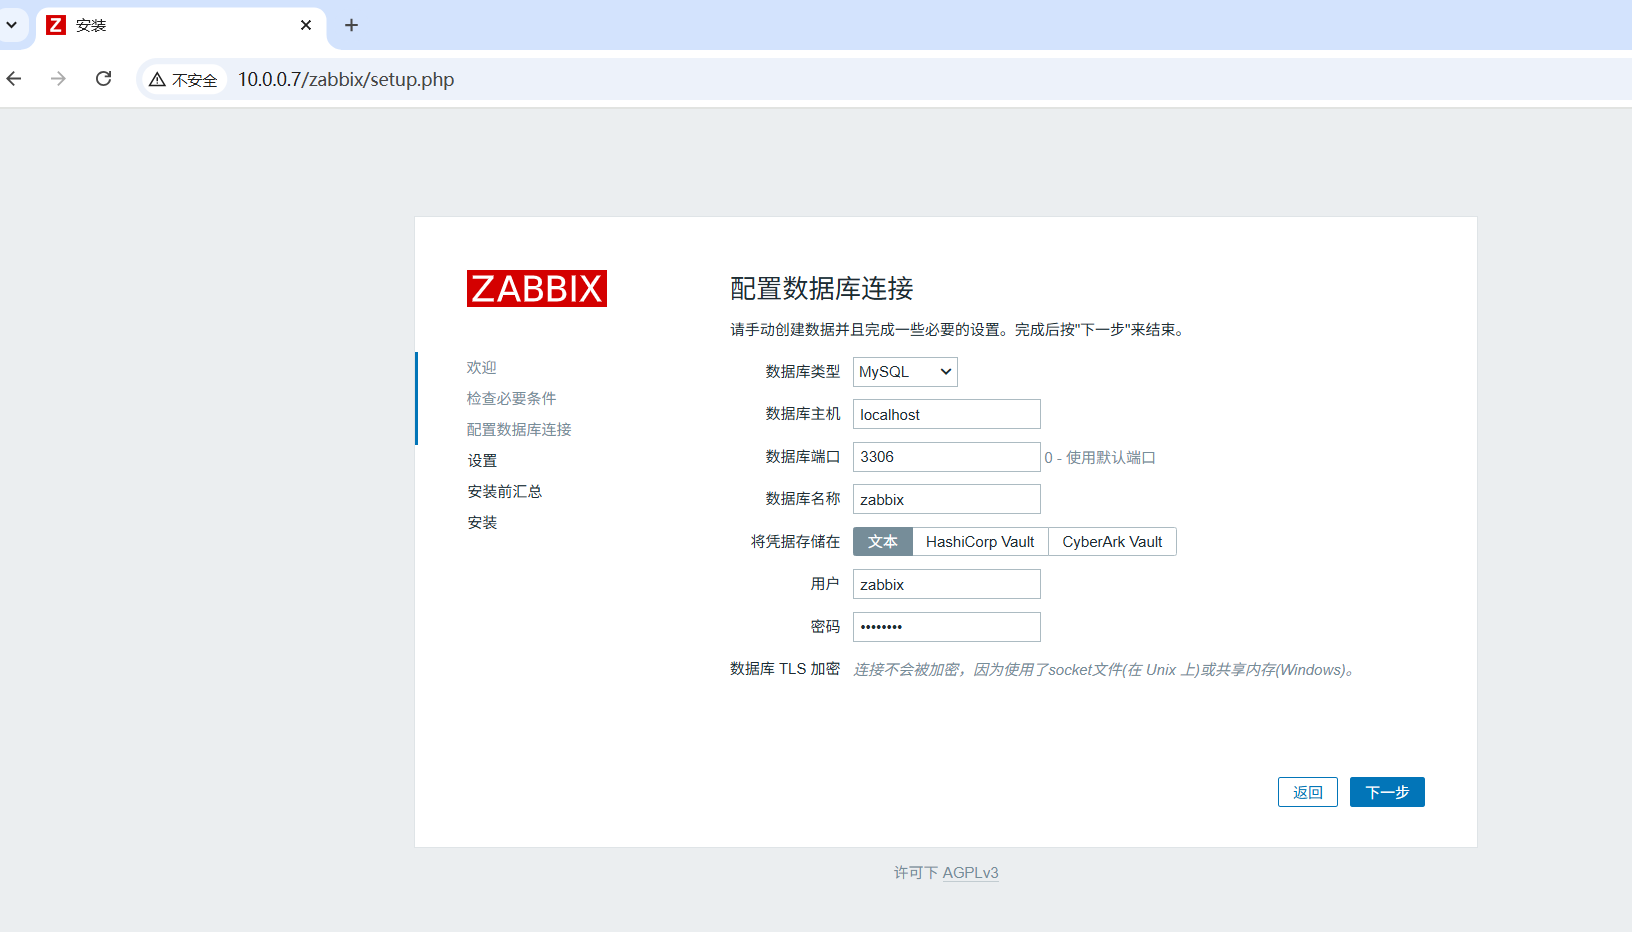
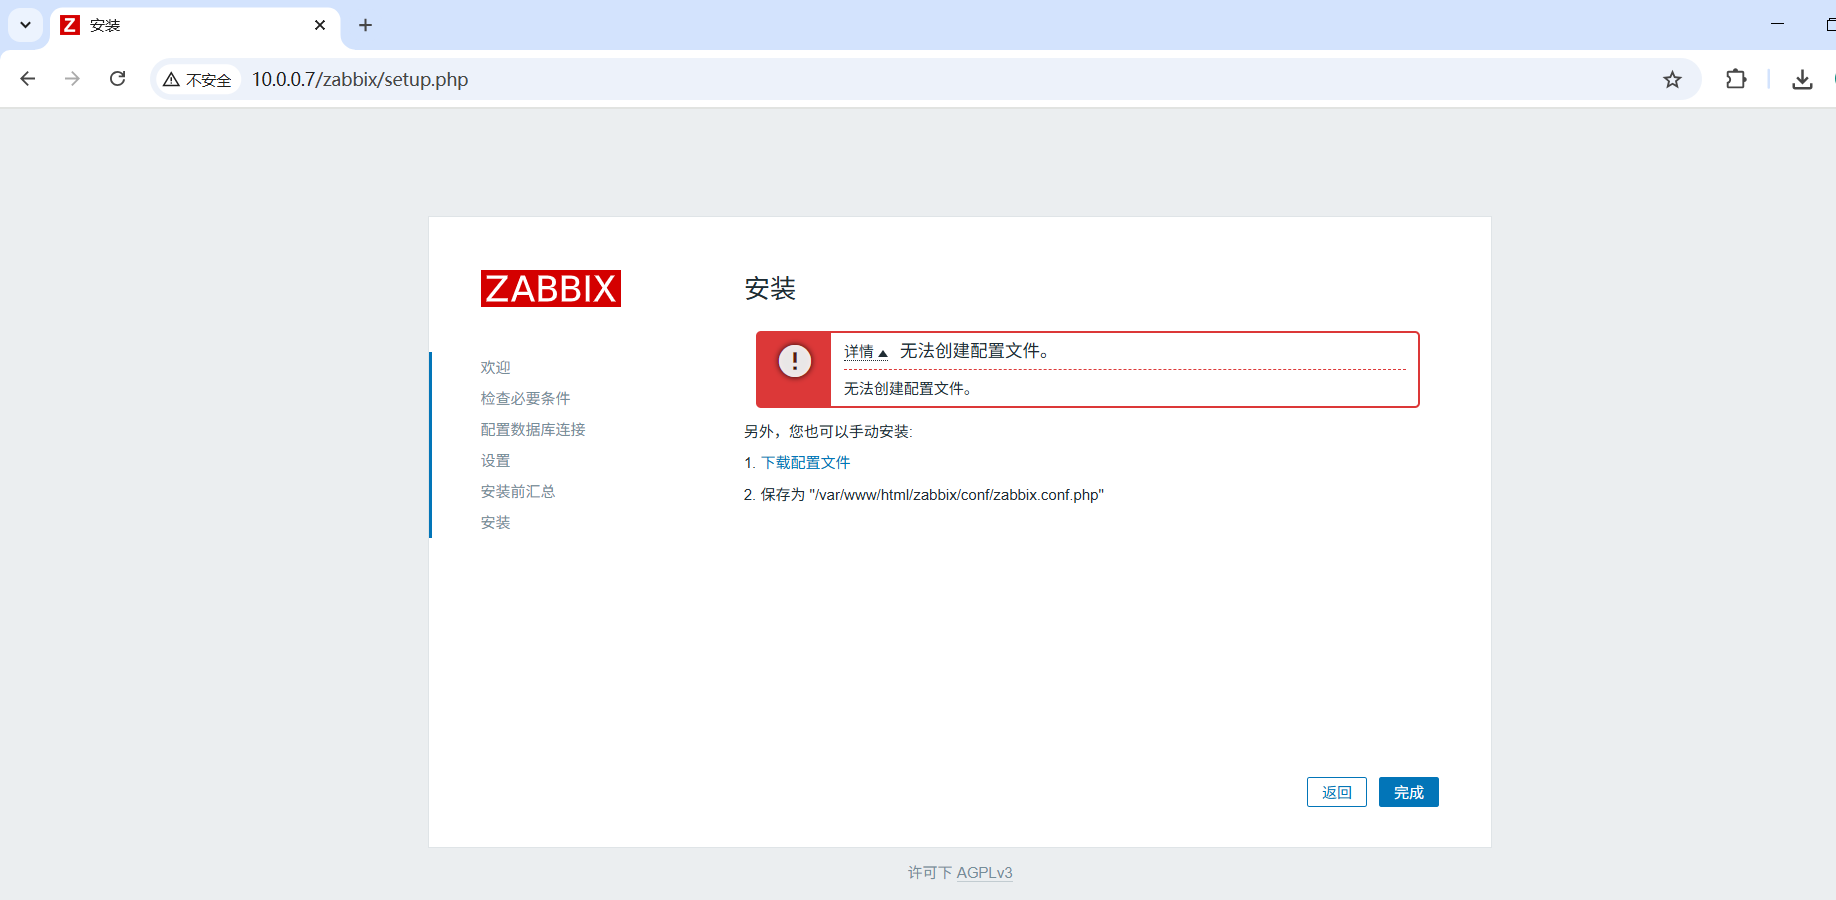
[root@centos7-7 ~]# vim /var/www/html/zabbix/conf/zabbix.conf.php
[root@centos7-7 ~]# cat /var/www/html/zabbix/conf/zabbix.conf.php
<?php
// Zabbix GUI configuration file.

$DB['TYPE']     = 'MYSQL';
$DB['SERVER']     = 'localhost';
$DB['PORT']     = '3306';
$DB['DATABASE']     = 'zabbix';
$DB['USER']     = 'zabbix';
$DB['PASSWORD']     = 'password';

// Schema name. Used for PostgreSQL.
$DB['SCHEMA']     = '';

// Used for TLS connection.
$DB['ENCRYPTION']   = false;
$DB['KEY_FILE']     = '';
$DB['CERT_FILE']    = '';
$DB['CA_FILE']      = '';
$DB['VERIFY_HOST']    = false;
$DB['CIPHER_LIST']    = '';

// Vault configuration. Used if database credentials are stored in Vault secrets manager.
$DB['VAULT']      = '';
$DB['VAULT_URL']    = '';
$DB['VAULT_PREFIX']   = '';
$DB['VAULT_DB_PATH']    = '';
$DB['VAULT_TOKEN']    = '';
$DB['VAULT_CERT_FILE']    = '';
$DB['VAULT_KEY_FILE']   = '';
// Uncomment to bypass local caching of credentials.
// $DB['VAULT_CACHE']   = true;

// Uncomment and set to desired values to override Zabbix hostname/IP and port.
// $ZBX_SERVER      = '';
// $ZBX_SERVER_PORT   = '';

$ZBX_SERVER_NAME    = 'zabbix-server';

$IMAGE_FORMAT_DEFAULT = IMAGE_FORMAT_PNG;

// Uncomment this block only if you are using Elasticsearch.
// Elasticsearch url (can be string if same url is used for all types).
//$HISTORY['url'] = [
//  'uint' => 'http://localhost:9200',
//  'text' => 'http://localhost:9200'
//];
// Value types stored in Elasticsearch.
//$HISTORY['types'] = ['uint', 'text'];

// Used for SAML authentication.
// Uncomment to override the default paths to SP private key, SP and IdP X.509 certificates, and to set extra settings.
//$SSO['SP_KEY']      = 'conf/certs/sp.key';
//$SSO['SP_CERT']     = 'conf/certs/sp.crt';
//$SSO['IDP_CERT']    = 'conf/certs/idp.crt';
//$SSO['SETTINGS']    = [];

// If set to false, support for HTTP authentication will be disabled.
// $ALLOW_HTTP_AUTH = true;

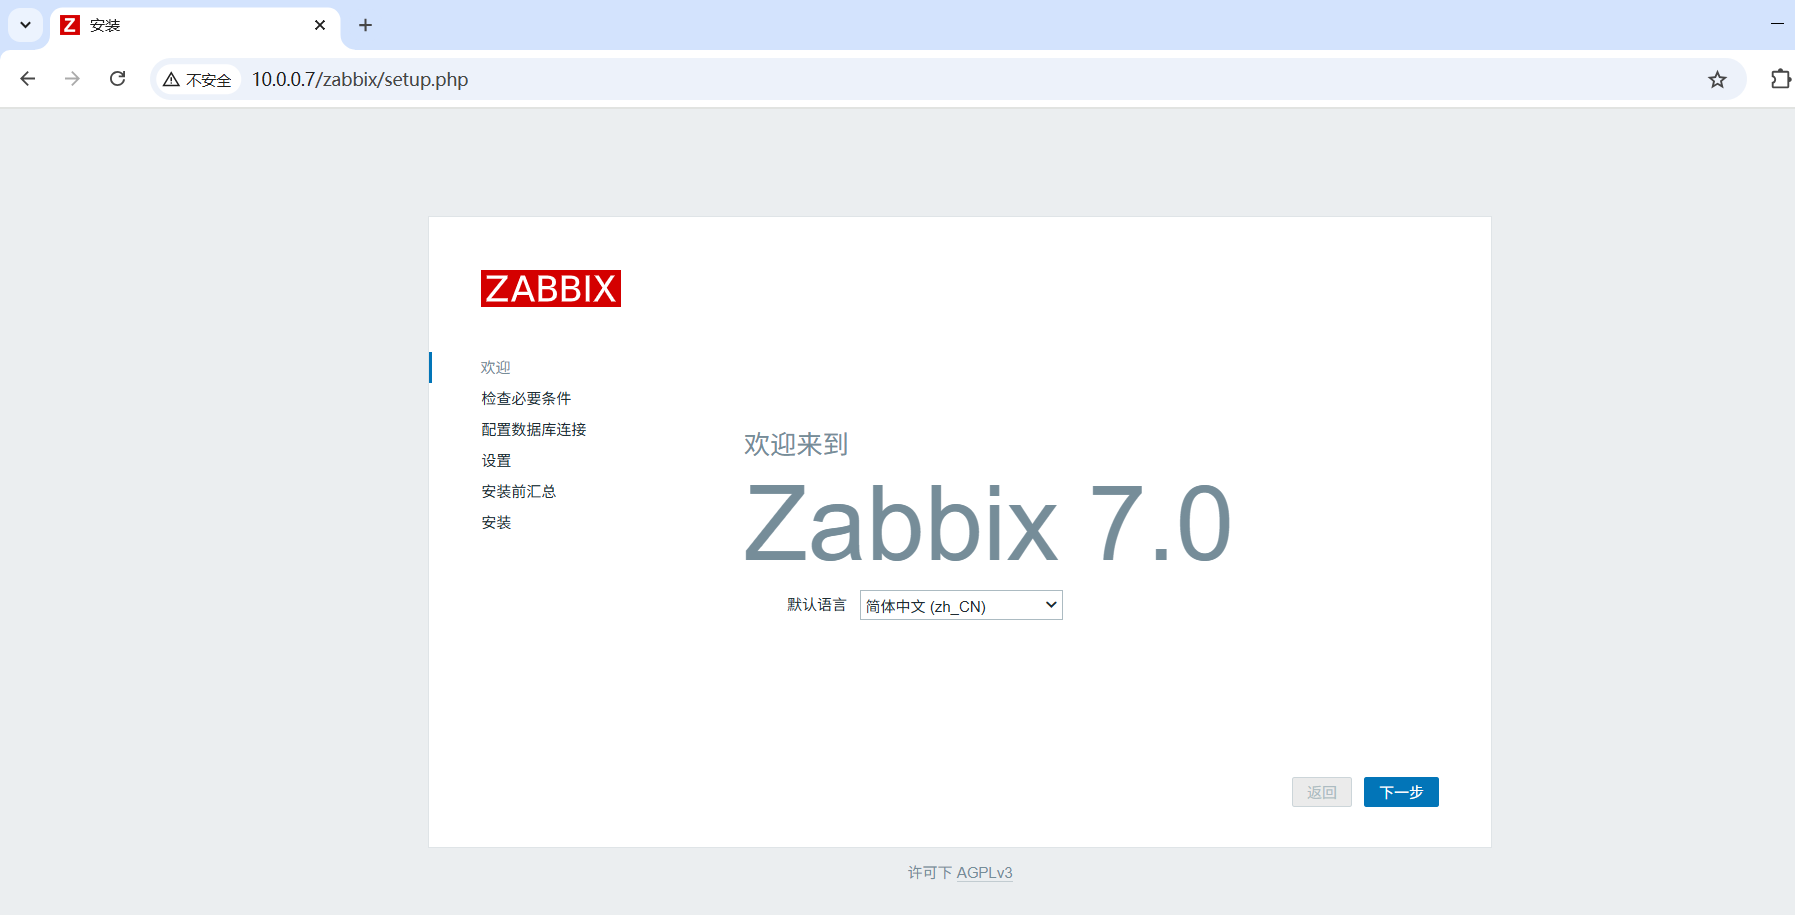
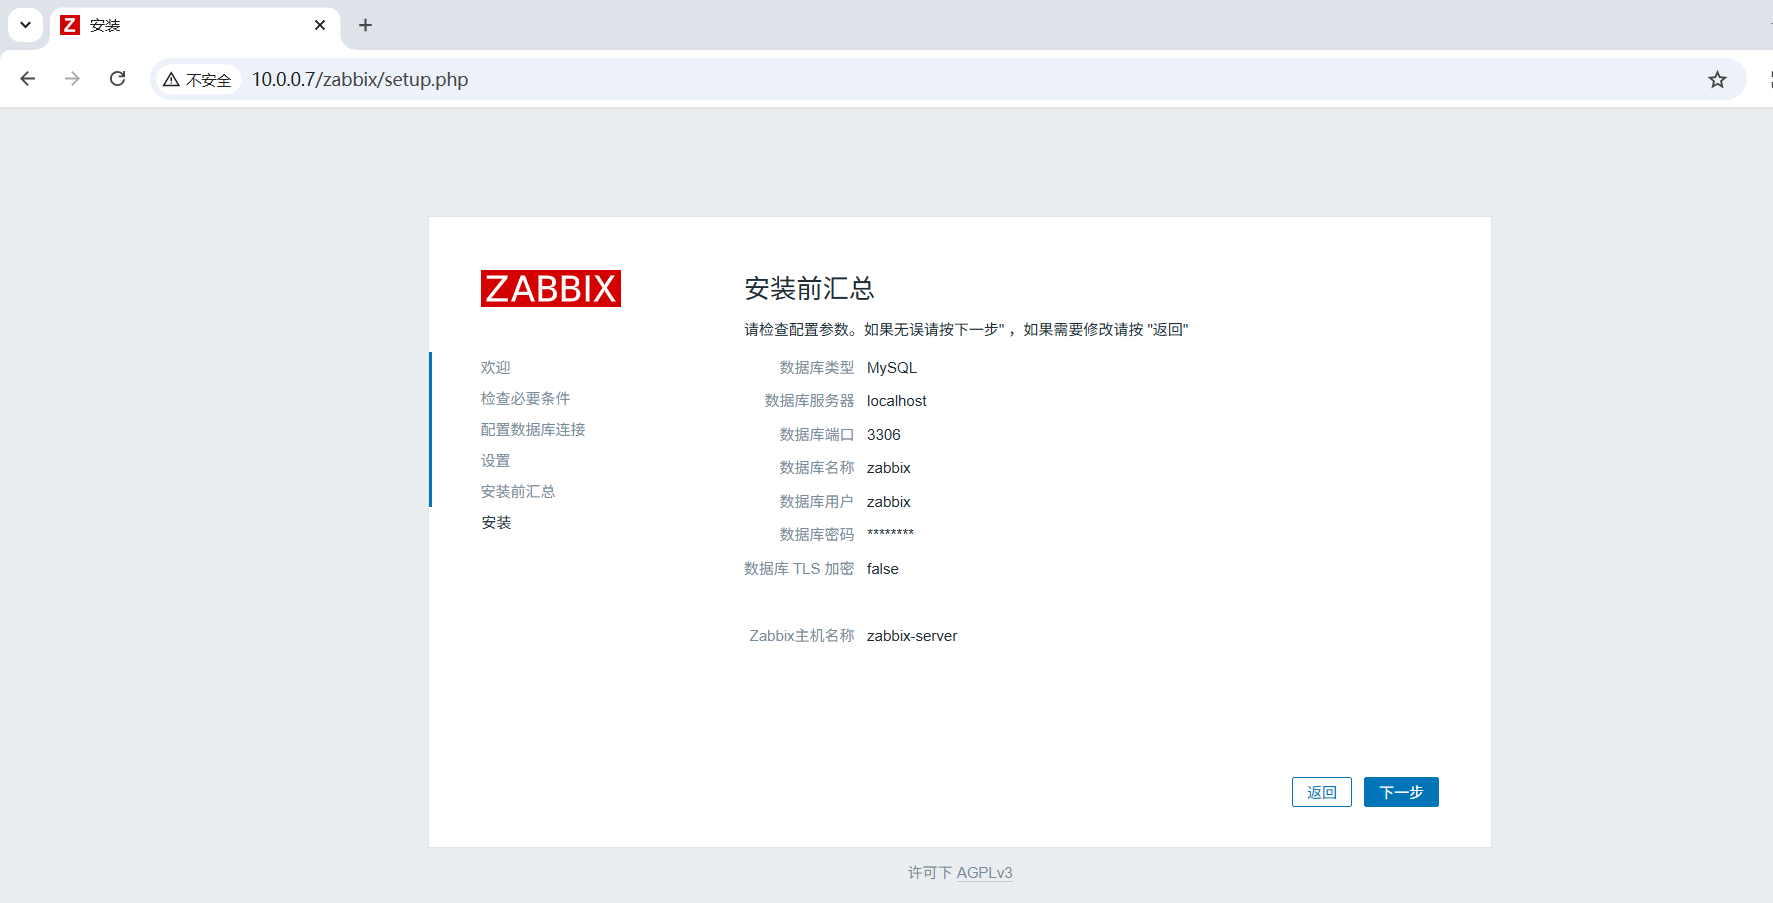
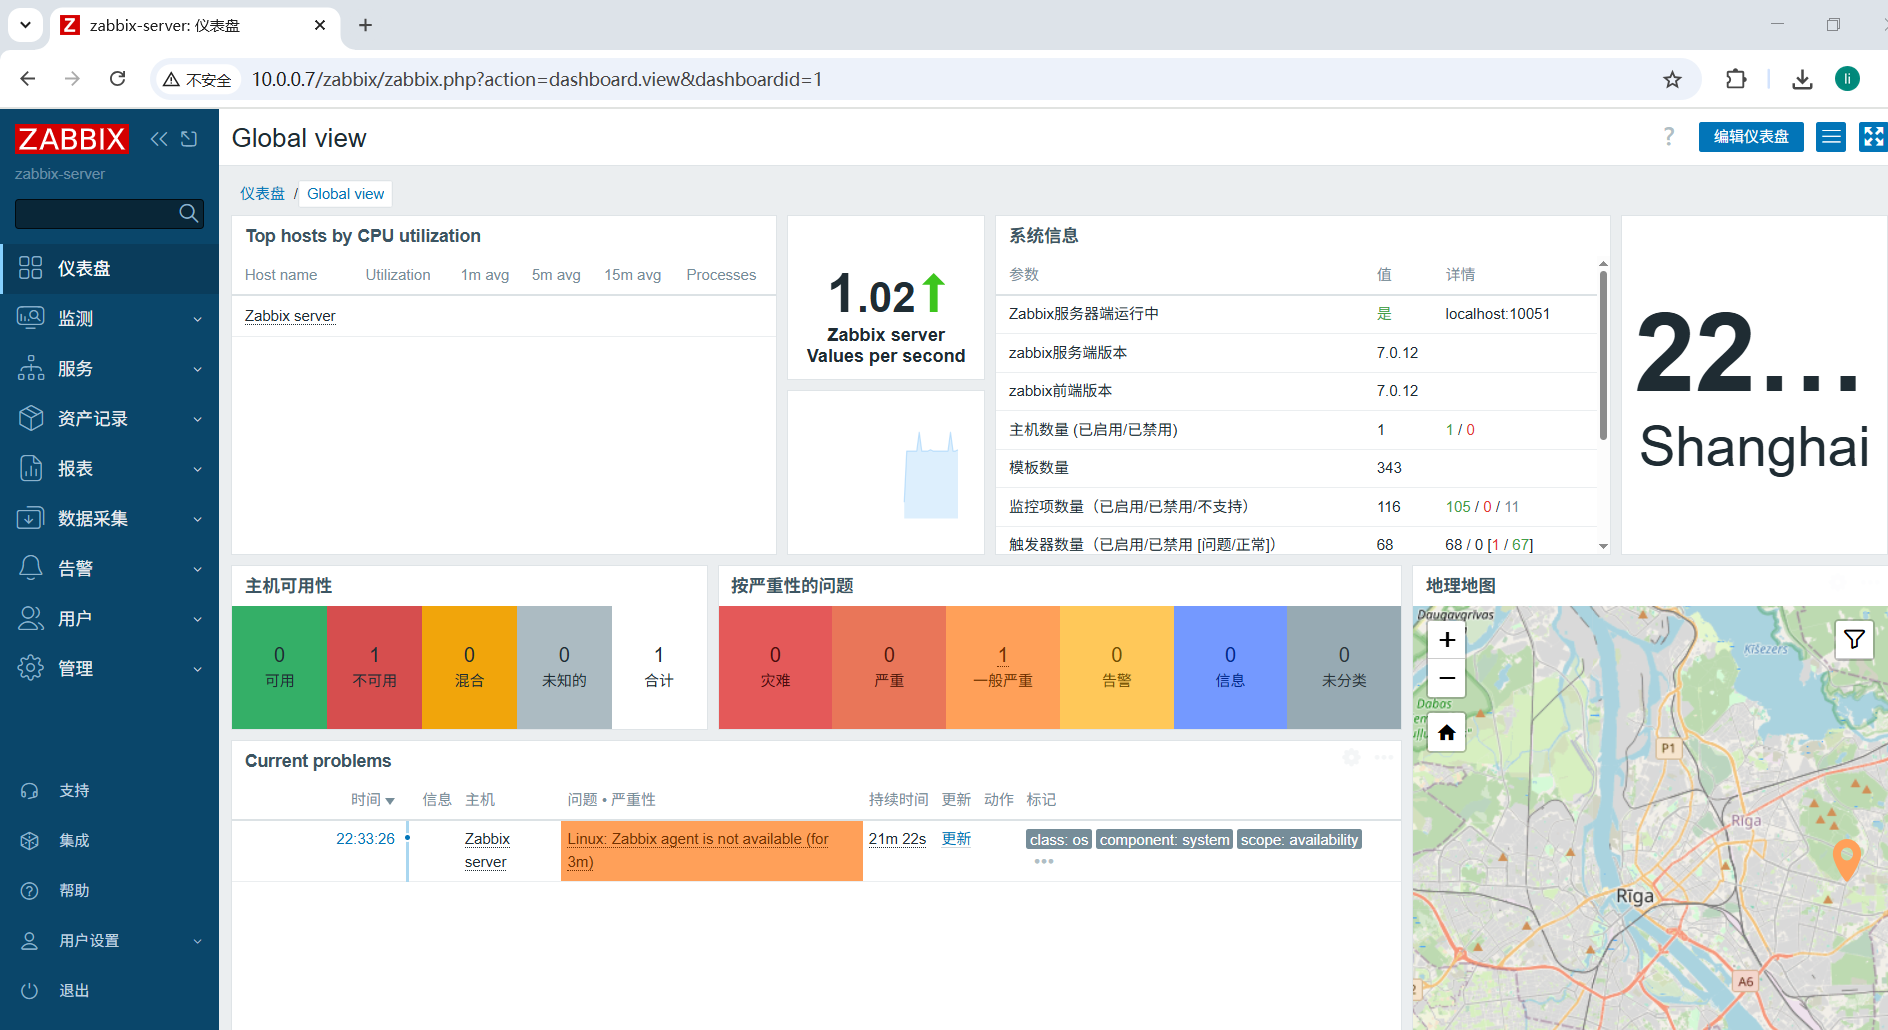
Zabbix 前端已经就绪!第一次登录, 默认的用户名是 Admin,密码是zabbix

修改PHP文件,防止重复安装
mv /var/www/html/zabbix/setup.php /var/www/html/zabbix/setup.php.bak
再次登录
http://10.0.0.7/zabbix/
7.支持nginx脚本
需要提前准备安装包到/usr/local/src/目录下
里面的包已下载,在此处下载
https://wwqz.lanzouw.com/b00q0lr2mf
密码:bk2o
#!/bin/bash
for item in \
  "/usr/local/src/libevent-2.1.12-stable.tar.gz" \
  "/usr/local/src/net-snmp-5.9.1.tar.gz" \
  "/usr/local/src/openssl-1.1.1k.tar.gz" \
  "/usr/local/src/zabbix-7.0.12.tar.gz"; do

  if [ -f "$item" ]; then
    echo "已找到文件: $item"
  else
    echo "缺失文件: $item"
    echo "请将缺失的文件拷贝到 /usr/local/src 后重新运行脚本。"
    exit 1
  fi
done
echo "所有文件已就绪,可以开始安装。"

# 源信息
mkdir /etc/yum.repos.d/bak
mv /etc/yum.repos.d/*.repo /etc/yum.repos.d/bak
curl -o /etc/yum.repos.d/CentOS-Base.repo https://mirrors.aliyun.com/repo/Centos-7.repo
sed -i -e '/mirrors.cloud.aliyuncs.com/d' -e '/mirrors.aliyuncs.com/d' /etc/yum.repos.d/CentOS-Base.repo
wget -O /etc/yum.repos.d/epel.repo https://mirrors.aliyun.com/repo/epel-7.repo

# 安装相关依赖
yum -y install gcc gcc-c++ unixODBC-devel httpd mysql-devel libcurl libcurl-devel  fping curl-devel libxml2 libxml2-devel  perl-ExtUtils-MakeMaker libssh2 libssh2-devel pcre2-devel openssl11-libs java-11-openjdk-devel

# 编译安装net-snmp
yum info net-snmp net-snmp-devel | egrep '^Name|^Version|^Release|^Arch'
yum remove -y net-snmp net-snmp-devel
cd /usr/local/src
tar xf net-snmp-5.9.1.tar.gz
cd /usr/local/src/net-snmp-5.9.1
./configure --prefix=/usr/local/net-snmp --with-defaults
make -j$(nproc) && make install
cat >/etc/profile.d/net-snmp.sh<<-eof
export PATH=/usr/local/net-snmp/bin:\$PATH
export LD_LIBRARY_PATH=/usr/local/net-snmp/lib:\$LD_LIBRARY_PATH
export PKG_CONFIG_PATH=/usr/local/net-snmp/lib/pkgconfig:\$PKG_CONFIG_PATH
eof
source /etc/profile.d/net-snmp.sh
which snmpget
snmpget --version
ldd $(which snmpget) | grep net-snmp
pkg-config --modversion netsnmp


# 编译安装libevent
yum -y remove libevent libevent-devel
cd /usr/local/src/
tar xf libevent-2.1.12-stable.tar.gz
cd /usr/local/src/libevent-2.1.12-stable/
./configure --prefix=/usr/local/libevent2 --disable-static --enable-shared
make -j$(nproc) && make install
cat >/etc/profile.d/libevent.sh<<-eof
export CPPFLAGS="-I/usr/local/libevent2/include"
export LDFLAGS="-L/usr/local/libevent2/lib"
export LD_LIBRARY_PATH="/usr/local/libevent2/lib:\$LD_LIBRARY_PATH"
export CPPFLAGS="-I/usr/local/openssl/include -I/usr/local/libevent2/include"
export LDFLAGS="-L/usr/local/openssl/lib -L/usr/local/libevent2/lib"
eof
source /etc/profile.d/libevent.sh
pkg-config --modversion libevent
echo "/usr/local/libevent2/lib" > /etc/ld.so.conf.d/libevent2.conf
ldconfig
ldconfig -p | grep libevent_core

# 编译安装openssl
cd /usr/local/src
tar -xzf openssl-1.1.1k.tar.gz
cd /usr/local/src/openssl-1.1.1k
yum -y install zlib-devel.x86_64
./config --prefix=/usr/local/openssl --openssldir=/usr/local/openssl shared zlib
make -j$(nproc) && make install
/usr/local/openssl/bin/openssl version
cat >/etc/profile.d/openssl.sh<<-eof
export PATH=/usr/local/openssl/bin:\$PATH
export LD_LIBRARY_PATH=/usr/local/openssl/lib:\$LD_LIBRARY_PATH
export PKG_CONFIG_PATH=/usr/local/openssl/lib/pkgconfig:\$PKG_CONFIG_PATH
export CPPFLAGS="-I/usr/local/openssl/include"
export LDFLAGS="-L/usr/local/openssl/lib"
eof
source /etc/profile.d/openssl.sh
echo "/usr/local/openssl/lib" > /etc/ld.so.conf.d/openssl.conf
ldconfig
which openssl
openssl version

# 编译安装zabbix
getent group zabbix || groupadd zabbix && useradd -r -g zabbix -m -s /sbin/nologin zabbix
cd /usr/local/src/
tar xf zabbix-7.0.12.tar.gz
cd /usr/local/src/zabbix-7.0.12/
mkdir -p /apps/zabbix
time ./configure \
    --prefix=/apps/zabbix \
    --enable-server \
    --enable-agent \
    --enable-proxy \
    --enable-java \
    --with-agent \
    --with-mysql \
    --with-libpcre2 \
    --with-ssh2 \
    --with-libcurl \
    --with-libxml2 \
    --with-unixodbc \
    --with-libevent=/usr/local/libevent2 \
    --with-net-snmp=/usr/local/net-snmp \
    --with-openssl=/usr/local/openssl \
    CPPFLAGS="-I/usr/local/libevent2/include -I/usr/local/openssl/include -I/usr/local/net-snmp/include" \
    LDFLAGS="-L/usr/local/libevent2/lib -L/usr/local/openssl/lib -Wl,-rpath=/usr/local/openssl/lib -L/usr/local/net-snmp/lib"
time make -j$(nproc) && make install
ln -s /apps/zabbix/sbin/* /usr/sbin/
ln -s /apps/zabbix/bin/* /usr/bin/
echo 'PATH=/apps/zabbix/bin:$PATH' >/etc/profile.d/zabbix.sh
source /etc/profile.d/zabbix.sh
chown -R zabbix:zabbix /apps/zabbix/
tree /apps/zabbix/


# 安装数据库mysql
wget https://dev.mysql.com/get/mysql80-community-release-el7-11.noarch.rpm
rpm -ivh mysql80-community-release-el7-11.noarch.rpm
yum -y install mysql-server
mysql --version
systemctl enable --now mysqld
systemctl status mysqld
# 1. 获取 MySQL 安装生成的临时密码
MYSQL_TEMP_PASS=$(grep 'temporary password' /var/log/mysqld.log | tail -1 | awk '{print $NF}')
# 2. 定义新密码(你可以改成自己想要的)
NEW_PASS="Mysql.123456"
mysqladmin -uroot -p"${MYSQL_TEMP_PASS}" password "${NEW_PASS}"

mysql -uroot -p"${NEW_PASS}" --connect-expired-password <<EOF
-- 设置密码策略为 LOW
SET GLOBAL validate_password.policy=LOW;

-- 设置密码最小长度为 4
SET GLOBAL validate_password.length=4;

-- 再次修改密码为更简单的密码(如果你想)
ALTER USER 'root'@'localhost' IDENTIFIED BY 'password';

-- 查看当前密码策略设置
SHOW VARIABLES LIKE 'validate_password%';
EOF

# 定义变量
MYSQL_ROOT_PASS="password"
ZABBIX_DB="zabbix"
ZABBIX_USER_PASS="password"

# 登录 MySQL 执行批量 SQL 语句
mysql -uroot -p"${MYSQL_ROOT_PASS}" <<EOF

-- 创建 Zabbix 数据库
CREATE DATABASE IF NOT EXISTS ${ZABBIX_DB} CHARACTER SET utf8mb4 COLLATE utf8mb4_bin;

-- 创建本地用户
CREATE USER IF NOT EXISTS 'zabbix'@'localhost' IDENTIFIED WITH mysql_native_password BY '${ZABBIX_USER_PASS}';

-- 授予本地用户权限
GRANT ALL PRIVILEGES ON ${ZABBIX_DB}.* TO 'zabbix'@'localhost';

-- 创建远程用户
CREATE USER IF NOT EXISTS 'zabbix'@'10.0.0.%' IDENTIFIED WITH mysql_native_password BY '${ZABBIX_USER_PASS}';

-- 授予远程用户权限
GRANT ALL PRIVILEGES ON ${ZABBIX_DB}.* TO 'zabbix'@'10.0.0.%';

-- 设置允许创建函数不校验安全
SET GLOBAL log_bin_trust_function_creators = 1;

-- 可选:授予 SUPER 权限(某些环境可能不需要)
GRANT SUPER ON *.* TO 'zabbix'@'localhost';
GRANT SUPER ON *.* TO 'zabbix'@'10.0.0.%';

-- 应用权限变更
FLUSH PRIVILEGES;

EOF

mysql -uzabbix -ppassword -D zabbix < /usr/local/src/zabbix-7.0.12/database/mysql/schema.sql
mysql -uzabbix -ppassword -D zabbix < /usr/local/src/zabbix-7.0.12/database/mysql/images.sql
mysql -uzabbix -ppassword -D zabbix < /usr/local/src/zabbix-7.0.12/database/mysql/data.sql

mysql -uzabbix -ppassword -D zabbix -e 'show tables;'


# 创建相关服务文件
cat >/apps/zabbix/etc/zabbix_server.conf<<-eof
ListenPort=10051
LogFile=/tmp/zabbix_server.log
DBHost=localhost
DBName=zabbix
DBUser=zabbix
JavaGateway=127.0.0.1
JavaGatewayPort=10052

StartSNMPPollers=1
StartVMwareCollectors=1
StartReportWriters=1
StartConnectors=1

StartJavaPollers=5
DBPassword=password
DBPort=3306
Timeout=4
LogSlowQueries=3000
# 允许访问统计信息的 IP 地址为 127.0.0.1(仅本机)
StatsAllowedIP=127.0.0.1,10.0.0.0/24
# 是否启用“全局脚本”功能,0 表示不启用
EnableGlobalScripts=0
eof
cat >/usr/lib/systemd/system/zabbix-server.service<<-eof
[Unit]
Description=Zabbix Server
After=syslog.target
After=network.target

[Service]
Environment="LD_LIBRARY_PATH=/usr/local/libevent2/lib"
Type=forking
Restart=on-failure
PIDFile=/tmp/zabbix_server.pid
KillMode=control-group
ExecStart=/apps/zabbix/sbin/zabbix_server -c /apps/zabbix/etc/zabbix_server.conf
ExecStop=/bin/kill -SIGTERM \$MAINPID
RestartSec=10s
User=zabbix
Group=zabbix

[Install]
WantedBy=multi-user.target
eof
systemctl daemon-reload
systemctl enable --now zabbix-server.service


sed -i.bak \
-e "s/Server=127.0.0.1/Server=10.0.0.7,127.0.0.1/" \
-e "s/Hostname=Zabbix server/Hostname=Zabbix server/" \
/apps/zabbix/etc/zabbix_agentd.conf
cat >/usr/lib/systemd/system/zabbix-agent.service<<-eof
[Unit]
Description=Zabbix Agent
After=syslog.target
After=network.target

[Service]
Type=forking
Restart=on-failure
PIDFile=/tmp/zabbix_agentd.pid
KillMode=control-group
ExecStart=/apps/zabbix/sbin/zabbix_agentd -c /apps/zabbix/etc/zabbix_agentd.conf
ExecStop=/bin/kill -SIGTERM \$MAINPID
RestartSec=10s
User=zabbix
Group=zabbix

[Install]
WantedBy=multi-user.target
eof

systemctl daemon-reload
systemctl enable --now zabbix-agent.service

cat >/usr/lib/systemd/system/zabbix-proxy.service<<-eof
[Unit]
Description=Zabbix Proxy
After=syslog.target
After=network.target

[Service]
Type=forking
Restart=on-failure
PIDFile=/tmp/zabbix_proxy.pid
KillMode=control-group
ExecStart=/apps/zabbix/sbin/zabbix_proxy -c /apps/zabbix/etc/zabbix_proxy.conf
ExecStop=/bin/kill -SIGTERM \$MAINPID
RestartSec=10s
User=zabbix
Group=zabbix

[Install]
WantedBy=multi-user.target
eof

systemctl daemon-reload
systemctl enable --now zabbix-proxy.service


touch /tmp/zabbix_java.log
chown zabbix:zabbix /tmp/zabbix_java.log
chmod 644 /tmp/zabbix_java.log
cat >/usr/lib/systemd/system/zabbix-java-gateway.service<<-eof
[Unit]
Description=Zabbix Java Gateway
After=network.target
Requires=network.target

[Service]
Type=forking
PrivateTmp=true
User=zabbix
Group=zabbix
Environment=JAVA_HOME=/usr/lib/jvm/java-11-openjdk/
# 启动脚本(建议脚本内处理后台化与日志输出)
ExecStart=/apps/zabbix/sbin/zabbix_java/startup.sh
# 优雅关闭:脚本应支持 SIGTERM 捕获
ExecStop=/apps/zabbix/sbin/zabbix_java/shutdown.sh

[Install]
WantedBy=multi-user.target
eof
systemctl daemon-reload
systemctl enable --now zabbix-java-gateway.service

# 安装中文
yum -y install kde-l10n-Chinese glibc-common

# 安装nginx
yum -y install yum-utils
tee /etc/yum.repos.d/nginx.repo << 'EOF'
[nginx-stable]
name=nginx stable repo
baseurl=http://nginx.org/packages/centos/$releasever/$basearch/
gpgcheck=1
enabled=1
gpgkey=https://nginx.org/keys/nginx_signing.key
module_hotfixes=true
EOF
yum makecache
yum -y install nginx
systemctl start nginx
systemctl enable nginx

# 安装php
yum install -y https://rpms.remirepo.net/enterprise/remi-release-7.rpm
yum install -y yum-utils
yum-config-manager --enable remi-php82
mkdir -p /var/www/html/zabbix
cp -a /usr/local/src/zabbix-7.0.12/ui/* /var/www/html/zabbix/
chown -R nginx:nginx /var/www/html/zabbix/
yum -y install php php-gd php-xml php-cli php-json php-mysqlnd php-ldap php-mbstring php-bcmath php-fpm php-opcache php-pear openssl-devel php-zip php-gettext
php -v

sed -i 's/^post_max_size\s*=.*/post_max_size = 16M/' /etc/php.ini
sed -i 's/^max_execution_time\s*=.*/max_execution_time = 300/' /etc/php.ini
sed -i 's/^max_input_time\s*=.*/max_input_time = 300/' /etc/php.ini
echo "date.timezone = Asia/Shanghai" >>/etc/php.ini
cat <<EOF | tee /etc/php-fpm.d/www.conf
[www]
user = nginx
group = nginx
listen  = /run/php-fpm/www.sock
;listen = 127.0.0.1:9000
listen.acl_users = apache,nginx
listen.allowed_clients = 127.0.0.1
pm = dynamic
pm.max_children = 50
pm.start_servers = 5
pm.min_spare_servers = 5
pm.max_spare_servers = 35
pm.status_path = /pm_status
ping.path = /ping
ping.response = ping-pong
slowlog = /var/log/php-fpm/www-slow.log
php_admin_value[error_log] = /var/log/php-fpm/www-error.log
php_admin_flag[log_errors] = on
php_value[session.save_handler] = files
php_value[session.save_path]    = /var/lib/php/session
php_value[soap.wsdl_cache_dir]  = /var/lib/php/wsdlcache
EOF
systemctl restart php-fpm

cat >/etc/nginx/conf.d/default.conf<<-eof
server {
    listen       80;
    server_name  localhost;
    access_log  /var/log/nginx/host.access.log  main;
    location / {
        root   /var/www/html;
        index  index.php index.html index.htm;
    }
    error_page   500 502 503 504  /50x.html;
    location = /50x.html {
        root   /var/www/html;
    }
    location ~ \.php\$|php_status|ping {
        root           /var/www/html;
        fastcgi_pass   unix:/run/php-fpm/www.sock;
        fastcgi_index  index.php;
        fastcgi_param  SCRIPT_FILENAME  \$document_root\$fastcgi_script_name;
        include        fastcgi_params;
    }
    location ~ ^/(ping|pm_status)\$ {
        include fastcgi_params;
        fastcgi_pass unix:/run/php-fpm/www.sock;
        fastcgi_param PATH_TRANSLATED \$document_root\$fastcgi_script_name;
    }
}
eof
systemctl restart nginx
nginx -t

netstat -tunlp
ps -ef | grep zabbix


 1159
1159

 被折叠的 条评论
为什么被折叠?
被折叠的 条评论
为什么被折叠?
 到【灌水乐园】发言


