


目录
4)获取复选框的状态isChecked()、checkState()
1、按钮介绍
共四种按钮类型
QPushButton
QToolButton
QRadioButton
QCheckBox
有共同的父类:QAbstractButton
2、普通按钮QPushButton学习
1)特殊模式——开关按钮(toggle)
普通按钮的特殊模式即为开关状态,按钮只有按下和未按下两种状态,具体设置为:
①将按钮设置为可选择的
self.button1.setCheckable(True) # 将按钮设置为开关状态的特殊模式②将按钮按下
self.button1.toggle() # 将按钮按下,只有将button属性设置为checkable该行才有用注:上述一般是结合使用,若未将按钮的Checkable属性设置为TRUE,toggle是没有效果的
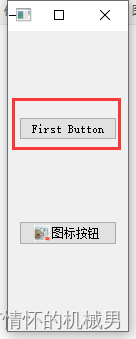
按下状态按钮会呈现浅蓝色:

未按下则显示灰色:
判断按钮是否被按下 isChecked()
通过按钮名称.isChecked()方法可以判断按钮是否被按下
2)给按钮设置前置图标setIcon()
self.button2.setIcon(QIcon(QPixmap("icon.jpg")))
3)按钮信号
clicked——常用的信号,就是“点击按钮”信号
toggled——这个信号只有开关模式的按钮才有,“按钮状态发生改变”信号
注:上述两个信号在普通按钮中的效果是一样的,因为要使得一个按钮的状态改变就必须点击按钮,因此效果一样
4)完整代码
from PyQt5.QtWidgets import *
from PyQt5.QtGui import *
import sys
# QPushButton——普通按钮
class QPushbuttonDemo(QWidget):
def __init__(self):
super(QPushbuttonDemo, self).__init__()
self.initUI()
def initUI(self):
self.resize(30,300)
self.setWindowTitle("普通按钮QPushButton学习")
layout = QVBoxLayout()
# 将普通按钮设置为特殊模式——开关按钮,有两个状态(按下和未按下)
self.button1 = QPushButton("第一个按钮")
self.button1.setText("First Button")
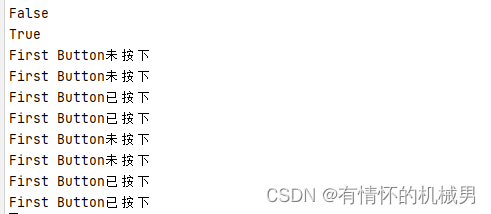
print(self.button1.isChecked()) # False
self.button1.setCheckable(True) # 将按钮设置为开关状态的特殊模式
self.button1.toggle() # 将按钮按下,只有将button属性设置为checkable该行才有用
print(self.button1.isChecked()) # TRUE
self.button1.clicked.connect(self.showState) # 将按钮点击信号绑定事件
self.button1.toggled.connect(self.showState) # 将按钮开关信号绑定事件,和上述一样
# 给普通按钮添加图标
self.button2 = QPushButton("图标按钮")
self.button2.setIcon(QIcon(QPixmap("icon.jpg")))
layout.addWidget(self.button1)
layout.addWidget(self.button2)
self.setLayout(layout)
def showState(self):
if self.button1.isChecked():
print(self.button1.text() + "已按下")
else:
print(self.button1.text() + "未按下")
if __name__ == '__main__':
app = QApplication(sys.argv)
mainWin = QPushbuttonDemo()
mainWin.show()
sys.exit(app.exec_())运行结果:
3、单选按钮QRadioButton学习
在同一个布局或者同一个容器里面的单选按钮,只有一个单选按钮可以被选中,即当选择一个按钮时,其它的按钮就会被取消选择。
两种状态——选中和不被选中
1)将按钮设置为选中状态setChecked()
self.button1.setChecked(True)2)信号toggled和clicked
clicked——常用的信号,就是“选择按钮”信号
toggled——“按钮状态发生改变”信号
注:上述两个信号在普通按钮中的效果是不一样的,当选中一个按钮时,之前被选择的按钮会取消按钮,这时候“按钮状态改变”的按钮有两个,而被点击(选择)的按钮只有一个
		self.button1.clicked.connect(self.showState) # 点击的时候会触发事件
		self.button2.toggled.connect(self.showState) # 状态发生变化了就会触发事件
3)获取发射信号的控件self.sender()
radioButton = self.sender() # 获得信号发射的控件4)完整代码
# QRadioButton——单选按钮
class QRadioButtonDemo(QWidget):
	def __init__(self):
		super(QRadioButtonDemo, self).__init__()
		self.initUI()

	def initUI(self):
		self.resize(30,300)
		self.setWindowTitle("单选按钮QRadioButton学习")
		layout = QVBoxLayout()

		self.button1 = QRadioButton("第一个按钮")
		self.button1.setText("First Button")
		self.button1.setChecked(True)
		self.button2 = QRadioButton("第二个按钮")
		self.button2.setText("Second Button")
		self.button1.clicked.connect(self.showState1) # 点击的时候会触发事件
		self.button2.toggled.connect(self.showState2) # 状态发生变化了就会触发事件

		layout.addWidget(self.button1)
		layout.addWidget(self.button2)
		self.setLayout(layout)

	def showState1(self):
		radioButton = self.sender() # 获得信号发射的控件
		if radioButton.isChecked() == True:
			print(radioButton.text() + "被选中_-------------------")
		else:
			print(radioButton.text() + "未被选中_-------------------------")

	def showState2(self):
		radioButton = self.sender() # 获得信号发射的控件
		if radioButton.isChecked() == True:
			print(radioButton.text() + "被选中")
		else:
			print(radioButton.text() + "未被选中")
if __name__ == '__main__':
	app = QApplication(sys.argv)
	mainWin = QRadioButtonDemo()
	mainWin.show()
	sys.exit(app.exec_())
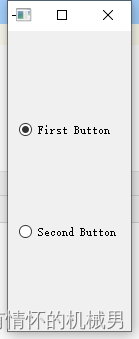

可以看到:
1)当在按钮2被选中的情况下,选择按钮1,这时候由于按钮1被点击因此会调用槽函数showState1,且因为按钮2由选中的状态切换为取消选择状态,因此showState2槽函数也会被调用;
2)当在按钮1被选择的情况下,选择按钮2时,因为按钮2状态发生改变,因此会调用showState2槽函数,而由于按钮1未被点击,因此showState1槽函数不会被调用
4、复选框QCheckBox学习
1)三种状态(未选中、半选中、选中)
复选框QCheckBox区别于单选按钮,复选框可以同时选中多个,有三种状态(未选中、半选中、选中)
未选中——0
半选中——1
选中——2

2) 设置状态
①方法一——setCheckState
self.checkbox3.setCheckState(num) # 其中num=1,2,3其中0表示未选中、1表示半选择,2表示选中
self.checkbox3.setCheckState(0) # 未选中

self.checkbox3.setCheckState(1) # 半选中

self.checkbox3.setCheckState(2) # 选中
或者:
self.checkbox1.setCheckState(Qt.PartiallyChecked) # 半选中
self.checkbox1.setCheckState(Qt.Checked) # 选中
默认为不选中
②方法二—— setChecked()
self.checkbox1.setChecked(True) # 选中
self.checkbox1.setChecked(False) # 未选中
3)开启三种状态 ——setTristate(True)
默认是两种状态——选中和未选中
如果需要三种状态则需要开启
self.checkbox3.setTristate(True) ## 将三种状态同时存在的开关打开
4)获取复选框的状态isChecked()、checkState()
self.checkbox3.isChecked()
这里只能获得TRUE或者False,其中半选中和选中都为true
self.checkbox1.checkState()
这里获得状态码,数字的形式
未选中——0
半选中——1
选中——2
5)信号——clicked、stateChanged
clicked——点击信号
stateChanged ——状态发生改变的信号
两者是一样的效果,原因和普通按钮一样
		self.checkbox1.clicked.connect(self.clickedSlot)
		self.checkbox3.stateChanged.connect(self.stateChangedSlot)
6)完整代码
# 复选框控件QCheckBox控件
'''
三种状态:
选中:0
半选中:1
未选中:2
'''
from PyQt5.Qt import *

class QCheckBoxDemo(QWidget):
	def __init__(self):
		super(QCheckBoxDemo, self).__init__()
		self.InitUI()

	def InitUI(self):
		self.resize(500,30)
		self.setWindowTitle("复选框控件学习")

		layout = QHBoxLayout()
		self.checkbox1 = QCheckBox("复选框1")
		self.checkbox2 = QCheckBox("复选框2")
		self.checkbox3 = QCheckBox("复选框3")

		# 设置为选中,默认不选中
		self.checkbox1.setChecked(True)
		# 设置为半选中
		self.checkbox3.setTristate(True) ## 将三种状态同时存在的开关打开
		self.checkbox3.setCheckState(1) ## 设置为半选中
		layout.addWidget(self.checkbox1)
		layout.addWidget(self.checkbox2)
		layout.addWidget(self.checkbox3)

		self.checkbox1.clicked.connect(self.clickedSlot)
		self.checkbox3.stateChanged.connect(self.stateChangedSlot)

		self.setLayout(layout)

	# clicked
	def clickedSlot(self):
		print(self.checkbox1.text() + ",isChecked=" +str(self.checkbox1.isChecked()) + ",checkedState=",str(self.checkbox1.checkState()))

	# stateChanged
	def stateChangedSlot(self):
		print(self.checkbox3.text() + ",isChecked=" +str(self.checkbox3.isChecked()) + ",checkedState=",str(self.checkbox3.checkState()))


if __name__ == '__main__':
	app = QApplication(sys.argv)
	mainWin = QCheckBoxDemo()
	mainWin.show()
	sys.exit(app.exec_())


 624
624


 被折叠的 条评论
为什么被折叠?
被折叠的 条评论
为什么被折叠?
 到【灌水乐园】发言


