


Echarts 表格通过ajax异步请求实现动态赋值(分析同比环比的实现)
对于ElementUI中使用ECharts在上一篇文章中已经说明具体使用方法
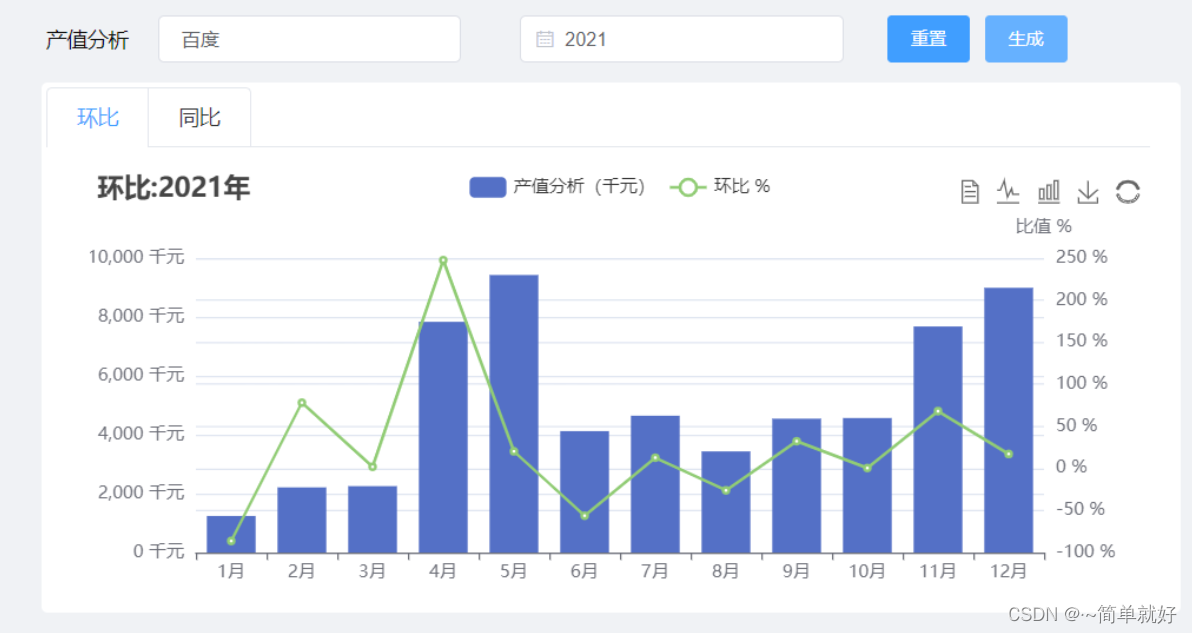
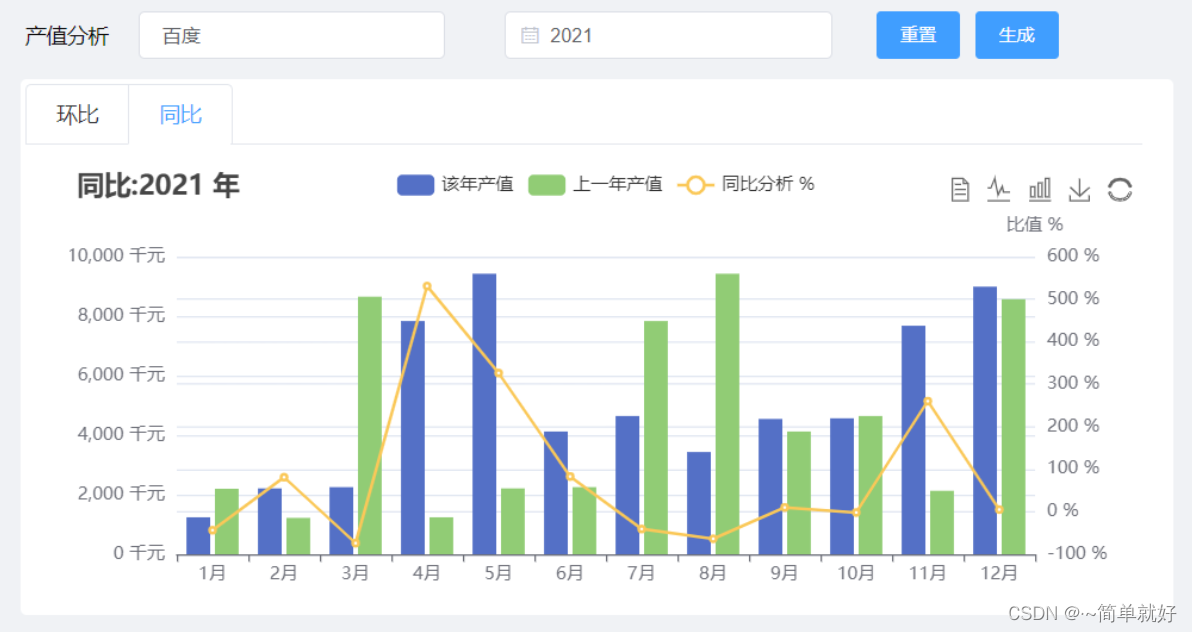
一、效果图:(以每一个月的工业产值为例)
我们可以选择不同企业和不同的年份生成同比环比图
1、环比图
2、同比图
二、从Echart官网中导入我们需要的图表
Echart官网 https://echarts.apache.org/zh/index.html
2.1、导入图表信息,生成静态图表
<template>
    <div>
            <!--    统计分析图        -->
             <div>
                <Echarts :option="option" style="height: 330px;width: 720px;margin-left: 30px" />
             </div>
  </div>
</template>
<script>

//引入Echart的包
import Echarts from "../../components/charts/Echarts";
export default {
  components:{
    Echarts,
  },
  data(){
    return{
      option:{
  		tooltip: {
    	trigger: 'axis',
    	axisPointer: {
      	type: 'cross',
      	crossStyle: {
        color: '#999'
      }
    }
  },
  toolbox: {
    feature: {
      dataView: { show: true, readOnly: false },
      magicType: { show: true, type: ['line', 'bar'] },
      restore: { show: true },
      saveAsImage: { show: true }
    }
  },
  legend: {
    data: ['Evaporation', 'Precipitation', 'Temperature']
  },
  xAxis: [
    {
      type: 'category',
      data: ['Mon', 'Tue', 'Wed', 'Thu', 'Fri', 'Sat', 'Sun'],
      axisPointer: {
        type: 'shadow'
      }
    }
  ],
  yAxis: [
    {
      type: 'value',
      name: 'Precipitation',
      min: 0,
      max: 250,
      interval: 50,
      axisLabel: {
        formatter: '{value} ml'
      }
    },
    {
      type: 'value',
      name: 'Temperature',
      min: 0,
      max: 25,
      interval: 5,
      axisLabel: {
        formatter: '{value} °C'
      }
    }
  ],
  series: [
    {
      name: 'Evaporation',
      type: 'bar',
      tooltip: {
        valueFormatter: function (value) {
          return value + ' ml';
        }
      },
      data: [
        2.0, 4.9, 7.0, 23.2, 25.6, 76.7, 135.6, 162.2, 32.6, 20.0, 6.4, 3.3
      ]
    },
    {
      name: 'Precipitation',
      type: 'bar',
      tooltip: {
        valueFormatter: function (value) {
          return value + ' ml';
        }
      },
      data: [
        2.6, 5.9, 9.0, 26.4, 28.7, 70.7, 175.6, 182.2, 48.7, 18.8, 6.0, 2.3
      ]
    },
    {
      name: 'Temperature',
      type: 'line',
      yAxisIndex: 1,
      tooltip: {
        valueFormatter: function (value) {
          return value + ' °C';
        }
      },
      data: [2.0, 2.2, 3.3, 4.5, 6.3, 10.2, 20.3, 23.4, 23.0, 16.5, 12.0, 6.2]
    }
  ]
};
  },
  created: function () {

  },
  methods:{

  }
}
</script>
<style scoped>
</style>
2.2、通过ajax请求,从数据库获取将要展示的信息
此时我们需要通过在script里面编写请求的方法,用于获取展示信息
当我们再使用的时候需要改写成自己的请求信息:获取自己想要的数据
//加载页面时执行一次
created() {
    this.selectCharts();
  },
  methods:{
	selectCharts:function (){
      this.axios({
        method: "POST",
        url: "/v1/statistics/selectYearDate",
      }).then((res) => {
        let code = res.data.code;
        if (code == 200) {
          //调用赋值操作的方法
          this.assignmentCharts(res.data.data)
        }
      }).catch((error) => {
        console.log(error);
      });
    },
}
-
注意:Echarts的赋值方式一定是得从根开始往下找,一直对应到自己赋值得数据域
-
例如:我们要给Echarts图表赋值时,例如给series里面的data赋值:this.optionzhezhu.series[0].data=所赋的值;
特别注意:series里面存储的是数组类型的对象,我们比如要给第一个对象赋值,那么得写series[0].对应赋值得变量
2.3、对图表进行赋值操作
    assignmentCharts:function (temp){
      console.log(temp)
      let nowYear = new Date().getFullYear();
      this.optionzhezhu.series[0].data=[];
      this.optionzhezhu.title.text=[]
      if(this.selectYear!=""){
        let yy = new Date(this.selectYear).getFullYear();
        this.optionzhezhu.title.text="环比:"+yy+"年";
      }else{
        this.optionzhezhu.title.text="环比:"+nowYear+" 年全企业";
      }
      this.optionzhezhu.series[1].data=[];
      for (let i = 0; i < temp.length; i++) {
          this.optionzhezhu.series[0].data.push(temp[i].nowYearOutputValue);   //当前月的数据
          this.optionzhezhu.series[1].data.push(temp[i].monthOnMonth);   //上一个月的数据
      }
    },
这样我们就对环比图赋值完成了
[外链图片转存失败,源站可能有防盗链机制,建议将图片保存下来直接上传(img-f1mXNjuo-1658664130032)(C:/Users/ZHANG/AppData/Roaming/Typora/typora-user-images/image-20220724194636766.png)]
2.4、当然我们也可以通过让用户去选择企业名称和年份动态生成数据
每次选择企业名称后会重新调用我们的数据回显函数,此时带着具体的企业id和年份,动态查询出数据
    <div style="padding: 0px 33px;" class="static">
      <h3>产值分析</h3>
      <el-select class="inputs"
           v-model="selectKey"
           :multiple="false"
           :filterable="true"
           :remote="true"
           :clearable="true"
           placeholder="请选择企业"
           :remote-method="remoteMethod"
           :loading="selectLoading">
        <el-option
            v-for="index in options"
            :key="index.id"
            :label="index.enterpriseName"
            :value="index.id">
        </el-option>
      </el-select>
      <el-date-picker class="selectYear"
          v-model="selectYear"
          type="year"
          :clearable="false"
          placeholder="选择年">
      </el-date-picker>
      <el-button type="primary" @click="reloadSerchDate" style="height: 32px;margin: auto 10px;">重置</el-button>
      <el-button type="primary" @click="clickCharts" style="height: 32px;margin: auto 0;">生成</el-button>
    </div>


//method
    //每次选择企业名称后会重新调用我们的数据回显函数,此时带着具体的企业id和年份
    remoteMethod(query) {
      this.selectLoading=true;
      this.selectEnterprise(query);
    },
---------------------->此时我么就能够动态的去获取数据


 572
572


 被折叠的 条评论
为什么被折叠?
被折叠的 条评论
为什么被折叠?
 到【灌水乐园】发言


