


引言
OpenCV是计算机视觉中经典的专用库,其支持多语言、跨平台,功能强大。OpenCV-Python为OpenCV提供了Python接口,使得使用者在Python中能够调用C/C++,在保证易读性和运行效率的前提下,实现所需的功能。
『飞桨领航团图像分类零基础训练营』课程链接:https://aistudio.baidu.com/aistudio/course/introduce/11939?directly=1&shared=1
1.图像的基本概念
灰度:灰度使用黑色来显示物体,即黑色为基准色,不同饱和度的黑色来显示图像。
通常,像素值量化后用一个字节(8B)来表示,如把有黑-灰-白连续变化的灰度值量化为256(2^8)个灰度级,灰度值的范围为0-255,表示亮度从深到浅,对应图像中的颜色为从黑到白。
换一种说法,即每个灰度对象都具有从0%(白色)到100%(黑色)的亮度值。
如果灰度范围为0-255,那么0是黑,255是白。

分辨率
分辨率=画面水平方向的像素值 * 画面垂直方向的像素值
屏幕分辨率
例如,屏幕分辨率是1024×768,也就是说设备屏幕的水平方向上有1024个像素点,垂直方向上有768个像素点。像素的大小是没有固定长度的,不同设备上一个单位像素色块的大小是不一样的。
图像分辨率
例如,一张图片分辨率是500x200,也就是说这张图片在屏幕上按1:1放大时,水平方向有500个像素点(色块),垂直方向有200个像素点(色块)。
常见图片格式:jpg、png、gif、psd、tiff、bmp等
2.OpenCv库操作
使用OpenCV加载并保存图片:
加载图片:cv2.imread()
显示图片:cv2.imshow()
保存图片:cv2.imwrite()
%matplotlib inline
import numpy as np
import cv2
import matplotlib.pyplot as plt
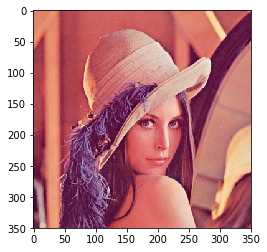
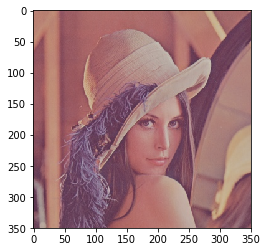
# 加载彩色图
img = cv2.imread('lena.jpg', 1)
# 将彩色图的BGR通道顺序转成RGB
img = cv2.cvtColor(img, cv2.COLOR_BGR2RGB)
# 显示图片
plt.imshow(img)
<matplotlib.image.AxesImage at 0x7f7130957750>
使用OpenCv实现通道分割与合并
cv2.split()
cv2.merge()
#创建一副图片
img = cv2.imread('lena.jpg')

#通道分割
b, g, r = cv2.split(img)

#通道合并
img = cv2.merge((b, g, r))

img = cv2.cvtColor(img, cv2.COLOR_BGR2RGB)
plt.imshow(img)
<matplotlib.image.AxesImage at 0x7fe2cf3036d0>

使用OpenCv实现颜色转换
最常用的颜色空间转换如下:
RGB或BGR到灰度(COLOR_RGB2GRAY,COLOR_BGR2GRAY)
RGB或BGR到YcrCb(或YCC)(COLOR_RGB2YCrCb,COLOR_BGR2YCrCb)
RGB或BGR到HSV(COLOR_RGB2HSV,COLOR_BGR2HSV)
RGB或BGR到Luv(COLOR_RGB2Luv,COLOR_BGR2Luv)
灰度到RGB或BGR(COLOR_GRAY2RGB,COLOR_GRAY2BGR)
img = cv2.imread('lena.jpg')
# 转换为灰度图
img_gray = cv2.cvtColor(img, cv2.COLOR_BGR2GRAY)
# 保存灰度图
cv2.imwrite('img_gray.jpg', img_gray)
True
使用OpenCv实现图像几何变换
缩放图片:cv2.resize()
翻转图片:cv2.flip()
平移图片:cv2.warpAffine()
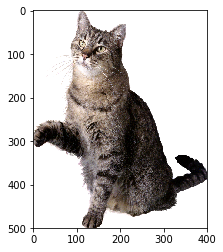
缩放图片
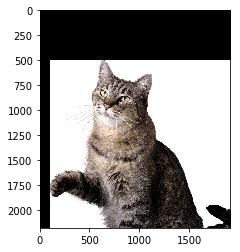
img = cv2.imread('1.png')
img = cv2.cvtColor(img, cv2.COLOR_BGR2RGB)
# 按照指定的宽度、高度缩放图片
res = cv2.resize(img, (400, 500))
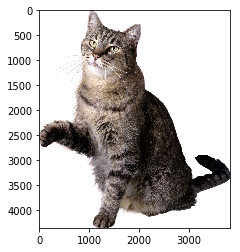
# 按照比例缩放,如x,y轴均放大一倍
res2 = cv2.resize(img, None, fx=2, fy=2, interpolation=cv2.INTER_LINEAR)
plt.imshow(res)
plt.imshow(res2)
<matplotlib.image.AxesImage at 0x7fe19d722910>
<Figure size 432x288 with 1 Axes>
plt.imshow(res2)
<matplotlib.image.AxesImage at 0x7fe2ce6937d0>
<Figure size 432x288 with 1 Axes>
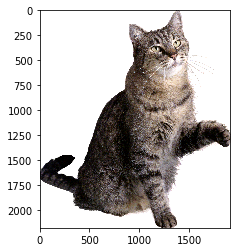
翻转图片
镜像翻转图片,可以用cv2.flip()函数: 其中,参数2 = 0:垂直翻转(沿x轴),参数2 > 0: 水平翻转(沿y轴),参数2 <0: 水平垂直翻转。
img = cv2.imread('1.png')
img = cv2.cvtColor(img, cv2.COLOR_BGR2RGB)
# 水平翻转
dst = cv2.flip(img, 1)
plt.imshow(dst)
<matplotlib.image.AxesImage at 0x7ff9986506d0>
<Figure size 432x288 with 1 Axes>
平移图片
# 平移图片
import numpy as np
# 获得图片的高、宽
rows, cols = img.shape[:2]
# 定义平移矩阵,需要是numpy的float32类型
# x轴平移200,y轴平移500
M = np.float32([[1, 0, 100], [0, 1, 500]])
# 用仿射变换实现平移
dst = cv2.warpAffine(img, M, (cols, rows))
plt.imshow(dst)
<matplotlib.image.AxesImage at 0x7fe2ce5b7410>
<Figure size 432x288 with 1 Axes>
图片亮度调节
class Brightness:
    def __init__(self,brightness_factor):
        self.brightness_factor=brightness_factor

    def __call__(self, img):
         a=np.clip((self.brightness_factor *img+125 *(1-self.brightness_factor)),0,255)
         img2=np.uint8(a)
         return img2
brightness=Brightness(0.6)
img2=brightness(img)
plt.imshow(img2)
<matplotlib.image.AxesImage at 0x7fb78c5d91d0>
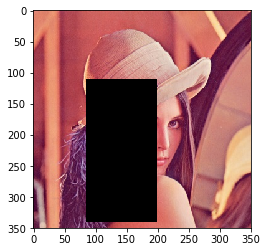
图片随机擦除
import random
import math

class RandomErasing(object):
    def __init__(self, EPSILON=0.5, sl=0.02, sh=0.4, r1=0.3,
                 mean=[0., 0., 0.]):
        self.EPSILON = EPSILON
        self.mean = mean
        self.sl = sl
        self.sh = sh
        self.r1 = r1

    def __call__(self, img):
        if random.uniform(0, 1) > self.EPSILON:
            return img

        for attempt in range(100):
            area = img.shape[0] * img.shape[1]

            target_area = random.uniform(self.sl, self.sh) * area
            aspect_ratio = random.uniform(self.r1, 1 / self.r1)

            h = int(round(math.sqrt(target_area * aspect_ratio)))
            w = int(round(math.sqrt(target_area / aspect_ratio)))

            if w < img.shape[0] and h < img.shape[1]:
                x1 = random.randint(0, img.shape[1] - h)
                y1 = random.randint(0, img.shape[0] - w)
                if img.shape[2] == 3:
                    img[ x1:x1 + h, y1:y1 + w, 0] = self.mean[0]
                    img[ x1:x1 + h, y1:y1 + w, 1] = self.mean[1]
                    img[ x1:x1 + h, y1:y1 + w, 2] = self.mean[2]
                else:
                    img[x1:x1 + h, y1:y1 + w,0] = self.mean[0]
                return img

            return img
erase = RandomErasing()
img2=erase(img)
plt.imshow(img2)


 701
701


 被折叠的 条评论
为什么被折叠?
被折叠的 条评论
为什么被折叠?
 到【灌水乐园】发言


