


前言
今天鸡米花给大家带来的是vue3基于高德地图实现导航的功能,与其说是导航,其实叫轨迹查询更为准确一点,因为毕竟是在PC端实现,目前只做到了查询的功能,离实时导航还是有一定的距离,UI呢是参照了苹果地图的mac版,所以这里只是用来学习交流,同时呢也是鸡米花自己写的一个小demo,并未用于商业用途,好了,废话不多说了,直接看效果图!
效果图
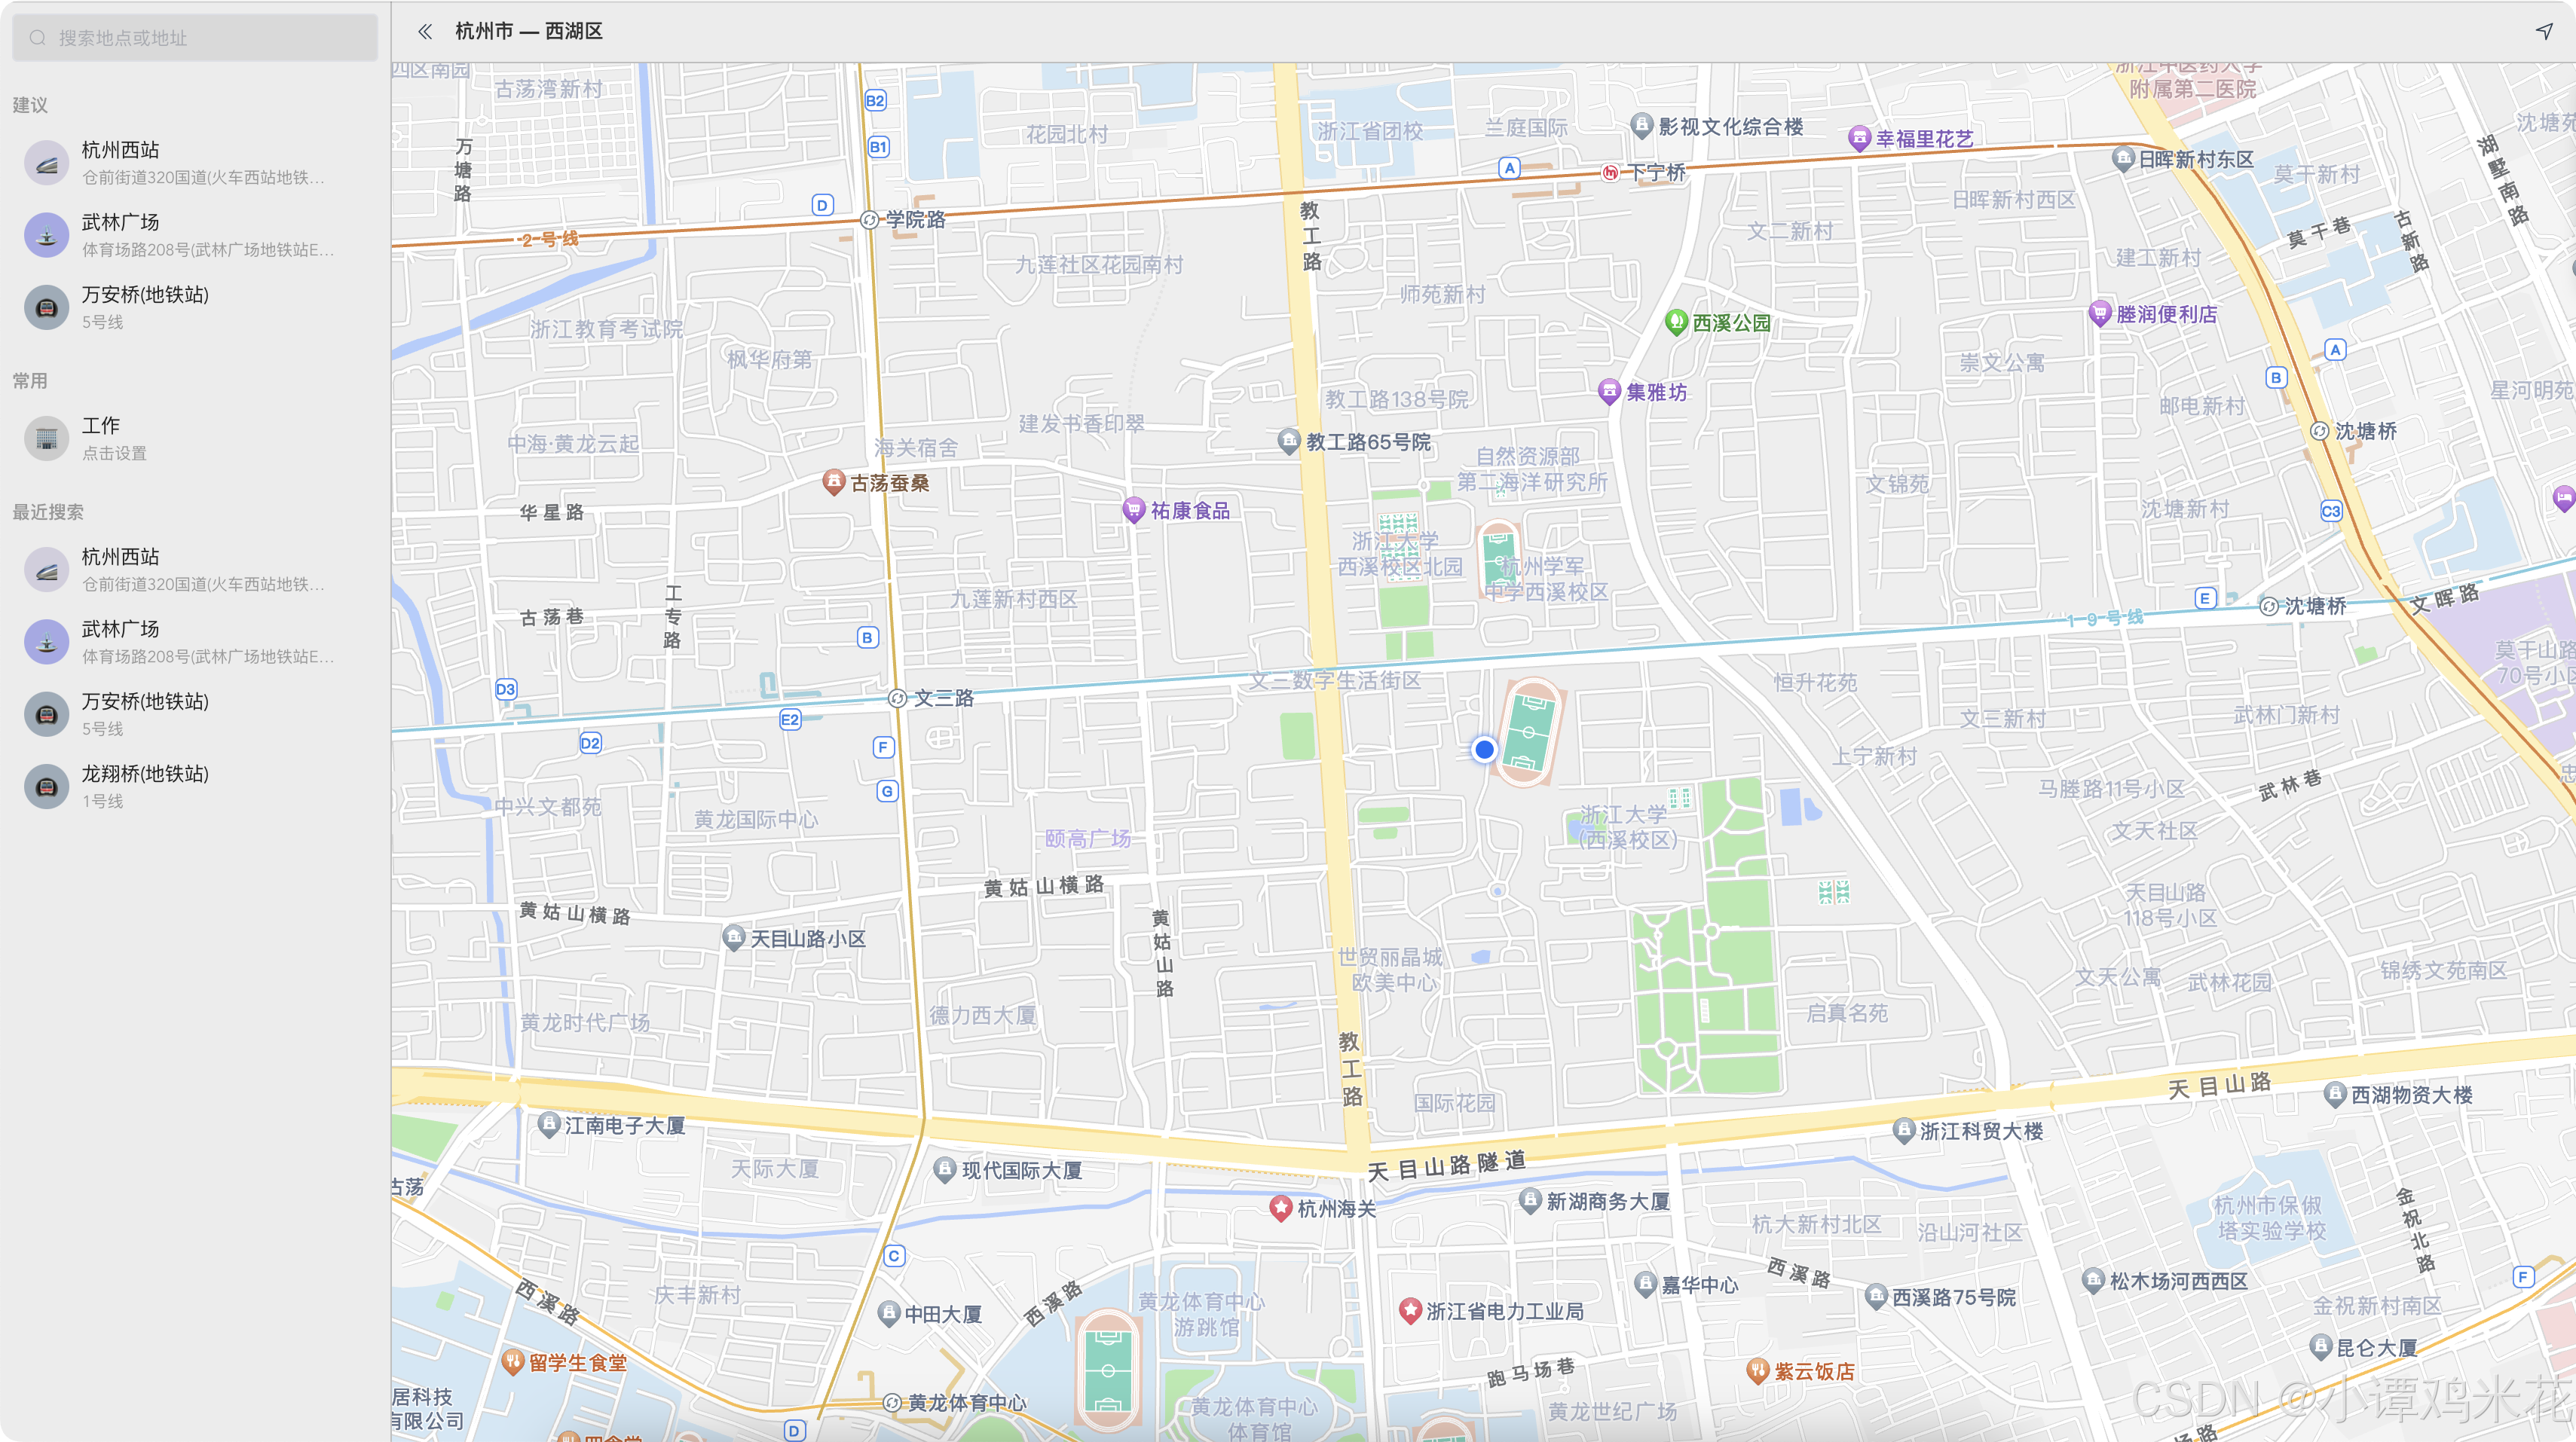
首页
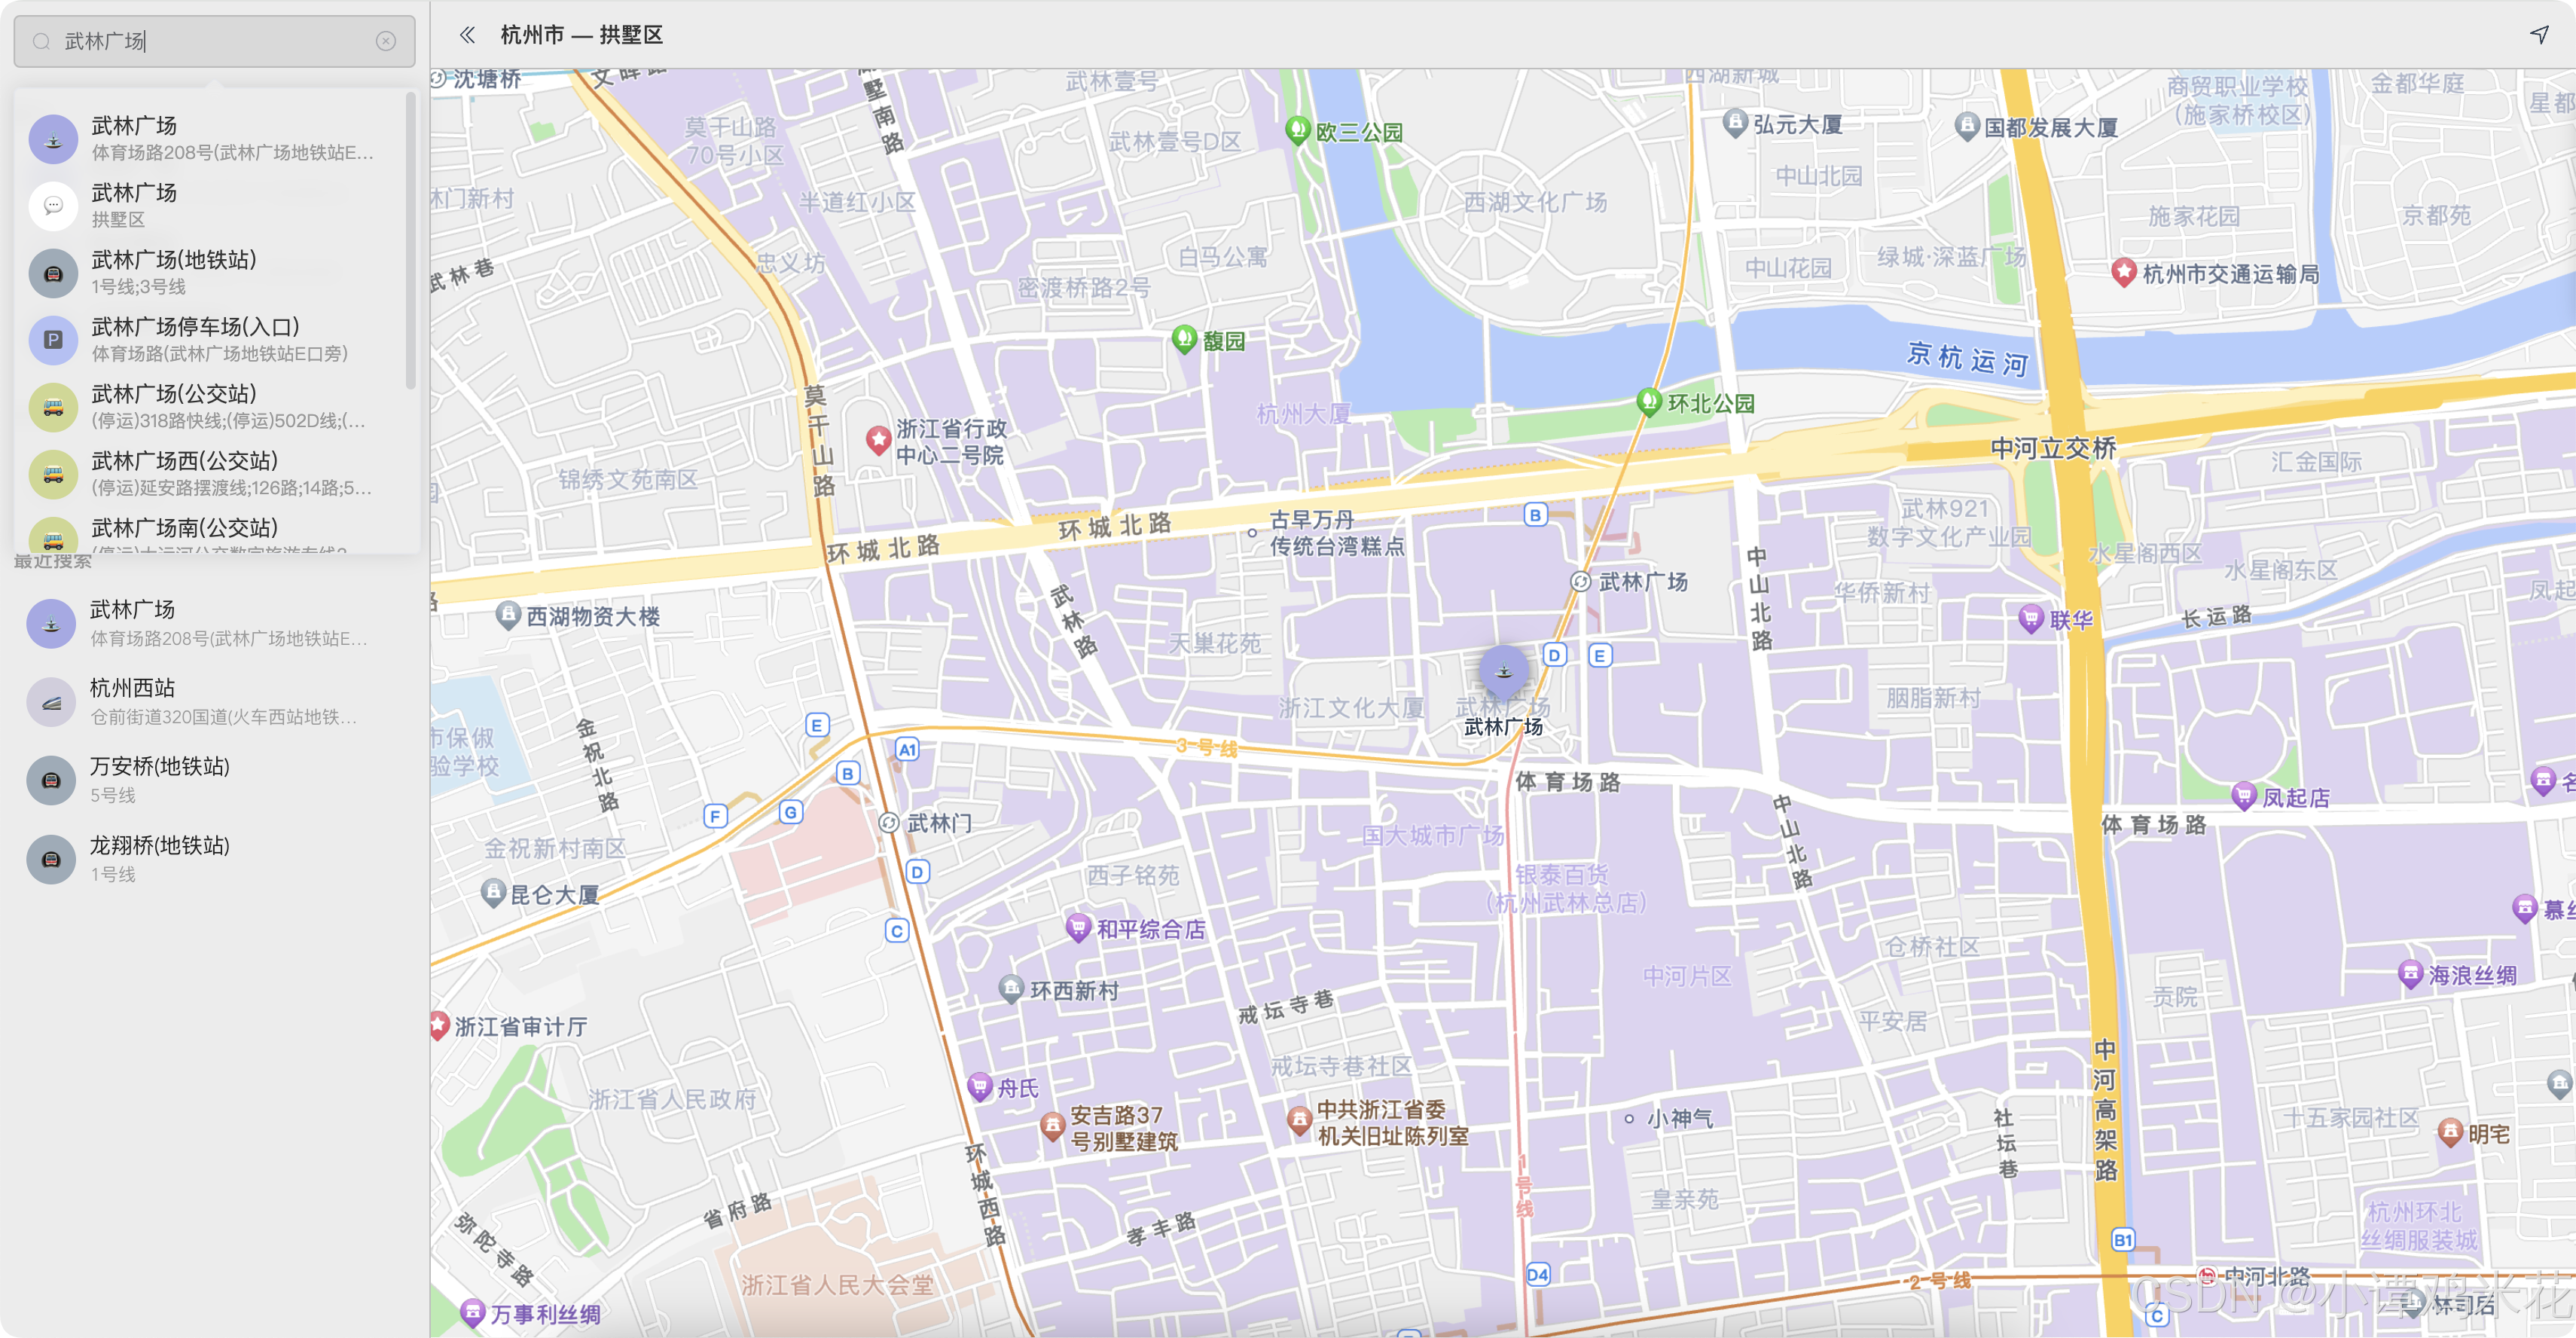
搜索
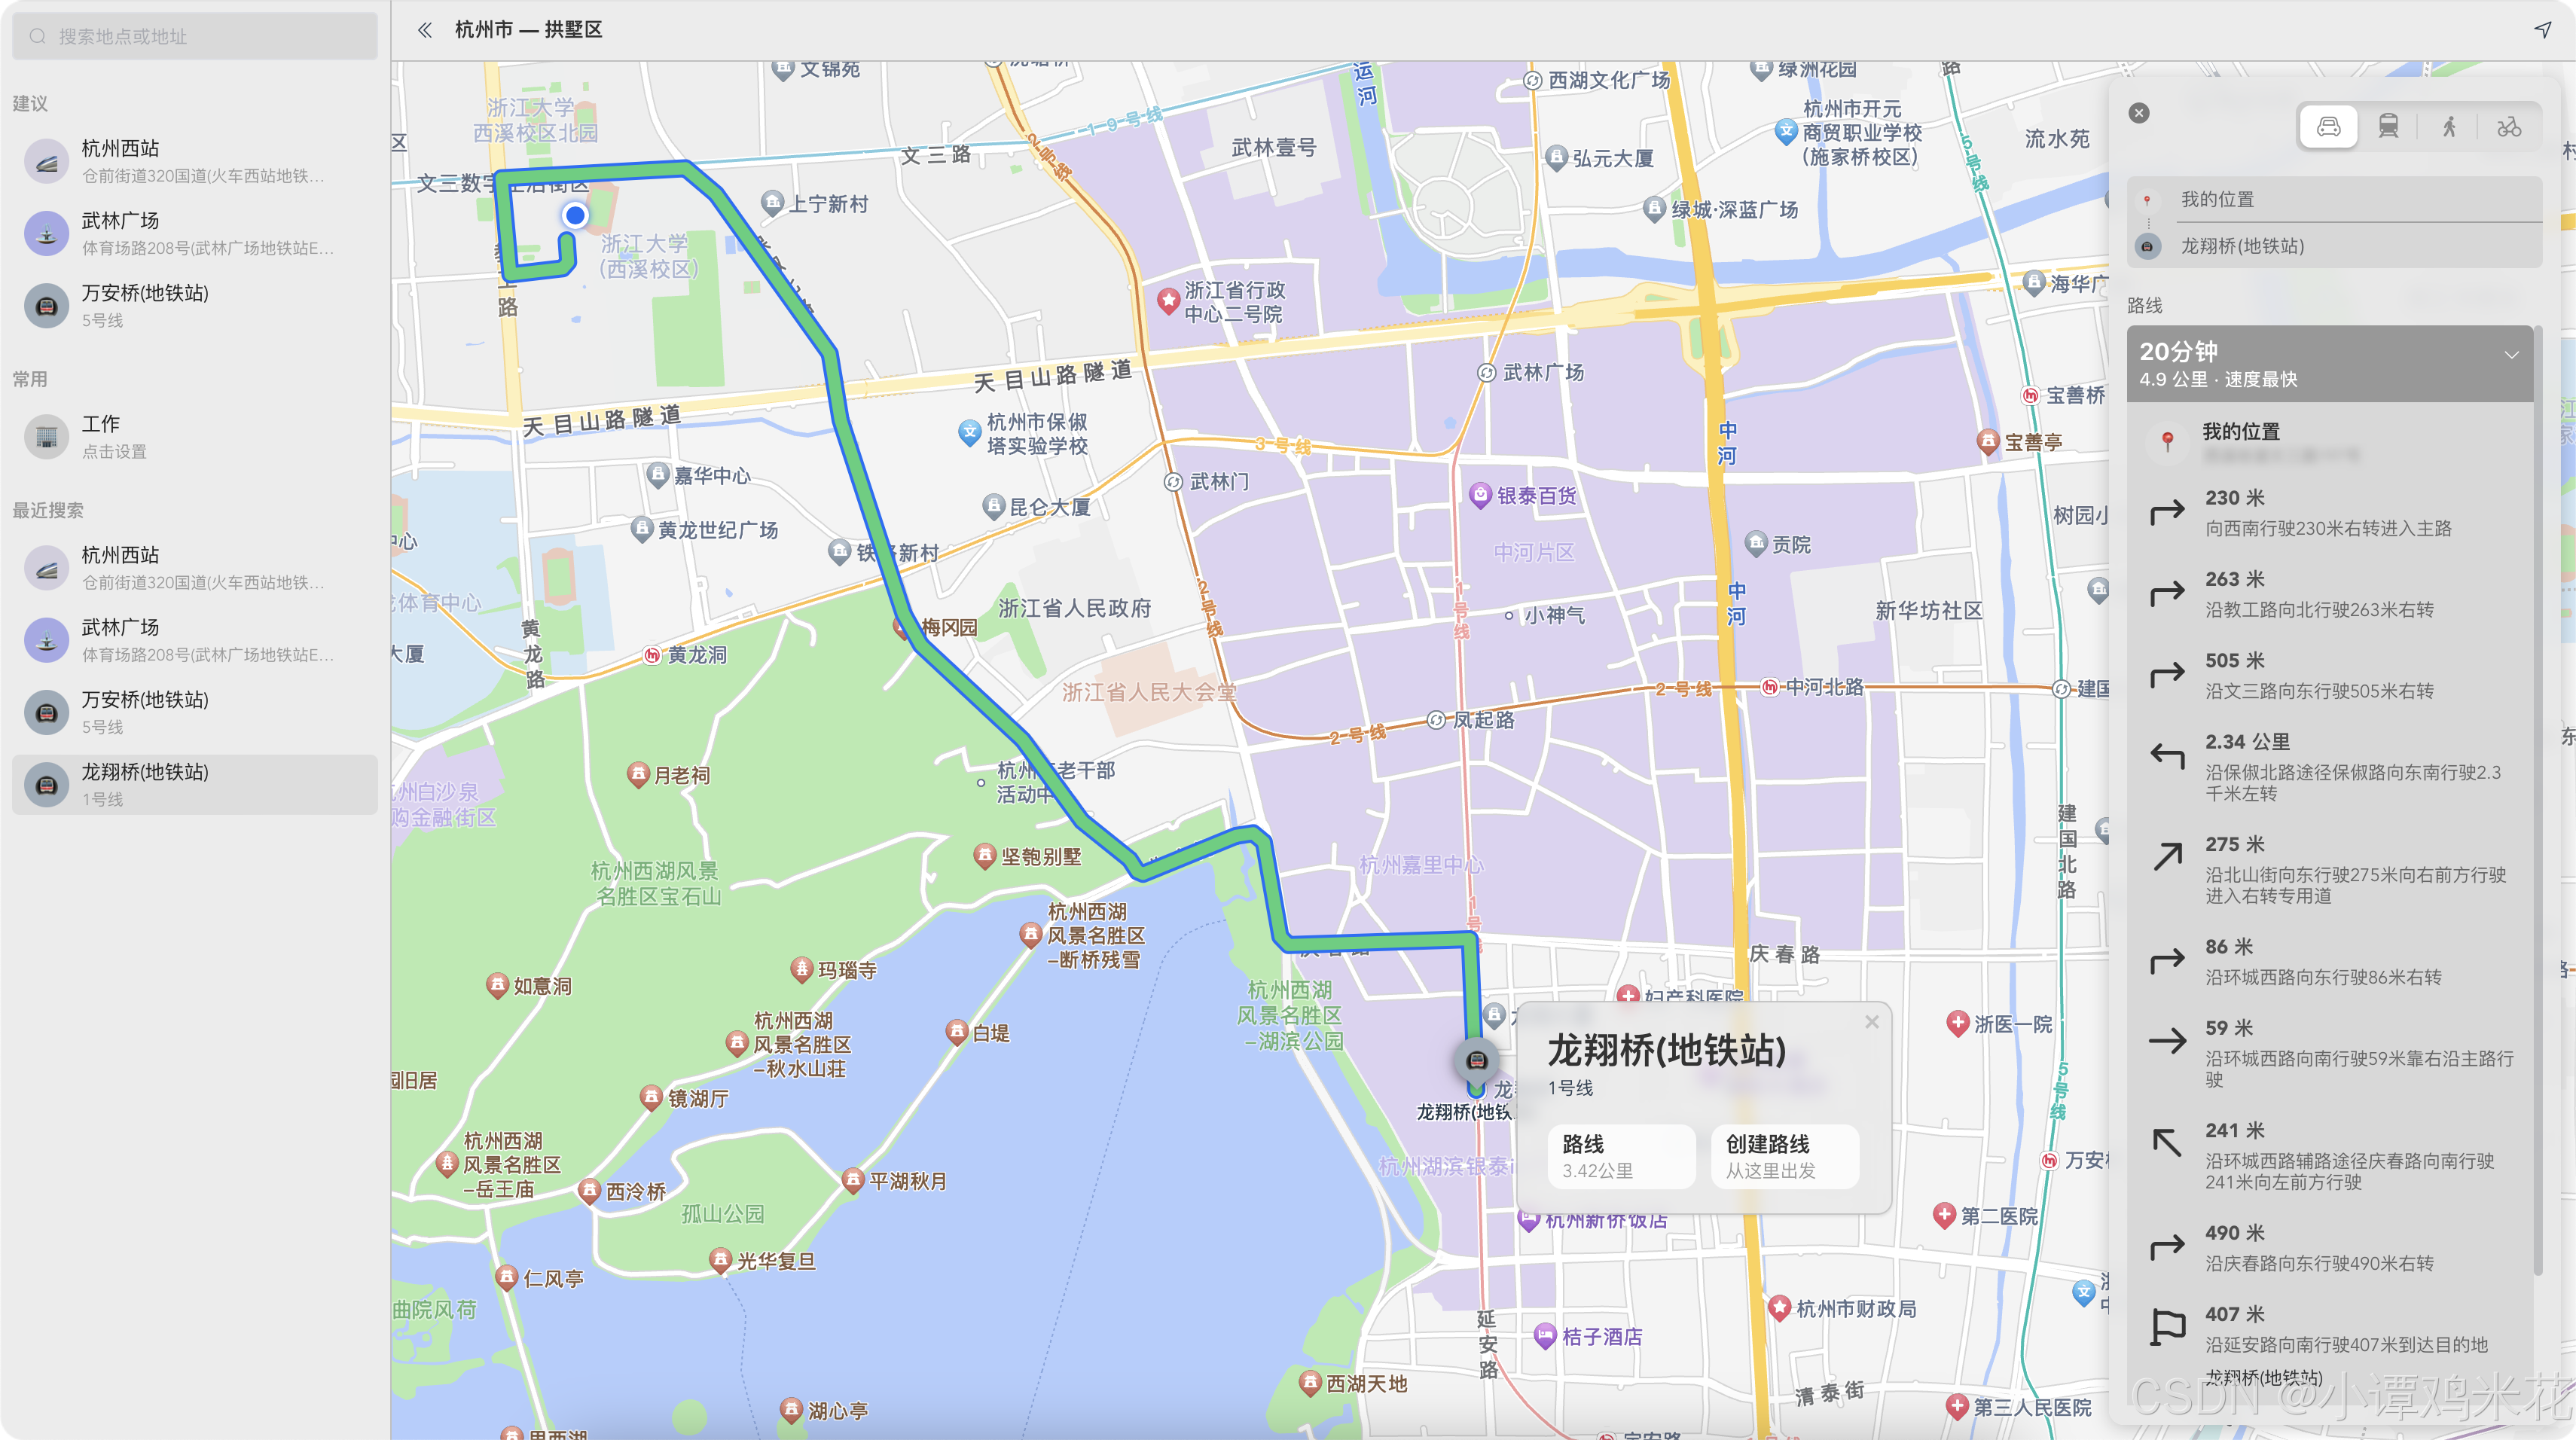
驾车导航
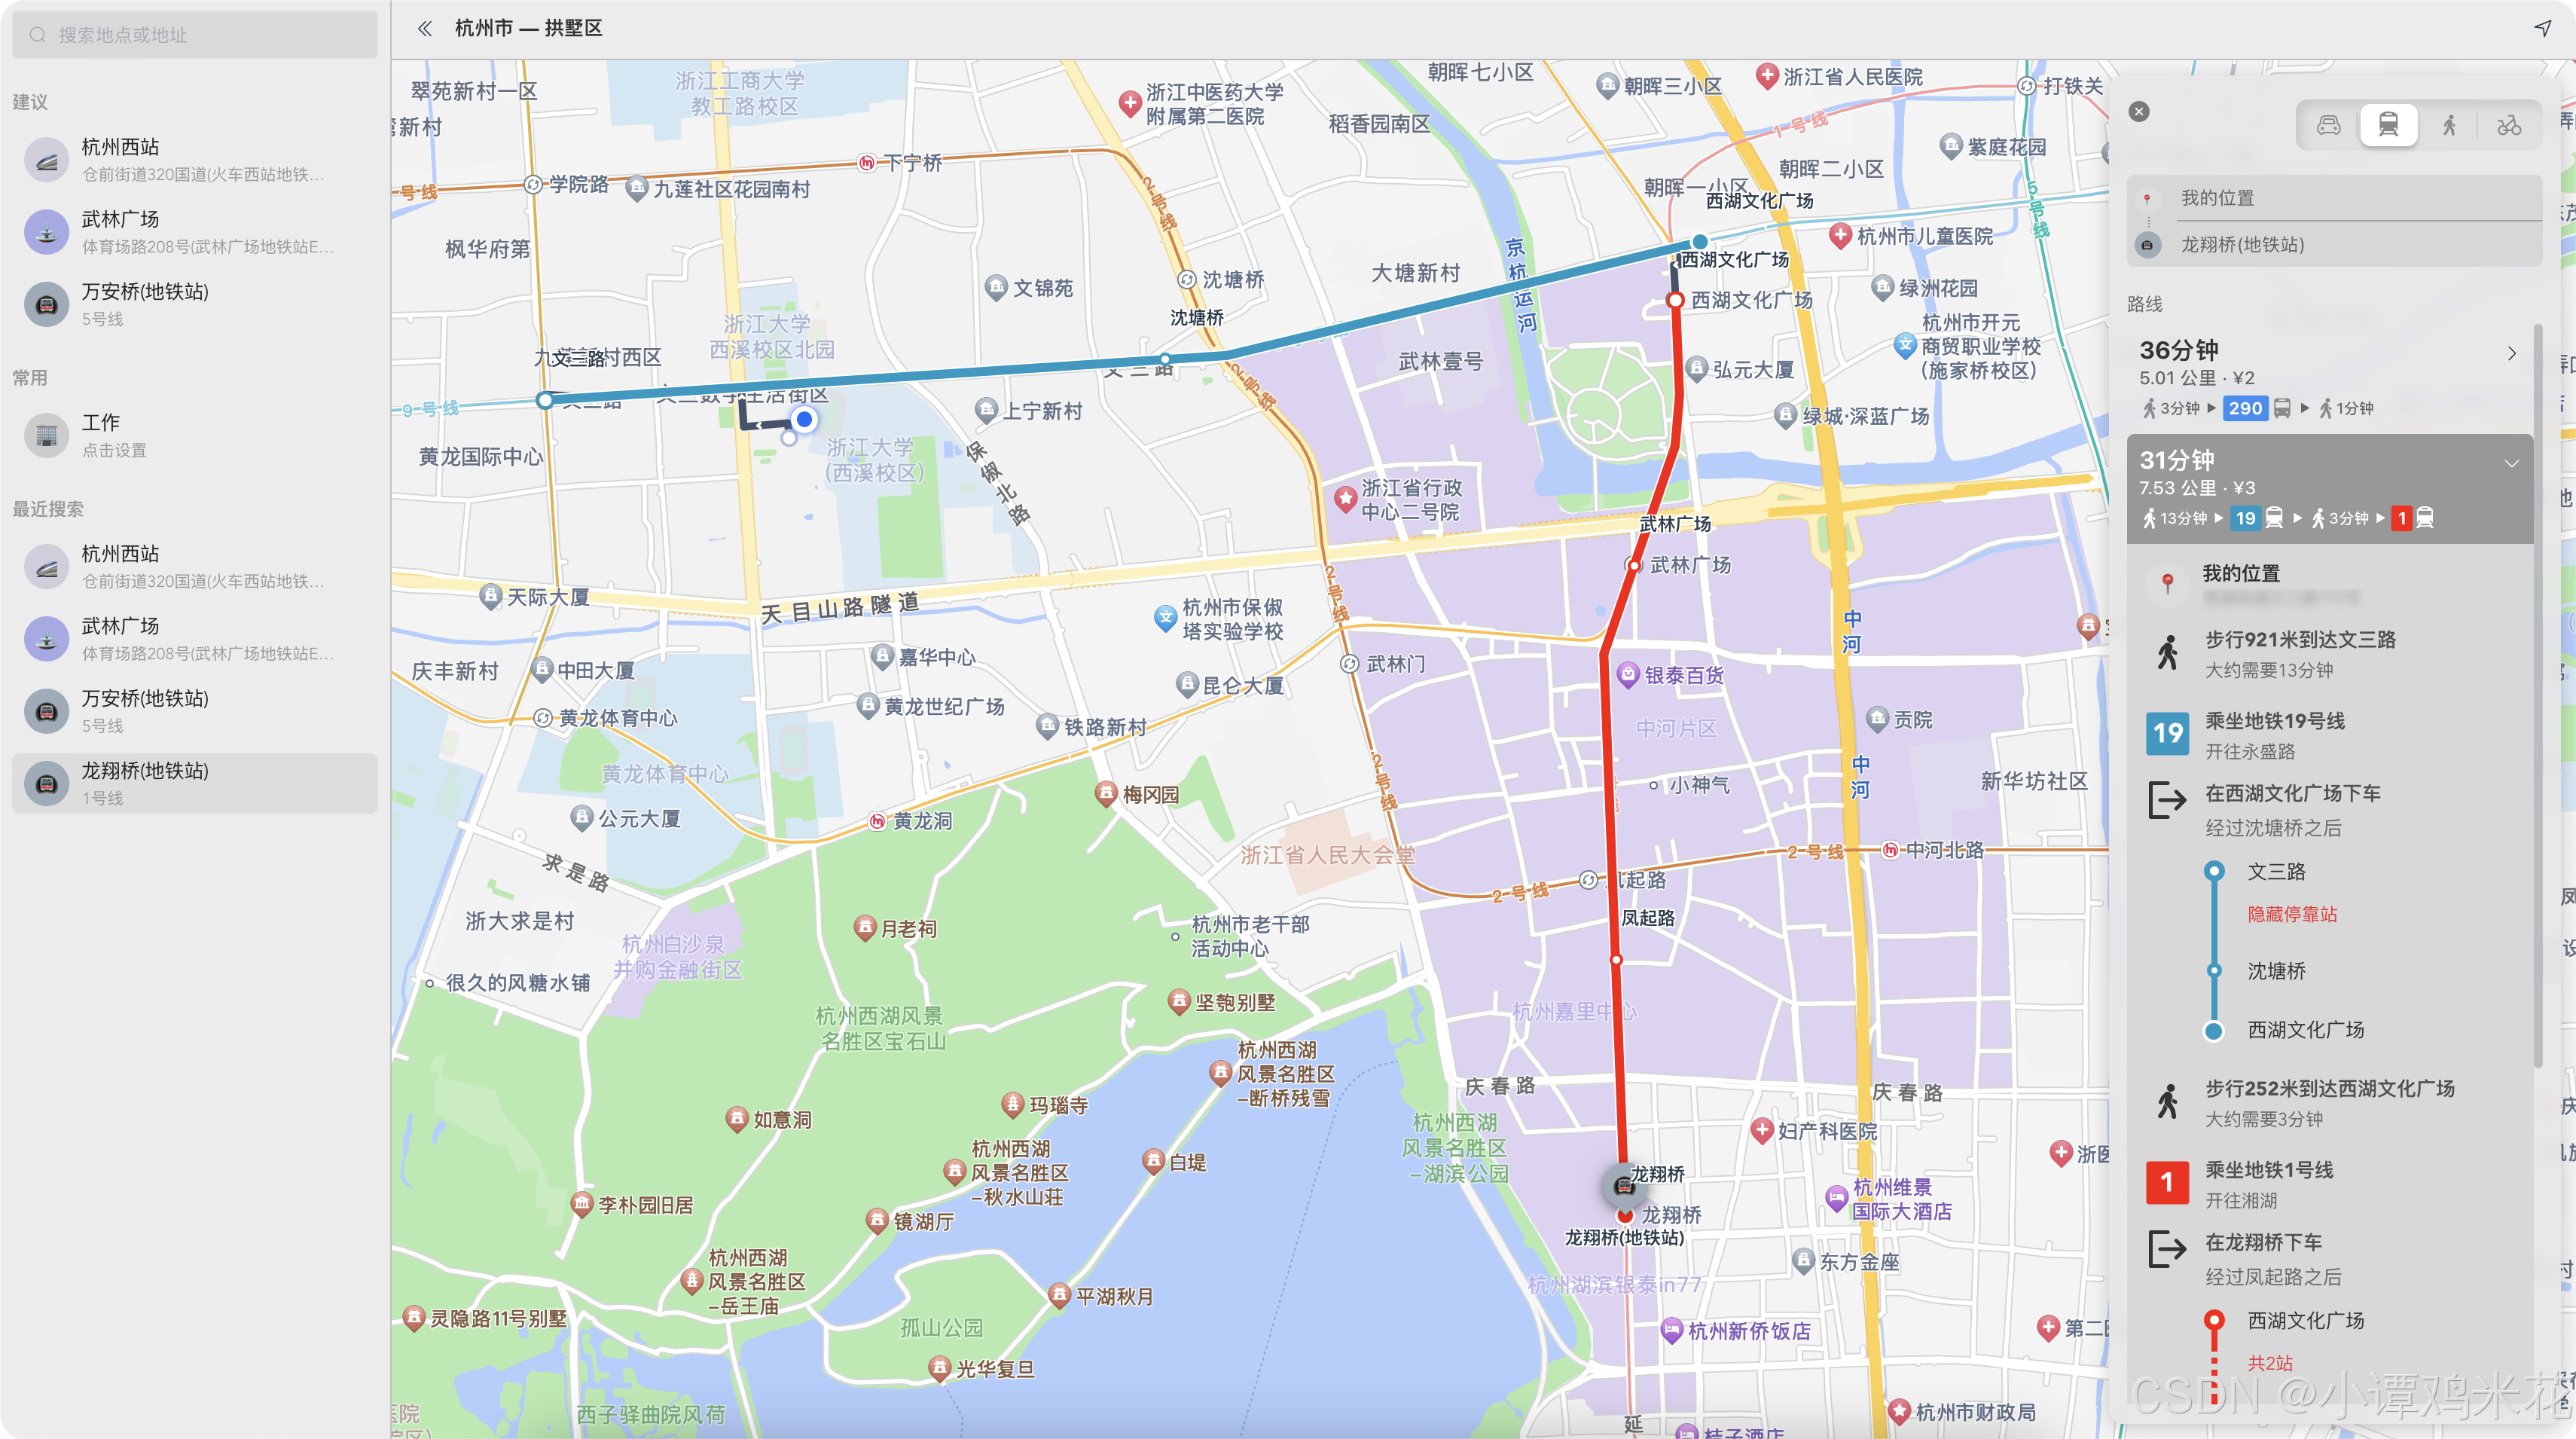
公交导航
由于驾车导航的页面与步行导航和骑行导航大致相同,这里就不再过多展示了。
一、创建地图
在开始之前,我们需要申请到高德地图的开发者Key,以及相关的导航定位权限,这里就不过多赘述啦,另附上申请链接。
首先我们需要创建地图:
<div id="myMap"></div>接下来我们要做地图的初始化,注意初始化地图的方法请放在onMounted生命周期!
onMounted(() => {
  map.value = new AMap.Map("myMap", {
    zoom: 16, //级别
    center: [120.209758, 30.246809], //中心点坐标
  });
});
最后,引入我们需要用到的插件就可以了。
 AMap.plugin(
      [
        "AMap.InfoWindow",//地图弹窗
        "AMap.PlaceSearch",//地点搜索
        "AMap.Geolocation",//定位到当前位置
        "AMap.Geocoder",//经纬度进行逆地理编码查询
        "AMap.Driving",//驾车导航
        "AMap.Transfer",//公交导航
        "AMap.Walking",//步行导航
        "AMap.Riding",//骑行导航
      ],
      () => {
        geolocation.value = new AMap.Geolocation({
          enableHighAccuracy: false, // 是否使用高精度定位,默认:true
          timeout: 10000, // 设置定位超时时间,默认:无穷大
          offset: [10, 20], // 定位按钮的停靠位置的偏移量
          zoomToAccuracy: true,
        });
        geoCoder.value = new AMap.Geocoder({
          radius: 100,
          extensions: "all",
        });
        driving.value = new AMap.Driving({
          policy: 0, // 0是速度优先的策略 1:费用优先 2:距离优先
        });
        walking.value = new AMap.Walking();
        riding.value = new AMap.Riding();
      }
    );
    // 轨迹绘制插件
    AMapUI.load(["ui/misc/PathSimplifier"], (PathSimplifier) => {
      if (!PathSimplifier.supportCanvas) {
        alert("当前环境不支持 Canvas!");
        return;
      }

      initPathSimplifier(PathSimplifier);
});其中所涉及到的插件以及相关属性,请移步高德地图官方文档查看,涉及到的轨迹绘制(AMapUI)我主页博客中有涉及到,感兴趣的小伙伴可以进我主页查看哦
二、搜索实现
搜索地点主要是用到了AMap.PlaceSearch中的search方法,是可以根据关键字返回符合条件的地点集合:
// 根据关键字搜索
const searchLocal = (val) => {
  return new Promise((reslove, reject) => {
    var PlaceSearchOptions = {
      city: "北京", //城市
      type: "", //数据类别
      pageSize: 10, //每页结果数,默认10
      pageIndex: 1, //请求页码,默认1
      extensions: "all", //返回信息详略,默认为base(基本信息)
    };
    MSearch.value = new AMap.PlaceSearch(PlaceSearchOptions); //构造PlaceSearch类
    MSearch.value.search(val, (status, result) => {
      if (status == "complete") {
        reslove(result.poiList);
      } else {
        reject(result);
      }
    });
  });
};
三、获取导航数据
拿到了终点和起点的数据后,就可以进行路线规划了,这里我以驾车导航和公交导航为例,向大家展示我的实现思路。
1. 驾车导航
驾车导航使用到的方法是AMap.Driving中的search方法,可以使用关键字查询,也可以使用经纬度进行查询,我这里使用的是经纬度查询。返回的结果请参照官方文档。
1.1 关键字查询
AMap.plugin("AMap.Driving", function () {
  var driving = new AMap.Driving({
    policy: 0, //驾车路线规划策略,0是速度优先的策略
  });
  var points = [
    { keyword: "北京市地震局(公交站)", city: "北京" },
    { keyword: "亦庄文化园(地铁站)", city: "北京" },
  ];
  driving.search(points, function (status, result) {
    //status:complete 表示查询成功,no_data 为查询无结果,error 代表查询错误
    //查询成功时,result 即为对应的驾车导航信息
  });
});
1.2 经纬度查询
// 驾车路线查询
const onDriveNavigation = (startLngLat, endLngLat) => {
  return new Promise((reslove, reject) => {
    driving.value.search(startLngLat, endLngLat, (status, result) => {
      if (status == "complete") {
        reslove(result);
      } else {
        reject(result);
      }
    });
  });
};
2. 公交导航
同样的,公交导航也是用相同方法获取导航数据,返回的请参照官方文档。
// 公交路线查询
const onTransfer = (startLngLat, endLngLat) => {
  var transOptions = {
    city: "杭州市",//公交换乘的城市,支持城市名称、城市区号、电话区号,此项为必填
    policy: AMap.TransferPolicy.LEAST_TIME,//公交换乘策略
    cityd: "杭州市",//终点城市,跨城公交路径规划时为必填参数
  };
  //构造公交换乘类
  transfer.value = new AMap.Transfer(transOptions);
  return new Promise((reslove, reject) => {
    transfer.value.search(startLngLat, endLngLat, (status, result) => {
      if (status == "complete") {
        reslove(result);
      } else {
        reject(result);
      }
    });
  });
};
四、轨迹渲染
同样的,轨迹渲染也以驾车导航和公交导航为例,向大家展示我的实现经过。
1. 轨迹插件初始化
// 轨迹展示初始化
const initPathSimplifier = (PathSimplifier) => {
  //启动页面
  pathSimplifierIns.value = new PathSimplifier({
    zIndex: 100,
    map: map.value,
    getPath: function (pathData, pathIndex) {
      return pathData.path;
    },
    renderOptions: {
      keyPointTolerance: 8,
      getPathStyle: (pathItem, zoom) => {
        if (pathItem.pathData.name == "Driving") {
          let pathLineStyle = {
            strokeStyle: "rgb(70,208,122)",
            lineWidth: 8,
            borderStyle: "rgb(0, 111, 249)",
            borderWidth: 2,
            dirArrowStyle: false,
          };
          return {
            pathLineStyle: pathLineStyle,
            pathLineHoverStyle: pathLineStyle,
            pathLineSelectedStyle: pathLineStyle,
            startPointStyle: {
              radius: 0,
            },
            endPointStyle: {
              radius: 0,
            },
            keyPointStyle: {
              radius: 0,
            },
          };
        } else if (pathItem.pathData.name == "Transfer") {
          //公交导航轨迹有所不同,所以需单独处理
          return transferLinesRender(pathItem.pathData);
        }
      },
    },
  });
};


// 根据公交类型返回不同路线样式
const transferLinesRender = (pathData) => {
  let res = {};
  let pathLineStyle = {};
  switch (pathData.mode) {
    case "WALK":
      pathLineStyle = {
        strokeStyle: "rgb(65,83,105)",
        lineWidth: 5,
        dirArrowStyle: true,
      };
      res = {
        pathLineStyle,
        pathLineHoverStyle: pathLineStyle,
        pathLineSelectedStyle: pathLineStyle,
        startPointStyle: {
          radius: 5,
          fillStyle: "#fff",
          strokeStyle: "rgb(176,190,217)",
          lineWidth: 2,
        },
        endPointStyle: {
          radius: 0,
          strokeStyle: "#fff",
          fillStyle: "rgb(176,190,217)",
          lineWidth: 2,
        },
        dirArrowStyle: {
          stepSpace: 10,
          strokeStyle: "#ffffff",
          lineWidth: 5,
        },
        keyPointStyle: {
          radius: 0,
        },
      };
      break;
    case "SUBWAY":
    case "BUS":
    case "METRO_RAIL":
      let cl = `#308ff2`;
      pathLineStyle = {
        strokeStyle: cl,
        lineWidth: 6,
        dirArrowStyle: false,
        borderStyle: "#fff",
        borderWidth: 1,
      };
      res = {
        pathLineStyle,
        pathLineHoverStyle: pathLineStyle,
        pathLineSelectedStyle: pathLineStyle,
        startPointStyle: {
          radius: 5,
          fillStyle: "#fff",
          strokeStyle: cl,
          lineWidth: 2,
        },
        endPointStyle: {
          radius: 6,
          strokeStyle: "#fff",
          fillStyle: cl,
          lineWidth: 2,
        },
        keyPointStyle: {
          radius: 0,
          fillStyle: "#fff",
          strokeStyle: cl,
          lineWidth: 2,
        },
      };
      break;

    default:
      break;
  }
  return res;
};
2. 驾车轨迹绘制
由于驾车轨迹是以段的形式返回的,所以会出现两段轨迹链接处有空白的情况,所以我这边做了处理,将上一段最后的坐标接入下一段轨迹的第一个坐标。
其中,routeActive是当前选中的驾车方案的下标,查询驾车路径规划会有可能返回多个规划方案。
// 驾车路线绘制
const onDrivingPathRender = (data) => {
  if (pathSimplifierIns.value) pathSimplifierIns.value.setData([]);
  if (!data) return;
  let { routes } = data || {};
  let route = routes[routeActive.value] || [];
  let { steps } = route || {};
  if (!steps?.length) return;
  let pathList = [];
  steps.map((item, index) => {
    let beforePath = null;
    if (index > 0) {
      let beforeData = steps[index - 1];
      beforePath = beforeData.path[beforeData.path.length - 1];
    }
    let pathItem = [...item.path];
    if (beforePath) pathItem.unshift(beforePath);
    pathList.push(...pathItem);
  });
  pathSimplifierIns.value.setData([
    {
      name: "Driving",
      path: pathList,
    },
  ]);
};
3.公交轨迹绘制
其中,routeActive是当前选中的公交方案。
// 公交路线绘制
const onTransferPathRender = (data) => {
  if (pathSimplifierIns.value) pathSimplifierIns.value.setData([]);
  if (!data) return;
  let { plans } = data;
  let pathSimplifierInsData = [];
  let { segments } = plans[routeActive.value];
  segments.map((item) => {
    pathSimplifierInsData.push({
        name: "Transfer",
        mode: item.transit_mode,
        path: item.transit.path,
    });
    let { via_stops, on_station, off_station } = item.transit;
    if (via_stops) {
      via_stops = JSON.parse(JSON.stringify(via_stops));
      via_stops.push(off_station);
      via_stops.unshift(on_station);
      if (subwayInfo) {
        via_stops = via_stops.map((key) => {
          key.subwayInfo = subwayInfo;
          return key;
        });
      }
      transferSiteListRender(via_stops);
    }
  });

  pathSimplifierIns.value.setData(pathSimplifierInsData);
};
3.1 公交站点渲染
公交轨迹绘制是要展示站点的情况,所以在公交轨迹绘制方法最后,我将当前选中方案经过的公交点位作出记录,然后以聚合点的形式展示。至于为什么要使用聚合点而不是普通点,是因为在用户缩放地图层级时,如果使用普通点,就会将所有的站点名聚集在一个地方,导致观感过差,所以这里选中聚合点进行优化。
// 绘制公交站点信息
const transferSiteListRender = (list) => {
  let points = [];
  list.map((item, index) => {
    if (index != 0 && index != list.length - 1) {
      let content = `<div class="transferMarker" style='--color:#308ff'></div>`;
      let marker = new AMap.Marker({
        position: item.location,
        content,
        zIndex: 1,
        extData: {
          ...item,
        },
      });
      map.value.add(marker);
      transferSiteList.value.push(marker);
    }

    points.push({
      lnglat: item.location,
      ...item,
    });
  });

  //聚合点样式
  var _renderClusterMarker = function (context) {
    let marker = context.marker;
    marker.setContent(" ");

    if (!markerCluster.value) {
      marker.remove();
      return;
    }
    if (context.count >= 2) {
      marker.hide();
    } else {
      marker.show();
    }
  };
  //非聚合点样式
  var _renderMarker = function (context) {
    let [data] = context.data;
    let marker = context.marker;
    marker.setContent(" ");
    if (!markerCluster.value) {
      marker.remove();
      return;
    }

    marker.setLabel({
      content: data.name,
      offset: new AMap.Pixel(10, 5),
    });
  };
  markerCluster.value = new AMap.MarkerCluster(map.value, points, {
    gridSize: 60, //数据聚合计算时网格的像素大小
    renderClusterMarker: _renderClusterMarker, //上述步骤的自定义聚合点样式
    renderMarker: _renderMarker, //上述步骤的自定义非聚合点样式
  });
};
附上使用到的transferMarker样式
.transferMarker {
  width: 5px;
  height: 5px;
  border-radius: 100px;
  background-color: #fff;
  transform: translate(-2px, -2px);
  box-shadow: 0px 0px 0px 2px var(--color);
}
五、路径规划信息
最后,我们处理效果图中的驾车导航和公交导航中,右侧导航信息显示的模块。
驾车导航信息、步行导航信息和骑行导航信息几乎信息格式时一致的,拿到我们在第三步获取到的导航数据后,导航方案都是放在routes这个数组里的,但是公交的导航方案是放在plans数组中,略有不同。
这里我们先说驾车导航信息、步行导航信息和骑行导航信息,拿到routes中的数据后,导航的每一步动作都在steps这个数组中,其中骑行导航的数据是在rides这个数组中,在控制台打印出这个数组,就可以看到导航的每一步信息了,具体字段可以移步文档查看。
接下来说说公交导航信息,再拿到plans中的数据后,公交的每一步信息都在segments这个数组中,其中包含此换乘段的文字描述(instruction)、换乘动作类型(transit_mode)以及此换乘段导航信息(transit)等等,有需要的可以移步文档查看。
结语
以上就是鸡米花分享的全部内容,由于总体代码量过大,所以就只讲述了具体的实现步骤和思路,有需要源码的同学可以私信鸡米花哦。


 1755
1755

 被折叠的 条评论
为什么被折叠?
被折叠的 条评论
为什么被折叠?
 到【灌水乐园】发言


