


一.全局事件总线
作用:实现任意组件间的通信
即通过安装一个中间的通用全局事件总线x,且此x内包含$on,$emit,$off;且要满足所有组件可以访问到;所以这时可以在Vue的原型对象上添加x,设置值为vm或者vc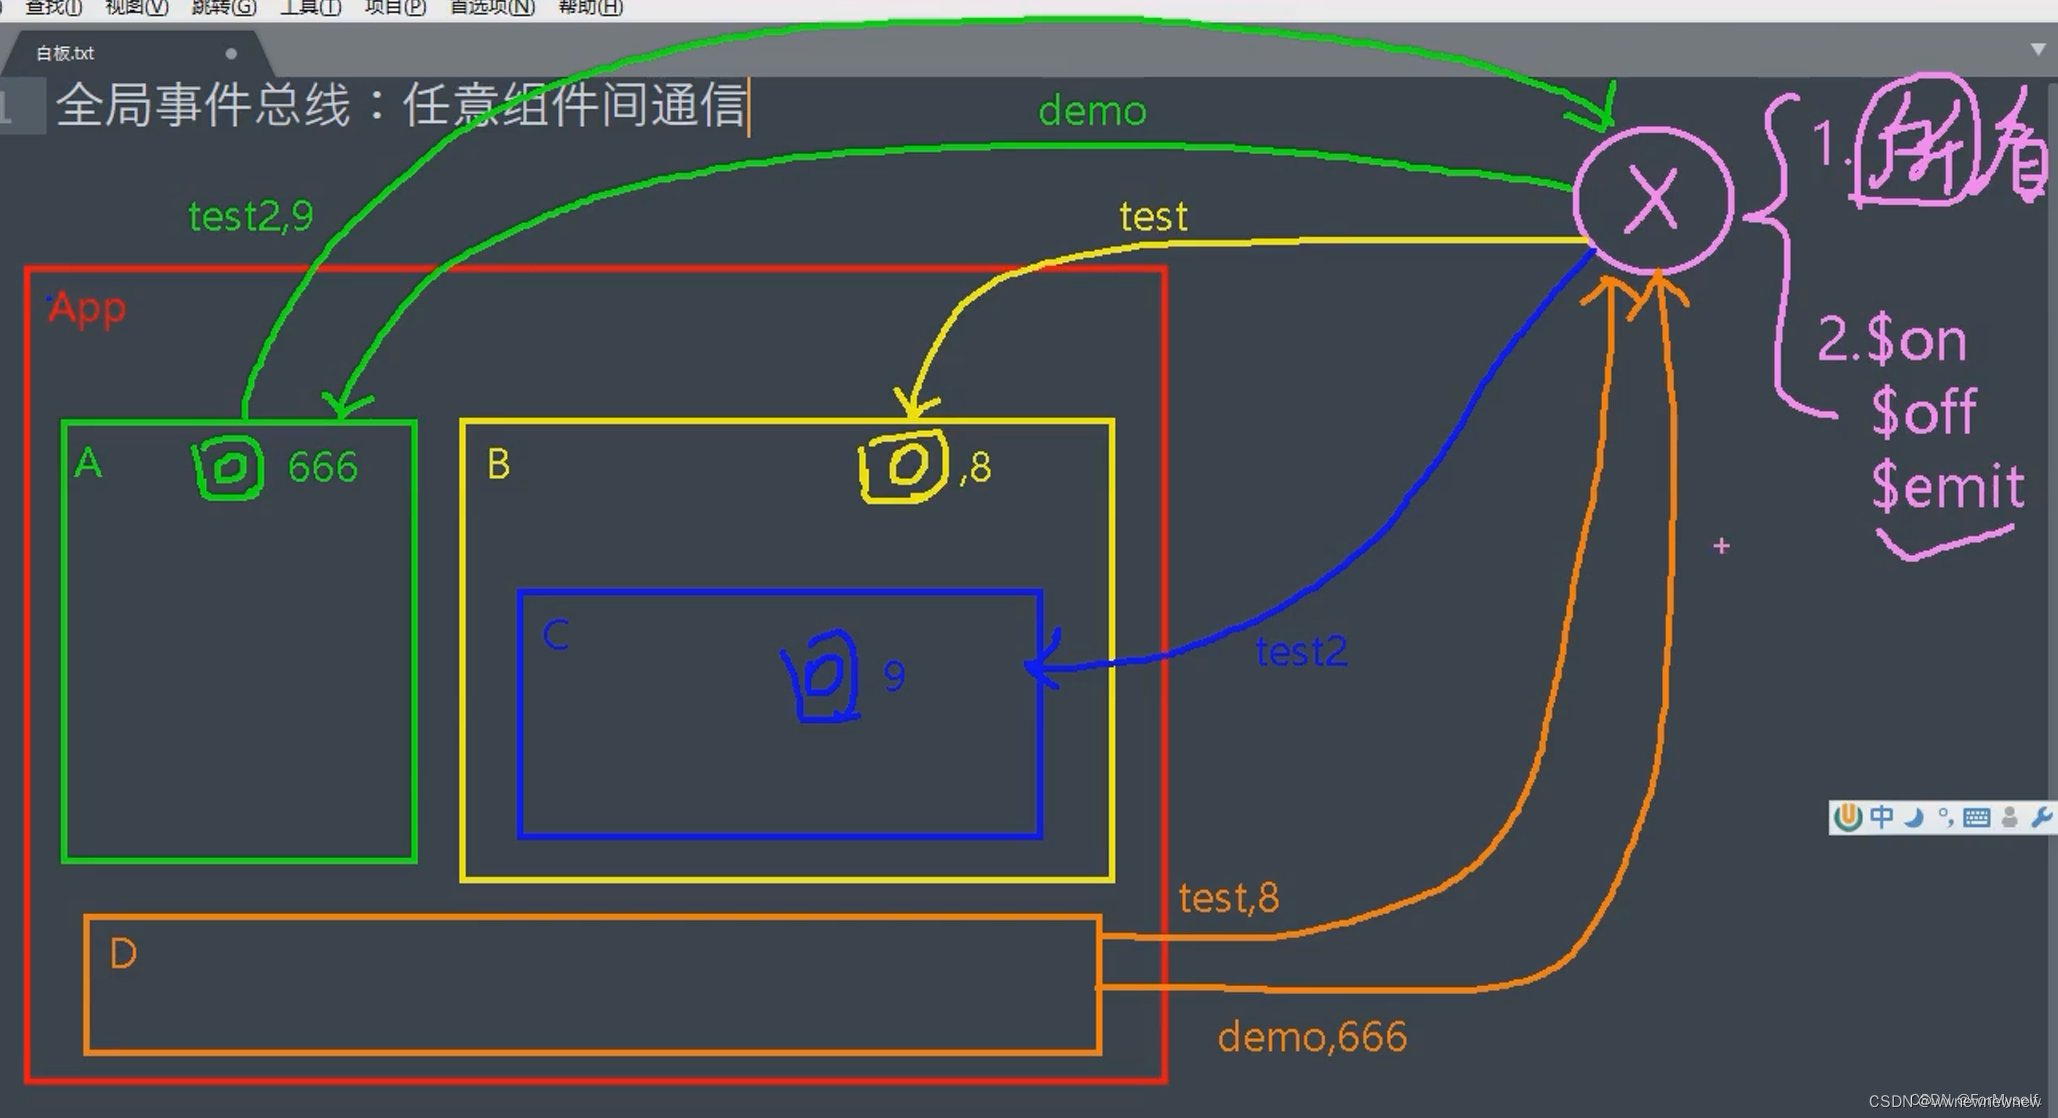
1.安装全局事件总线$bus
在vc上创建或者在vm上都可以使其他组件访问到
在vc上创建如下:
const demo = Vue.extend({})
const d = new demo()
// 将x放在vue的原型对象上,则所有组件都可以看到
Vue.prototype.x = d
在vm上创建如下:
 beforeCreate() {
        // 在vm中创建x,安装全局事件总线
        Vue.prototype.$bus = this//生命周期钩子中this指代vm
    },
2.使用全局事件总线
在接收数据的组件上绑定$bus事件总线的自定义事件,一挂载就将收数据的组件绑定全局事件总线的自定义事件
 mounted() {
    // School绑定hello事件
    this.$bus.$on("hello", (data) => {
      console.log("school组件已收到数据", data);
    });
一般在销毁组件前需要将全局事件总线的自定义事件销毁
 // 用完后解绑x身上的事件
  beforeDestroy() {
    this.$bus.$off("hello");
  },
3.其他组件传递信息
其他组件在方法中通过$emit触发自定义事件,传递信息
    sendStudentName() {
      // student通过x触发hello事件向school传递信息
      this.$bus.$emit("hello", this.name);
    },
二.todoList案例全局事件总线版本
之前是通过list实现孙子Item组件向爷爷App组件传递信息,使用全局事件总线则可以直接实现item向App传递信息,不借助List
1.首先安装全局事件总线
在main.js上给vm安装全局事件总线:
beforeCreate() {
        Vue.prototype.$bus = this
    },
2.在接收数据的组件中添加绑定自定义事件,并使用之前写好的回调
  // 一挂载就将收数据的组件绑定全局事件总线的自定义事件
  mounted() {
    this.$bus.$on("checkTodo", this.checkTodo);
    this.$bus.$on("deleteTodo", this.deleteTodo);
  },
  // 组件销毁时则解绑事件
  beforeDestroy() {
    this.$bus.$off("checkTodo");
    this.$bus.$off(" deleteTodo");
  },
3.Item内使用$emit触发自定义事件并传递id
<input type="checkbox" :checked="todo.done" @click="handleCheck(todo.id)"/>
  <button class="btn btn-danger" @click="handleDelete(todo.id)">删除</button>
methods: {
// 勾选todo
handleCheck(id) {
// 触发全局事件将ID传给App;
this.$bus.$emit("checkTodo", id);
},
// 删除todo
handleDelete(id) {
if (confirm("确认删除吗?")) {
this.$bus.$emit("deleteTodo", id);
}
},三.消息订阅与发布pubsub
与全局事件总线类似,用于组件之间传递信息;
需要安装pubsub库并引用,安装:npm i pubsub-js 引用:import pubsub from 'pubsub-js’
1.在接收数据的组件中订阅消息subscribe
使用箭头函数:
每次订阅的id都不同,根据Id对订阅进行解绑
msgName为订阅名, data为数据
  mounted() {
    // 订阅消息、
    // 需要使用箭头函数this才正常指代vc
  this.pubId = pubsub.subscribe("hello", (msgName, data) => {
      console.log(
        "有人发布了hello消息,hello消息的回调函数执行了",
        msgName,
        data
      );
    });
  },
  // 用完后根据id解绑
  beforeDestroy() {
    pubsub.unsubscribe(this.pubId);
  },
使用methods配置
methods: {
    demo(msgName, data) {
      console.log("有人发布了hello消息,hello消息的回调函数执行了",msgName, data );
    },
  },
mounted() {
// 或者在methods中配置
this.pubId = pubsub.subscribe("hello", this.demo);
},
// 用完后根据id解绑
beforeDestroy() {
pubsub.unsubscribe(this.pubId);
},2.在传递数据的组件中发布信息
methods: {
    sendStudentName() {
      // 发布消息
      pubsub.publish("hello", 88888);
    },
  },
};
3.TodoList案例—pubsub
App:
 mounted() {
    this.$bus.$on("checkTodo", this.checkTodo);
    this.pubId = pubsub.subscribe("deleteTodo", this.deleteTodo);
  },
  // 组件销毁时则解绑事件
  beforeDestroy() {
    this.$bus.$off("checkTodo");
    pubsub.unsubscribe(this.pubId);
  },
item
  handleDelete(id) {
      if (confirm("确认删除吗?")) {
        pubsub.publish("deleteTodo", id); //消息发布
      }
    }
四.TodoList案例编辑
思路:首先需要在删除按钮旁边添加编辑按钮,同时为编辑按钮添加自定义点击事件, 点击也要添加修改框,并为其添加v-show判断显示状态,点击编辑则span隐藏,input编辑框出现;失去焦点时input编辑框消失,span框显示;
失去焦点时执行修改逻辑,且失去焦点时输入框不能为空,否则提示;
1.实现span和input切换
实现span和input切换需要判断状态,即是否为编辑状态,这里通过 todo.isEdit判断是否为编辑状态;
因为一开始不是编辑状态,显示的是span,所以为span设置v-show="!todo.isEdit"
input一开始是不显示的所以设置v-show="todo.isEdit";同时也要为button按钮添加
v-show="!todo.isEdit",因为编辑时编辑按钮不显示,只有不编辑时才会显示
 <span v-show="!todo.isEdit">{{ todo.title }}</span>
      <input  v-show="todo.isEdit" type="text" :value="todo.title"  @blur="handleBlur(todo, $event)" />
    </label>
    <!-- 编辑框不存在时则展示编辑按钮 -->
<button v-show="!todo.isEdit" class="btn btn-edit" @click="handleEdit(todo)" > 编辑 </button>为编辑按钮添加点击事件@click="handleEdit(todo)"
为防止每点击一次编辑添加一次isEdit,所以添加判断,若todo已经有isEdit属性则直接修改,没有则添加
  handleEdit(todo) {
      // 如果已经拥有isEdit则直接进行第二次修改,没有则添加
      if (todo.hasOwnProperty("isEdit")) {
        todo.isEdit = true;
      } else {
        console.log("todo身上没有todo,则需要添加");
        // 使用set添加,有响应式则会更改数据
        this.$set(todo, "isEdit", true);
      }
    },
2. 失去焦点时执行修改逻辑
修改完毕失去焦点首先input修改框变成span,即todo.isEdit=false;随后使用全局事件总线向App组件传入更新后的todo的id和title进行监视;若有变化则进行更新;
  //失去焦点时执行修改逻辑
    handleBlur(todo, e) {
      todo.isEdit = false;
      // 更改后不能为空
      if (!e.target.value.trim()) return alert("输入不能为空");
      // e.target.value取title值
      this.$bus.$emit("updateTodo", todo.id, e.target.value);
    },
// 一挂载就将收数据的组件绑定全局事件总线的自定义事件
mounted() {
。。。。。。
this.$bus.$on("updateTodo", this.updateTodo);
},
// 组件销毁时则解绑事件
beforeDestroy() {
。。。。。
this.$bus.$off("updateTodo");
},
}; // 更新一个todo
updateTodo(id, title) {
// 遍历todos数组 将todo.id对应的done取反
this.todos.forEach((todo) => {
if (todo.id === id) todo.title = title;
});
},五.$nextTick
当改变数据后,要基于更新后的新Dom进行某些操作时,要在nextTick的回调函数执行
语法:this. $nextTick(回调函数)
TodoList编辑按钮点击后不会在input中自动获取焦点,只有点击一下才能编辑,这时可以为input编辑框设置全局事件总线,若使用 this.$refs.inputTitle.focus()直接设置自动获取焦点则不能,
因为编辑框修改了todo.isEdit的状态后则会直接执行获取焦点语句,但此时isEdit更新后还没有解析模板,即input编辑框还没有显示,则不能获取焦点;
此时可以使用this. $nextTick(回调函数);解析更新后的Dom模板在执行获取焦点的函数、
也可以使用setTimeout()延时执行获取焦点的函数
ref="inputTitle" // 编辑
handleEdit(todo) {
// 如果已经拥有isEdit则直接进行第二次修改,没有则添加
if (todo.hasOwnProperty("isEdit")) {
todo.isEdit = true;
} else {
console.log("todo身上没有todo,则需要添加");
// 使用set添加,有响应式则会更改数据
this.$set(todo, "isEdit", true);
}
// if执行完毕后执行获取焦点再解析模板,则获取焦点时编辑input框还未显示,所以不能自动获取焦点,可以设置定时器
/* setTimeout(() => {
// 使input编辑框自动获取焦点
this.$refs.inputTitle.focus();
}, 200); */
// DOM更新后再调用回调函数,即先解析模板展示Input后再获取焦点
this.$nextTick(function () {
this.$refs.inputTitle.focus();
});
},六.动画
1.动画效果
使用<transition>包裹要过度的元素,并配置name属性,appear使动画一开始便出现:
<!-- appear使一开始就有动画 -->
    <transition name="t1" appear>
      <h1 v-show="isShow" class="come">hello!!!</h1>
    </transition>
当name存在时,则为.name-enter-active进入特效, .name-leave-active离开特效;若没有名字则用v代替名字部分;
.t1-enter-active {
  animation: donghua 1s;
}
.t1-leave-active {
  animation: donghua 1s reverse;
}

@keyframes donghua {
  from {
    transform: translateX(-100%);
  }
  to {
    transform: translateX(0px);
  }
}
2.过渡效果
/* 进入的起点,离开的终点*/
.t1-enter,
.t1-leave-to {
  transform: translateX(-100%);
}
/* 进入过程中,离开过程中 */
.t1-enter-active,
.t1-leave-active {
  transition: 1s linear;
}

/* 进入的终点,离开的起点 */
.t1-enter-to,
.t1-leave {
  transform: translateX(0);
}
3.多个元素过渡
当有多个元素需要使用同一个过渡时,不能使用transition,而是transition-group,且每个元素要有自己的key值
    <transition-group name="t1" appear>
      <h1 v-show="!isShow" key="1">hello!!!</h1>
      <h1 v-show="isShow" key="2">你好啊!!!</h1>
    </transition-group>
4.引入动画库
第三方动画库animate.css:Animate.css | A cross-browser library of CSS animations.
首先下载该库:npm install animate.css
引入该库后写入名字和进出动画
    <transition-group
      name="animate__animated animate__bounce"
      appear
      enter-active-class="animate__wobble"
      leave-active-class="animate__bounceOutUp"
    >
      <h1 v-show="!isShow" key="1">hello!!</h1>
      <h1 v-show="isShow" key="2">你好啊!!!</h1>
    </transition-group>
5.todoList过渡与动画版本
将li包含在<transition name="todo" appear>即可,在style中添加过渡动画
/* 进入的起点,离开的终点*/
.todo-enter,
.todo-leave-to {
  transform: translateX(-100%);
}
/* 进入过程中,离开过程中 */
.todo-enter-active,
.todo-leave-active {
  transition: 1s linear;
}

/* 进入的终点,离开的起点 */
.todo-enter-to,
.todo-leave {
  transform: translateX(0);
}


 684
684


 被折叠的 条评论
为什么被折叠?
被折叠的 条评论
为什么被折叠?
 到【灌水乐园】发言


