


实验五 Hibernate基础应用——基于Hibernate框架的用户登录模块
一、基础实验——Hibernate框架搭建
(一)实验目的
- 掌握Hibernate 开发环境搭建的基本步骤;
- 观察持久化类与数据库表的映射关系,观察相应的Hibernate 映射文件(.hbm.xml)配置,并能够做简单应用;
- 观察Hibernate 配置文件(hibernate.cfg.xml)中的主要元素及属性配置,并能
够做简单应用。
(二)基本知识与原理
- Hibernate 是一个ORM(Object-Relational Mapping)框架,用于把对象模型表示的对象映射到基于SQL 的关系模型数据结构中去,采用完全面向对象的方式来操作数据库;
- Hibernate 的主要作用是简化应用的数据持久层编程,不仅能管理Java 类到数据库表的映射,还提供数据查询和获取数据的方法,从而大幅减少了开发人员编写SQL 和JDBC 代码的时间;
- Hibernate 框架主要包括持久化对象(Persistent Objects)、Hibernate 配置文件(一般被命名为*.cfg.xml)、Hibernate 映射文件(一般被命名为*.hbm.xml)三部分;
- 编译运行基于Hibernate 框架的工程,需要导入相应的Hibernate 类库;
- 由于Hibernate 底层是基于JDBC 的,因此在应用程序中使用Hibernate 执行持久化操作时也需要导入相关的JDBC 驱动(例如MySQL 数据库驱动)。
(三)实验过程
-
在阿里云RDS服务器上创建名为hibernatedb的数据库,并在该数据库中创建一个名称为customer的数据表,表结构如下所示:
表5-1 customer数据表

-
在表customer中添加3条记录,具体如表5-2所示:
表5-2 customer中的记录 
图5-3 数据库中数据 
-
下载MySQL JDBC驱动;
-
创建Web工程hibernate-prj1,添加MySQL驱动程序库文件和Struts2核心包到工程中;
-
下载Hibernate发布版(hibernate-release-5.6.0.Final)并解压缩,将Hibernate中lib\required里的jar包添加到工程中;
-
下载commons-logging-1.2-bin.zip并解压缩,将commons-logging-1.2.jar添加到工程hibernate-prj1中;
-
如图5-1所示,如下构建Hibernate相关文件,用于将对象模型表示的对象映射到关系模型数据结构中去。
图5-4 Hibernate目录结构 
-
cn.edu.zjut.po包中的Customer.java是与customer数据库表相对应的持久化类,持久化类用POJO编程模式实现:
package cn.edu.zjut.po; import java.io.Serializable; import java.util.Date; public class Customer implements Serializable { private int customerID; private String account; private String password; private String name; private Boolean sex; private Date birthday; private String phone; private String email; private String address; private String zipcode; private String fax; public Customer() { } public Customer(int customerID, String account, String password, String name, Boolean sex, Date birthday, String phone, String email, String address, String zipcode, String fax) { this.customerID = customerID; this.account = account; this.password = password; this.name = name; this.sex = sex; this.birthday = birthday; this.phone = phone; this.email = email; this.address = address; this.zipcode = zipcode; this.fax = fax; } public int getCustomerID() { return customerID; } public void setCustomerID(int customerID) { this.customerID = customerID; } public String getAccount() { return account; } public void setAccount(String account) { this.account = account; } public String getPassword() { return password; } public void setPassword(String password) { this.password = password; } public String getName() { return name; } public void setName(String name) { this.name = name; } public Boolean getSex() { return sex; } public void setSex(Boolean sex) { this.sex = sex; } public Date getBirthday() { return birthday; } public void setBirthday(Date birthday) { this.birthday = birthday; } public String getPhone() { return phone; } public void setPhone(String phone) { this.phone = phone; } public String getEmail() { return email; } public void setEmail(String email) { this.email = email; } public String getAddress() { return address; } public void setAddress(String address) { this.address = address; } public String getZipcode() { return zipcode; } public void setZipcode(String zipcode) { this.zipcode = zipcode; } public String getFax() { return fax; } public void setFax(String fax) { this.fax = fax; } } -
Customer.hbm.xml是Hibernate映射文件,其中名为的元素表示持久化类Customer.java与数据库表customer的映射关系,其子元素表示持久化类中的主键,子元素表示持久化类中的其它属性与数据库表中某个列的映射关系:
<?xml version="1.0"?> <!DOCTYPE hibernate-mapping PUBLIC "-//Hibernate/Hibernate Mapping DTD3.0//EN" "http://hibernate.sourceforge.net/hibernate-mapping-3.0.dtd"> <hibernate-mapping> <class name="cn.edu.zjut.po.Customer" table="customer" catalog="hibernatedb"> <id name="customerID" type="int"> <column name="customerid"/> <generator class="assigned"/> </id> <property name="account" type="java.lang.String"> <column name="account" length="20" unique="true"/> </property> <property name="password" type="java.lang.String"> <column name="password" length="20"/> </property> <property name="name" type="java.lang.String"> <column name="name" length="20"/> </property> <property name="sex" type="java.lang.Boolean"> <column name="sex"/> </property> <property name="birthday" type="java.util.Date"> <column name="birthday" length="10"/> </property> <property name="phone" type="java.lang.String"> <column name="phone" length="20"/> </property> <property name="email" type="java.lang.String"> <column name="email" length="100"/> </property> <property name="address" type="java.lang.String"> <column name="address" length="200"/> </property> <property name="zipcode" type="java.lang.String"> <column name="zipcode" length="10"/> </property> <property name="fax" type="java.lang.String"> <column name="fax" length="20"/> </property> </class> </hibernate-mapping> -
hibernate.cfg.xml是Hibernate配置文件,用于设置JDBC连接相关属性:
<?xml version='1.0' encoding='utf-8'?> <!DOCTYPE hibernate-configuration PUBLIC "-//Hibernate/Hibernate Configuration DTD 3.0//EN" "http://www.hibernate.org/dtd/hibernate-configuration-3.0.dtd"> <hibernate-configuration> <session-factory> <property name="connection.url">jdbc:mysql://rm-bp10ju74719fp6g4emo.mysql.rds.aliyuncs.com:3306/hibernatedb?serverTimezone=GMT%2B8&useSSL=false</property> <property name="connection.driver_class">com.mysql.jdbc.Driver</property> <property name="connection.username">yiyi1333</property> <property name="connection.password">zzy@15712651279</property> <property name="hibernate.dialect">org.hibernate.dialect.MySQLDialect</property> <mapping resource="cn/edu/zjut/po/Customer.hbm.xml"/> </session-factory> </hibernate-configuration> -
新建login.jsp页面,作为用户登录视图,新建loginSuccess.jsp页面,作为登录成功的视图;
-
新建cn.edu.zjut.dao包,创建CustomerDAO.java:
package cn.edu.zjut.dao; import org.apache.commons.logging.Log; import org.apache.commons.logging.LogFactory; import org.hibernate.Query; import org.hibernate.Session; import org.hibernate.SessionFactory; import org.hibernate.boot.MetadataSources; import org.hibernate.boot.registry.StandardServiceRegistry; import org.hibernate.boot.registry.StandardServiceRegistryBuilder; import java.util.List; public class CustomerDAO { private Log log = LogFactory.getLog(CustomerDAO.class); public List findByHql(String hql){ log.debug("finding LoginUser instance by hql"); StandardServiceRegistry ssr = new StandardServiceRegistryBuilder().configure().build(); SessionFactory sessionFactory = new MetadataSources(ssr).buildMetadata().buildSessionFactory(); Session session = sessionFactory.openSession(); try{ Query q = session.createQuery(hql); return q.list(); }catch (RuntimeException re){ log.error("find by hql failed", re); throw re; }finally { session.close(); } } } -
新建cn.edu.zjut.service包,并在其中创建UserService.java:
package cn.edu.zjut.service; import cn.edu.zjut.dao.CustomerDAO; import cn.edu.zjut.po.Customer; import java.util.List; public class UserService { public boolean login(Customer loginuser){ CustomerDAO dao = new CustomerDAO(); String hql = "from Customer where account='" + loginuser.getAccount() + "' and password='" + loginuser.getPassword() + "'"; List user = dao.findByHql(hql); if(user.isEmpty()) return false; else return true; } } -
新建cn.edu.zjut.action包,创建UserAction.java,定义login()用于登录逻辑:
package cn.edu.zjut.action; import cn.edu.zjut.po.Customer; import cn.edu.zjut.service.UserService; public class UserAction { private Customer loginUser; public Customer getLoginUser() { return loginUser; } public void setLoginUser(Customer loginUser) { this.loginUser = loginUser; } public String login(){ UserService userServ = new UserService(); if(userServ.login(loginUser)){ return "success"; } return "fail"; } } -
在src目录下,创建struts.xml文件,配置Action并设置页面导航:
<?xml version="1.0" encoding="UTF-8"?> <!DOCTYPE struts PUBLIC "-//Apache Software Foundation//DTD Struts Configuration 2.0//EN" "http://struts.apache.org/dtds/struts-2.0.dtd"> <struts> <constant name="struts.enable.DynamicMethodInvocation" value="true"/> <package name="strutsBean" extends="struts-default" namespace="/"> <action name="login" class="cn.edu.zjut.action.UserAction" method="login"> <result name="success">/loginSuccess.jsp</result> <result name="fail">/login.jsp</result> </action> </package> </struts> -
编辑Web.xml文件,增加Struts2核心Filter配置:
<?xml version="1.0" encoding="UTF-8"?> <web-app xmlns="http://xmlns.jcp.org/xml/ns/javaee" xmlns:xsi="http://www.w3.org/2001/XMLSchema-instance" xsi:schemaLocation="http://xmlns.jcp.org/xml/ns/javaee http://xmlns.jcp.org/xml/ns/javaee/web-app_4_0.xsd" version="4.0"> <filter> <filter-name>struts2</filter-name> <filter-class>org.apache.struts2.dispatcher.FilterDispatcher</filter-class> </filter> <filter-mapping> <filter-name>struts2</filter-name> <url-pattern>/*</url-pattern> </filter-mapping> </web-app> -
将项目部署到Tomcat服务器上,启动服务,访问login.jsp页面
图5-5 运行结果 [外链图片转存失败,源站可能有防盗链机制,建议将图片保存下来直接上传(img-iC0BnTw0-1635212475288)(https://i.loli.net/2021/10/25/cYNwLGkDq8j5VWx.png)]

(四)实验总结
-
对hibernate.cfg.xml配置文件各元素的总结:
<hibernate-configuration> <!-- hibernate配置元素--> <session-factory> <!-- 会话工程配置--> <property name="connection.url">jdbc:mysql://rm-bp10ju74719fp6g4emo.mysql.rds.aliyuncs.com:3306/hibernatedb?serverTimezone=GMT%2B8&useSSL=false</property> <!-- 数据库连接url--> <property name="connection.driver_class">com.mysql.jdbc.Driver</property> <!-- 数据库用户名--> <property name="connection.username">yiyi1333</property> <!-- 数据库密码--> <property name="connection.password">zzy@15712651279</property> <!-- hibernate使用的数据库方言--> <property name="hibernate.dialect">org.hibernate.dialect.MySQLDialect</property> <!-- 运行时是否打印SQL--> <property name="show_sql">true</property> <!-- C3P0数据源连接池的配置--> <!-- 最大连接数--> <property name="hibernate.c3p0.max_size">10</property> <!-- 最小连接数--> <property name="hibernate.c3p0.min_size">5</property> <!-- 超时时间--> <property name="hibernate.c3p0.timeout">2000</property> <!-- hibernate对映射文件的配置--> <mapping resource="cn/edu/zjut/po/Customer.hbm.xml"/> </session-factory> </hibernate-configuration> -
总结Hibernate映射文件Customer.hbm.xml各元素的作用:
<hibernate-mapping> <!-- hibernate映射文件根元素,定义的属性在映射文件的所有节点都有效--> <class name="cn.edu.zjut.po.Customer" table="customer" catalog="hibernatedb"> <!-- class 配置了java类和数据库表的关系,catalog指定了数据库名, lazy属性指定是否使用延迟加载--> <id name="customerID" type="int"> <!-- 每一个class元素都包含了一个<id>元素,说明该属性用于持久化类的对象标识符和表的主键的映射 name时持久化类属性名,tyoe时持久化类的数据类型, column设置标识属性所映射的数据列的列名, access指定hibernate对标识属性的访问策略,默认为property--> <column name="customerid"/> <!-- generator制指定了主键的生成方式:increment、assigned--> <generator class="assigned"/> </id> <!-- 持久化子元素,其他属性和数据表中的映射关系, length表示数据表字段定义的长度--> <property name="account" type="java.lang.String"> <column name="account" length="20" unique="true"/> </property> ...... </class> </hibernate-mapping> -
总结实验一拓展实验中的DAO类和本实验中DAO类的区别:
在传统的DAO类中,需要获取到数据库连接对象,手动写好SQL语句之后再进行数据库操作,而在Hibernate框架下,用户只需要提前配置好持久化类与数据库表的映射关系,SQL语句交给Hibernate框架自动生成
自动生成的SQL语句:
Hibernate: select customer0_.customerid as customer1_0_, customer0_.account as account2_0_, customer0_.password as password3_0_, customer0_.name as name4_0_, customer0_.sex as sex5_0_, customer0_.birthday as birthday6_0_, customer0_.phone as phone7_0_, customer0_.email as email8_0_, customer0_.address as address9_0_, customer0_.zipcode as zipcode10_0_, customer0_.fax as fax11_0_ from hibernatedb.customer customer0_ where customer0_.account='admin' and customer0_.password='Admin' -
遇到的问题:主要的问题时Hibernate的版本问题,最后是使用了Hibernate5.6版本,在调试过程中切换版本的时候,没有删除构建的jar包,导致了项目中的包重复,报了methodNotFound错误。
二、提高实验——持久化对象与Hibernate映射文件
(一)实验目的
- 进一步熟悉Hibernate应用的基本开发方法;
- 掌握持久化类与持久化对象的概念,能按照规范进行持久化类的设计开发;
- 掌握Hibernate映射文件的作用,熟悉映射文件中主要元素及其属性的含义和作用,并能进行正确应用;
- 掌握Hibernate中主键的各种生成策略。
(二)基本知识与原理
- 在应用程序中,用来实现业务实体的类被称为持久化类(Persistent Class)如客户信息管理系统中的Customer类;
- Hibernate框架中的持久化类与数据库表对应,常用POJO编程模式实现,符合JavaBean规范,提供public的无参构造方法,提供符合命名规范的getters和setters方法;
- 持久化类与数据库表对应,类的属性与表的字段对应;持久化类的对象被称为持久化对象PO(Persistent Objects),PO 对应表中的一条记录;
- 持久化对象映射数据库中的记录,其映射关系依赖Hibernate 框架的映射文件配置,映射文件是XML 文件,往往以*.hbm.xml 形式命名,其中*是持久化对象的类名;
- Hibernate 映射文件中,元素表示持久化类中的主键,的子元素表示主键的生成策略,其取值可以是“assigned”(用户赋值)、“increment”(自动递增)等等;
- 若数据库表中有多个列组成主键,则需要将其对应的持久化类中相应的多个属性封装成一个类,作为复合主键。
(三)实验过程
-
在阿里云RDS云数据库中创建一个名为item的数据表,表结构如表5-3所示:
表5-6 item数据表 
-
在表item添加2条记录具体如表5-4所示:
表5-7 itemr中的记录 [外链图片转存失败,源站可能有防盗链机制,建议将图片保存下来直接上传(img-OWVkFWmf-1635212475293)(https://i.loli.net/2021/10/25/29a8c5eBFI6MGK3.png)]
insert into item
set isbn = '978-7-121-12345-1',
    title = 'JAVAEE技术实验指导教程',
    description = 'WEB程序设计知识回顾、轻量级JAVAEE应用框架、企业级EJB组件编程技术、JAVAEE综合应用开发',
    cost = 19.95;

insert into item
set isbn = '978-7-121-12345-2',
    title = 'JAVAEE技术',
    description = 'Struts框架、Hibernate框架、Spring框架、会话Bean、实体Bean、消息驱动Bean',
    cost = 29.95;
图5-8 数据库中item表数据 [外链图片转存失败,源站可能有防盗链机制,建议将图片保存下来直接上传(img-9mkELEoN-1635212475295)(https://i.loli.net/2021/10/25/y1Em7SetwYzDOrX.png)]
-
在cn.edu.zjut.po包中创建Java持久化类Item.java,与item数据表相映射。
package cn.edu.zjut.po; import java.io.Serializable; import java.sql.Blob; public class Item implements Serializable { private String isbn; private String title; private String description; private float cost; private Blob image; public Item() { } public Item(String isbn, String title, String description, float cost, Blob image) { this.isbn = isbn; this.title = title; this.description = description; this.cost = cost; this.image = image; } public String getIsbn() { return isbn; } public void setIsbn(String isbn) { this.isbn = isbn; } public String getTitle() { return title; } public void setTitle(String title) { this.title = title; } public String getDescription() { return description; } public void setDescription(String description) { this.description = description; } public float getCost() { return cost; } public void setCost(float cost) { this.cost = cost; } public Blob getImage() { return image; } public void setImage(Blob image) { this.image = image; } } -
在Item.java同一目录下创建Hibernate映射文件Item.hbm.xml:
<?xml version="1.0"?> <!DOCTYPE hibernate-mapping PUBLIC "-//Hibernate/Hibernate Mapping DTD3.0//EN" "http://hibernate.sourceforge.net/hibernate-mapping-3.0.dtd"> <hibernate-mapping> <class name="cn.edu.zjut.po.Item" table="item" catalog="hibernatedb"> <id name="isbn" type="java.lang.String"> <column name="isbn"/> <!-- generator制指定了主键的生成方式:increment、assigned--> <generator class="assigned"/> </id> <property name="title" type="java.lang.String"> <column name="account" length="30"/> </property> <property name="description" type="java.lang.String"> <column name="description" length="100"/> </property> <property name="cost" type="java.lang.Float"> <column name="cost"/> </property> <property name="image" type="java.sql.Blob"> <column name="image"/> </property> </class> </hibernate-mapping> -
修改配置文件hibernate.cfg.xml,增加Item.hbm.xml映射文件声明:
<?xml version='1.0' encoding='utf-8'?> <!DOCTYPE hibernate-configuration PUBLIC "-//Hibernate/Hibernate Configuration DTD 3.0//EN" "http://www.hibernate.org/dtd/hibernate-configuration-3.0.dtd"> <hibernate-configuration> <session-factory> <property name="connection.url">jdbc:mysql://rm-bp10ju74719fp6g4emo.mysql.rds.aliyuncs.com:3306/hibernatedb?serverTimezone=GMT%2B8&useSSL=false</property> <property name="connection.driver_class">com.mysql.jdbc.Driver</property> <property name="connection.username">yiyi1333</property> <property name="connection.password">zzy@15712651279</property> <property name="hibernate.dialect">org.hibernate.dialect.MySQLDialect</property> <property name="show_sql">true</property> <property name="hibernate.c3p0.max_size">10</property> <property name="hibernate.c3p0.min_size">5</property> <property name="hibernate.c3p0.timeout">2000</property> <mapping resource="cn/edu/zjut/po/Customer.hbm.xml"/> <mapping resource="cn/edu/zjut/po/Item.hbm.xml"/> </session-factory> </hibernate-configuration> -
在cn.edu.zjut.dao包中创建数据库操作类ItemDAO.java:
package cn.edu.zjut.dao; import org.apache.commons.logging.Log; import org.apache.commons.logging.LogFactory; import org.hibernate.Query; import org.hibernate.Session; import org.hibernate.SessionFactory; import org.hibernate.boot.MetadataSources; import org.hibernate.boot.registry.StandardServiceRegistry; import org.hibernate.boot.registry.StandardServiceRegistryBuilder; import java.util.List; public class ItemDAO { private static final Log log = LogFactory.getLog(ItemDAO.class); public List findAll(){ log.debug("finding all Item instances"); StandardServiceRegistry ssr = new StandardServiceRegistryBuilder().configure().build(); SessionFactory sessionFactory = new MetadataSources(ssr).buildMetadata().buildSessionFactory(); Session session = sessionFactory.openSession(); try{ String queryString = "from Item"; Query queryObject = session.createQuery(queryString); return queryObject.list(); }catch (RuntimeException re){ log.error("find all failed", re); throw re; }finally { session.close(); } } } -
在cn.edu.zjut.service包中创建ItemService.java,用于获取所有商品信息:
package cn.edu.zjut.service; import cn.edu.zjut.dao.ItemDAO; import java.util.ArrayList; import java.util.List; public class ItemService { private List items = new ArrayList(); public List getAllItems(){ ItemDAO dao = new ItemDAO(); items = dao.findAll(); return items; } } -
在cn.edu.zjut.action包中创建ItemAction.java,并在其中定义getAllItems()方法用于调用”获取所有商品信息“逻辑:
package cn.edu.zjut.action; import cn.edu.zjut.po.Item; import cn.edu.zjut.service.ItemService; import com.opensymphony.xwork2.ActionSupport; import org.apache.struts2.interceptor.ApplicationAware; import org.apache.struts2.interceptor.RequestAware; import org.apache.struts2.interceptor.SessionAware; import java.util.List; import java.util.Map; public class ItemAction extends ActionSupport implements RequestAware, SessionAware, ApplicationAware { private List items; private Map request, session, application; public List getItems() { return items; } public void setItems(List items) { this.items = items; } @Override public void setApplication(Map<String, Object> map) { this.application = map; } @Override public void setRequest(Map<String, Object> map) { this.request = map; } @Override public void setSession(Map<String, Object> map) { this.session = map; } public String getAllItems(){ ItemService itemService = new ItemService(); List items = itemService.getAllItems(); System.out.println(items.size()); request.put("items", items); return "itemList"; } } -
新建itemList.jsp页面,作为商品信息的展示视图:
<%-- Created by IntelliJ IDEA. User: yiyi Date: 2021/10/25 Time: 21:13 To change this template use File | Settings | File Templates. --%> <%@ page contentType="text/html;charset=UTF-8" language="java" %> <%@ taglib prefix="s" uri="/struts-tags"%> <html> <head> <title>商品列表</title> </head> <body> <center>商品列表</center> <table border=1> <tr> <th>编号</th> <th>书名</th> <th>说明</th> <th>单价</th> </tr> <s:iterator value="#request.items" > <tr> <td><s:property value="isbn"/></td> <td><s:property value="title"/></td> <td><s:property value="description"/></td> <td><s:property value="cost"/></td> </tr> </s:iterator> </table> </body> </html> -
在loginSuccess.jsp中添加超链接,用于查看所有商品信息:
<a href="./allItms">查看所有商品信息</a> -
修改struts.xml,增加ItemAction的配置并设置页面导航;
-
部署到Tomcat服务器,查看运行结果;
图5-9 运行结果 [外链图片转存失败,源站可能有防盗链机制,建议将图片保存下来直接上传(img-jUMNw3Tt-1635212475297)(https://i.loli.net/2021/10/25/1ZVY2d4CkcoEq8s.png)]

-
假设持久化类Item.java中的isbn属性和title属性作为复合主键,则需要将这两个属性封装成一个类:
package cn.edu.zjut.po; import java.io.Serializable; public class ItemPK implements Serializable { private String isbn; private String title; public String getIsbn() { return isbn; } public void setIsbn(String isbn) { this.isbn = isbn; } public String getTitle() { return title; } public void setTitle(String title) { this.title = title; } } -
修改Item.java类:
package cn.edu.zjut.po; import java.io.Serializable; import java.sql.Blob; public class Item implements Serializable { private ItemPK ipk; private String description; private float cost; private Blob image; public Item() { } public Item(ItemPK ipk, String description, float cost, Blob image) { this.ipk = ipk; this.description = description; this.cost = cost; this.image = image; } public ItemPK getIpk() { return ipk; } public void setIpk(ItemPK ipk) { this.ipk = ipk; } public String getDescription() { return description; } public void setDescription(String description) { this.description = description; } public float getCost() { return cost; } public void setCost(float cost) { this.cost = cost; } public Blob getImage() { return image; } public void setImage(Blob image) { this.image = image; } } -
修改Hibernate映射文件Item.hbm.xml:
<?xml version="1.0"?> <!DOCTYPE hibernate-mapping PUBLIC "-//Hibernate/Hibernate Mapping DTD3.0//EN" "http://hibernate.sourceforge.net/hibernate-mapping-3.0.dtd"> <hibernate-mapping> <class name="cn.edu.zjut.po.Item" table="item" catalog="hibernatedb"> <composite-id name="ipk" class="cn.edu.zjut.po.ItemPK"> <key-property name="isbn" column="isbn"/> <key-property name="title" column="title"/> </composite-id> ...... </class> </hibernate-mapping> -
修改itemList.jsp页面:
<s:iterator value="#request.items" > <tr> <td><s:property value="ipk.isbn"/></td> <td><s:property value="ipk.title"/></td> <td><s:property value="description"/></td> <td><s:property value="cost"/></td> </tr> </s:iterator> -
重新部署到Tomcat服务器,浏览login.jsp页面访问itemList.jsp:
图5-10 使用复合主键后运行结果

结果相同
(四)实验总结
-
总结POJO模式下持久化类的规范:
- 持久化类中需要提供一个使用 public 修饰的无参构造器;
- 持久化类中需要提供一个标识属性 OID,与数据表主键字段向对应,例如实体类 User 中的 id 属性。为了保证 OID 的唯一性,OID 应该由 Hibernate 进行赋值,尽量避免人工手动赋值;
- 持久化类中所有属性(包括 OID)都要与数据库表中的字段相对应,且都应该符合 JavaBean 规范,即属性使用 private 修饰,且提供相应的 setter 和 getter 方法;
- 标识属性应尽量使用基本数据类型的包装类型,例如 Interger,目的是为了与数据库表的字段默认值 null 保持一致;
- 不能用 final 修饰持久化类。
-
总结映射文件中的主要元素的含义与作用:
- class:主要用于指定持久化类和数据表的映射关系,它是 XML 配置文件中的主要配置内容;
- id:class内包含了一个id元素用于设定持久化类的OID和表的主键的映射;
- generator:指定了主键的生成方式。对于不同的关系型数据库和业务应用来说,其主键的生成方式往往也不同,有的是依赖数据库自增字段生成主键,有的是按照具体的应用逻辑决定,通过 元素就可以指定这些不同的实现方式
- property:class内可以包含多个property子元素,表示持久化类的其他属性和数据表中非主键字段的映射关系。
-
总结设置复合主键的方法和步骤:
- 创建复合主键的po类;
- 在以复合主键作为主键的po类内,将po类作为子对象,设置好getter和setter方法;
- 在映射配置文件中使用composite-id元素配置复合主键
-
总结Hibernate映射文件中各种生成策略的作用:
表5-11 生产策略表 名称 描述 increment 用于 long.short 或 int 类型,由 Hibernate 自动以递增的方式生成唯一标识符,每次增量为 1。只有当没有其他进程向同一张表中插入数据时才可以使用,不能在集群环境下使用,适用于代理主键 identity 采用底层数据库自身提供的主键生成标识符,条件是数据库支持自动增长数据类型。在 DB2、MySQL、SQL Server、Sybase 和 HypersonicSQL 数据库中可以使用该生成器,该生成器要求在数据库中把主键定义成为自增长类型,适用于代理主键 sequence Hibernate 根据底层数据库序列生成标识符。条件是数据库支持序列,适用于代理主键 hiio 使用一个高/低位算法高效地生成 long、short 或 int 类型的标识符。给定一个表和字段(默认的表和字段分别为 hibernate_unique_key 和 next_hi)作为高位值的来源。高/低位算法产生的标识符仅在特定数据库中是唯一的 native 根据底层数据库对自动生成标识符的能力选择 identity、sequence、hilo 三种生成器中的一种,适合跨数据库平台开发,适用于代理主键 uuid Hibernate 采用 128 位的 UUID 算法生成标识符。该算法能够在网络环境中生成唯一的字符串标识符,其 UUID 被编码为一个长度为 32 位的十六进制字符串。这种策略并不流行,因为字符串类型的主键比整数类型的主键占用更多的数据库空间,适用于代理主键 assigned 由 java 程序负责生成标识符,如果不指定 id 元素的 generator 属性,则默认使用该主键生成策略,适用于自然主键 -
实验收获:对Hibernate的映射文件配置有了更深刻的认识。
三、扩展实验——粒度设计
(一)实验目的
- 进一步熟悉持久化类与Hibernate 映射文件的开发方法;
- 学习在实际应用中进行粒度细分,将一张表映射到多个类。
(二)基本知识与原理
- 在实际应用中,并不都是一张表与一个实体类映射,往往可能会有一张表跟多个实体类映射的情况,称为粒度设计;
- 如果表中的某些字段联合起来能表示持久化类中的某一个属性,那么可以进行基于设计的粒度设计:将表跟多个类映射;类和类之间使用关联关系;只需要一个映射文件,其中使用component 元素进行映射;
- 如果表中的某些字段不经常使用,而且占有空间较大,则可以使用基于性能的粒度设计:一个表可以映射为多个类;每个类对应一个*.hbm.xml 文件;根据实际情况,使用不同的类。
(三)实验过程
-
在cn.edu.zjut.po包中新增ContactInfo.java类,将customer数据表中的phone、email、address、zipcode、fax封装起来:
package cn.edu.zjut.po; public class ContactInfo { private String phone; private String email; private String address; private String zipcode; private String fax; public ContactInfo() { } public ContactInfo(String phone, String email, String address, String zipcode, String fax) { this.phone = phone; this.email = email; this.address = address; this.zipcode = zipcode; this.fax = fax; } public String getPhone() { return phone; } public void setPhone(String phone) { this.phone = phone; } public String getEmail() { return email; } public void setEmail(String email) { this.email = email; } public String getAddress() { return address; } public void setAddress(String address) { this.address = address; } public String getZipcode() { return zipcode; } public void setZipcode(String zipcode) { this.zipcode = zipcode; } public String getFax() { return fax; } public void setFax(String fax) { this.fax = fax; } } -
修改Customer.java,将ContactInfo作为Customer的属性:
package cn.edu.zjut.po; import java.io.Serializable; import java.util.Date; public class Customer implements Serializable { private int customerID; private String account; private String password; private String name; private Boolean sex; private Date birthday; private ContactInfo contactInfo; public Customer() { } public Customer(int customerID, String account, String password, String name, Boolean sex, Date birthday, ContactInfo contactInfo) { this.customerID = customerID; this.account = account; this.password = password; this.name = name; this.sex = sex; this.birthday = birthday; this.contactInfo = contactInfo; } public int getCustomerID() { return customerID; } public void setCustomerID(int customerID) { this.customerID = customerID; } public String getAccount() { return account; } public void setAccount(String account) { this.account = account; } public String getPassword() { return password; } public void setPassword(String password) { this.password = password; } public String getName() { return name; } public void setName(String name) { this.name = name; } public Boolean getSex() { return sex; } public void setSex(Boolean sex) { this.sex = sex; } public Date getBirthday() { return birthday; } public void setBirthday(Date birthday) { this.birthday = birthday; } public ContactInfo getContactInfo() { return contactInfo; } public void setContactInfo(ContactInfo contactInfo) { this.contactInfo = contactInfo; } } -
修改Hibernate映射文件Customer.hbm.xml,将customer表与两个类映射:
<?xml version="1.0"?> <!DOCTYPE hibernate-mapping PUBLIC "-//Hibernate/Hibernate Mapping DTD3.0//EN" "http://hibernate.sourceforge.net/hibernate-mapping-3.0.dtd"> <hibernate-mapping> <class name="cn.edu.zjut.po.Customer" table="customer" catalog="hibernatedb"> <id name="customerID" type="int"> <column name="customerid"/> <generator class="increment"/> </id> <property name="account" type="java.lang.String"> <column name="account" length="20" unique="true"/> </property> <property name="password" type="java.lang.String"> <column name="password" length="20"/> </property> <property name="name" type="java.lang.String"> <column name="name" length="20"/> </property> <property name="sex" type="java.lang.Boolean"> <column name="sex"/> </property> <property name="birthday" type="java.util.Date"> <column name="birthday" length="10"/> </property> <component name="contactInfo" class="cn.edu.zjut.po.ContactInfo"> <property name="phone" type="java.lang.String"> <column name="phone" length="20"/> </property> <property name="email" type="java.lang.String"> <column name="email" length="100"/> </property> <property name="address" type="java.lang.String"> <column name="address" length="200"/> </property> <property name="zipcode" type="java.lang.String"> <column name="zipcode" length="10"/> </property> <property name="fax" type="java.lang.String"> <column name="fax" length="20"/> </property> </component> </class> </hibernate-mapping> -
修改hibernate.cfg.xml,开启增删改操作的事务的自动提交:
<property name="connection.autocommit">true</property> -
新建register.jsp页面,作为用户注册的视图,新建regSuccess.jsp页面,作为注册成功的视图;
-
修改CustomerDAO.java,增加”添加新用户“的操作:
package cn.edu.zjut.dao; import cn.edu.zjut.po.Customer; import org.apache.commons.logging.Log; import org.apache.commons.logging.LogFactory; import org.hibernate.Query; import org.hibernate.Session; import org.hibernate.SessionFactory; import org.hibernate.Transaction; import org.hibernate.boot.MetadataSources; import org.hibernate.boot.registry.StandardServiceRegistry; import org.hibernate.boot.registry.StandardServiceRegistryBuilder; import java.util.List; public class CustomerDAO { private Log log = LogFactory.getLog(CustomerDAO.class); public List findByHql(String hql){ log.debug("finding LoginUser instance by hql"); StandardServiceRegistry ssr = new StandardServiceRegistryBuilder().configure().build(); SessionFactory sessionFactory = new MetadataSources(ssr).buildMetadata().buildSessionFactory(); Session session = sessionFactory.openSession(); try{ Query q = session.createQuery(hql); return q.list(); }catch (RuntimeException re){ log.error("find by hql failed", re); throw re; }finally { session.close(); } } public void save(Customer customer){ log.debug("saving customer instance"); StandardServiceRegistry ssr = new StandardServiceRegistryBuilder().configure().build(); SessionFactory sessionFactory = new MetadataSources(ssr).buildMetadata().buildSessionFactory(); Session session = sessionFactory.openSession(); try{ Transaction tran = session.beginTransaction(); session.save(customer); tran.commit(); log.debug("save successful"); }catch (Exception re){ log.error("save failed", re); throw re; }finally { session.close(); } } } -
修改UserService.java,增加用户注册逻辑:
package cn.edu.zjut.service; import cn.edu.zjut.dao.CustomerDAO; import cn.edu.zjut.po.Customer; import java.util.List; public class UserService { public boolean login(Customer loginuser){ CustomerDAO dao = new CustomerDAO(); String hql = "from Customer where account='" + loginuser.getAccount() + "' and password='" + loginuser.getPassword() + "'"; List user = dao.findByHql(hql); if(user.isEmpty()){ return false; } else{ return true; } } public void register(Customer loginuser){ CustomerDAO dao = new CustomerDAO(); dao.save(loginuser); } } -
修改UserAction.java,定义register()方法调用用户注册逻辑:
package cn.edu.zjut.action; import cn.edu.zjut.po.Customer; import cn.edu.zjut.service.UserService; public class UserAction { private Customer loginUser; public Customer getLoginUser() { return loginUser; } public void setLoginUser(Customer loginUser) { this.loginUser = loginUser; } public String login(){ UserService userServ = new UserService(); if(userServ.login(loginUser)){ return "success"; } return "fail"; } public String register(){ UserService userService = new UserService(); userService.register(loginUser); return "registersuccess"; } } -
修改struts.xml文件,增加Action配置并设置页面导航:
<action name="register" class="cn.edu.zjut.action.UserAction" method="register"> <result name="registersuccess">/regSuccess.jsp</result> </action> -
部署到Tomcat服务器上运行:
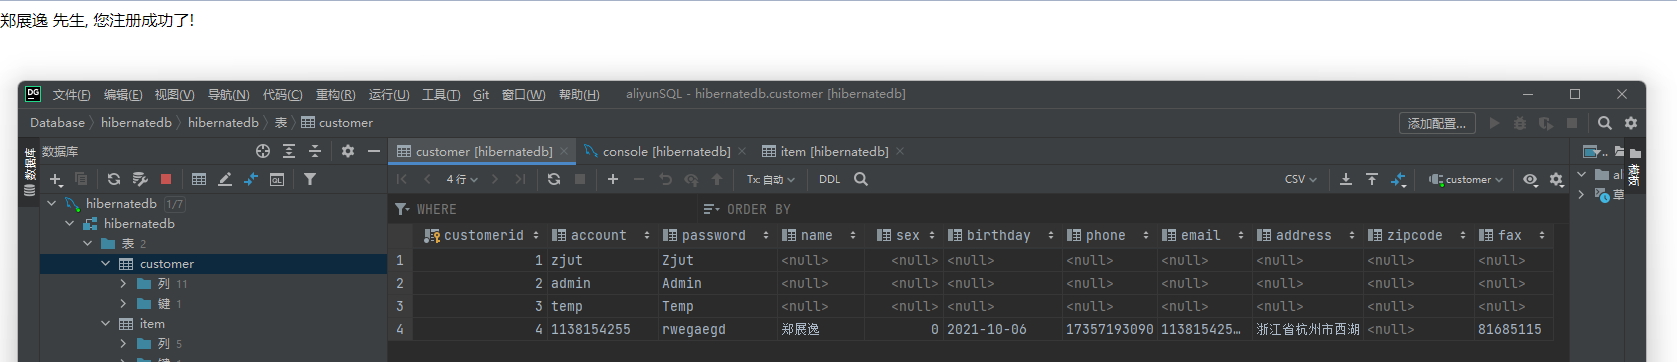
图5-12 运行结果

-
在hibernatedb数据库的item数据表中,image字段表示商品的照片,使用Blob类型,所占空间较大,基于性能的粒度设计将item映射为两个类,ItemDetail映射表中所有字段,另一个ItemBasic,映射表中除了image之外的字段:
//ItemBasic
package cn.edu.zjut.po;

public class ItemBasic {
    private String isbn;
    private String title;
    private String description;
    private Float cost;

    public ItemBasic() {
    }

    public ItemBasic(String isbn, String title, String description, Float cost) {
        this.isbn = isbn;
        this.title = title;
        this.description = description;
        this.cost = cost;
    }

    public String getIsbn() {
        return isbn;
    }

    public void setIsbn(String isbn) {
        this.isbn = isbn;
    }

    public String getTitle() {
        return title;
    }

    public void setTitle(String title) {
        this.title = title;
    }

    public String getDescription() {
        return description;
    }

    public void setDescription(String description) {
        this.description = description;
    }

    public Float getCost() {
        return cost;
    }

    public void setCost(Float cost) {
        this.cost = cost;
    }
}
//ItemDetail package cn.edu.zjut.po; import java.sql.Blob; public class ItemDetail extends ItemBasic{ private Blob image; public ItemDetail() { } public ItemDetail(Blob image) { this.image = image; } public ItemDetail(String isbn, String title, String description, Float cost, Blob image) { super(isbn, title, description, cost); this.image = image; } public Blob getImage() { return image; } public void setImage(Blob image) { this.image = image; } } -
在ItemBasic.java和ItemDetail.java同一目录下创建Hibernate映射文件ItemBasic.hbm.xml和ItemDetail.hbm.xml:
#ItemDetail.hbm.xml
<?xml version="1.0"?>
<!DOCTYPE hibernate-mapping PUBLIC "-//Hibernate/Hibernate Mapping DTD3.0//EN"
        "http://hibernate.sourceforge.net/hibernate-mapping-3.0.dtd">
<hibernate-mapping>
    <class name="cn.edu.zjut.po.ItemDetail" table="item" catalog="hibernatedb">
        <id name="isbn" type="java.lang.String">
            <column name="isbn" length="20"/>
            <generator class="assigned"></generator>
        </id>
        <property name="title" type="java.lang.String">
            <column name="title" length="30"/>
        </property>
        <property name="description" type="java.lang.String">
            <column name="description" length="100"/>
        </property>
        <property name="cost" type="java.lang.Float">
            <column name="cost"/>
        </property>
        <property name="image" type="java.sql.Blob">
            <column name="image"/>
        </property>
    </class>
</hibernate-mapping>
#ItemBasic.hbm.xml <?xml version="1.0"?> <!DOCTYPE hibernate-mapping PUBLIC "-//Hibernate/Hibernate Mapping DTD3.0//EN" "http://hibernate.sourceforge.net/hibernate-mapping-3.0.dtd"> <hibernate-mapping> <class name="cn.edu.zjut.po.ItemDetail" table="item" catalog="hibernatedb"> <id name="isbn" type="java.lang.String"> <column name="isbn" length="20"/> <generator class="assigned"></generator> </id> <property name="title" type="java.lang.String"> <column name="title" length="30"/> </property> <property name="description" type="java.lang.String"> <column name="description" length="100"/> </property> <property name="cost" type="java.lang.Float"> <column name="cost"/> </property> </class> </hibernate-mapping> -
修改Hibernate配置文件hibernate.cfg.xml,删除Item.hbm.xml映射,增加ItemDetail.hbm.xml和ItemBasic.hbm.xml映射文件声明:
<?xml version='1.0' encoding='utf-8'?> <!DOCTYPE hibernate-configuration PUBLIC "-//Hibernate/Hibernate Configuration DTD 3.0//EN" "http://www.hibernate.org/dtd/hibernate-configuration-3.0.dtd"> <hibernate-configuration> <!-- hibernate配置元素--> <session-factory> ......... <mapping resource="cn/edu/zjut/po/Customer.hbm.xml"/> <mapping resource="cn/edu/zjut/po/ItemDetail.hbm.xml"/> <mapping resource="cn/edu/zjut/po/ItemBasic.hbm.xml"/> </session-factory> </hibernate-configuration> -
重新部署到Tomcat服务器,运行查看结果:
图5-13 粒度设计运行结果 
(四)实验总结
-
两种粒度设计的方法及特点:
- 封装类方法:将一些可能重用的数据类型封装成类之后可以重用,封装之后使得数据结构更加清晰。
- 继承方法:将一些可能用不到的数据映射到子类中,达到了想用可用,不用的时候调用父类即可,这样处理Blob这种数据类型的效果非常好。
-
connection.autocommit属性作用:hibernate中hibernate.connection.autocommit属性用来设置获取到的jdbc connection的autoCommit属性。hibernate.cfg.xml中默认是false。session.connection().getAutoCommit()方法可以获取session对应的connection的autoCommit属性。
-
遇到的问题:
-
表单提交的注册表中出现中文乱码问题,修改struts.xml:
<constant name="struts.i18n.encoding" value="UTF-8" />修改struts.properties:
struts.i18n.encoding=utf-8 -
编号书名无法显示,修改jsp页面代码:
<s:iterator value="#request.items" >
        <tr>
            <td><s:property value="isbn"/></td>
            <td><s:property value="title"/></td>
            <td><s:property value="description"/></td>
            <td><s:property value="cost"/></td>
        </tr>
    </s:iterator>
-
-
实验收获:熟悉了Hibernate粒度设计模式。


 339
339


 被折叠的 条评论
为什么被折叠?
被折叠的 条评论
为什么被折叠?
 到【灌水乐园】发言


