


Spring简介
Spring 是一个开源框架,Spring 是于2003 年兴起的一个轻量级的Java 开发框架,由RodJohnson在其著作Expert One-On-One J2EE Development and Design中阐述的部分理念和原型衍生而来。它是为了解决企业应用开发的复杂性而创建的。框架的主要优势之一就是其分层架构,分层架构允许使用者选择使用哪一个组件,同时为J2EE 应用程序开发提供集成的框架。Spring 使用基本的 JavaBean来完成以前只可能由 EJB 完成的事情。然而,Spring的用途不仅限于服务器端的开发。从简单性、可测试性和松耦合的角度而言,任何 Java 应用都可以从 Spring 中受益。Spring的核心是控制反转(IoC)和面向切面(AOP)。简单来说,Spring 是一个分层的JavaSE/EEfull-stack(一站式) 轻量级开源框架。
为什么学习Spring?
- 方便解耦,简化开发
- Spring 就是一个大工厂,可以将所有对象创建和依赖关系维护,交给 Spring 管理 AOP 编程的支持
- Spring 提供面向切面编程,可以方便的实现对程序进行权限拦截、运行监控等功能 声明式事务的支持
- 只需要通过配置就可以完成对事务的管理,而无需手动编程 方便程序的测试
- Spring 对 Junit4 支持,可以通过注解方便的测试 Spring 程序 方便集成各种优秀框架
- Spring 不排斥各种优秀的开源框架,其内部提供了对各种优秀框架(如:Struts、Hibernate、 MyBatis、Quartz等)的直接支持
- 降低 JavaEE API 的使用难度
- Spring 对 JavaEE 开发中非常难用的一些 API(JDBC、JavaMail、远程调用等),都提供了封装, 使这些 API应用难度大大降低
一、下载 Spring 的开发包
下载地址:https://repo.spring.io/webapp/#/artifacts/browse/tree/General/libs-release-local/org/springframework/spring

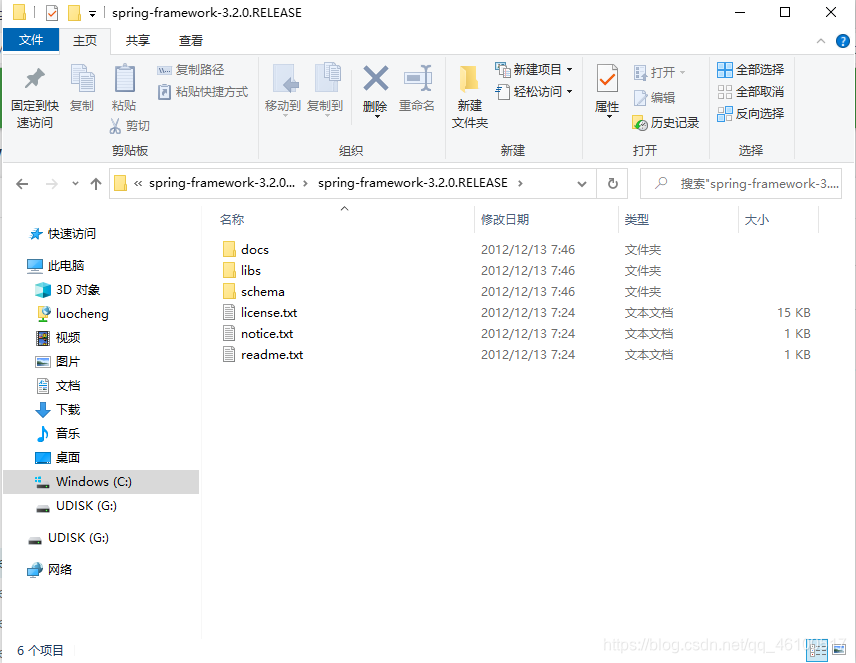
docs:API和开发规范
libs:jar包和源码
schema:约束
二、创建 web 项目,引入 Spring 的开发包
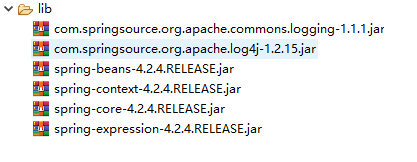
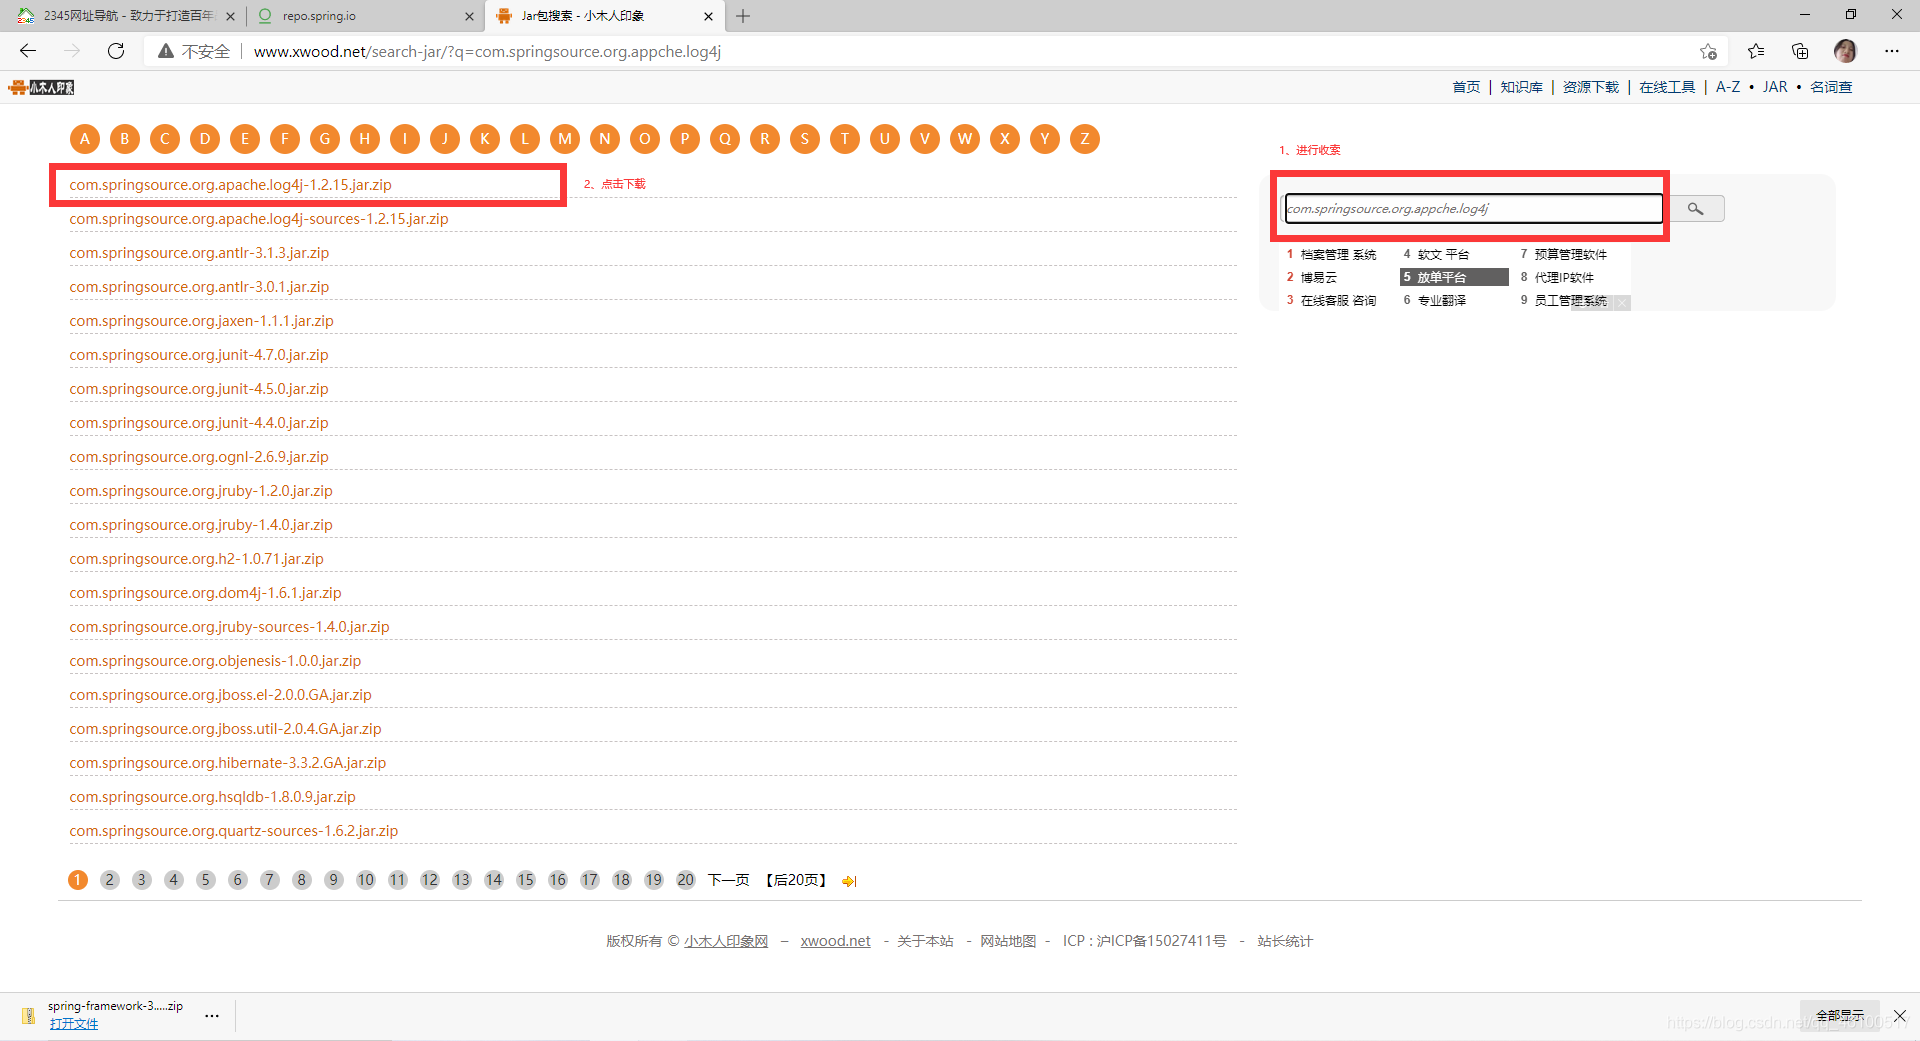
第1、2个包可以在http://www.xwood.net/search-jar/?q=com.springsource.org.appche.log4j里面搜索下载
三、引入相关配置文件
配置文件1:log4j.properties
### direct log messages to stdout ###
log4j.appender.stdout=org.apache.log4j.ConsoleAppender
log4j.appender.stdout.Target=System.out
log4j.appender.stdout.layout=org.apache.log4j.PatternLayout
log4j.appender.stdout.layout.ConversionPattern=%d{ABSOLUTE} %5p %c{1}:%L - %m%n

log4j.rootLogger=error, stdout

log4j.logger.com.springframework=DEBUG
log4j.logger.com.ibatis=DEBUG
log4j.logger.com.ibatis.common.jdbc.SimpleDataSource=DEBUG
log4j.logger.com.ibatis.common.jdbc.ScriptRunner=DEBUG
log4j.logger.com.ibatis.sqlmap.engine.impl.SqlMapClientDelegate=DEBUG

log4j.logger.java.sql.Connection=DEBUG
log4j.logger.java.sql.Statement=DEBUG
log4j.logger.java.sql.PreparedStatement=DEBUG
log4j.logger.java.sql.ResultSet=DEBUG
配置文件2:applicationContext.xml
<?xml version="1.0" encoding="UTF-8"?>
<beans xmlns="http://www.springframework.org/schema/beans"
	xmlns:xsi="http://www.w3.org/2001/XMLSchema-instance" xmlns:p="http://www.springframework.org/schema/p"
	xmlns:context="http://www.springframework.org/schema/context" xmlns:tx="http://www.springframework.org/schema/tx"
	xsi:schemaLocation="
       http://www.springframework.org/schema/beans
       http://www.springframework.org/schema/beans/spring-beans-4.2.xsd
       http://www.springframework.org/schema/context
       http://www.springframework.org/schema/context/spring-context-4.2.xsd
       http://www.springframework.org/schema/tx
       http://www.springframework.org/schema/tx/spring-tx-4.2.xsd">
</beans>
四、初步使用Spring
1、dao
package com.test.dao;

import java.util.List;

import com.test.domain.User;

public interface UserDao {
	List<User> findAllUser();
}
2、domain
package com.test.domain;

public class User {
	private int id;
	private String username;

	public int getId() {
		return id;
	}
	public void setId(int id) {
		this.id = id;
	}
	public String getUsername() {
		return username;
	}
	public void setUsername(String username) {
		this.username = username;
	}
}
3、dao的实现
package com.test.dao.impl;

import java.util.List;

import com.test.dao.UserDao;
import com.test.domain.User;

public class UserDaolmpl implements UserDao {
	public List<User> findAllUser() {
		// TODO Auto-generated method stub
		System.out.println("User");
		return null;
	}
}
4、在测试之前需要在applicationContext.xml里配置bean
bean中id 属性和 name 属性
- id :Bean起个名字. 在约束中采用 ID的约束:唯一.必须以字母开始,可以使用字母、数字、连字符、
下划线、句话、冒号 id:不能出现特殊字符.(bean id=”bookAction”) - name:Bean起个名字. 没有采用 ID的约束. name:出现特殊字符.如果没有 id的话 , name 可以当做id使用.(bean name=”/loginAction”)
<?xml version="1.0" encoding="UTF-8"?>
<beans xmlns="http://www.springframework.org/schema/beans"
	xmlns:xsi="http://www.w3.org/2001/XMLSchema-instance" xmlns:p="http://www.springframework.org/schema/p"
	xmlns:context="http://www.springframework.org/schema/context" xmlns:tx="http://www.springframework.org/schema/tx"
	xsi:schemaLocation="
       http://www.springframework.org/schema/beans
       http://www.springframework.org/schema/beans/spring-beans-4.2.xsd
       http://www.springframework.org/schema/context
       http://www.springframework.org/schema/context/spring-context-4.2.xsd
       http://www.springframework.org/schema/tx
       http://www.springframework.org/schema/tx/spring-tx-4.2.xsd">

       <!-- 类的实列注入到工厂 -->
       <!--
        	scope属性:
        		1、singleton:单列(默认值)
        		2、prototype:多列
        		3、request:WEB项目中,Spring创建一个Bean的对象,将对象存入到request域中
        		4、session:WEB项目中,Spring创建一个Bean的对象,将对象存入到session域中
        		5、globalSession:WEB项目中,应用在Porlet环境,如果没有Porlet环境那么globalSession相当于session
       -->
       <bean id="userDao" class="com.test.dao.impl.UserDaolmpl"></bean>
</beans>
5、测试
package springpro1;

import org.junit.Test;
import org.springframework.beans.factory.BeanFactory;
import org.springframework.context.ApplicationContext;
import org.springframework.context.support.ClassPathXmlApplicationContext;

import com.test.dao.UserDao;


/*
 * ClassPathXmlApplicationContext:加载类路径下Spring的配置文件
 * FileSystemXmlApplicationContext:加载本地磁盘下Spring的配置文件
 *
 * BeanFactory与ApplicationContext区别:
 * 		前者是在getBean的时候才会生成类的实列(在硬件比较差的地方使用)
 * 		后者在加载applicationContext.xml(容器启动)时候就会创建,占内存
 *
 */
public class TestDemo1 {
	@Test
	public void test1() {
//		UserDao ud = new UserDaolmpl();
//		ud.findAllUser();

		ApplicationContext ap = new ClassPathXmlApplicationContext("applicationContext.xml");
		UserDao ud = (UserDao) ap.getBean("userDao");
		ud.findAllUser();

		BeanFactory ap2 = new ClassPathXmlApplicationContext("applicationContext.xml");
		UserDao ud2 = (UserDao) ap2.getBean("userDao");
		ud2.findAllUser();
	}
}
以后可能遇到的面试题(IOC 和 DI)
- IOC:控制反转,将对象的创建权交给了 Spring.
- DI:Dependency Injection 依赖注入.需要有 IOC 的环境,Spring 创建这个类的过程中,Spring
将类的依赖的属性设置进去.


 2737
2737


 被折叠的 条评论
为什么被折叠?
被折叠的 条评论
为什么被折叠?
 到【灌水乐园】发言


