


目录
一、任务目标
- 实现一个Flask网页 连接数据库 将单词表打印在网页中
- 再实现一个Flask网页 将人脸识别的内容放入到网页中 具体来说需要包含以下内容:
① 匹配还是不匹配
② 原图
③ 人脸对齐 人脸识别后的识别结果图
④ 人脸的特征向量
二、任务一
1. 连接库
代码如下:
import MySQLdb
import pandas as pd
from flask import Flask, jsonify
import time

# 连接数据库
db = MySQLdb.connect("127.0.0.1", "username", "password", "database", charset='utf8' )
cursor = db.cursor()
2. 创建flask服务和页面
代码如下:
# 创建服务
app = Flask(__name__)
app.config['JSON_SORT_KEYS'] = False

@app.route("/")
def getmovies():
    sql = "select * from map_enword;"
    cursor.execute(sql)
    rs=cursor.fetchall()
    rs=list(rs)
    result = "<h1>词表</h1>"
    result+="<body>"
    for r in rs:
        result+="<br>"
        result+=str(tuple(r))+"<br/>"
    result+="<body/>"
    return result
3. main函数
代码如下:
if __name__ == '__main__':
    try:
        app.run(host='127.0.0.1', port=5000, debug=True)
    except:
        print("network outage")
    finally:
        cursor.close()
        db.close()
3. 注意事项
注意,在程序结束后,关闭程序与数据库的连接,即“cursor.close()”、“db.close()”
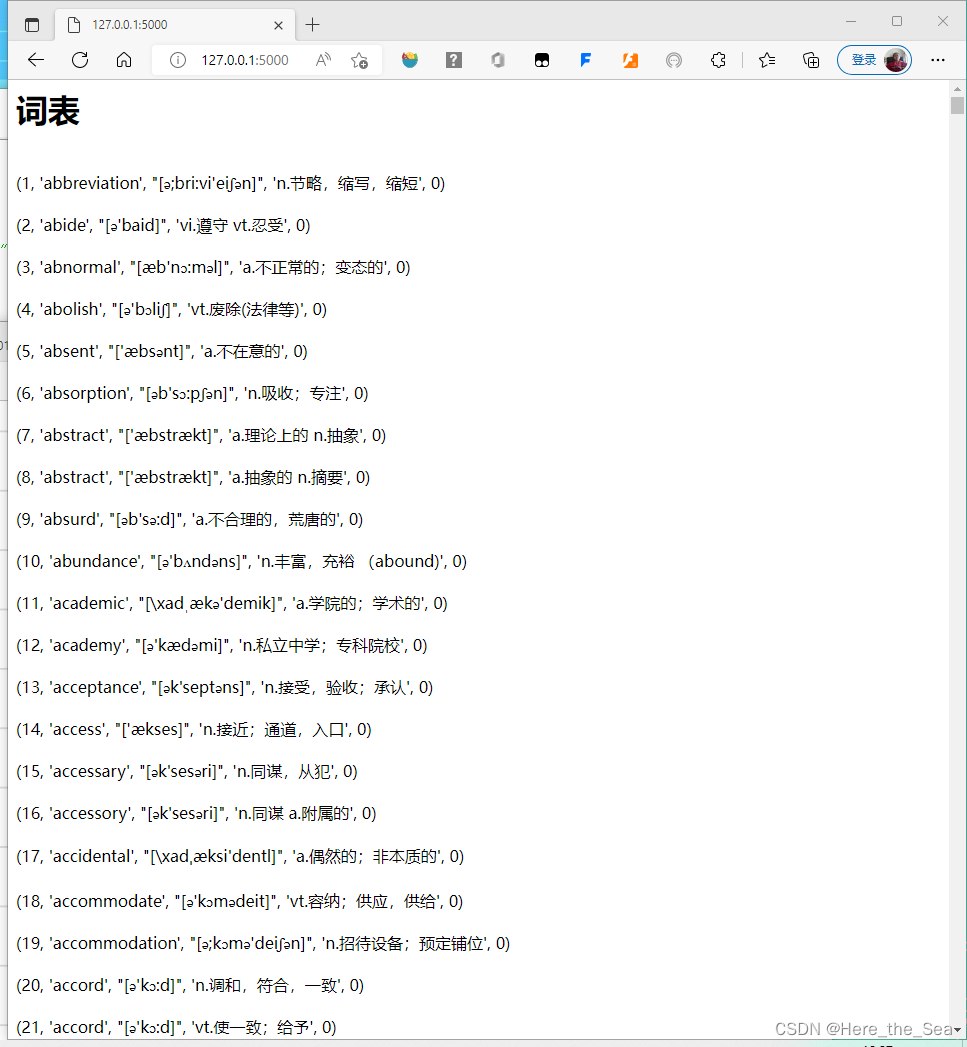
4. 结果展示
二、任务二
1. 人脸匹配子函数
代码如下:
import cv2
import torch
from facenet_pytorch import MTCNN, InceptionResnetV1
import face_recognition
import dlib

def match_faces(faces_emb, known_faces_emb, threshold):
    isExistDst = False
    distance = (known_faces_emb[0] - faces_emb[0]).norm().item()
    if(distance < threshold):
        isExistDst = True
    return isExistDst

def detect(filename):
    face_cascade = cv2.CascadeClassifier('haarcascade_frontalface_default.xml')
    img = cv2.imread(filename)
    gray = cv2.cvtColor(img, cv2.COLOR_BGR2GRAY)
    faces = face_cascade.detectMultiScale(gray, 1.3, 5)
    for (x, y, w, h) in faces:
        img = cv2.rectangle(img, (x, y), (x + w, y + h), (255, 0, 0), 2)
    cv2.imwrite("result2.jpg",img)
2. 人脸识别子函数
代码如下:
def face1():
    image = face_recognition.load_image_file("test1.jpg",mode ='RGB')
    face_locations_noCNN=face_recognition.face_locations(image)
    face_recognition.face_locations(image,model='cnn')

    face_num2=len(face_locations_noCNN)
    print(face_num2)       # The number of faces

    org = cv2.imread("test1.jpg")
    img = cv2.imread("test1.jpg")

    for i in range(0,face_num2):
        top = face_locations_noCNN[i][0]
        right = face_locations_noCNN[i][1]
        bottom = face_locations_noCNN[i][2]
        left = face_locations_noCNN[i][3]
        start = (left, top)
        end = (right, bottom)
        color = (0,255,255)
        thickness = 2
        cv2.rectangle(org, start, end, color, thickness)
    cv2.imwrite("origin.jpg",img)
    cv2.imwrite("result1.jpg",org)
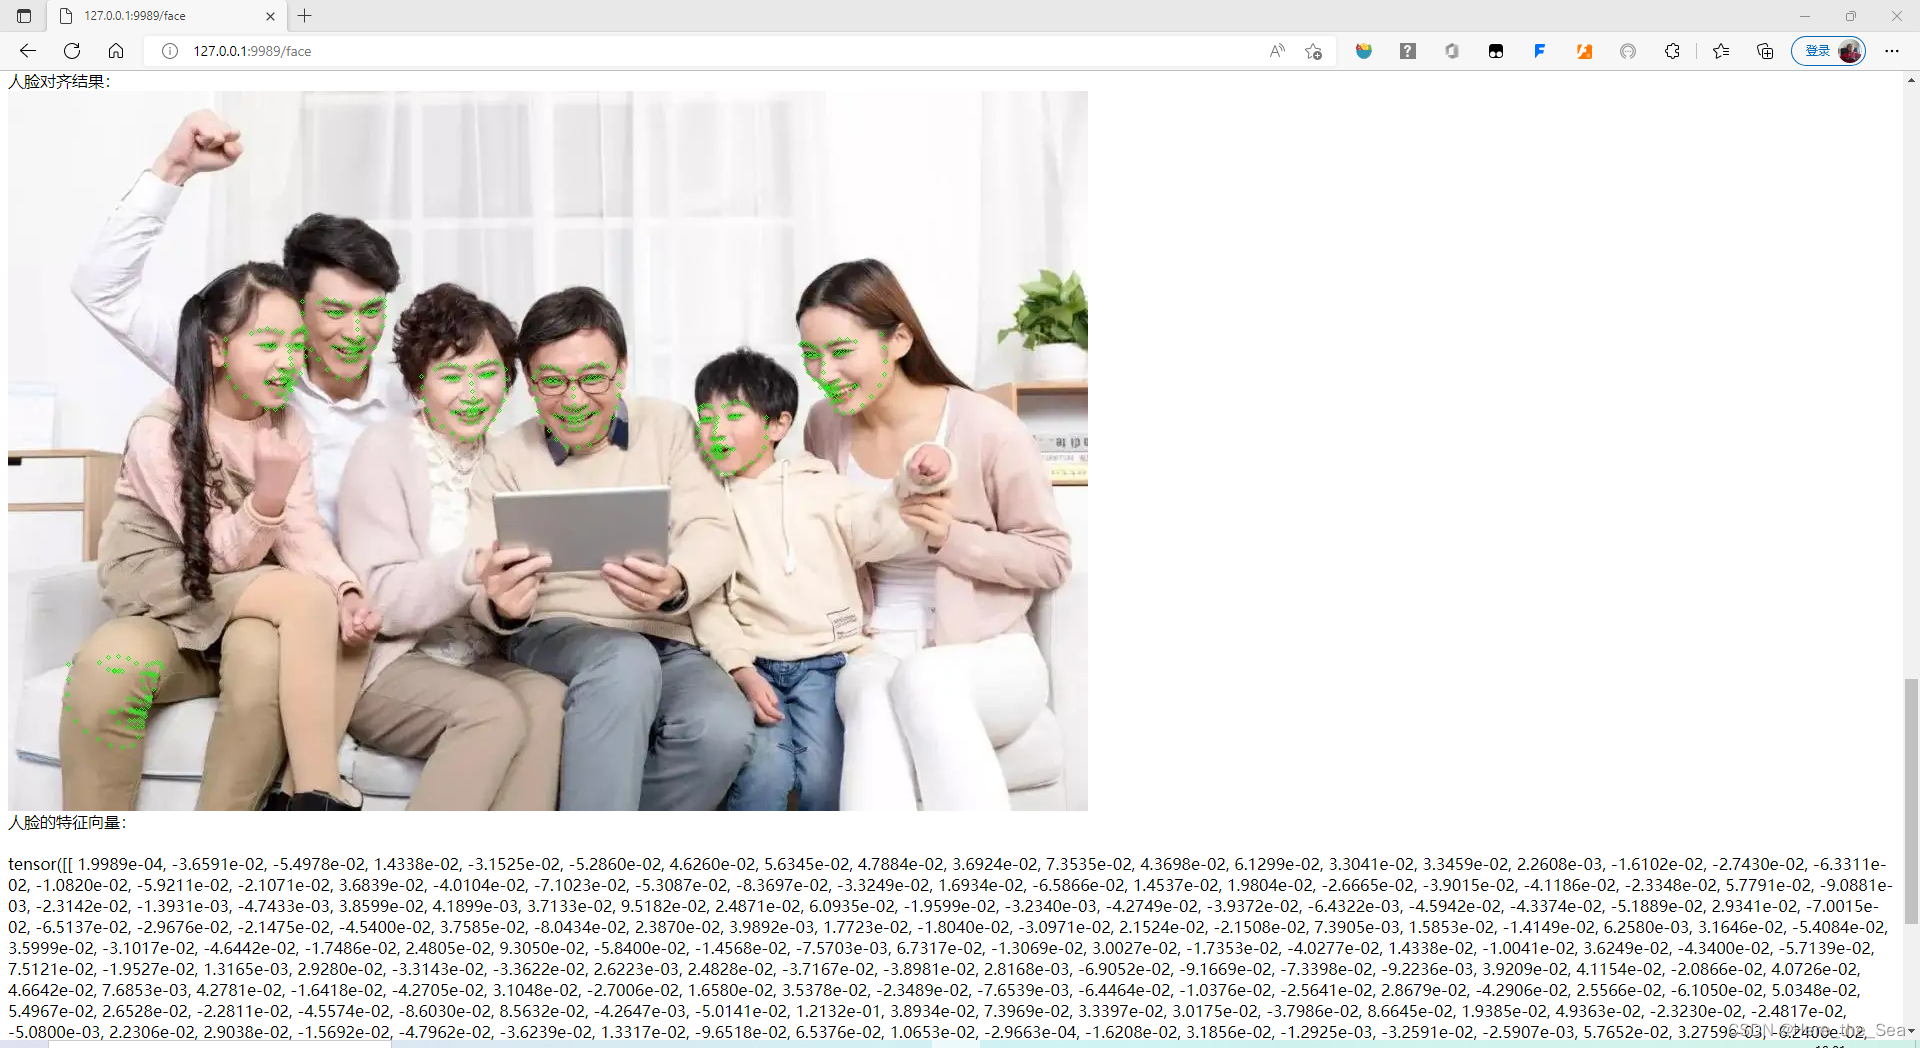
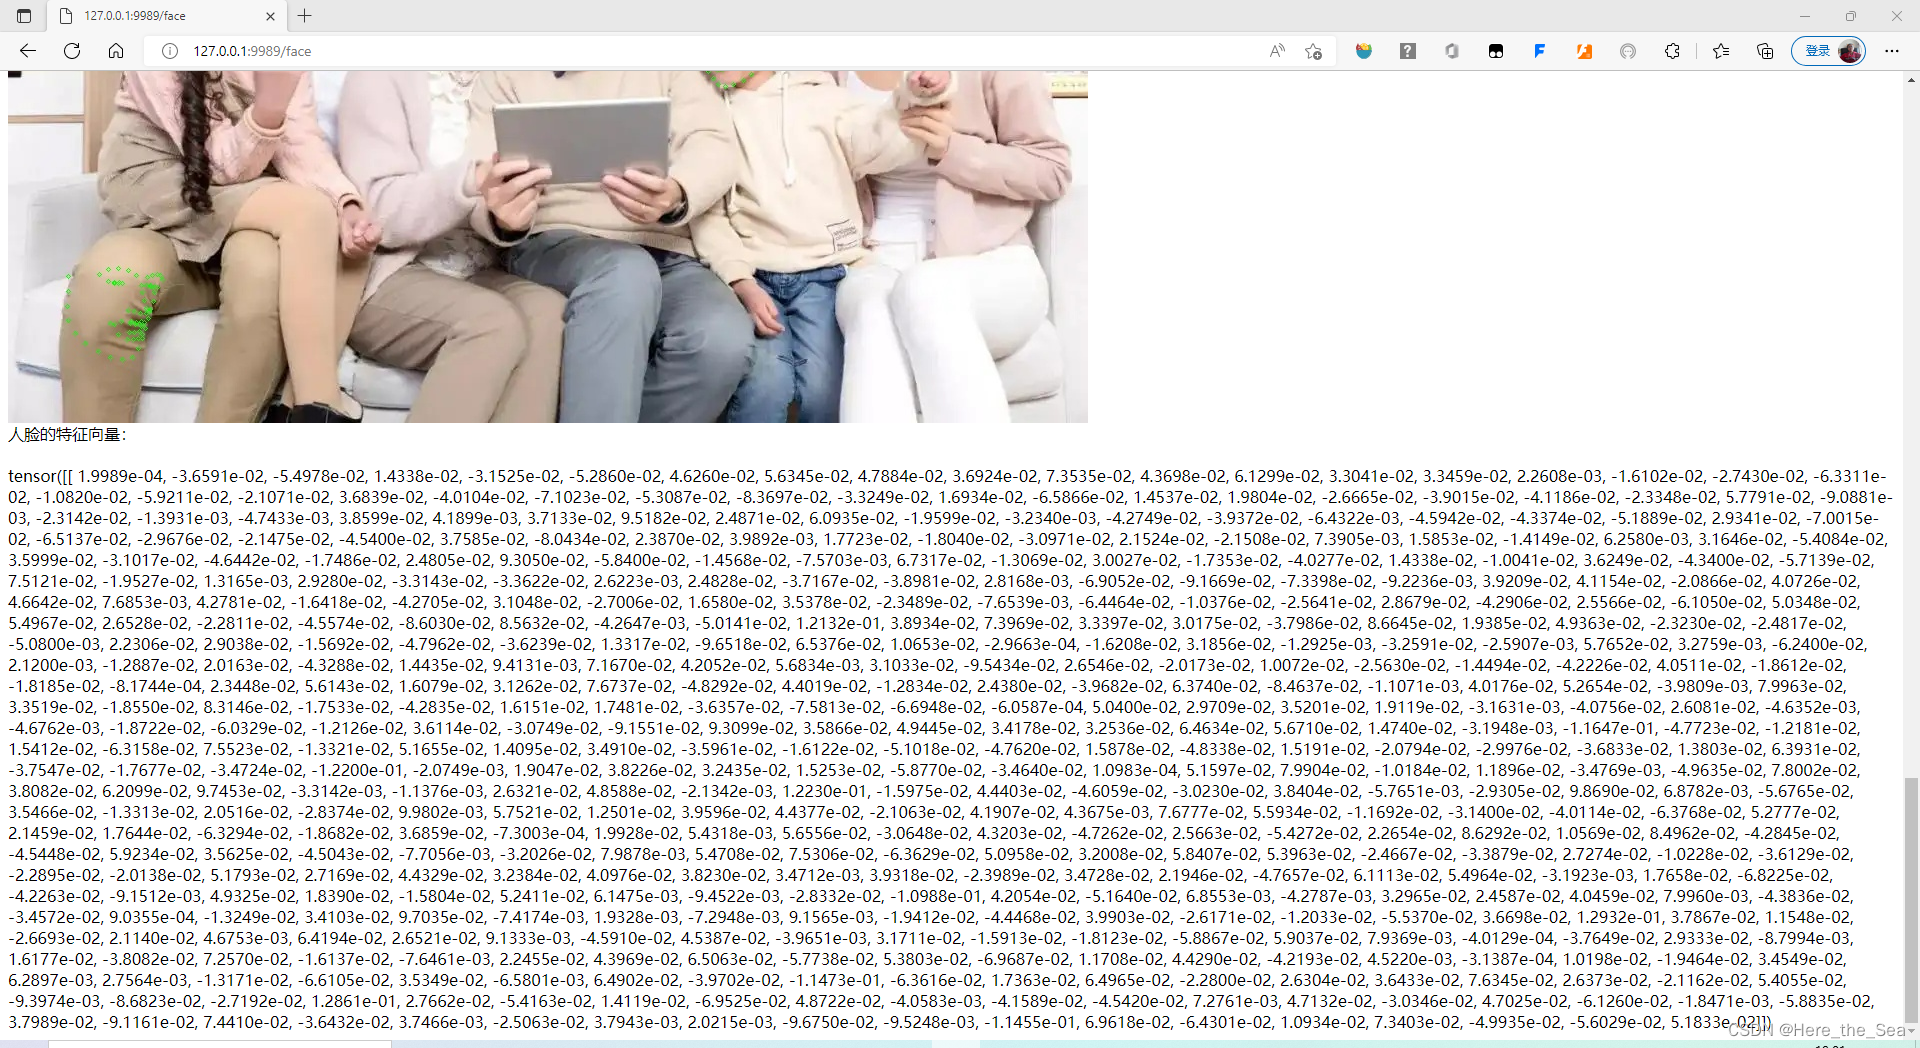
3. 人脸对齐子函数
代码如下:
def face2():
    path = "test1.jpg"
    img = cv2.imread(path)
    gray = cv2.cvtColor(img, cv2.COLOR_BGR2GRAY)
    detector = dlib.get_frontal_face_detector()
    dets = detector(gray, 1)
    predictor = dlib.shape_predictor("C:\\software\\anaconda3\\Lib\\site-packages\\shape_predictor_68_face_landmarks.dat")
    for face in dets:
        shape = predictor(img, face)
        for pt in shape.parts():
            pt_pos = (pt.x, pt.y)
            cv2.circle(img, pt_pos, 2, (0, 255, 0), 1)
        cv2.imwrite("result3.jpg",img)
    return
3. 人脸特征向量子函数
代码如下:
def load_known_faces(dstImgPath, mtcnn, resnet, device):
    aligned = []
    knownImg = cv2.imread(dstImgPath)
    face = mtcnn(knownImg)
    if face is not None:
        aligned.append(face[0])
    aligned = torch.stack(aligned).to(device)
    with torch.no_grad():
        known_faces_emb = resnet(aligned).detach().cpu()
    return known_faces_emb, knownImg
4. Flask融合展示
代码如下:
from flask import Flask, Response
app = Flask(__name__)

@app.route('/<imageId>')
def get_image1(imageId):
    with open(r'{}'.format(imageId), 'rb') as f:
        image = f.read()
        result = Response(image, mimetype="image/jpg")
    return result

@app.route('/face')
def hello_world():
    result="<body>"
    result+='<br>人脸匹配结果:<br/>'
    device = torch.device('cuda:0' if torch.cuda.is_available() else 'cpu')
    mtcnn = MTCNN(min_face_size=12, thresholds=[0.2, 0.2, 0.3],keep_all=True, device=device)
    resnet = InceptionResnetV1(pretrained='vggface2').eval().to(device)
    MatchThreshold = 0.8
    known_faces_emb, _ = load_known_faces('lyf.jpg',mtcnn, resnet, device)
    faces_emb, img = load_known_faces('lyf2.jpg', mtcnn,resnet, device)
    isExistDst = match_faces(faces_emb, known_faces_emb, MatchThreshold)

    if isExistDst:
        boxes, prob, landmarks = mtcnn.detect(img, landmarks=True)
        result+='<br>匹配<br/>'
    else:
        result+='<br>不匹配<br/>'

    result+='<br>原图<br/>'
    result+='<img src="origin1.jpg" alt="">'

    face1()
    result+='<br>cv2人脸识别结果:<br/>'
    result+='<img src="result2.jpg" alt="">'

    detect('test1.jpg')
    result+='<br>face_recognition人脸识别结果:<br/>'
    result+='<img src="result1.jpg" alt="">'

    face2()
    result+='<br>人脸对齐结果:<br/>'
    result+='<img src="result3.jpg" alt="">'

    result+='<br>人脸的特征向量:<br/>'
    result+='<br>'
    result+=str(faces_emb)
    result+='<br/>'

    result+='</body>'
    return result


if __name__=='__main__':
    app.run(debug=True,port=9989,use_reloader=False)
该处使用的url网络请求的数据。
5. 注意事项
注意,当一个flask网页调用一个图片时,图片的调用路径不是该程序文件的位置,而使“127.0.0.1:5000/< imageId>",因此需要建立个图片的flask网页,该网页中使用Response获取本地图片。
6. 结果展示


三、总结
成功完成实验目标,总体较为顺利,遇到的问题也通过查阅网络资料解决了。


 709
709


 被折叠的 条评论
为什么被折叠?
被折叠的 条评论
为什么被折叠?
 到【灌水乐园】发言


