


 本文介绍如何使用 Vue2 框架创建一个功能完整的日历组件,该组件不仅展示日期,还支持用户新增日程。通过模板 HTML、JavaScript 和 CSS 的巧妙结合,实现了动态显示日历并添加日程的功能。
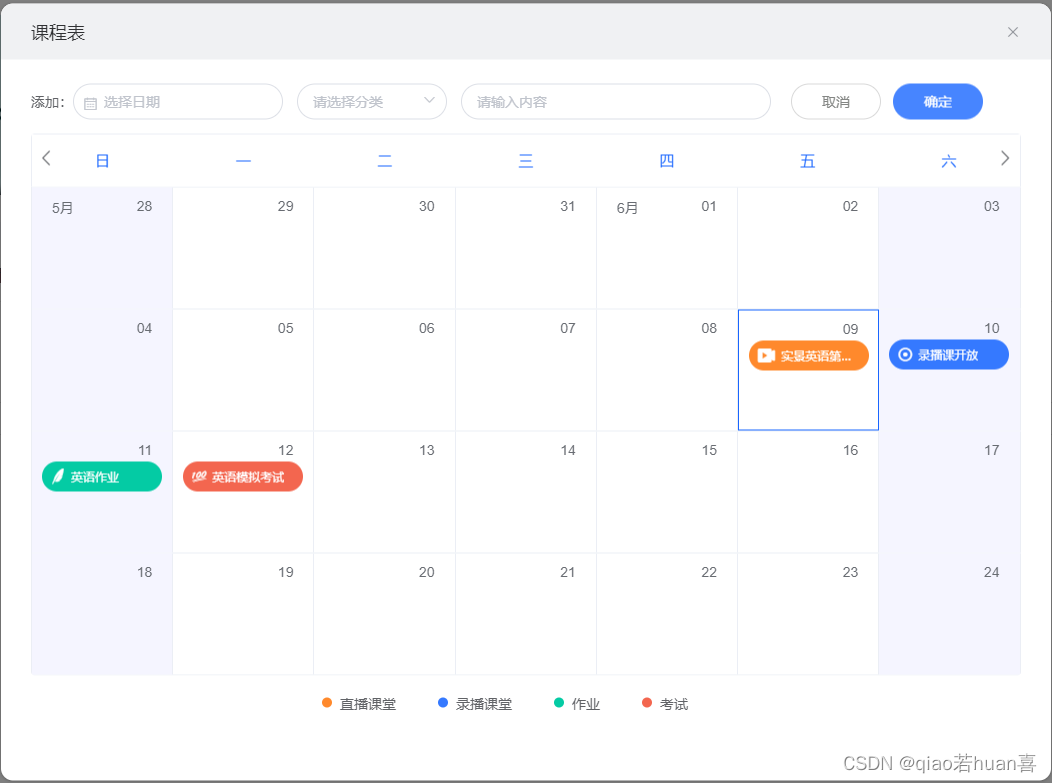
实现的最终效果:
模板 html 部分
<template>
  <!-- 自定义提示组件 -->
  <div class="publicDialog">
    <el-dialog
      :visible.sync="Dialogshow"
      title="课程表"
      width="1050px"
      @open="open"
      @close="close"
      left
      :close-on-click-modal="false"
    >
      <div class="contentBody">
        <div class="flex-row-center">
          添加:
          <el-date-picker
            style="width: 210px"
            v-model="editForm.time"
            type="date"
            placeholder="选择日期"
            value-format="yyyy-M-d"
          >
          </el-date-picker>
          <el-select
            v-model="editForm.type"
            style="width: 150px; margin-left: 14px"
            placeholder="请选择分类"
          >
            <el-option
              v-for="item in cateOptions"
              :key="item.value"
              :label="item.label"
              :value="item.value"
            >
            </el-option>
          </el-select>
          <el-input
            style="width: 310px; margin-left: 14px"
            v-model="editForm.txt"
            placeholder="请输入内容"
          ></el-input>
          <div
            style="margin-left: 20px"
            class="commonBtn width90Height36 borderRadius18 defalutBorderBtn"
            @click="cancleHandle"
          >
            取消
          </div>
          <div
            style="margin-left: 12px"
            class="commonBtn width90Height36 borderRadius18 hasBgBtn"
            @click="addConfirm"
          >
            确定
          </div>
        </div>
        <div class="air-calendar-box">
          <table class="sn-calendar-table">
            <thead>
              <i class="el-icon-arrow-left iconBtn" @click="preTimeHandle"></i>
              <th
                class="fc-day-header"
                v-for="(item, inx) in weekdays"
                :key="inx"
              >
                {

  { item }}
              </th>
              <i
                class="el-icon-arrow-right iconBtn"
                @click="nextTimeHandle"
              ></i>
            </thead>
            <tbody>
              <tr v-for="(calc, index1) in visibleTimetableData" :key="index1">
                <td
                  v-for="(item, idx) in calc"
                  :key="idx"
                  :class="{
                    include: item.include,
                    active: activeData && item.date === activeData.date,
                  }"
                  @click="clickDay(item)"
                >
                  <slot name="day" :row="item">
                    <div>
                      <div
                        class="month"
                        v-if="item.day2 == '01' || (index1 == 0 && idx == 0)"
                      >
                        {

  { item.month }}月
                      </div>
                      <div class="day">
                        {

  { item.day2 }}
                      </div>
                      <div style="margin-top: 30px"></div>
 最低0.47元/天 解锁文章


 770
770

 被折叠的 条评论
为什么被折叠?
被折叠的 条评论
为什么被折叠?
 到【灌水乐园】发言


