


文章目录
一、搭建Redis环境
1、下载Redis安装压缩包
Redis官网与在线教程
2、将Redis安装包解压到任意位置
- 解压到D:\Program Files\redis目录
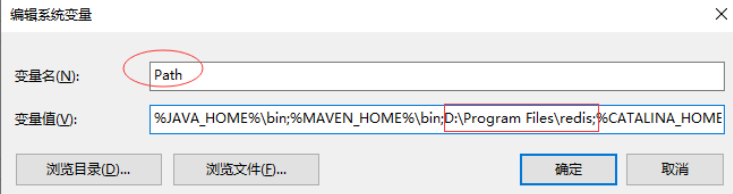
3、配置环境变量
编辑系统变量path
4、启动Redis服务器
启动命令行窗口(cmd),键入redis-server命令

- 报错,寻找解决方法
redis-server.exe redis.windows.conf
windows下redis启动时遇到错误:
D:\redis>redis-server.exe [13732] 29 Nov 11:35:57.446 # Warning: no
config file specified, using the default config. In order to specify a
config file use redis-server.exe /path/to/redis.conf意思是没有默认的conf文件
然后把命令改成:D:\redis>redis-server.exe redis.windows.conf
即可启动。
有时候还会遇到有关端口6379的错误。
只要把redis.windows.conf里面的#bind 127.0.0.1的“#”去掉即可以。
注:是# bind 127.0.0.1 ,不是# bind 127.0.0.1 ::1
D:\redis> 指redis解压到的位置

二、安装Redis可视化管理工具
Redis可视化工具连接Redis服务
-
在命令行窗口,启动Redis服务

-
连接服务器


- 打开Redis可视化工具的控制台

三、创建Spring Boot 项目

- 添加依赖

- 设置项目名称与保存位置

四、创建实体类
1、地址实体类

package net.zy.lesson08.bean;

import org.springframework.data.redis.core.index.Indexed;

//地址实体类 2021.5.17
public class Address {

    @Indexed
    private String country;
    @Indexed
    private String city;

//有参构造方法
    public Address(String country, String city) {

        this.country = country;
        this.city = city;
    }

    public String getCountry() {

        return country;
    }

    public void setCountry(String country) {

        this.country = country;
    }

    public String getCity() {

        return city;
    }

    public void setCity(String city) {

        this.city = city;
    }

    @Override
    public String toString() {

        return "Address{" +
                "country='" + country + '\'' +
                ", city='" + city + '\'' +
                '}';
    }
}
2、家庭实体类

package net.zy.lesson08.bean;

import org.springframework.data.redis.core.index.Indexed;

//家庭实体类 2021.5.17
public class Family {

    @Indexed
    private String type; //成员类型
    @Indexed
    private String name;

//有参构造方法
    public Family(String type, String name) {

        this.type = type;
        this.name = name;
    }

    public String getType() {

        return type;
    }

    public void setType(String type) {

        this.type = type;
    }

    public String getName() {

        return name
最低0.47元/天 解锁文章


 2万+
2万+


 被折叠的 条评论
为什么被折叠?
被折叠的 条评论
为什么被折叠?
 到【灌水乐园】发言


