


目录
一、开发步骤
准备 Maven 项目及环境
创建一个Maven项目,名称为 spring-study(自己随便起) ,以下是项目的 maven 配置文件 pom.xml:
<?xml version="1.0" encoding="UTF-8"?>
<project xmlns="http://maven.apache.org/POM/4.0.0"
         xmlns:xsi="http://www.w3.org/2001/XMLSchema-instance"
         xsi:schemaLocation="http://maven.apache.org/POM/4.0.0 http://maven.apache.org/xsd/maven-4.0.0.xsd">
    <modelVersion>4.0.0</modelVersion>

    <groupId>org.example</groupId>
    <artifactId>spring-study</artifactId>
    <version>1.0-SNAPSHOT</version>

    <properties>
        <java.version>1.8</java.version>
        <maven.compiler.source>${java.version}</maven.compiler.source>
        <maven.compiler.target>${java.version}</maven.compiler.target>
        <project.build.sourceEncoding>UTF-8</project.build.sourceEncoding>
        <spring-framework.version>5.2.10.RELEASE</spring-framework.version>
    </properties>

    <dependencies>
        <dependency>
            <groupId>org.springframework</groupId>
            <artifactId>spring-beans</artifactId>
            <version>${spring-framework.version}</version>
        </dependency>
        <dependency>
            <groupId>org.springframework</groupId>
            <artifactId>spring-context</artifactId>
            <version>${spring-framework.version}</version>
        </dependency>

        <dependency>
            <groupId>org.projectlombok</groupId>
            <artifactId>lombok</artifactId>
            <version>1.18.16</version>
        </dependency>
    </dependencies>

    <build>
        <plugins>
            <!-- 明确指定一些插件的版本,以免受到 maven 版本的影响 -->
            <plugin>
                <artifactId>maven-clean-plugin</artifactId>
                <version>3.1.0</version>
            </plugin>
            <plugin>
                <artifactId>maven-compiler-plugin</artifactId>
                <version>3.8.1</version>
            </plugin>
            <plugin>
                <artifactId>maven-deploy-plugin</artifactId>
                <version>2.8.2</version>
            </plugin>
            <plugin>
                <artifactId>maven-install-plugin</artifactId>
                <version>2.5.2</version>
            </plugin>
            <plugin>
                <artifactId>maven-jar-plugin</artifactId>
                <version>3.2.0</version>
            </plugin>
            <plugin>
                <artifactId>maven-resources-plugin</artifactId>
                <version>3.1.0</version>
            </plugin>
            <plugin>
                <artifactId>maven-site-plugin</artifactId>
                <version>3.3</version>
            </plugin>
            <plugin>
                <artifactId>maven-surefire-plugin</artifactId>
                <version>2.22.2</version>
            </plugin>

        </plugins>
    </build>
</project>
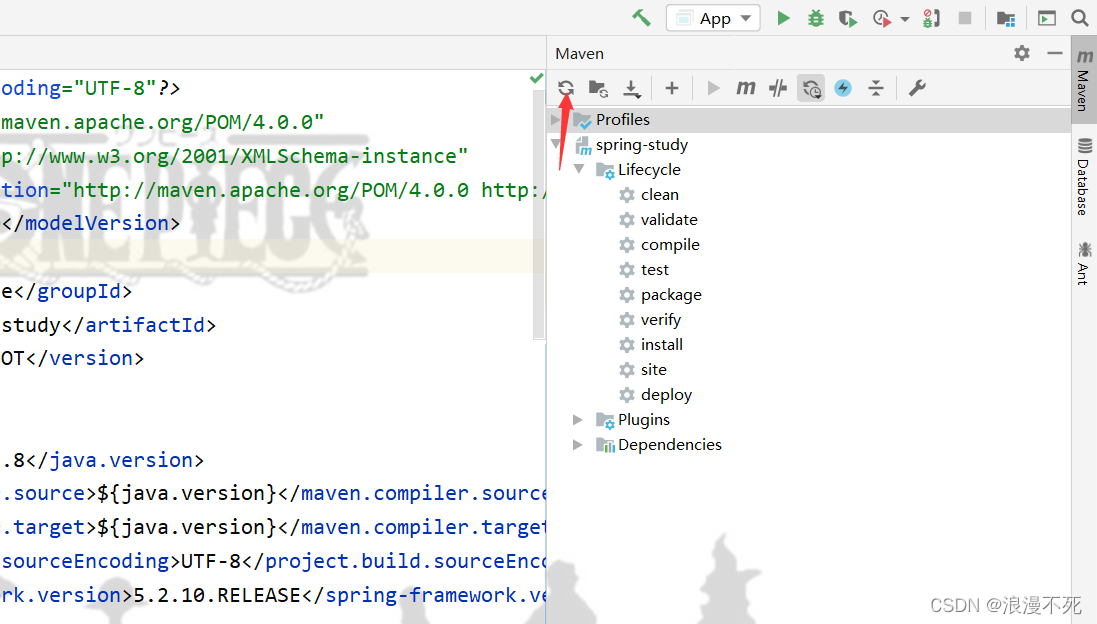
配置完成记得要刷新 Maven 面板。
准备启动入口类
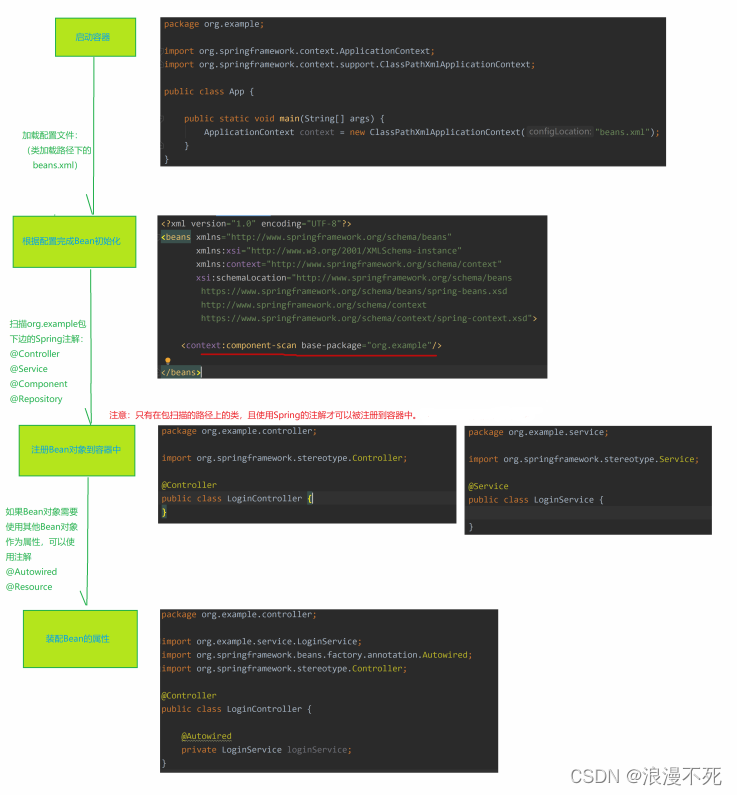
前面步骤完成后就可以使用 Spring 框架了,Spring 提供了通过 xml 配置文件,来定义 Bean,但是定义 Bean 的方式需要通过包扫描的方式注册到容器中。(这里主要是包扫描的方式)
写一个入口类:
package org.example;

import org.springframework.context.ApplicationContext;
import org.springframework.context.support.ClassPathXmlApplicationContext;

public class App {
    public static void main(String[] args) {
        //根据Spring配置文件路径创建容器:应用上下文对象
        ApplicationContext context = new ClassPathXmlApplicationContext("beans.xml");
        //关闭容器
       ((ClassPathXmlApplicationContext) context).close();
   }
}
尝试运行一下,保证没有出错。
准备 Spring 配置文件
定义需要加载的Bean配置文件,在src/main/resources下,创建beans.xml文件:
<?xml version="1.0" encoding="UTF-8"?>
<beans xmlns="http://www.springframework.org/schema/beans"
       xmlns:xsi="http://www.w3.org/2001/XMLSchema-instance"
       xmlns:context="http://www.springframework.org/schema/context"
       xsi:schemaLocation="http://www.springframework.org/schema/beans
        https://www.springframework.org/schema/beans/spring-beans.xsd
        http://www.springframework.org/schema/context
        https://www.springframework.org/schema/context/spring-context.xsd">

    <context:component-scan base-package="org.example"/>
</beans>
二、Spring容器执行流程
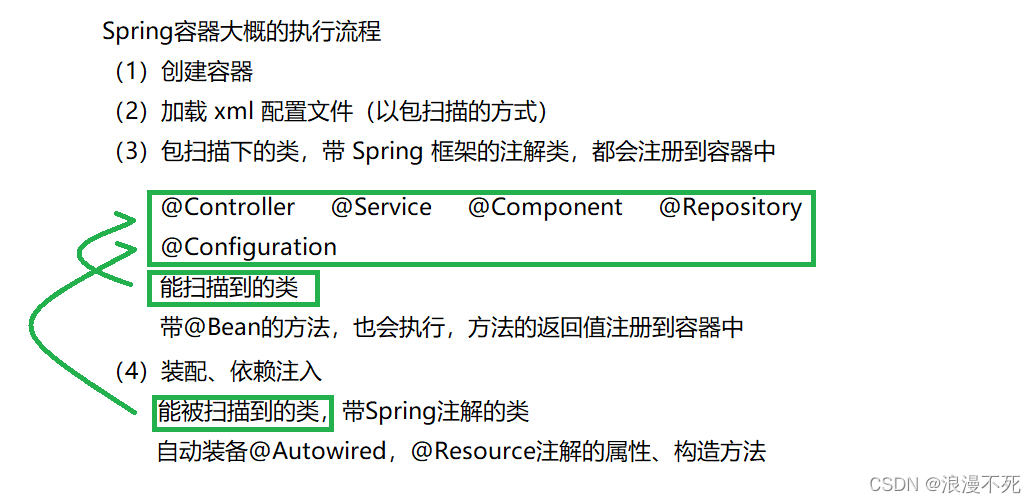
注册 Bean
方式一:类注解
@Component:这将 java 类标记为 bean。它是任何 Spring 管理组件的通用构造型。spring 的组件扫描机制现在可以将其拾取并将其拉入应用程序环境中。
@Controller:这将一个类标记为 Spring Web MVC 控制器。标有它的 Bean 会自动导入到 IoC 容器中。
@Service:此注解是组件注解的特化。它不会对@Component注解提供任何其他行为。您可以在服务层类中使用 @Service 而不是 @Component,因为它以更好的方式指定了意图。
@Repository:这个注解是具有类似用途和功能的@Component注解的特化。它为 DAO 提供了额外的好处。它将 DAO 导入 IoC 容器,并使未经检查的异常有资格转换为 Spring DataAccessException。
在类上使用注解 @Controller , @Service , @Repository , @Component 。需要保证该类会被 Spring 扫描到,这种定义方式默认会注册一个名称为类名首字母小写的 Bean 对象到容器中。
注意:只会注册一个(遵循单例模式)
方式二:@Bean
当前类被 Spring 扫描到时,可以在方法上使用@Bean注解,通过方法返回类型,也可以定义、注册 Bean 对象,默认使用方法名作为 Bean 的名称。
package org.example.model;

import lombok.Getter;
import lombok.Setter;
import lombok.ToString;

@Getter
@Setter
@ToString
public class User {
    private String username;
    private String password;
}

@Bean
public User user1(){
    User user = new User();
    user.setUsername("abc");
    user.setPassword("123");
    return user;
}
方式三:@Configuration
在类被Spring扫描到时,使用@Configuration注解,可以注册一个配置类到容器中。配置类一般用来自定义配置某些资源。
package org.example.config;

import org.springframework.context.annotation.Configuration;

@Configuration
public class AppConfig {
}
扩展补充:FactoryBean接口
FactoryBean接口实现如下:
public interface FactoryBean<T> {

    //返回的对象实例
	T getObject() throws Exception;

    //Bean的类型
	Class<?> getObjectType();

	//是否是单例的Bean对象,不实现该接口方法默认为单例
	default boolean isSingleton() {
		return true;
	}
}
FactoryBean 以 Bean 结尾,表示它是一个 Bean ,不同于普通 Bean 的是:实现了 FactoryBean < T > 接口的Bean,根据该 Bean 的 ID 从容器中获取的实际上是 FactoryBean 的 getObject() 返回的对象,而不是 FactoryBean 本身,如果要获取 FactoryBean 对象,请在id前面加一个 & 符号来获取。
示例:如下先定义一个Bean,实现FactoryBean接口,指定泛型为User类,会将getObject方法的返回对象注册到容器中。
package org.example.model;

import org.springframework.beans.factory.FactoryBean;
import org.springframework.stereotype.Component;

@Component
public class ByFactoryBean implements FactoryBean<User> {

    @Override
    public User getObject() throws Exception {
        User user = new User();
        user.setUsername("abc");
        user.setPassword("123");
        return user;
   }

    @Override
    public Class<?> getObjectType() {
        return User.class;
   }
}
获取该Bean对象:
User user = (User) context.getBean("byFactoryBean");
System.out.printf("get bean by FactoryBean: %s%n", user);
因为已经定义过 User 对象了,所以只能通过 id 获取,通过类型获取会报错。
依赖注入
第一种方式:属性注入
当前类被 Spring 扫描到时,可以在属性上使用@Autowired注解,会将容器中的 Bean 对象装配进来。
package org.example.service;

import org.example.dao.LoginRepository;
import org.springframework.beans.factory.annotation.Autowired;
import org.springframework.stereotype.Service;

@Service
public class LoginService {
    @Autowired
    private LoginRepository loginRepository;
}
也可以使用setter方法上使用@Autowired注解:
package org.example.service;

import org.example.dao.LoginRepository;
import org.springframework.beans.factory.annotation.Autowired;
import org.springframework.stereotype.Service;

@Service
public class LoginServiceBySetter {

    private LoginRepository loginRepository;

    public LoginRepository getLoginRepository() {
        return loginRepository;
   }

    @Autowired
    public void setLoginRepository(LoginRepository loginRepository) {
        System.out.printf("LoginServiceBySetter: loginRepository=%s%n", loginRepository);
        this.loginRepository = loginRepository;
   }
}
说明:其实只要写在方法上的 @Autowired 注解,都会将容器中的 Bean 对象注入方法参数,setter 注入的本质也是这样,只是 setter 方法一般都是设置属性用的,所以也归到属性注入。
第二种方式:构造方法注入
当前类被 Spring 扫描到时,可以在构造方法上使用@Autowired注解,作用也是和setter方法类似,会将容器中的Bean对象注入方法参数。
package org.example.service;

import org.example.dao.LoginRepository;
import org.springframework.beans.factory.annotation.Autowired;
import org.springframework.stereotype.Service;

@Service
public class LoginServiceByConstructor {

    private LoginRepository loginRepository;

    @Autowired
    public LoginServiceByConstructor(LoginRepository loginRepository){
        System.out.printf("LoginServiceByConstructor: %s%n", loginRepository);
        this.loginRepository = loginRepository;
   }
}
自动注入方法参数
在使用@Bean注解的方法上,容器中的Bean会自动注入方法参数。
@Bean
public User u6(LoginService loginService){
    System.out.printf("u6: %s%n", loginService == this.loginService);
    return new User();
}
注入指定的Bean:@Qualifier
同类型的 Bean 有多个时,注入该类型 Bean 需要指定 Bean 的名称:
- 属性名或方法参数名设置为 Bean 的名称。
- 属性名或方法参数设置
@Qualifier("名称")注解,注解内的字符串是Bean对象的名称。
@Controller//注册一个id为类名首字母小写的bean对象
public class LoginController {

    @Autowired
    @Qualifier("u2")
    private User u;

    //注册一个返回值User对象到容器中,id=方法名
    @Bean
    public User u2(){
        User user = new User();
        user.setUsername("黄黄");
        user.setPassword("胖胖,先约后赏,老八离场");
        return user;
    }

    @Bean
    public User u5(@Qualifier("u2") User u) {
        System.out.printf("u5: u2=%s%n", u);
        return new User();
    }
}


 1769
1769

 被折叠的 条评论
为什么被折叠?
被折叠的 条评论
为什么被折叠?
 到【灌水乐园】发言


