今天学习了一下SprintBoot连接数据库的一个方法,就想把它记录下来,和大家分享
还是新手,有不对的地方,望海涵!!!
一、准备数据库
数据库大家随便建一个就好啦!!

二、配置application.yml
这里我就直接附上代码
这是我重新设置了访问的端口号为8181
spring:
  datasource:
    url: jdbc:mysql://localhost:3306/salay?useUnicode=true&characterEncoding=UTF-8&serverTimezone=Asia/Shanghai
    username: root
    password: root
    driver-class-name: com.mysql.cj.jdbc.Driver
server:
  port: 8181
三、创建Depatment实体类
这里使用@Data就可以免去写构造方法等之类的方法
import lombok.Data;
@Data
public class Depatment {
    private  long id;
    private  String deptId;
    private  String deptName;
    private  String deptManage;
}
或者直接给出,如下
大家可以按照自己喜好来选择
public class Depatment {
    private  long id;
    private  String deptId;
    private  String deptName;
    private  String deptManage;

    public Depatment() {
    }

    public Depatment(long id, String deptId, String deptName, String deptManage) {
        this.id = id;
        this.deptId = deptId;
        this.deptName = deptName;
        this.deptManage = deptManage;
    }

    public long getId() {
        return id;
    }

    public void setId(long id) {
        this.id = id;
    }

    public String getDeptId() {
        return deptId;
    }

    public void setDeptId(String deptId) {
        this.deptId = deptId;
    }

    public String getDeptName() {
        return deptName;
    }

    public void setDeptName(String deptName) {
        this.deptName = deptName;
    }

    public String getDeptManage() {
        return deptManage;
    }

    public void setDeptManage(String deptManage) {
        this.deptManage = deptManage;
    }

    public void getId(long id) {
    }
}
四、创建DepatmentDao接口
我在这里只是简单实现了一些方法
public interface DepatmentDao {
    ArrayList<Depatment> add(Depatment depatment);
    int delete(Depatment depatment);
    int update(Depatment depatment);
}
五、创建DepatmenImpl类实现DepatmentDao接口
这里简单实现了插入方法
 @Override
    public ArrayList<Depatment> add(Depatment depatment) {
        ArrayList<Depatment> dept = new ArrayList<Depatment>();//创建一个集合
        dbUtil.Connection();//连接数据库
        String sql="insert into depatment(dept_id,dept_Name,dept_manage) values(?,?,?)";//sql语句
        PreparedStatement ps;
        ps = dbUtil.getPreparedStatement(sql);
        try {
            ps.setString(1,depatment.getDeptId());
            ps.setString(2, depatment.getDeptName());
            ps.setString(3, depatment.getDeptManage());
            ps.executeUpdate();
            ps = dbUtil.getPreparedStatement("select * from depatment");//sql语句
            ResultSet rs =ps.executeQuery();//插入后获取表中所有数据
            Depatment depatment1;
            while(rs.next()){
                depatment = new Depatment();
                depatment.setId(rs.getLong("id"));
                depatment.setDeptId(rs.getString("dept_id"));
                depatment.setDeptName(rs.getString("dept_Name"));
                depatment.setDeptManage(rs.getString("dept_manage"));
                dept.add(depatment1);
            }
            dbUtil.closeResource();
        } catch (SQLException throwables) {
            throwables.printStackTrace();
        }

        return dept;
    }
六、写一个util工具类DBUtil
注意这里的驱动要和appilation.yml的驱动一样
用户名和密码是自己数据库的用户名和密码
import java.sql.*;

public class DBUtil {
    static final String driver= "com.mysql.cj.jdbc.Driver";
    static final String url= "jdbc:mysql://localhost:3306/salay?useUnicode=true&characterEncoding=UTF-8";
    static final String user= "root";
    static final String password= "root";

    static {
        try {
            Class.forName(driver);
        } catch (ClassNotFoundException e) {
            // TODO Auto-generated catch block
            e.printStackTrace();
        }
    }

    private Connection con;
    private PreparedStatement ps;

    public void Connection() {
        try {
            conn = DriverManager.getConnection(url, user, password);
            conn.setAutoCommit(true);
        } catch (SQLException e) {
            e.printStackTrace();
        }
    }

    public PreparedStatement getPreparedStatement(String sql) {
        openConnection();
        try {
            ps = conn.prepareStatement(sql);
        } catch (SQLException e) {
            e.printStackTrace();
        }
        return pstmt;
    }
    public void closeResource() {
        try {
            if (pstmt != null && !pstmt.isClosed()) {
                pstmt.close();
            }

            if (stat != null && !stat.isClosed()) {
                stat.close();
            }

            if (conn != null && !conn.isClosed()) {
                conn.close();
            }

        } catch (SQLException e) {
            // TODO: handle exception
            e.printStackTrace();
        }
    }
}
七、最后写Controller类DepatmentController
@RestController
@RequestMapping("depatment")
public class DepatmentController {
    private DepatementImpl depatementImpl = new DepatementImpl();
    @RequestMapping("/getAllDepatment")
    public ArrayList<Depatment> findALL(){
        Depatment depatment = new Depatment();
        depatment.setDeptId("d10004");
        depatment.setDeptName("后勤部");
        depatment.setDeptManage("小五");
        ArrayList<Depatment> dept = new ArrayList<Depatment>();
        dept =  depatementImpl.add(depatment);
        return dept;

    }
}
最后启动项目,在浏览器运行就可以得到
localhost:8181/depatment/getAllDepatment
如下结果
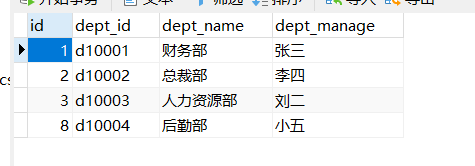
[{"id":1,"deptId":"d10001","deptName":"财务部","deptManage":"张三"},{"id":2,"deptId":"d10002","deptName":"总裁部","deptManage":"李四"},{"id":3,"deptId":"d10003","deptName":"人力资源部","deptManage":"刘二"},{"id":8,"deptId":"d10004","deptName":"后勤部","deptManage":"小五"}]
我们也可以通过数据库看到插入的数据

这样就完成啦!!!!以后项目就可以实现前后端分离
当然啦,方法多种多样,我这种方法是很基础的,方便新手认识sql语句的写法,有不对的地方感谢大家的指正。


 394
394


 被折叠的 条评论
为什么被折叠?


