


 这篇博客介绍了Android中Fragment的使用场景及其优势。通过示例展示了如何在MainActivity和SecondActivity中创建并替换Fragment,实现界面的动态加载。同时,提供了TopFragment和BottomFragment的布局及逻辑代码,演示了如何在Fragment中添加UI元素和响应点击事件。
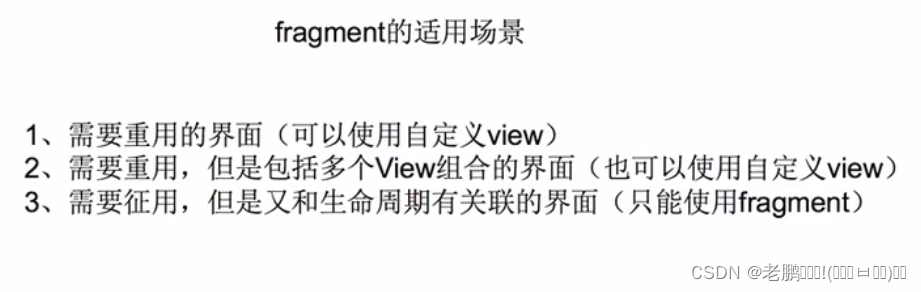
1.fragment的适用场景:
2.代码示例:
(1)
//主活动布局:
<?xml version="1.0" encoding="utf-8"?>
<LinearLayout xmlns:android="http://schemas.android.com/apk/res/android"
    xmlns:app="http://schemas.android.com/apk/res-auto"
    xmlns:tools="http://schemas.android.com/tools"
    android:layout_width="match_parent"
    android:layout_height="match_parent"
    android:orientation="vertical"
    tools:context=".MainActivity">

    <!--  通过框架布局FrameLayout将主活动页面进行分割。android:layout_weight通过不同的权重,将其分为顶部和底部!  -->

    <FrameLayout
        android:id="@+id/frame_layout_top"
        android:layout_width="match_parent"
        android:layout_weight="1"
        android:layout_height="0dp">

    </FrameLayout>

    <FrameLayout
        android:id="@+id/frame_layout_bottom"
        android:layout_width="match_parent"
        android:layout_weight="1"
        android:layout_height="0dp">

    </FrameLayout>

</LinearLayout>
//主活动:
package com.example.test_1;

import androidx.appcompat.app.AppCompatActivity;
import androidx.fragment.app.FragmentActivity;
import androidx.fragment.app.FragmentManager;
import androidx.fragment.app.FragmentTransaction;

import android.content.Intent;
import android.os.Bundle;
import android.view.View;
import android.widget.Button;

public class MainActivity extends FragmentActivity {


    @Override
    protected void onCreate(Bundle savedInstanceState) {
        super.onCreate(savedInstanceState);
        setContentView(R.layout.activity_main);

        FragmentManager fm = getSupportFragmentManager();
        FragmentTransaction ft = fm.beginTransaction();
        ft.replace(R.id.frame_layout_top,new TopFragment());            /**调用活动布局的顶部**/  /**new TopFragment(),实例化TopFragment类**/
        ft.replace(R.id.frame_layout_bottom,new BottomFragment());          /**调用活动布局的底部**/     /**new BottomFragment(),实例化BottomFragment类**/
        ft.commit();                                        /**通过commit()方法进行提交**/

    }
}
//SecondActivity类:
package com.example.test_1;

import android.os.Bundle;

import androidx.annotation.Nullable;
import androidx.fragment.app.FragmentActivity;
import androidx.fragment.app.FragmentManager;
import androidx.fragment.app.FragmentTransaction;

public class SecondActivity extends FragmentActivity {

    @Override
    protected void onCreate(@Nullable Bundle savedInstanceState) {
        super.onCreate(savedInstanceState);
        setContentView(R.layout.activity_second);

        /**fragement的相关代码得到重用,避免了代码的混乱和冗余!!!**/

        /**通过以下方式进行重复使用**/

        FragmentManager fm_1 = getSupportFragmentManager();
        FragmentTransaction ft_1 = fm_1.beginTransaction();
        ft_1.replace(R.id.second_activity_frame_layout, new TopFragment());
        ft_1.commit();


    }
}
(2)
//fragement_top.xml
<?xml version="1.0" encoding="utf-8"?>
<LinearLayout xmlns:android="http://schemas.android.com/apk/res/android"
    android:orientation="vertical" android:layout_width="match_parent"
    android:layout_height="match_parent">

<!--  顶部内容  -->

    <TextView

        android:gravity="center"
        android:text="上面的片段显示用户显示"
        android:layout_width="match_parent"
        android:layout_height="match_parent">

    </TextView>


</LinearLayout>
//TopFragment类:
package com.example.test_1;

import android.os.Bundle;
import android.view.LayoutInflater;
import android.view.View;
import android.view.ViewGroup;

import androidx.annotation.NonNull;
import androidx.annotation.Nullable;
import androidx.fragment.app.Fragment;

public class TopFragment extends Fragment {

    @Nullable
    @Override
    public View onCreateView(@NonNull LayoutInflater inflater, @Nullable ViewGroup container, @Nullable Bundle savedInstanceState) {

        View rootview = inflater.inflate(R.layout.fragement_top,  null);

        return rootview;
    }
}
(3)
//fragemnet_bottom.xml
<?xml version="1.0" encoding="utf-8"?>
<LinearLayout xmlns:android="http://schemas.android.com/apk/res/android"
    android:orientation="vertical" android:layout_width="match_parent"
    android:gravity="center"
    android:layout_height="match_parent">

<!--  底部内容  -->

    <Button

        android:id="@+id/btn_bottom"
        android:text="注册登录"
        android:gravity="center"
        android:background="#FF018786"
        android:layout_width="match_parent"
        android:layout_height="wrap_content">

    </Button>


</LinearLayout>
//BottomFragment类:
package com.example.test_1;

import android.content.Intent;
import android.os.Bundle;
import android.view.LayoutInflater;
import android.view.View;
import android.view.ViewGroup;

import androidx.annotation.NonNull;
import androidx.annotation.Nullable;
import androidx.fragment.app.Fragment;

public class BottomFragment extends Fragment {

    @Nullable
    @Override
    public View onCreateView(@NonNull LayoutInflater inflater, @Nullable ViewGroup container, @Nullable Bundle savedInstanceState) {


        View rootview_1 = inflater.inflate(R.layout.fragement_bottom, null);

        /**因为这个按钮是在rootview_1里面的,所以该按钮只能通过rootview_1进行获取,否则报错为空对象**/
        rootview_1.findViewById(R.id.btn_bottom).setOnClickListener(new View.OnClickListener() {
            @Override
            public void onClick(View v) {

                Intent intent = new Intent(getContext(),SecondActivity.class);
                startActivity(intent);


            }
        });

        return rootview_1;
    }
}


 1590
1590

 被折叠的 条评论
为什么被折叠?
被折叠的 条评论
为什么被折叠?
 到【灌水乐园】发言


