


文章目录
一.元素偏移量offset系列
1.offset概述
offset翻译过来就是偏移量,我们使用offset系列相关属性可以动态的得到该元素的位置(偏移)、大小等。
- 获得元素距离带有定位父元素位置
- 获得元素自身大小(宽度高度)
- 注意: 返回的数值都不带单位
offset系列常用属性:

offset和style的区别:

获取鼠标在盒子内的坐标:
 <style>
        .box {
            width: 300px;
            height: 300px;
            background-color: pink;
            margin: 200px;
        }
    </style>
</head>
<body>
<!--案例分析 1.我们在盒子内点击,想要得到鼠标距离盒子左右的距离
            2.首先得到鼠标在页面中的坐标(e.pageX,e.pageY)
            3.其次得到盒子在页面中的距离(box.offsetLeft,box.offsetTop)-->
            <div class="box"></div>
            <script>
                var box = document.querySelector('.box');
                box.addEventListener('mousemove',function(e){   //鼠标移动坐标变化
                   var x = e.pageX - box.offsetLeft;
                   var y = e.pageY - box.offsetTop;
                   this.innerHTML  = 'x坐标是' + x +'y坐标是' + y;
                 })
            </script>
效果图:

拖动模态框案例:

<style>
        .login-header {
            width: 100%;
            text-align: center;
            height: 30px;
            font-size: 24px;
            line-height: 30px;
        }

        .login {
            display: none;
            width: 512px;
            height: 280px;
            position: fixed;
            border: #ebebeb solid 1px;
            left: 50%;
            top: 50%;
            background: #ffffff;
            box-shadow: 0px 0px 20px #ddd;
            z-index: 9999;
            transform: translate(-50%, -50%);
        }

        .login-title {
            width: 100%;
            margin: 10px 0px 0px 0px;
            text-align: center;
            line-height: 40px;
            height: 40px;
            font-size: 18px;
            position: relative;
            cursor: move;
        }

        .login-input-content {
            margin-top: 20px;
        }

        .login-button {
            width: 50%;
            margin: 30px auto 0px auto;
            line-height: 40px;
            font-size: 14px;
            border: #ebebeb 1px solid;
            text-align: center;
        }

        .login-bg {
            display: none;
            width: 100%;
            height: 100%;
            position: fixed;
            top: 0px;
            left: 0px;
            background: rgba(0, 0, 0, .3);
        }

        a {
            text-decoration: none;
            color: #000000;
        }

        .login-button a {
            display: block;
        }

        .login-input input.list-input {
            float: left;
            line-height: 35px;
            height: 35px;
            width: 350px;
            border: #ebebeb 1px solid;
            text-indent: 5px;
        }

        .login-input {
            overflow: hidden;
            margin: 0px 0px 20px 0px;
        }

        .login-input label {
            float: left;
            width: 90px;
            padding-right: 10px;
            text-align: right;
            line-height: 35px;
            height: 35px;
            font-size: 14px;
        }

        .login-title span {
            position: absolute;
            font-size: 12px;
            right: -20px;
            top: -30px;
            background: #ffffff;
            border: #ebebeb solid 1px;
            width: 40px;
            height: 40px;
            border-radius: 20px;
        }
    </style>
</head>

<body>
    <div class="login-header"><a href="javascript:;" id="link">点击,弹出登录框</a> </div>
    <div id="login" class="login" style="display: none;">
        <div class="login-title" id="title">"会员登录"
            <span><a href="javascript:void(0);" id="closeBtn" class="close-login">关闭</a></span>
        </div>
        <div class="login-input-content">
            <div class="login-input">
                <label>用户名:</label>
                <input type="text " placeholder="请输入用户名" name="info[username]" id="username" class="list-input">
            </div>
            <div class="login-input">
                <label>登录密码:</label>
                <input type="password" placeholder="请输入登录密码" name="info[password]" id="password" class="list-input">
            </div>
        </div>
        <div class="login-button" id="loginBtn">
            <a href="javascript:void(0);" id="login-button-submit">登录会员</a>
        </div>
    </div>
    <div class="login-bg" id="bg" style="display: none;"></div>
    <script>
        // 1.获取元素
        var login = document.querySelector('.login');
        var mask = document.querySelector('.login-bg');
        var link = document.querySelector('#link');
        var closeBtn = document.querySelector('#closeBtn');
        var title = document.querySelector('#title');
        // 2.点击弹出层这个链接 让mask 和login显示出来
        link.addEventListener('click', function () {
            mask.style.display = 'block';
            login.style.display = 'block';
        })
        // 3.点击closeBtn 就隐藏mask和login
        closeBtn.addEventListener('click', function () {
            mask.style.display = 'none';
            login.style.display = 'none';
        })
        // 4.开始拖拽
        // (1)当我们鼠标按下,就获得鼠标在盒子内的坐标
        title.addEventListener('mousedown', function (e) {//只要有鼠标事件就会有鼠标事件对象e
            var x = e.pageX - login.offsetLeft;
            var y = e.pageY - login.offsetTop;
            // (2)鼠标移动的时候,把鼠标在页面中的坐标减去鼠标在盒子内的坐标就是模态框的left和top
            document.addEventListener('mousemove', move)//document任何地方
            function move(e) {
                login.style.left = e.pageX - x + 'px';
                login.style.top = e.pageY - y + 'px';
            }
            // (3)鼠标弹起,就让鼠标移动事件移除
            document.addEventListener('mouseup', function () {
                document.removeEventListener('mousemove', move);//将move这个方法移除
            })
        })
    </script>
效果图:

二.元素可视区client系列
1.client概述
client翻译过来就是客户端,我们使用client系列的相关属性来获取元素可视区的相关信息。通过client系列的相关属性可以动态的得到该元素的边框大小、元素大小等。


2.立即执行函数
- 立即执行函数不需要调用,立马能够自己执行的函数
- 立即执行函数写法
(function(){})() 或者 (function(){}())
// 普通函数:
function fun(){
    console.log(1);
}
fun();
 //立即执行函数
 (function(a,b){
     console.log(a + b);
 })(1,2)//第二个小括号可以看作是调用函数
- 主要作用:创建一个独立作用域。避免了命名冲突问题
三.元素滚动scroll系列属性
1.scroll概念
scroll翻译过来就是滚动的,我们使用scroll系列的相关属性可以动态的得到该元素的大小、滚动距离等

实际的内容大小

2.页面被卷去的头部
如果浏览器的高或者宽度不足以显示整个页面时,会自动出现滚动条。当滚动条向下滚动时,页面上面被隐藏掉的高度,我们就称为页面被卷去的头部,滚动条在滚动时会触发onscroll事件


仿淘宝固定侧边栏案例:

3.三大系列总结


四.mouseenter和mouseover的区别
mouseenter鼠标事件只会经过自身盒子触发,没有冒泡
mouseoverr鼠标事件经过自身盒子触发,经过子盒子还会触发 ,因为有冒泡

五.动画函数封装
1.动画实现原理
动画实现原理:通过定时器setInterval()不断移动盒子位置(动画里面必须加定位)

注意:offsetLeft只能获取不能赋值,需要用style来赋值 div.style.left =div.offsetLeft + 1 + 'px';
<style>
        div {
            position: absolute;  /* 有了定位才能移动 */
            width: 100px;
            height: 100px;
            background-color: pink;

        }
    </style>
</head>
<body>
    <div></div>
    <script>
        var div = document.querySelector('div');
        // 1.获得盒子当前的位置  用div.offsetLeft可以获得
        // 2.让盒子在当前位置加上提个移动距离  div.offsetLeft + 1   offsetLeft只能获取不能赋值
        // 3.利用定时器不断重复这个操作
        // 4.加一个结束定时器的条件   div.offsetLeft >= 400  获取的这个位置>=400像素就停止
        var timer =setInterval(function(){
            if(div.offsetLeft >= 400){
                clearInterval(timer);
            }
            div.style.left =div.offsetLeft + 5 + 'px';
        },30)

    </script>
</body>
简单动画函数封装:
<div></div>
    <script>
    // 1.将动画封装为函数 obj目标对象 targer目标位置
    function animate(obj, targer){
        var timer =setInterval(function(){
            if(obj.offsetLeft >= targer){
                clearInterval(timer);
            }
            obj.style.left =obj.offsetLeft + 5 + 'px';
        },30)
    }
    // 2.调用函数
    var div = document.querySelector('div');
    animate(div, 400);
    </script>
- 用var每次开辟新的空间会浪费资源,而且每次不同的调用会有歧义
所以性能优化代码:
function animate(obj, targer){
        obj timer =setInterval(function(){
            if(obj.offsetLeft >= targer){
                clearInterval(obj.timer);
            }
- 点击按钮 动画才能移动
var btn = document.querySelector('button');
    btn.addEventListener('click',function(){
        animate(div, 400);
    })
- 但是每次点击 div的速度会越来越快 如何解决
- 先清除以前的定时器只保留当前的定时器执行 在函数里加
clearInterval(obj.timer);
function animate(obj, targer){
		clearInterval(obj.timer);
        var timer =setInterval(function(){
            if(obj.offsetLeft >= targer){
                clearInterval(timer);
            }
            obj.style.left =obj.offsetLeft + 5 + 'px';
        },30)
    }
2.缓动效果原理
缓动效果就是让元素运动速度有所变化,最常见的是让速度慢慢停下来

- 步长值(目标值 - 现在的位置)/ 10
function animate(obj, targer){
        clearInterval(obj.timer);
        var timer =setInterval(function(){
            // 步长值写到定时器里面
           var step = (targer - obj.offsetLeft) / 10;
            if(obj.offsetLeft == targer){
                clearInterval(timer);
            }
            // 把每次加1 这个步长值改为一个慢慢变小的值
            obj.style.left =obj.offsetLeft + step + 'px';
        },15)
    }
- 把我们的步长值改为整数 不要有小数的问题 采取向上取整
var step = Math.ceil((targer - obj.offsetLeft) / 10);
- 目标值来回的移动
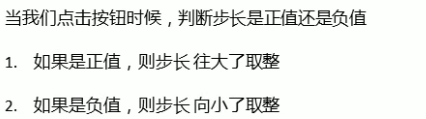
		var step = (targer - obj.offsetLeft) / 10;
        step = step > 0? Math.ceil(step) : Math.floor(step);
3.动画函数添加回调函数
回调函数原理:函数可以作为一个参数,将这个函数作为参数传到另一个函数里,当那个函数执行完之后,再执行传进去的这个函数,这个过程就叫做回调。
function animate(obj, targer,callback){   //(1)
        clearInterval(obj.timer);
        var timer =setInterval(function(){
           var step = (targer - obj.offsetLeft) / 10;
           step = step > 0? Math.ceil(step) : Math.floor(step);
            if(obj.offsetLeft == targer){
                clearInterval(timer);
                // 回调函数写到定时器结束里面
                if(callback){ //(2)
                    callback();
                }
            }
            obj.style.left =obj.offsetLeft + step + 'px';
        },15)
    }
    var div = document.querySelector('div');
    var btn = document.querySelector('button');
    btn.addEventListener('click',function(){
        animate(div, 400,function(){//(3)
            div.style.backgroundColor = 'red';
        });
    })
- 把函数当做参数调用
- (3)调用animate函数,函数里传入三个参数,第三个参数比较特殊,是以函数的形式。所以callback=function(){}
- (2)的意思是定时器结束判断有没有函数传进来,如果有就调用回调函数
动画函数的使用: - 将动画函数封装为js文件
<script src="animate.js"></script>
<style>
.sliderbar {
position: fixed;
right: 0;
bottom: 100px;
width: 40px;
height: 40px;
text-align: center;
line-height: 40px;
cursor: pointer;
color: #fff;
}
.con {
position: absolute;
left: 0;
top: 0;
width: 200px;
height: 40px;
background-color: purple;
z-index: -1;
}
</style>
</head>
<body>
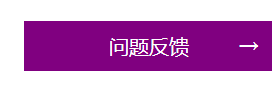
<div class="sliderbar">
<span>←</span>
<div class="con">问题反馈</div>
</div>
<script>
var sliderbar = document.querySelector('.sliderbar');
var con = document.querySelector('.con');
sliderbar.addEventListener('mouseenter',function(){
animate(con, -160,function(){
sliderbar.children[0].innerHTML = '→';
});
})
sliderbar.addEventListener('mouseleave',function(){
animate(con, 0,function(){
sliderbar.children[0].innerHTML = '←';
});
})
</script>
效果图:
六.本地存储
 window.sessionStorage
1.生命周期为关闭浏览器窗口
2.在同一个窗口(页面)下数据可以共享
3.以键值对的形式存储使用
存储数据:
sessionStorage.setltem(key,value);
实例:
 var ipt = document.querySelector('.input');
    var set = document.querySelector('.set');
    set.addEventListener('click',function(){
        var val = ipt.value;
        sessionStorage.setItem('uname',value)//uname是键  value是值
    })

获取数据:
sessionStorage.getltem(key);
删除数据:
sessionStorage.removeltem(key);
删除所有数据:
sessionStorage.clear();


 593
593


 被折叠的 条评论
为什么被折叠?
被折叠的 条评论
为什么被折叠?
 到【灌水乐园】发言


