


一、spring core
1.ioc container
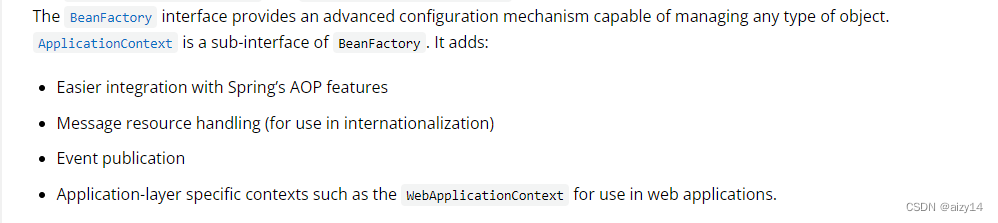
1.beanfactory和applicationcontext区别
2.bean的来源还可以是用户手动注册单例bean,官方并不是很推荐这种方式创建对象。

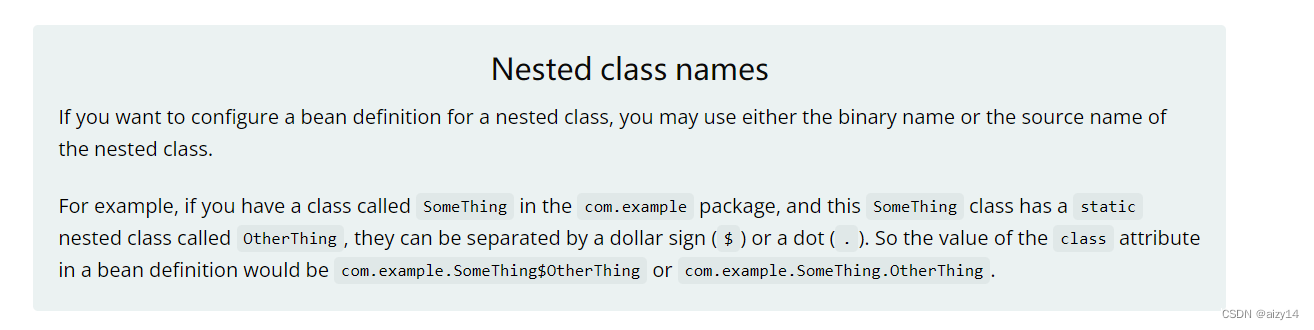
3.bean命名,如果有些类前两个字母都是大写,那么将保留这个名字作为bean name.

4.静态内部类的全路径名如下:
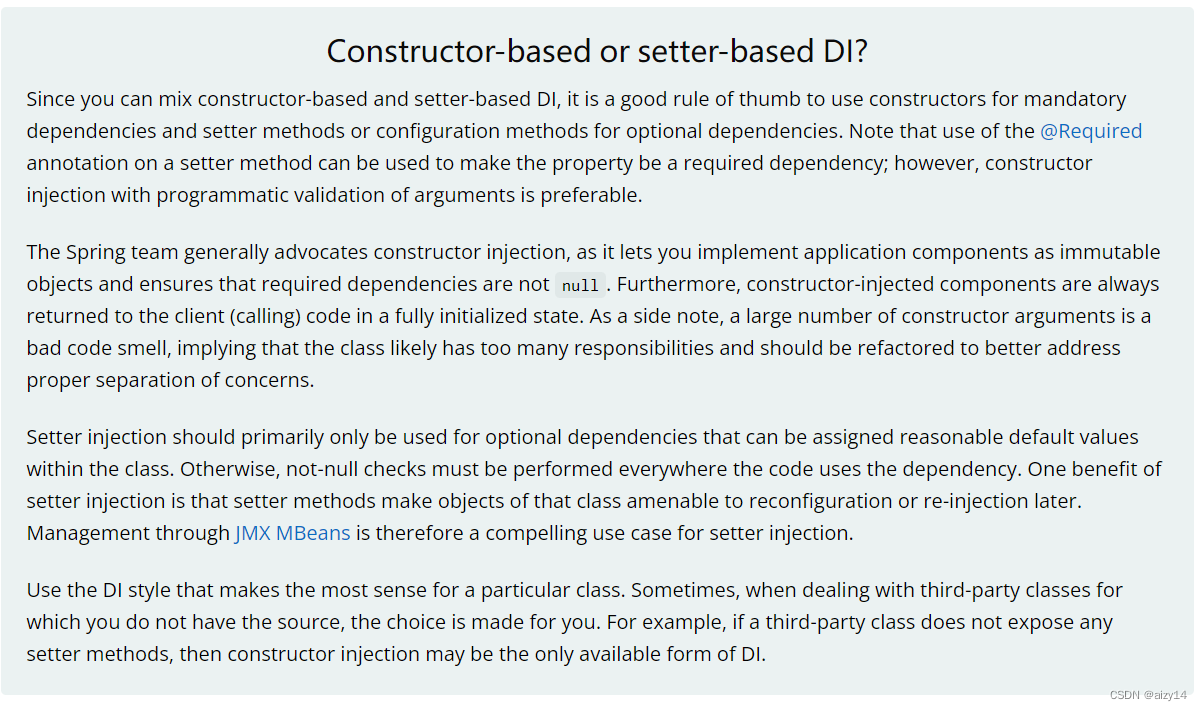
5.构造器注入与setter注入的区别与选择:
官方推荐使用构造器注入,这样可以保证依赖的对象是非空并可以定义成final的,还可以保证依赖注入顺序,如果所需依赖太多可以考虑分离类职责,还有就是构造器注入无法解决循环依赖。set注入可以用来注入那些非必需的依赖。
6.单例bean想要每次获取其所依赖的非单例bean都是不同的可以通过获取bean工厂来显示getBean获取。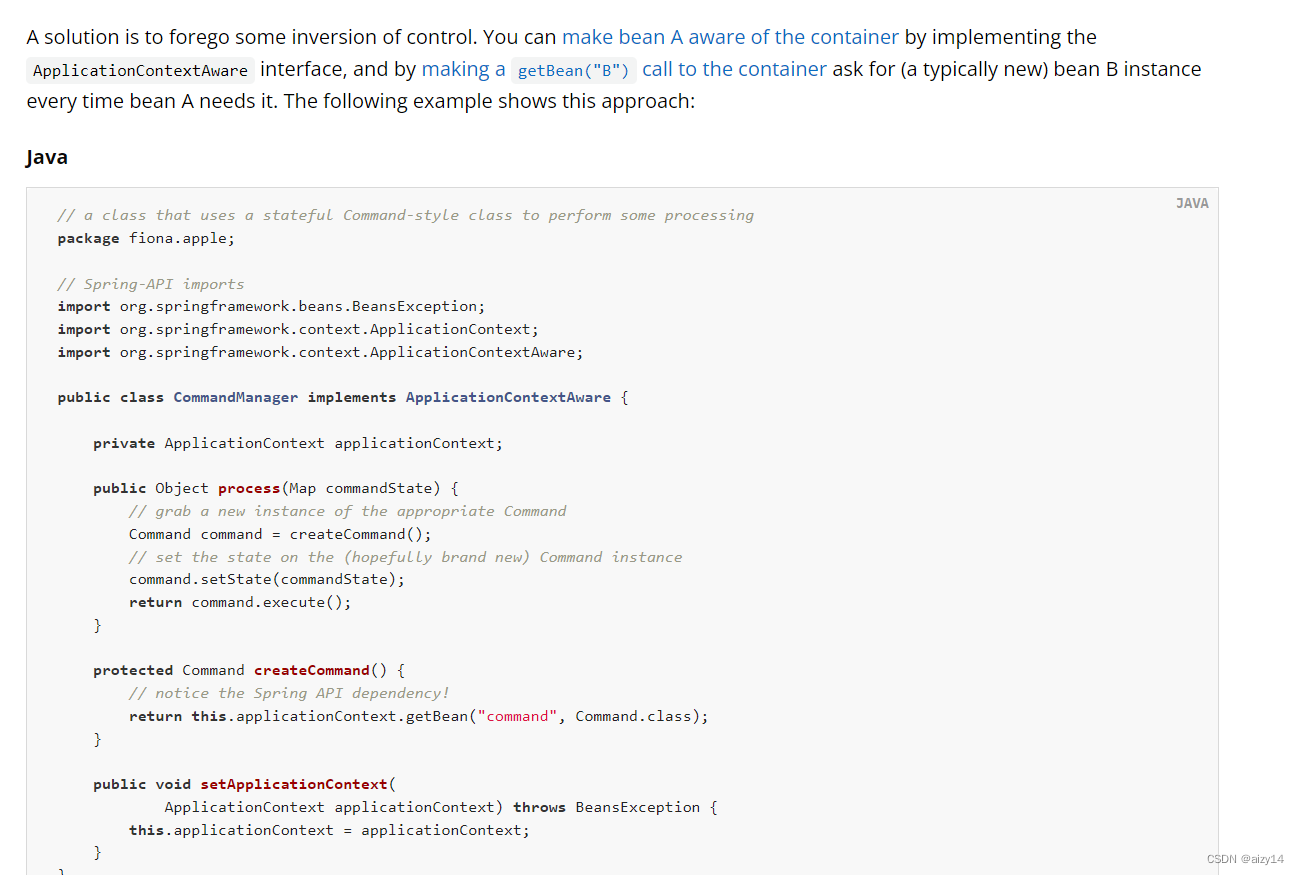
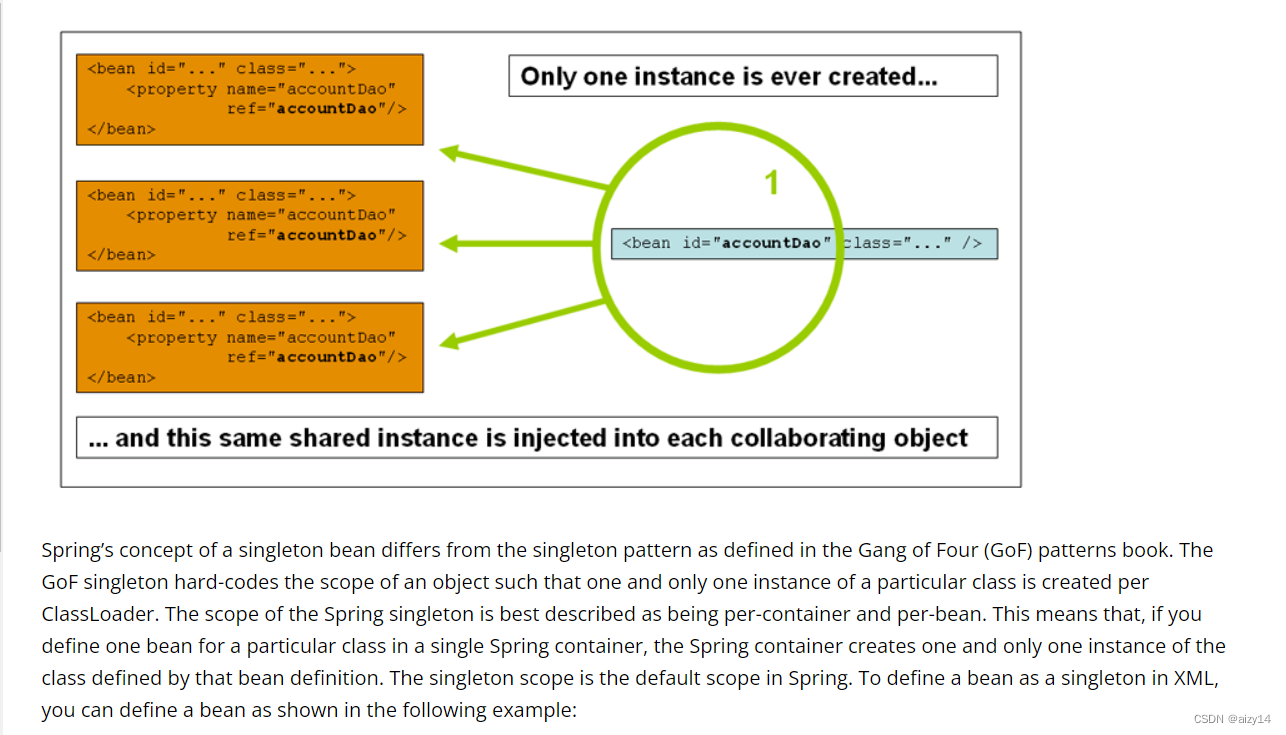
7.单例bean所谓的单例是针对所在的容器来说。
8.prototype bean应该定义给那些有状态的bean,此外,原型bean的生命周期sping并没有完全管理,其销毁spring没法管理。

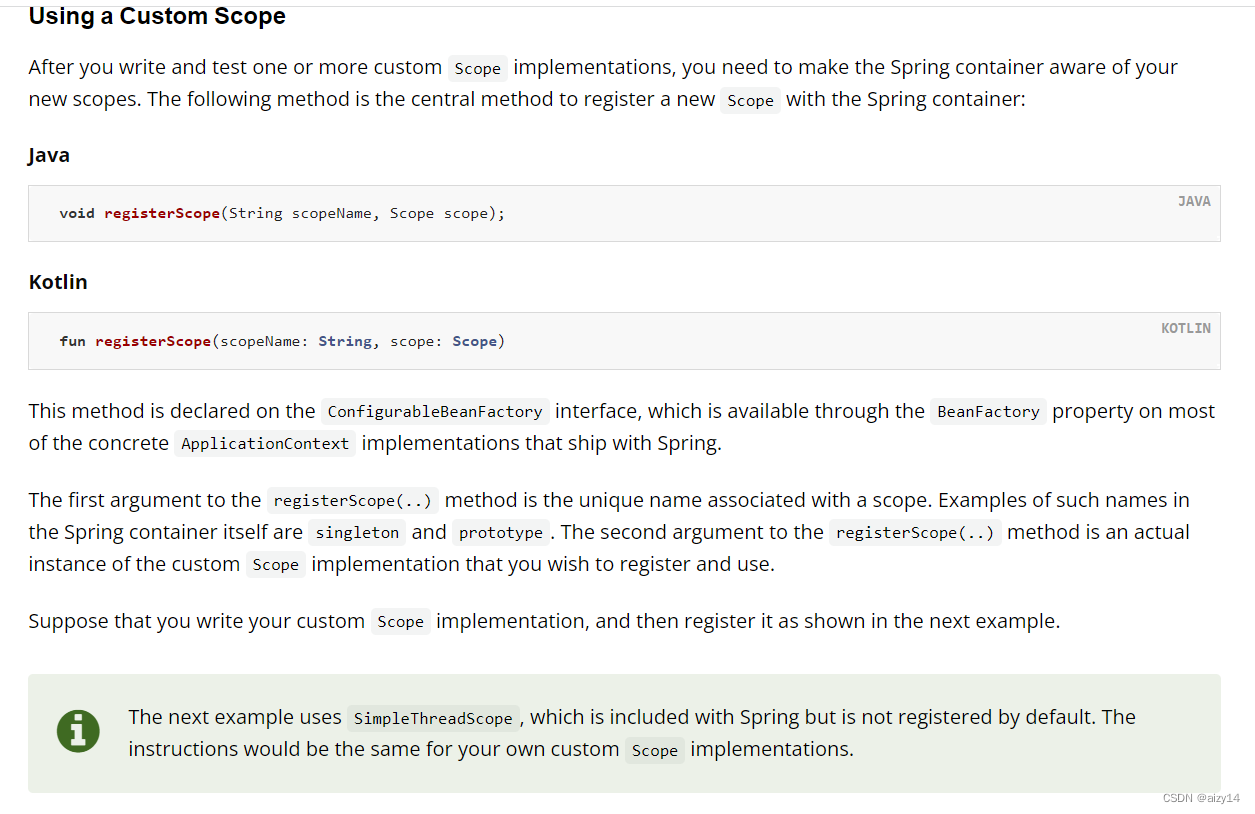
9.通过实现Scope接口可以自定义scope作用域,再调用容器的register方法就好了。
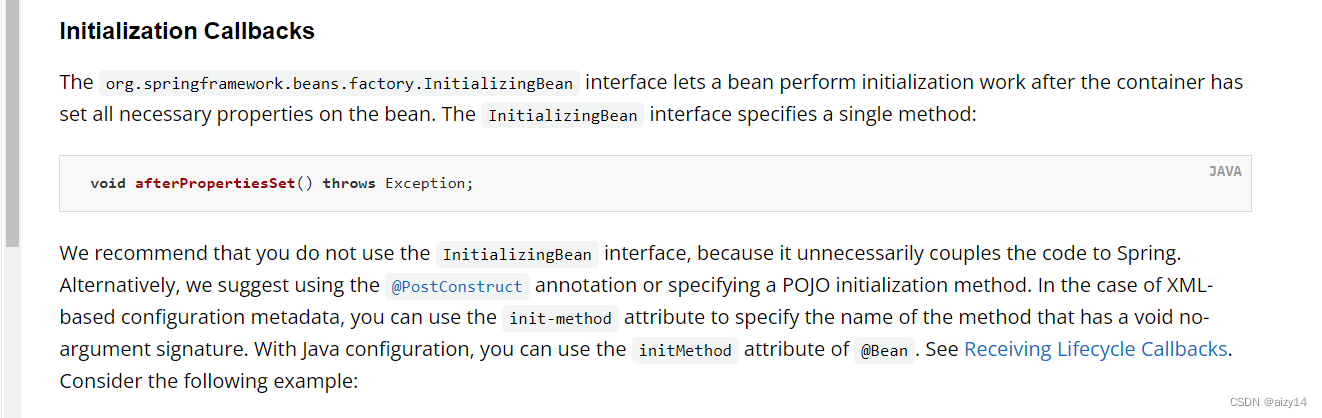
10.bean的初始化回调spring官方建议使用@postconstruct方法或者bean的init而不是实现InitializingBean接口,这样有利于业务代码与spring代码解耦。
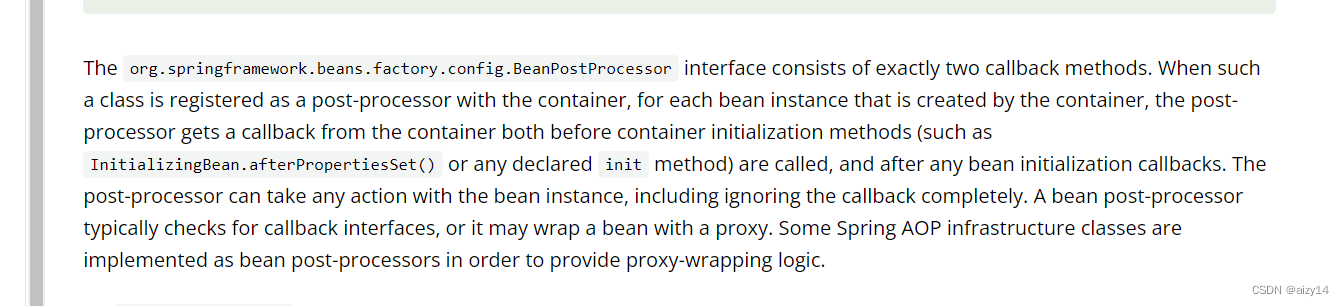
11.beanpostprocessor作用于bean实例化后,初始化前后。
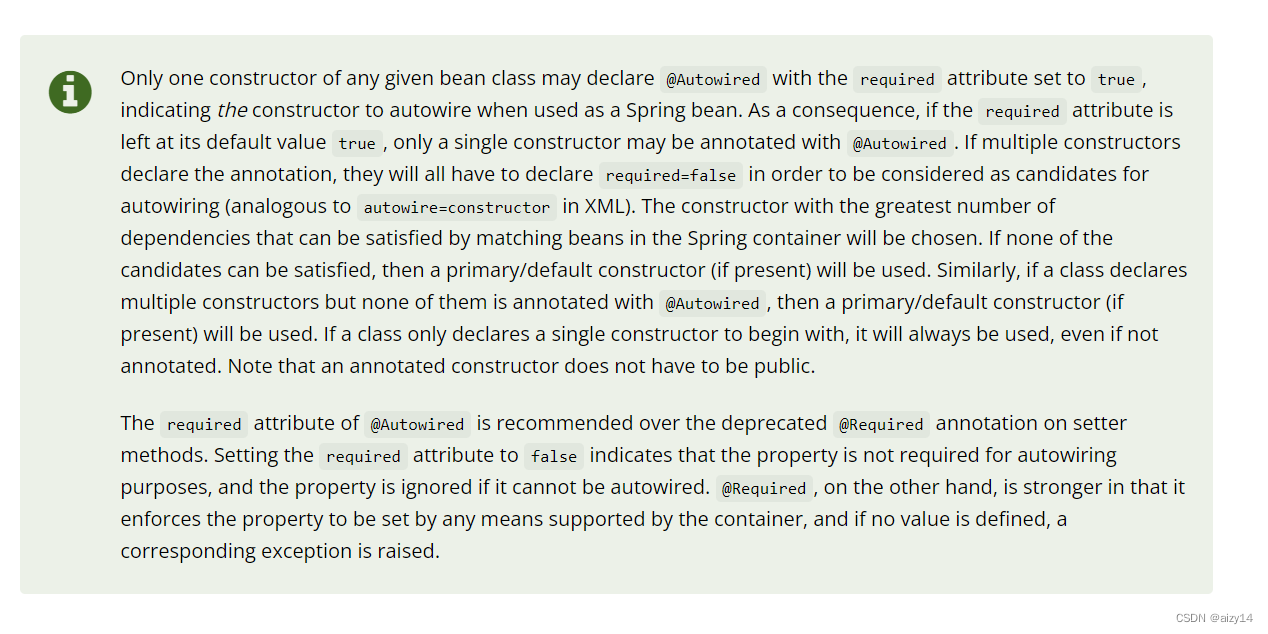
12.如果只有一个构造函数,那么无需@autowired也可进行依赖注入,如果有多个构造函数,没有指定@autowired时会选择无参构造函数。
13.@bean定义在static方法上可以使其无需实例化所在类即可调用,并且由于是static可以让其不能被动态代理。
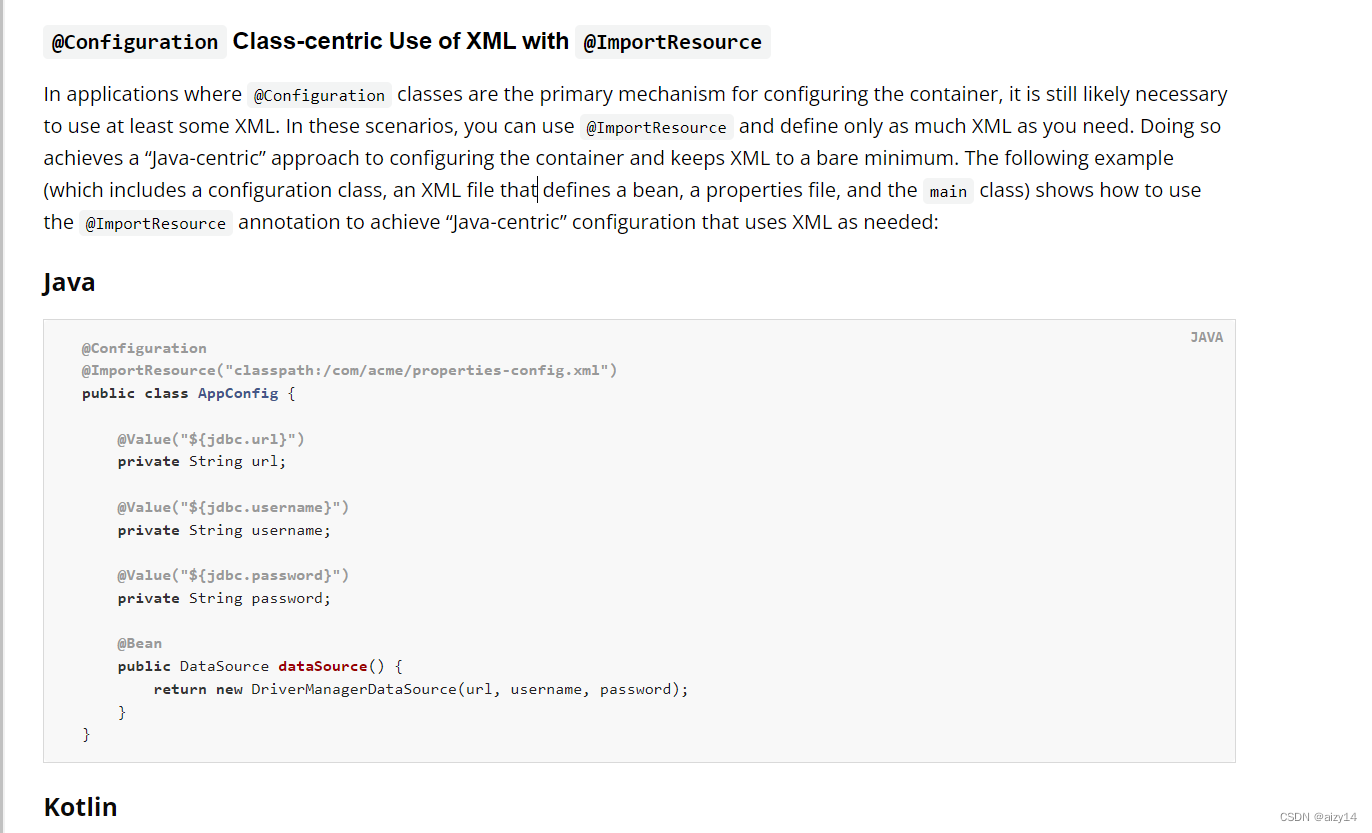
14.可以通过@ImportResource导入xml中定义的对象或者资源。
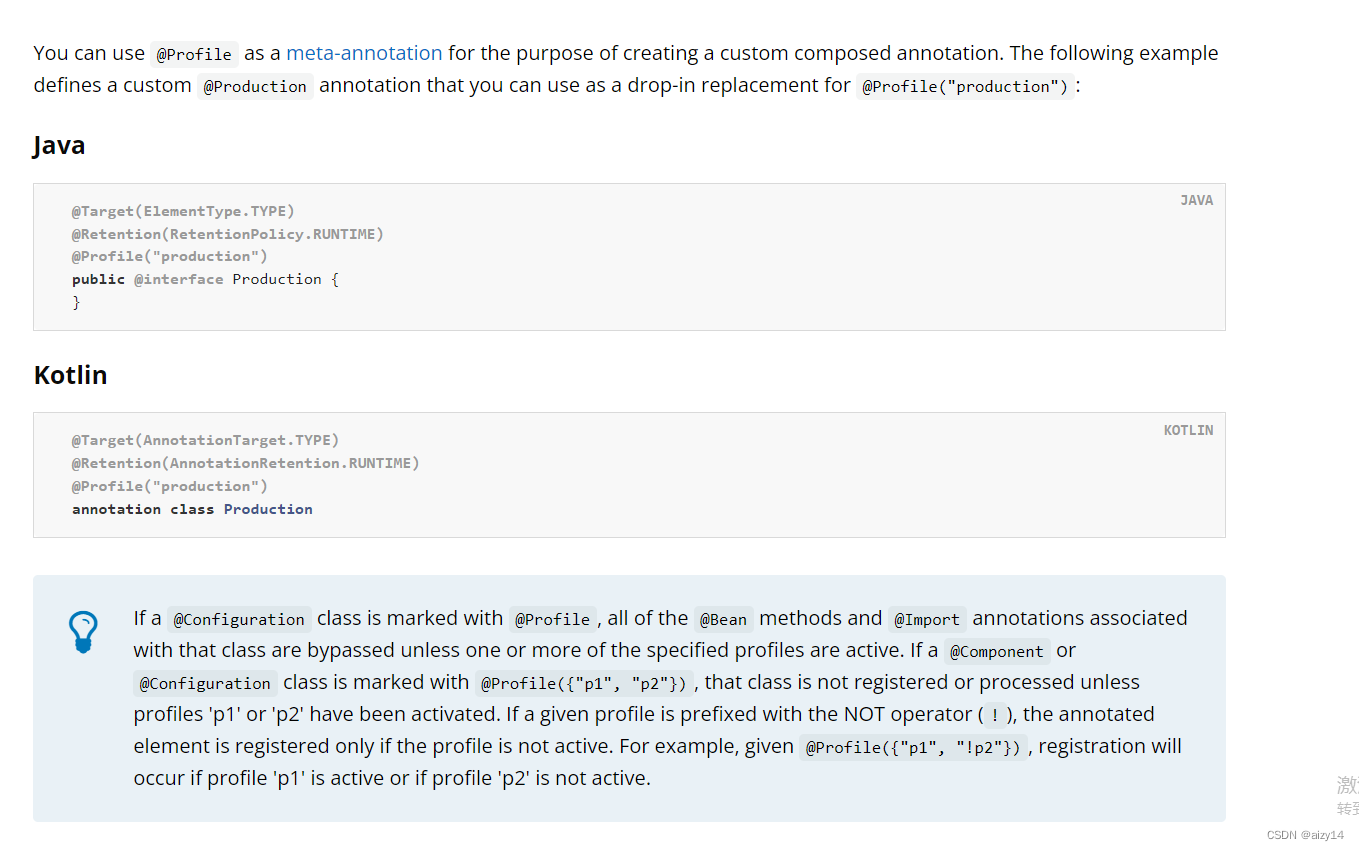
15.可以使用@profile用来标明这个类在什么环境才会被容器管理

这个注解支持与或非表达式。(!& |)
还可以使用这个注解作为元注解,更加见名知意。
16. 使用spring.profiles.active环境参数标明当前环境。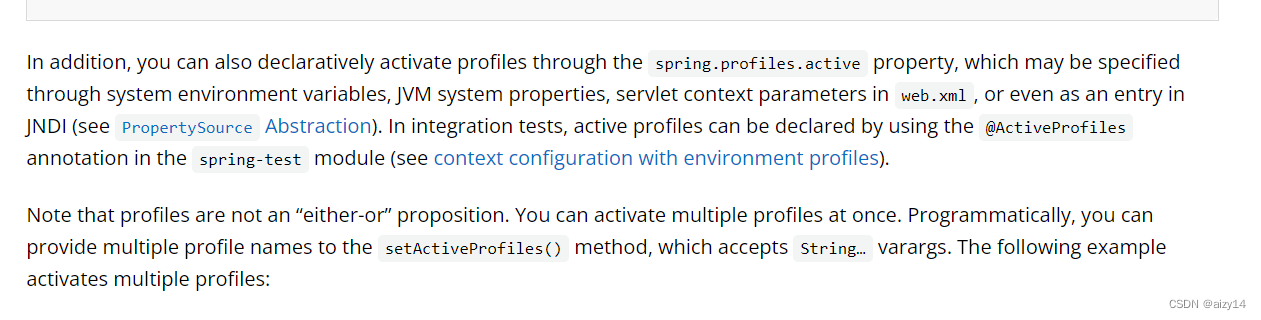
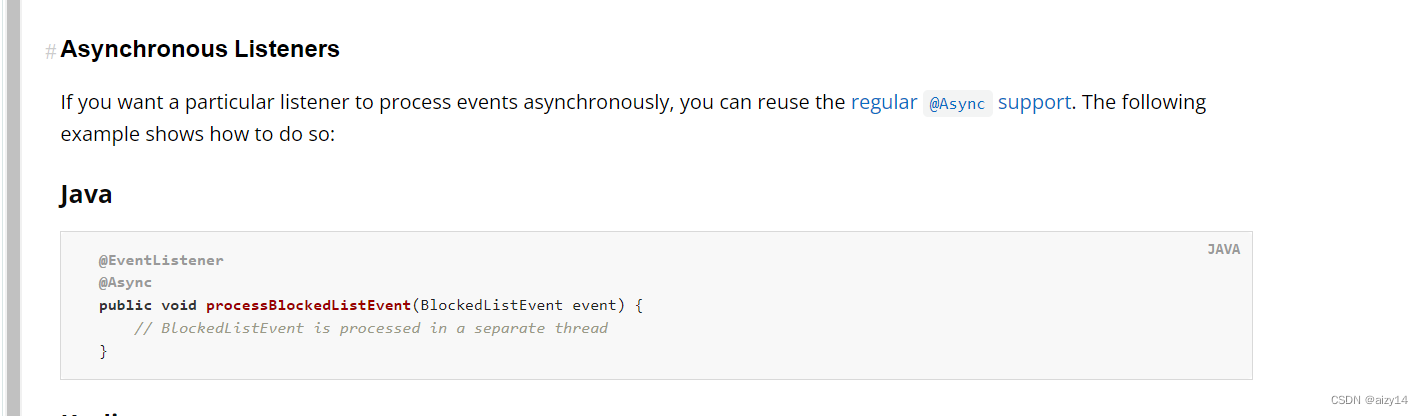
17.spring事件默认是同步的,所以监听后业务逻辑出现异常也会让事件发布者获知,可以使用@ASYNC注解使监听的逻辑异步执行。
二、Spirng AOP
1.spring aop所支持的级别是方法级别,不支持字段级别

2.被@aspect标注的类不能成为其他aspect类所通知的目标

3.pointCut注意事项:
1.pointCut的意思是过滤哪些方法能被advice(before,after,around标注的方法增强的目标方法)。
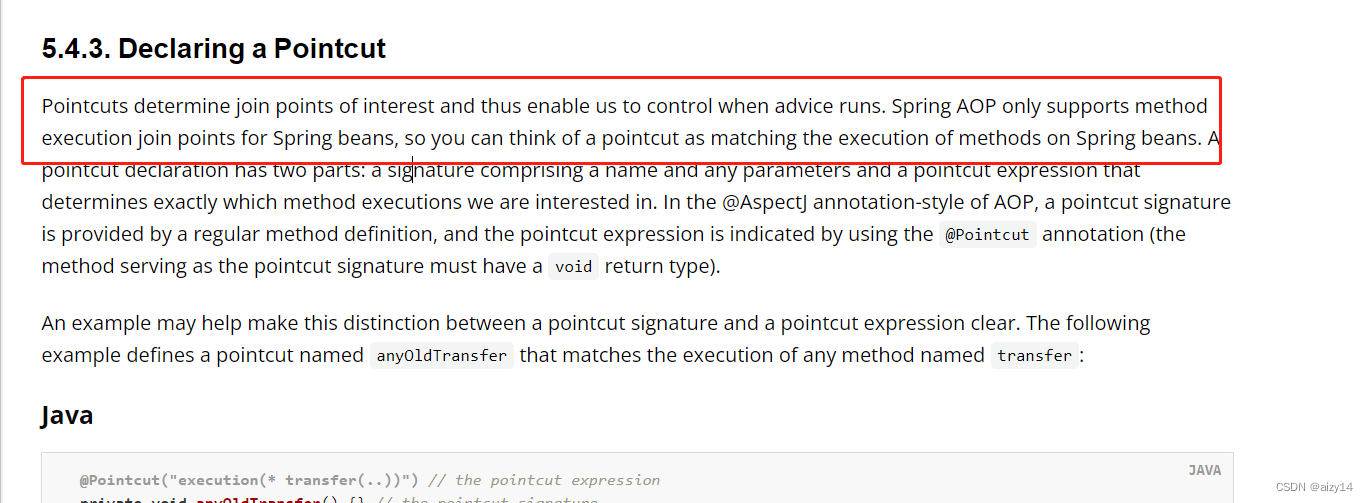
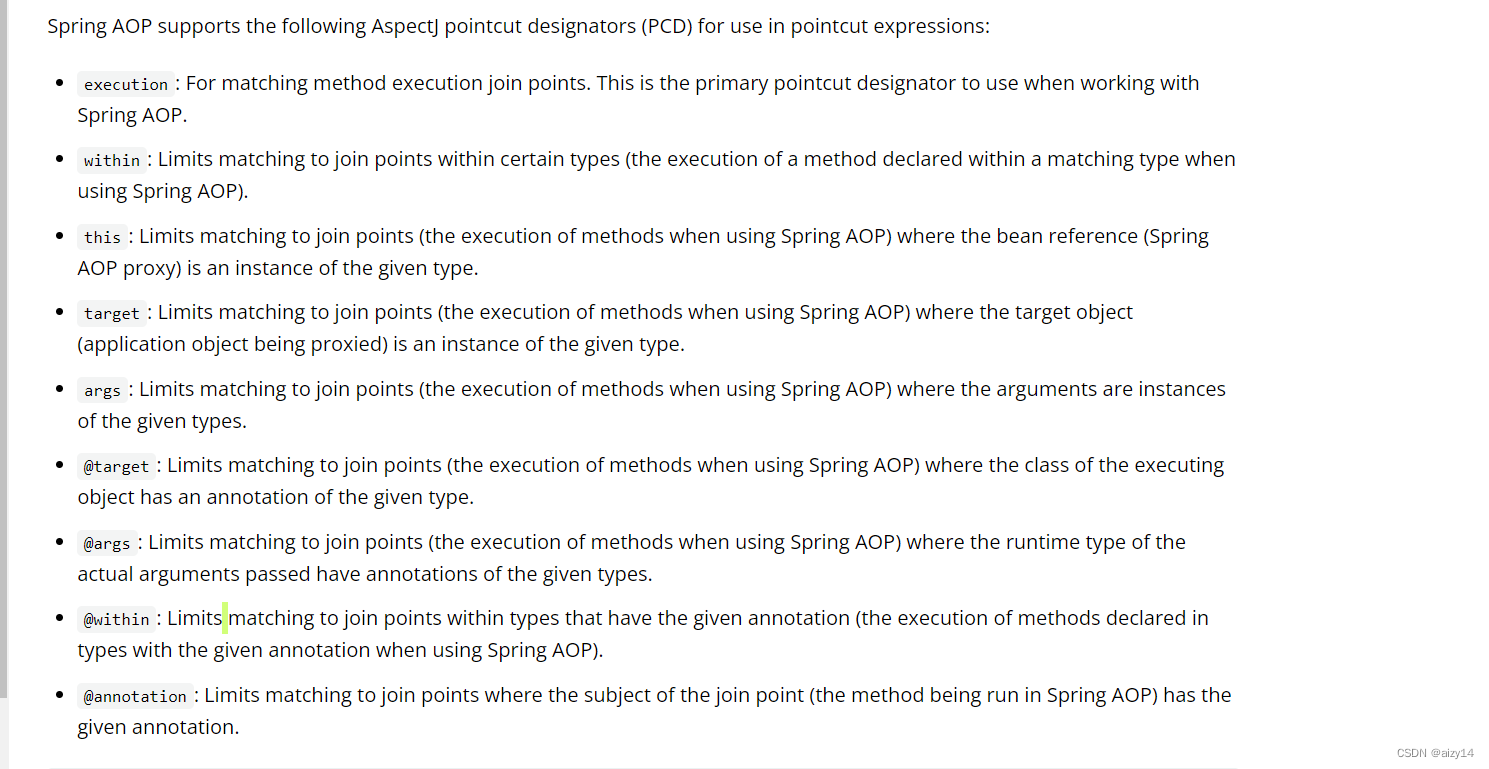
2.其支持的表达式如下;
3.一个好的pointcut最好包含范围(例如 within),这样的话可以试匹配速度和处理速度更快。

4.advice顺序,如果是多个相同的通知类型,顺序是不确定的,可以使用@Order规定先后顺序。
不同的通知类型其顺序如下所示:

三、data access
1.@transactional事务管理
1.@Transactional执行流程如下图所示

2.@Transactional失效有如下情况:注解标注在非public方法上;本类的方法this.调用被标注的方法。
3.@Transactional注解可以配置order确定多个advice的执行顺序。例如让统计执行时间的advice在事务之前执行。
四、spring mvc
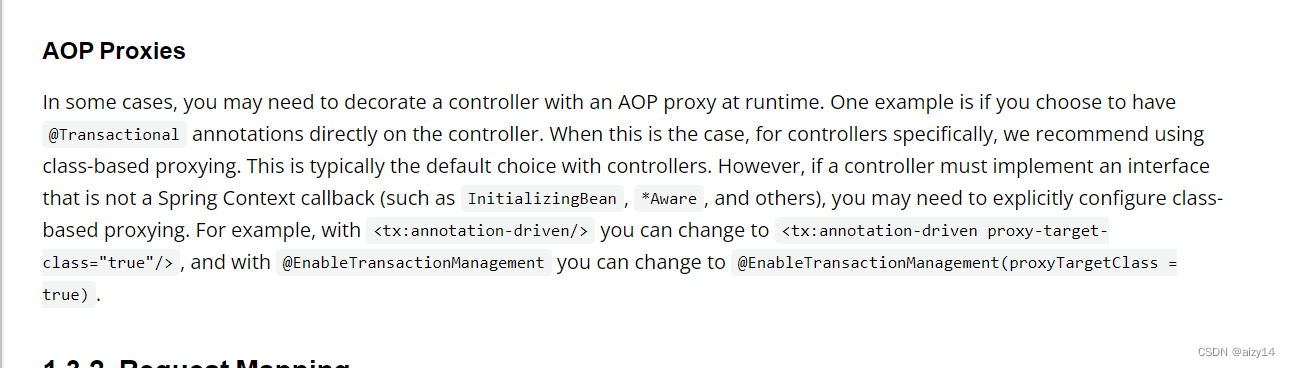
1. 在对controller进行aop增强时,如果controller实现了非spring定义的上下文接口,建议手动使proxyTargetClass = true使用cglib动态代理。
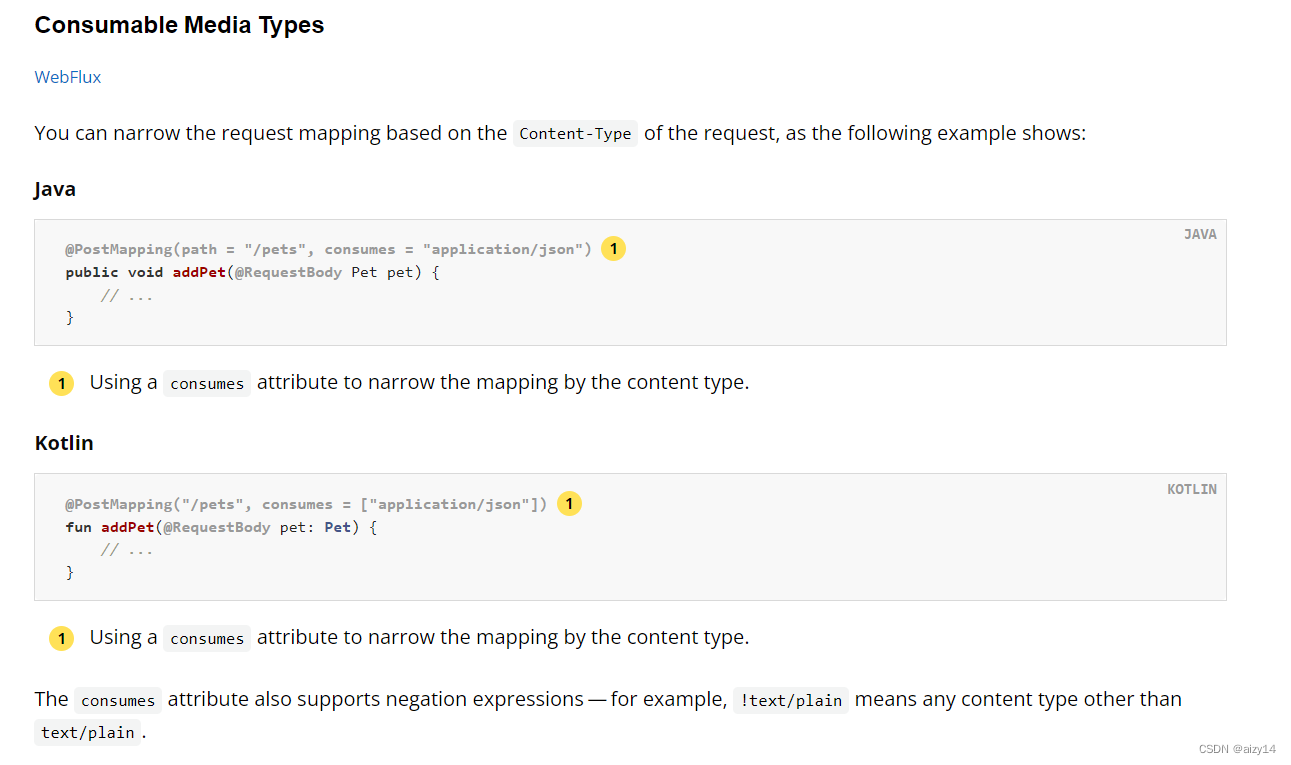
2.requestMapping内的consumes可以标识仅接受具体content-type的请求。
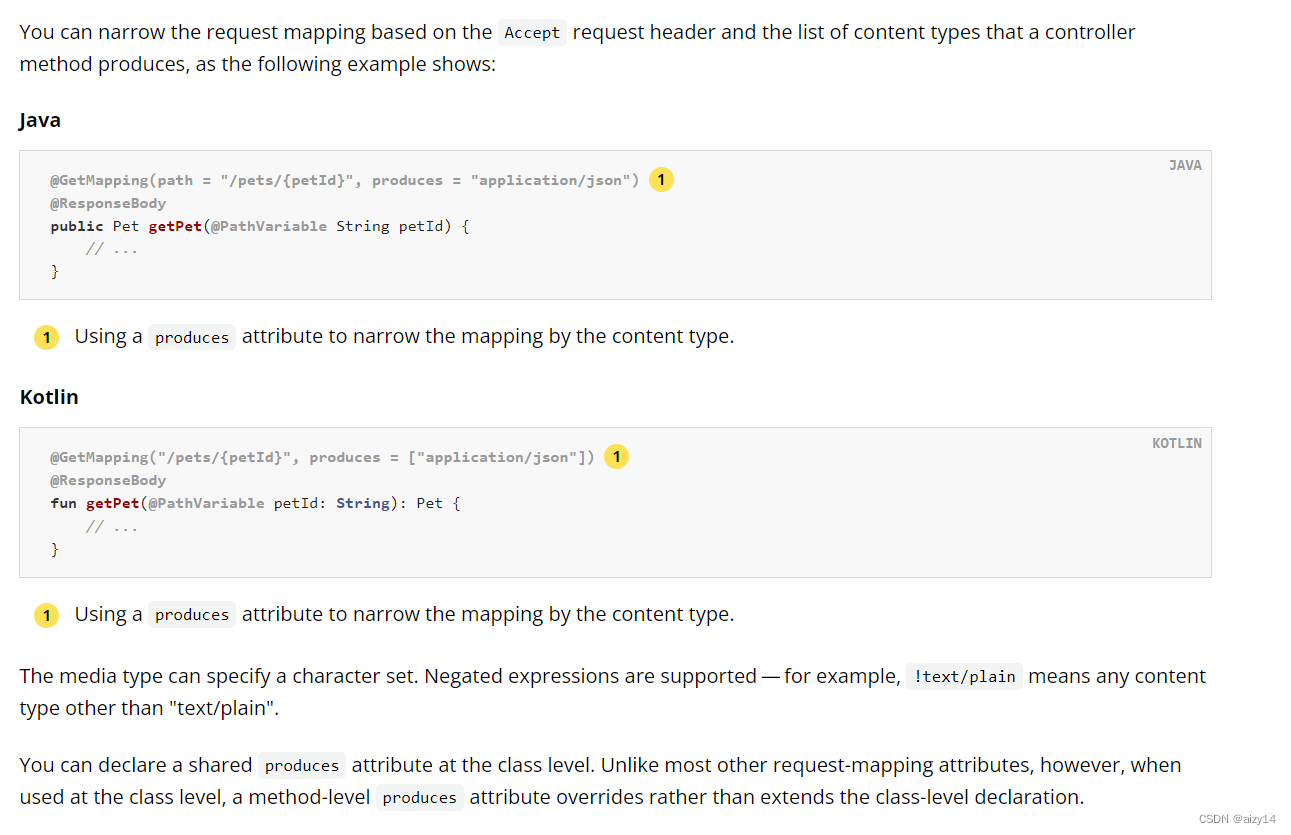
 3.requestMapping内的produces可以标识仅接受具体accept的请求。
4.跨域可使用@crossOrgin标注固定类和方法和以下全局配置

五、spring webflux
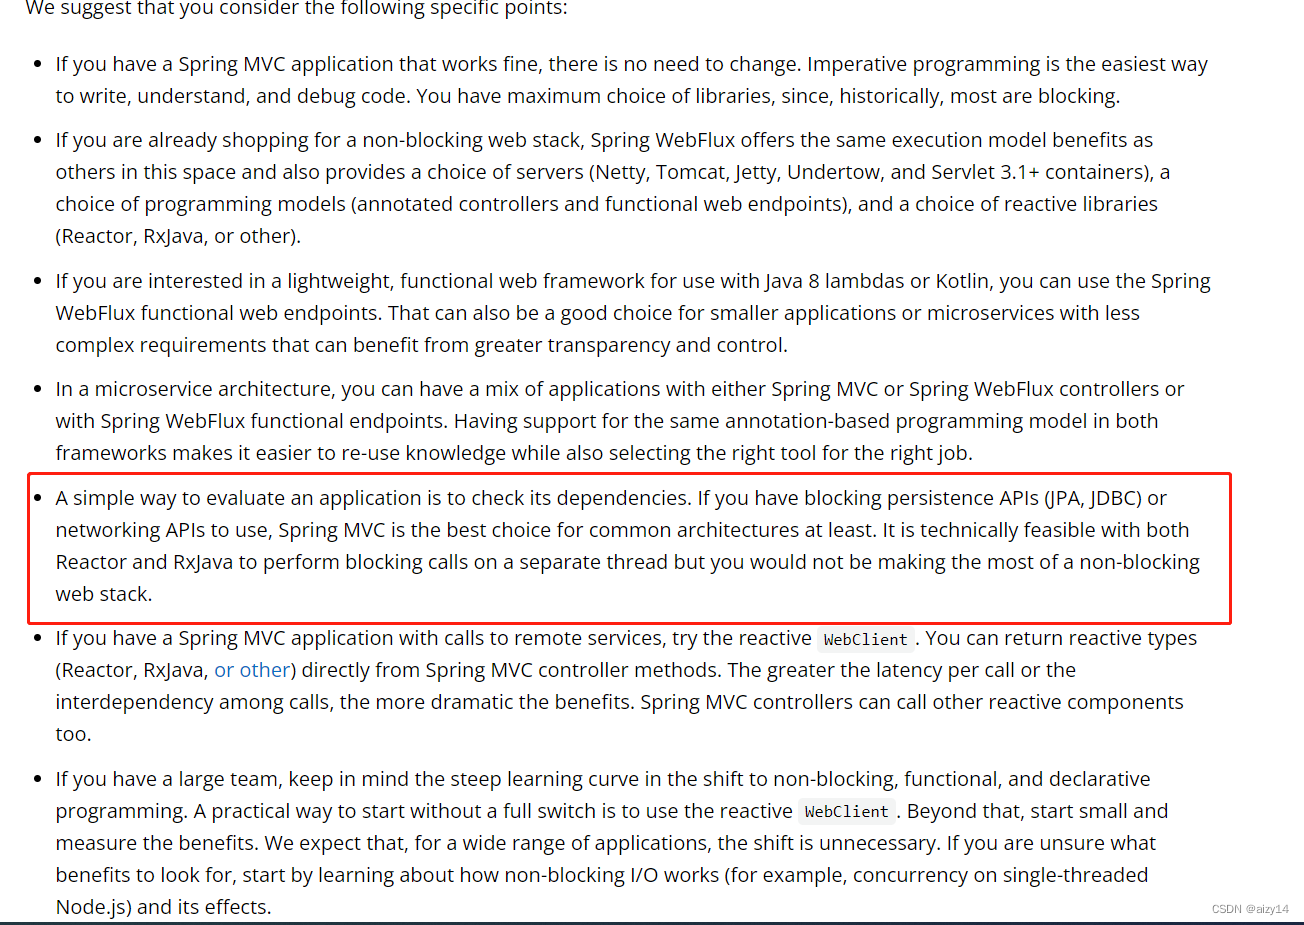
1.最简单去评估是否使用webflux看应用是否依赖阻塞api调用,如果依赖,则使用web mvc同步调用即可,此外,基于web client远程调用是web mvc也可使用,并且推荐其取代resttemplate调用。
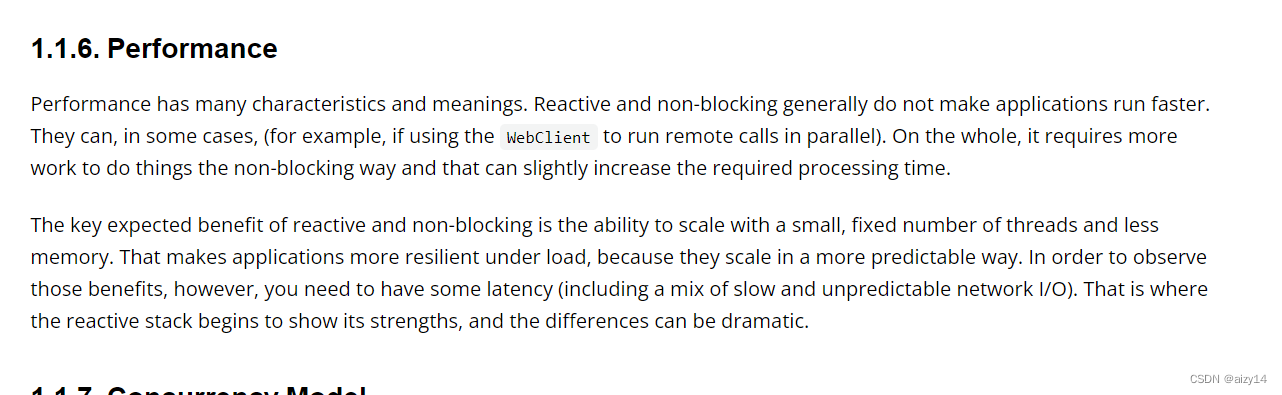
2.web flux并没有明显的性能优势,甚至可能会导致运行的时间更长,其主要的优势是可以使用很少的线程和内存使得应用在高负载下更容易扩容。
3.由于web mvc会阻塞,所以应用默认创建了很大的线程池以便cpu利用率不会下降,而web flux不会阻塞,所以无需创建很多线程。

六、spring boot
1.如果项目还依赖了父类而不想使spring boot作为父类,可以在父类的依赖管理里面import springboot,如果还想覆盖掉spring boot的依赖,在依赖管理里面必须写在前面。

2.springboot读取外部配置文件顺序如下:

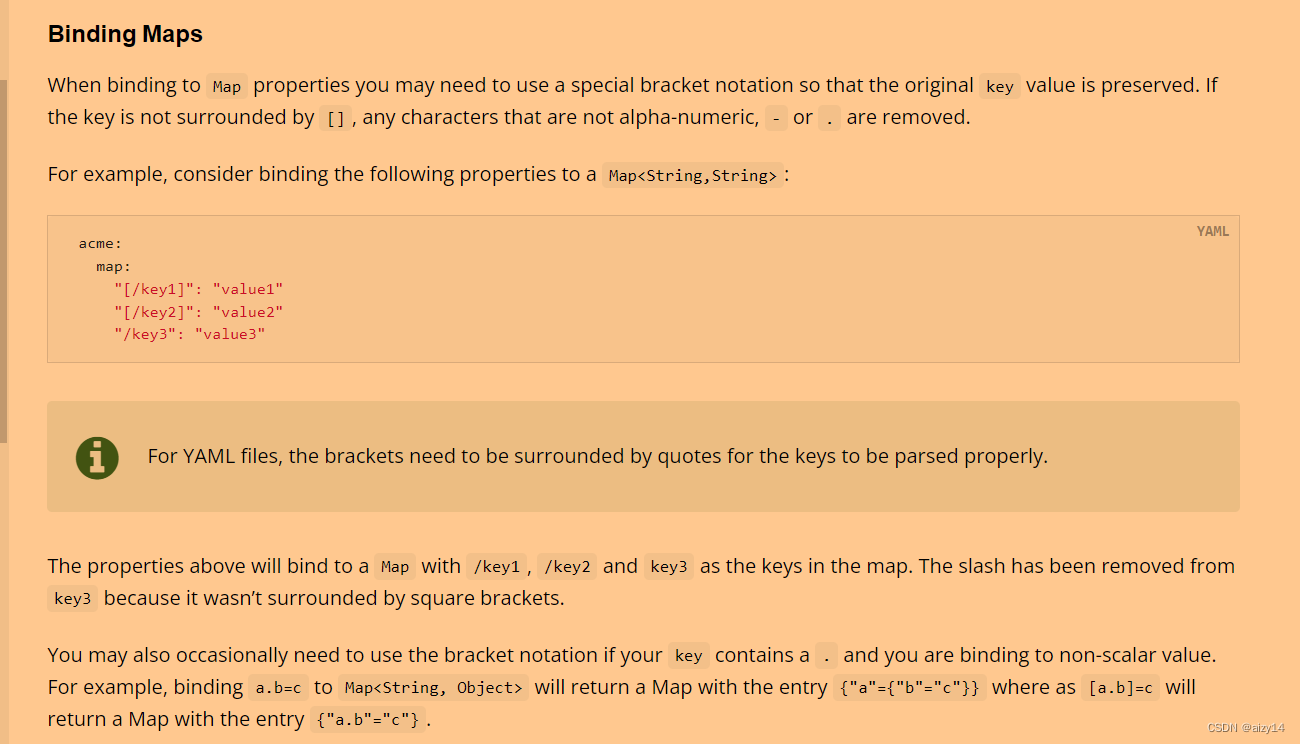
3.yaml 还可以绑定map
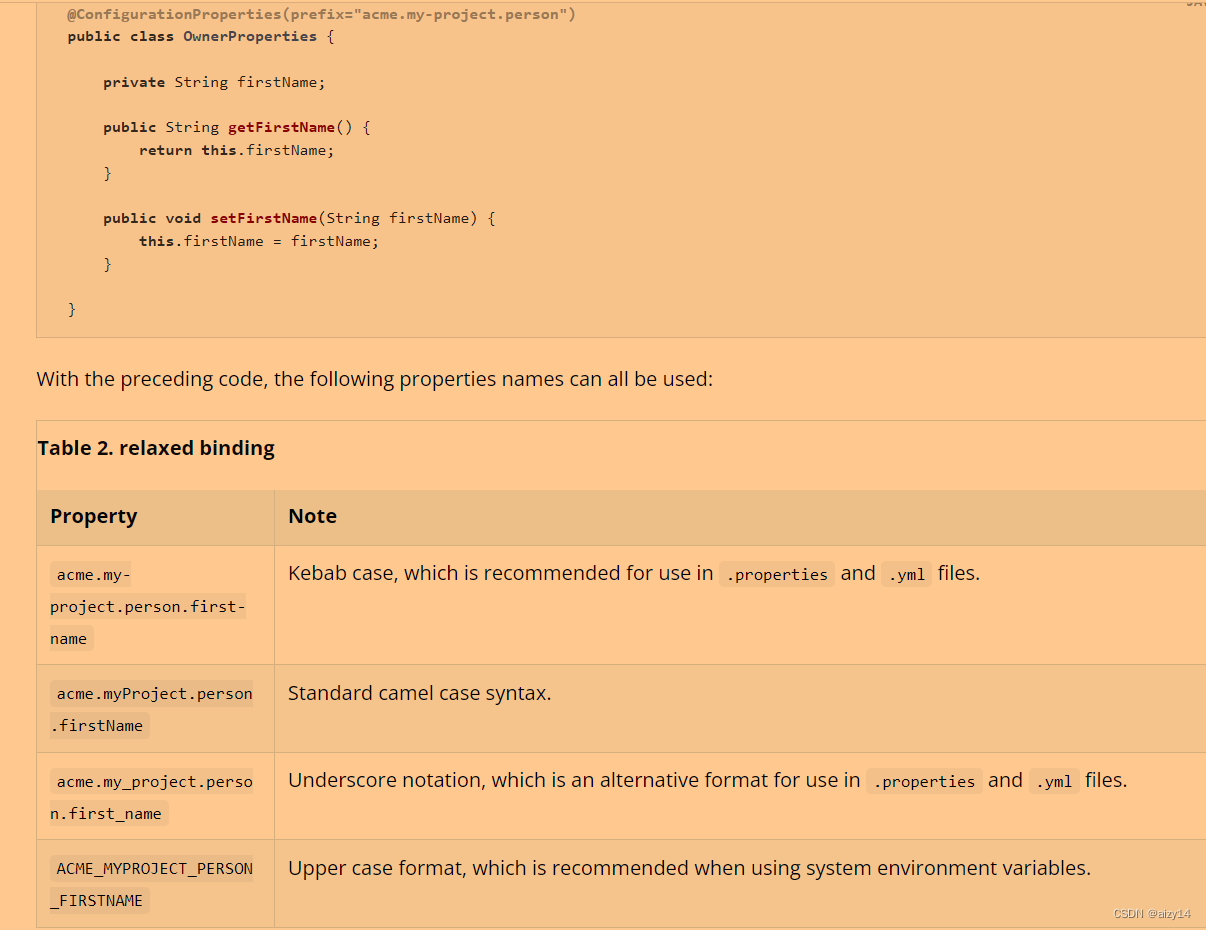
4.configurationproperties支持宽松绑定,如下所示:
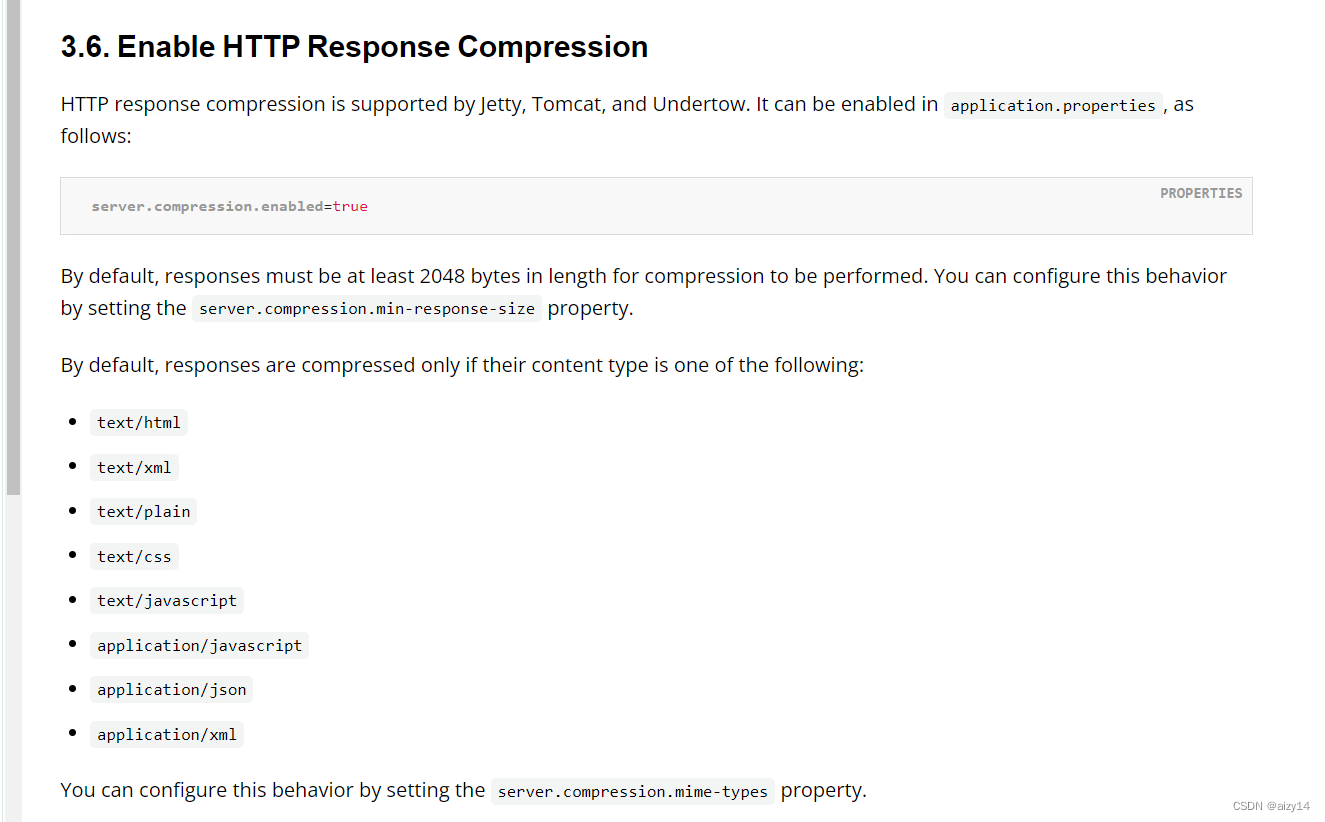
5.可以启用响应数据压缩
七、源码篇:
一.spring
spring生命周期总览:
1.创建ClassPathBeanDefinitionScanner用于扫描类获取元信息:
/**
	 * Create a new AnnotationConfigApplicationContext that needs to be populated
	 * through {@link #register} calls and then manually {@linkplain #refresh refreshed}.
	 */
	public AnnotationConfigApplicationContext() {
		StartupStep createAnnotatedBeanDefReader = this.getApplicationStartup().start("spring.context.annotated-bean-reader.create");
		// 额外会创建StandardEnvironment
		this.reader = new AnnotatedBeanDefinitionReader(this);
		createAnnotatedBeanDefReader.end();
		this.scanner = new ClassPathBeanDefinitionScanner(this);
	}
1.1.该类会在容器的refresh方法中的此方法中被调用

同时会在此方法的中对配置类进行扫描,并且递归的获取所有beandefinition
org.springframework.context.support.PostProcessorRegistrationDelegate#invokeBeanFactoryPostProcessors(org.springframework.beans.factory.config.ConfigurableListableBeanFactory, java.util.List<org.springframework.beans.factory.config.BeanFactoryPostProcessor>)2.ClassPathBeanDefinitionScanner的doscan方法首先调用findCandidateComponents获取所有候选beanDefinition.
	protected Set<BeanDefinitionHolder> doScan(String... basePackages) {
		Assert.notEmpty(basePackages, "At least one base package must be specified");
		Set<BeanDefinitionHolder> beanDefinitions = new LinkedHashSet<>();
		for (String basePackage : basePackages) {

			Set<BeanDefinition> candidates = findCandidateComponents(basePackage);
2.1,在此方法内首先判断是否有sping.componets文件手动指定bean,没有的话就执行scanCandidateComponents挨个类扫描。
	/**
	 * Scan the class path for candidate components.
	 * @param basePackage the package to check for annotated classes
	 * @return a corresponding Set of autodetected bean definitions
	 */
	public Set<BeanDefinition> findCandidateComponents(String basePackage){
		if (this.componentsIndex != null && indexSupportsIncludeFilters()) {
			return addCandidateComponentsFromIndex(this.componentsIndex, basePackage);
		}
		else {
			return scanCandidateComponents(basePackage);
		}
	}
2.2 在scanCandidateComponents方法内会扫描指定包下的所有class文件,并通过元信息判断是否含有componet注解,有的话就封装基本信息成beanDefinitions将其放入集合中。

3.在得到doscan方法内得到beandefinition集合后再获取bean的更多元信息,如是否单例,是否懒加载等。最后将其注册到beanDefinitionMap中。
Set<BeanDefinition> candidates = findCandidateComponents(basePackage);

			for (BeanDefinition candidate : candidates) {
				ScopeMetadata scopeMetadata = this.scopeMetadataResolver.resolveScopeMetadata(candidate);
				candidate.setScope(scopeMetadata.getScopeName());

				String beanName = this.beanNameGenerator.generateBeanName(candidate, this.registry);

				if (candidate instanceof AbstractBeanDefinition) {
					postProcessBeanDefinition((AbstractBeanDefinition) candidate, beanName);
				}
				if (candidate instanceof AnnotatedBeanDefinition) {
					// 解析@Lazy、@Primary、@DependsOn、@Role、@Description
					AnnotationConfigUtils.processCommonDefinitionAnnotations((AnnotatedBeanDefinition) candidate);
				}

				// 检查Spring容器中是否已经存在该beanName
				if (checkCandidate(beanName, candidate)) {
					BeanDefinitionHolder definitionHolder = new BeanDefinitionHolder(candidate, beanName);
					definitionHolder =
							AnnotationConfigUtils.applyScopedProxyMode(scopeMetadata, definitionHolder, this.registry);
					beanDefinitions.add(definitionHolder);

					// 注册
					registerBeanDefinition(definitionHolder, this.registry);
				}
			}
4.调用容器的refresh方法
public AnnotationConfigApplicationContext(Class<?>... componentClasses) {
		// 构造DefaultListableBeanFactory、AnnotatedBeanDefinitionReader、ClassPathBeanDefinitionScanner
		this();
		register(componentClasses);
		refresh();
	}
在refresh方法中含有初始化所有非懒加载bean的方法。

5.在调用DefaultListableBeanfactory中的preInstantiateSingletons方法时,这时会根据之前创建好的beanDefinition来创建单例bean
public void preInstantiateSingletons() throws BeansException {
		if (logger.isTraceEnabled()) {
			logger.trace("Pre-instantiating singletons in " + this);
		}

		// Iterate over a copy to allow for init methods which in turn register new bean definitions.
		// While this may not be part of the regular factory bootstrap, it does otherwise work fine.
		List<String> beanNames = new ArrayList<>(this.beanDefinitionNames);

		// Trigger initialization of all non-lazy singleton beans...
		for (String beanName : beanNames) {
			// 获取合并后的BeanDefinition
			RootBeanDefinition bd = getMergedLocalBeanDefinition(beanName);

			if (!bd.isAbstract() && bd.isSingleton() && !bd.isLazyInit()) {
				if (isFactoryBean(beanName)) {
					// 获取FactoryBean对象
					Object bean = getBean(FACTORY_BEAN_PREFIX + beanName);
					if (bean instanceof FactoryBean) {
						FactoryBean<?> factory = (FactoryBean<?>) bean;
						boolean isEagerInit;
						if (System.getSecurityManager() != null && factory instanceof SmartFactoryBean) {
							isEagerInit = AccessController.doPrivileged(
									(PrivilegedAction<Boolean>) ((SmartFactoryBean<?>) factory)::isEagerInit,
									getAccessControlContext());
						}
						else {
							isEagerInit = (factory instanceof SmartFactoryBean &&
									((SmartFactoryBean<?>) factory).isEagerInit());
						}
						if (isEagerInit) {
							// 创建真正的Bean对象(getObject()返回的对象)
							getBean(beanName);
						}
					}
				}
				else {
					// 创建Bean对象
					getBean(beanName);
				}
			}
		}

		// 所有的非懒加载单例Bean都创建完了后
		// Trigger post-initialization callback for all applicable beans...
		for (String beanName : beanNames) {
			Object singletonInstance = getSingleton(beanName);
			if (singletonInstance instanceof SmartInitializingSingleton) {
				StartupStep smartInitialize = this.getApplicationStartup().start("spring.beans.smart-initialize")
						.tag("beanName", beanName);
				SmartInitializingSingleton smartSingleton = (SmartInitializingSingleton) singletonInstance;
				if (System.getSecurityManager() != null) {
					AccessController.doPrivileged((PrivilegedAction<Object>) () -> {
						smartSingleton.afterSingletonsInstantiated();
						return null;
					}, getAccessControlContext());
				}
				else {
					smartSingleton.afterSingletonsInstantiated();
				}
				smartInitialize.end();
			}
		}
	}
,其中特别注意一下factorybean的处理,想获取factoryBean本身,必须在getBean时在bean名称前加&标识符。如果没有实现SmartInitializingSingleton并且重写isEagerInit为true,这个阶段不会将getObject内的对象实例化出来。
6.在getBean中会调用createBean方法,在此方法中首先运行实现了InstantiationAwareBeanPostProcessor接口的初始化前方法

/**
	 * Apply InstantiationAwareBeanPostProcessors to the specified bean definition
	 * (by class and name), invoking their {@code postProcessBeforeInstantiation} methods.
	 * <p>Any returned object will be used as the bean instead of actually instantiating
	 * the target bean. A {@code null} return value from the post-processor will
	 * result in the target bean being instantiated.
	 * @param beanClass the class of the bean to be instantiated
	 * @param beanName the name of the bean
	 * @return the bean object to use instead of a default instance of the target bean, or {@code null}
	 * @see InstantiationAwareBeanPostProcessor#postProcessBeforeInstantiation
	 */
	@Nullable
	protected Object applyBeanPostProcessorsBeforeInstantiation(Class<?> beanClass, String beanName) {
		for (InstantiationAwareBeanPostProcessor bp : getBeanPostProcessorCache().instantiationAware) {
			Object result = bp.postProcessBeforeInstantiation(beanClass, beanName);
			if (result != null) {
				return result;
			}
		}
		return null;
	}
6.1.当调用实例化前方法返回值不为空时,会调用实例化后方法。
/**
	 * Apply before-instantiation post-processors, resolving whether there is a
	 * before-instantiation shortcut for the specified bean.
	 * @param beanName the name of the bean
	 * @param mbd the bean definition for the bean
	 * @return the shortcut-determined bean instance, or {@code null} if none
	 */
	@Nullable
	protected Object resolveBeforeInstantiation(String beanName, RootBeanDefinition mbd) {
		Object bean = null;
		if (!Boolean.FALSE.equals(mbd.beforeInstantiationResolved)) {
			// Make sure bean class is actually resolved at this point.
			// synthetic表示合成,如果某些Bean式合成的,那么则不会经过BeanPostProcessor的处理
			if (!mbd.isSynthetic() && hasInstantiationAwareBeanPostProcessors()) {
				Class<?> targetType = determineTargetType(beanName, mbd);
				if (targetType != null) {
					bean = applyBeanPostProcessorsBeforeInstantiation(targetType, beanName);
					if (bean != null) {
						bean = applyBeanPostProcessorsAfterInitialization(bean, beanName);
					}
				}
			}
			mbd.beforeInstantiationResolved = (bean != null);
		}
		return bean;
	}
7.接着执行实例化方法。

8.接着会执行实现了MergedBeanDefinitionPostProcessor接口的bean的对beandefinition的处理方法:(此过程每个定义的bean只会执行一次,如代码所示)
// 后置处理合并后的BeanDefinition
// Allow post-processors to modify the merged bean definition.
synchronized (mbd.postProcessingLock) {
if (!mbd.postProcessed) {
try {
applyMergedBeanDefinitionPostProcessors(mbd, beanType, beanName);
}
catch (Throwable ex) {
throw new BeanCreationException(mbd.getResourceDescription(), beanName,
"Post-processing of merged bean definition failed", ex);
}
mbd.postProcessed = true;
}
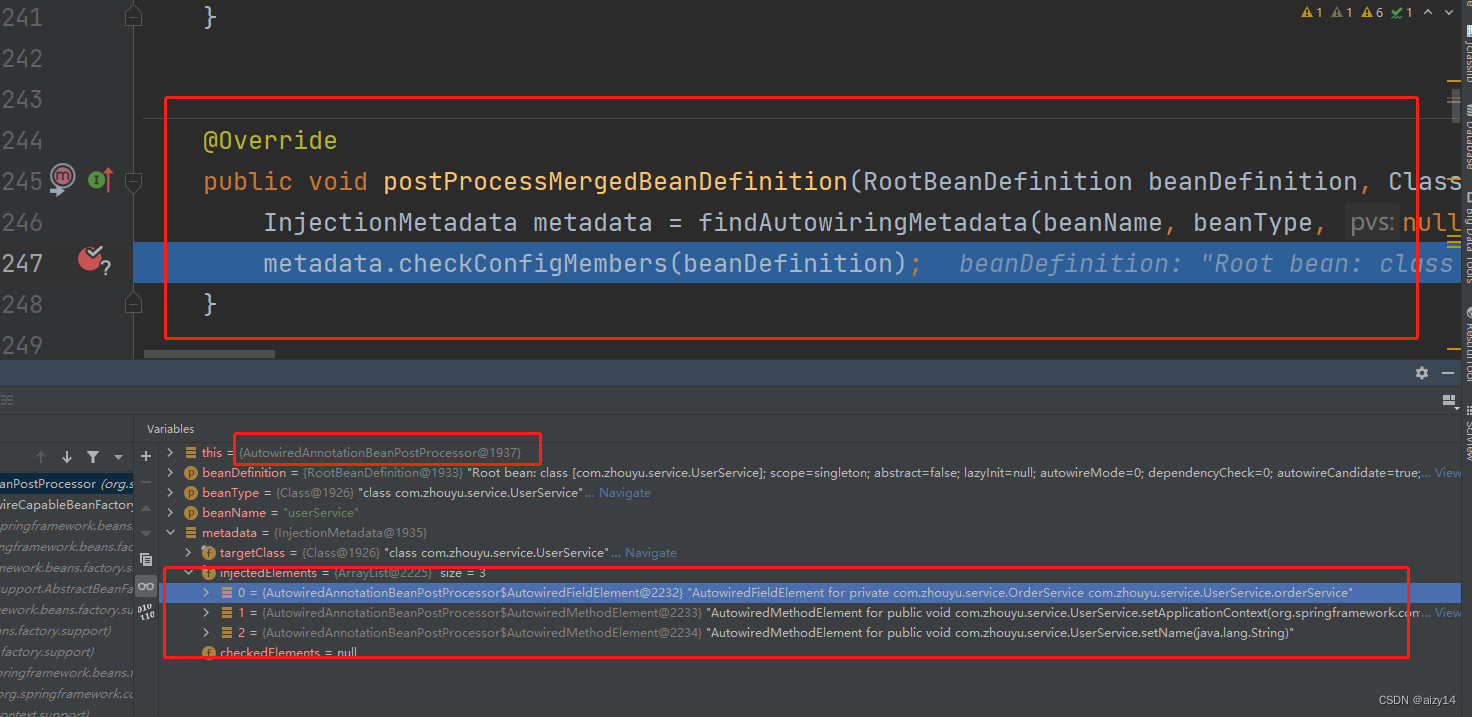
}8.1注意,@Value、@autowired、@inject的依赖注入都是由
AutowiredAnnotationBeanPostProcessor实现的,

所以它在这个阶段也会进行操作,在这个阶段
AutowiredAnnotationBeanPostProcessor会扫描bean的属性,找出被以上注解修饰的字段或者方法并缓存起来供后续流程使用
9.接着会在populateBean方法中执行实例化后方法,同样是实现了InstantiationAwareBeanPostProcessor接口
		// Give any InstantiationAwareBeanPostProcessors the opportunity to modify the
		// state of the bean before properties are set. This can be used, for example,
		// to support styles of field injection.
		// 实例化之后,属性设置之前
		if (!mbd.isSynthetic() && hasInstantiationAwareBeanPostProcessors()) {
			for (InstantiationAwareBeanPostProcessor bp : getBeanPostProcessorCache().instantiationAware) {
				if (!bp.postProcessAfterInstantiation(bw.getWrappedInstance(), beanName)) {
					return;
				}
			}
		}
10.populateBean下面的方法就是进行属性赋值了。

10.1 在AutowiredAnnotationBeanPostProcessor的
postProcessProperties中,会对之前找到的注入点进行挨个赋值。
	@Override
	public PropertyValues postProcessProperties(PropertyValues pvs, Object bean, String beanName) {
		// 找注入点(所有被@Autowired注解了的Field或Method)
		InjectionMetadata metadata = findAutowiringMetadata(beanName, bean.getClass(), pvs);
		try {
			metadata.inject(bean, beanName, pvs);
		}
		catch (BeanCreationException ex) {
			throw ex;
		}
		catch (Throwable ex) {
			throw new BeanCreationException(beanName, "Injection of autowired dependencies failed", ex);
		}
		return pvs;
	}
11.在initializeBean方法中,首先执行实现了beanPostProcessor的初始化前方法。
@Override
	public Object applyBeanPostProcessorsBeforeInitialization(Object existingBean, String beanName)
			throws BeansException {

		Object result = existingBean;
		for (BeanPostProcessor processor : getBeanPostProcessors()) {
			Object current = processor.postProcessBeforeInitialization(result, beanName);
			if (current == null) {
				return result;
			}
			result = current;
		}
		return result;
	}
12.然后执行初始化方法。注意是先执行afterPropertiesSet,再执行bean的init-method。
protected void invokeInitMethods(String beanName, Object bean, @Nullable RootBeanDefinition mbd)
			throws Throwable {

		boolean isInitializingBean = (bean instanceof InitializingBean);
		if (isInitializingBean && (mbd == null || !mbd.isExternallyManagedInitMethod("afterPropertiesSet"))) {
			if (logger.isTraceEnabled()) {
				logger.trace("Invoking afterPropertiesSet() on bean with name '" + beanName + "'");
			}
			if (System.getSecurityManager() != null) {
				try {
					AccessController.doPrivileged((PrivilegedExceptionAction<Object>) () -> {
						((InitializingBean) bean).afterPropertiesSet();
						return null;
					}, getAccessControlContext());
				}
				catch (PrivilegedActionException pae) {
					throw pae.getException();
				}
			}
			else {
				((InitializingBean) bean).afterPropertiesSet();
			}
		}

		if (mbd != null && bean.getClass() != NullBean.class) {
			String initMethodName = mbd.getInitMethodName();
			if (StringUtils.hasLength(initMethodName) &&
					!(isInitializingBean && "afterPropertiesSet".equals(initMethodName)) &&
					!mbd.isExternallyManagedInitMethod(initMethodName)) {
				invokeCustomInitMethod(beanName, bean, mbd);
			}
		}
	}
13.最后执行初始化后方法
	@Override
	public Object applyBeanPostProcessorsAfterInitialization(Object existingBean, String beanName)
			throws BeansException {

		Object result = existingBean;

		for (BeanPostProcessor processor : getBeanPostProcessors()) {
			Object current = processor.postProcessAfterInitialization(result, beanName);
			if (current == null) {
				return result;
			}
			result = current;
		}
		return result;
	}
13.1在此方法会有的对应的beanPostprocess对bean进行aop增强
org.springframework.aop.framework.autoproxy.AbstractAutoProxyCreator#postProcessAfterInitialization@Override
public Object postProcessAfterInitialization(@Nullable Object bean, String beanName) {
if (bean != null) {
Object cacheKey = getCacheKey(bean.getClass(), beanName);
if (this.earlyProxyReferences.remove(cacheKey) != bean) {
return wrapIfNecessary(bean, beanName, cacheKey);
}
}
return bean;
}至此,spring bean的生命周期就大概算完成了。
BeanPostProcessor
- InstantiationAwareBeanPostProcessor.postProcessBeforeInstantiation()
- 实例化
- MergedBeanDefinitionPostProcessor.postProcessMergedBeanDefinition()
- InstantiationAwareBeanPostProcessor.postProcessAfterInstantiation()
- 自动注入
- InstantiationAwareBeanPostProcessor.postProcessProperties()
- Aware对象
- BeanPostProcessor.postProcessBeforeInitialization()
- 初始化
- BeanPostProcessor.postProcessAfterInitialization()
BeanDefinitionRegistryPostProcessor
postProcessBeanDefinitionRegistry方法可以注册beanDefinition
spring容器启动过程
Spring启动流程详解| ProcessOn免费在线作图,在线流程图,在线思维导图
二、spring mvc:
1. spring mvc 执行流程:
1.在容器启动过程中,会调用requestmappingHandlermapping中的初始化方法将拥有controller或者@requestmapping的类中的方法扫描并且根据路由映射起来。
@Override
	@SuppressWarnings("deprecation")
	public void afterPropertiesSet() {
		this.config = new RequestMappingInfo.BuilderConfiguration();
		this.config.setTrailingSlashMatch(useTrailingSlashMatch());
		this.config.setContentNegotiationManager(getContentNegotiationManager());

		if (getPatternParser() != null) {
			this.config.setPatternParser(getPatternParser());
			Assert.isTrue(!this.useSuffixPatternMatch && !this.useRegisteredSuffixPatternMatch,
					"Suffix pattern matching not supported with PathPatternParser.");
		}
		else {
			this.config.setSuffixPatternMatch(useSuffixPatternMatch());
			this.config.setRegisteredSuffixPatternMatch(useRegisteredSuffixPatternMatch());
			this.config.setPathMatcher(getPathMatcher());
		}

		super.afterPropertiesSet();
	}
2.在请求过来的时候,dispatcherservlet首先根据请求信息找到对应handlerexecutionChain,这个对象中包含了方法以及拦截器3.方法。3.
@Nullable
	protected HandlerExecutionChain getHandler(HttpServletRequest request) throws Exception {
		if (this.handlerMappings != null) {
			for (HandlerMapping mapping : this.handlerMappings) {
				HandlerExecutionChain handler = mapping.getHandler(request);
				if (handler != null) {
					return handler;
				}
			}
		}
		return null;
	}
3.然后根据handler适配成对应的handleradapter,接着就调用拦截器的preHandler方法
该方法返回true后执行真正的业务方法:
				if (!mappedHandler.applyPreHandle(processedRequest, response)) {
					return;
				}

				// Actually invoke the handler.
				mv = ha.handle(processedRequest, response, mappedHandler.getHandler());
4.在org.springframework.web.servlet.mvc.method.annotation.ServletInvocableHandlerMethod#invokeAndHandle方法中会执行业务方法并且根据返回类型选择相应的returnvaluehandler进行返回值的处理。
	public void invokeAndHandle(ServletWebRequest webRequest, ModelAndViewContainer mavContainer,
			Object... providedArgs) throws Exception {

		Object returnValue = invokeForRequest(webRequest, mavContainer, providedArgs);
		setResponseStatus(webRequest);

		if (returnValue == null) {
			if (isRequestNotModified(webRequest) || getResponseStatus() != null || mavContainer.isRequestHandled()) {
				disableContentCachingIfNecessary(webRequest);
				mavContainer.setRequestHandled(true);
				return;
			}
		}
		else if (StringUtils.hasText(getResponseStatusReason())) {
			mavContainer.setRequestHandled(true);
			return;
		}

		mavContainer.setRequestHandled(false);
		Assert.state(this.returnValueHandlers != null, "No return value handlers");
		try {
			this.returnValueHandlers.handleReturnValue(
					returnValue, getReturnValueType(returnValue), mavContainer, webRequest);
		}
		catch (Exception ex) {
			if (logger.isTraceEnabled()) {
				logger.trace(formatErrorForReturnValue(returnValue), ex);
			}
			throw ex;
		}
	}
@Nullable
private HandlerMethodReturnValueHandler selectHandler(@Nullable Object value, MethodParameter returnType) {
boolean isAsyncValue = isAsyncReturnValue(value, returnType);
for (HandlerMethodReturnValueHandler handler : this.returnValueHandlers) {
if (isAsyncValue && !(handler instanceof AsyncHandlerMethodReturnValueHandler)) {
continue;
}
if (handler.supportsReturnType(returnType)) {
return handler;
}
}
return null;
}@Override
public void handleReturnValue(@Nullable Object returnValue, MethodParameter returnType,
ModelAndViewContainer mavContainer, NativeWebRequest webRequest) throws Exception {
HandlerMethodReturnValueHandler handler = selectHandler(returnValue, returnType);
if (handler == null) {
throw new IllegalArgumentException("Unknown return value type: " + returnType.getParameterType().getName());
}
handler.handleReturnValue(returnValue, returnType, mavContainer, webRequest);
}4.1注意,如果是respnseBody返回类型,会在org.springframework.web.servlet.mvc.method.annotation.RequestResponseBodyMethodProcessor#handleReturnValue方法中直接进行json返回。同时在输出时可以有扩展点responBodyAdvice的beforeBodyWrite方法进行返回值特别处理。
if (selectedMediaType != null) {
			selectedMediaType = selectedMediaType.removeQualityValue();
			for (HttpMessageConverter<?> converter : this.messageConverters) {
				GenericHttpMessageConverter genericConverter = (converter instanceof GenericHttpMessageConverter ?
						(GenericHttpMessageConverter<?>) converter : null);
				if (genericConverter != null ?
						((GenericHttpMessageConverter) converter).canWrite(targetType, valueType, selectedMediaType) :
						converter.canWrite(valueType, selectedMediaType)) {
					body = getAdvice().beforeBodyWrite(body, returnType, selectedMediaType,
							(Class<? extends HttpMessageConverter<?>>) converter.getClass(),
							inputMessage, outputMessage);
					if (body != null) {
						Object theBody = body;
						LogFormatUtils.traceDebug(logger, traceOn ->
								"Writing [" + LogFormatUtils.formatValue(theBody, !traceOn) + "]");
						addContentDispositionHeader(inputMessage, outputMessage);
						if (genericConverter != null) {
							genericConverter.write(body, targetType, selectedMediaType, outputMessage);
						}
						else {
							((HttpMessageConverter) converter).write(body, selectedMediaType, outputMessage);
						}
					}
					else {
						if (logger.isDebugEnabled()) {
							logger.debug("Nothing to write: null body");
						}
					}
					return;
				}
			}
		}
5.最后调用拦截器的其他两个方法,完美。


 879
879


 被折叠的 条评论
为什么被折叠?
被折叠的 条评论
为什么被折叠?
 到【灌水乐园】发言


