


官方教程地址:https://nativesupport.dcloud.net.cn/AppDocs/usesdk/android
uni-app 打包成apk需要借助官方Android 离线sdk 和Android Studio进行打包
一、下载 Android Studio
https://developer.android.google.cn/studio
二、下载uni-app Android离线sdk
https://nativesupport.dcloud.net.cn/AppDocs/download/android.html
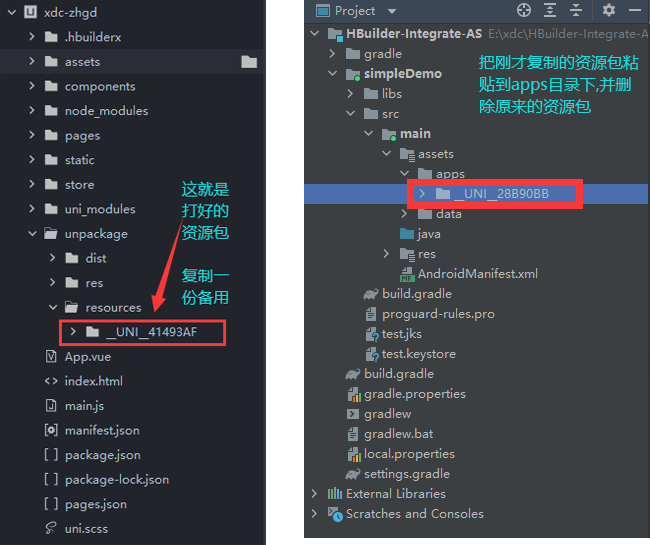
解压后目录
|-- HBuilder-Hello App离线打包演示应用
|-- HBuilder-Integrate-AS 集成uni-app的最简示例
|-- SDK SDK库文件目录
|-- Feature-Android.xls Android平台各扩展Feature API对应的详细配置
|-- Readme.txt 版本说明文件及注意事项
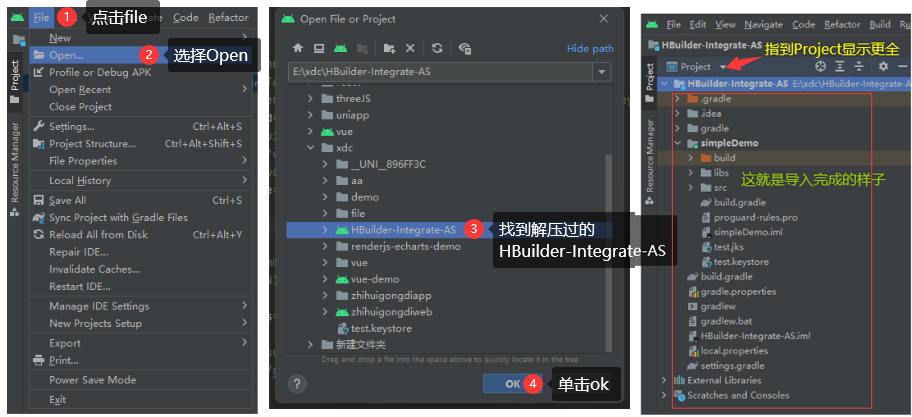
|-- UniPlugin-Hello-AS uni原生插件开发示例三、打开Android Studio导入项目HBuilder-Integrate-AS
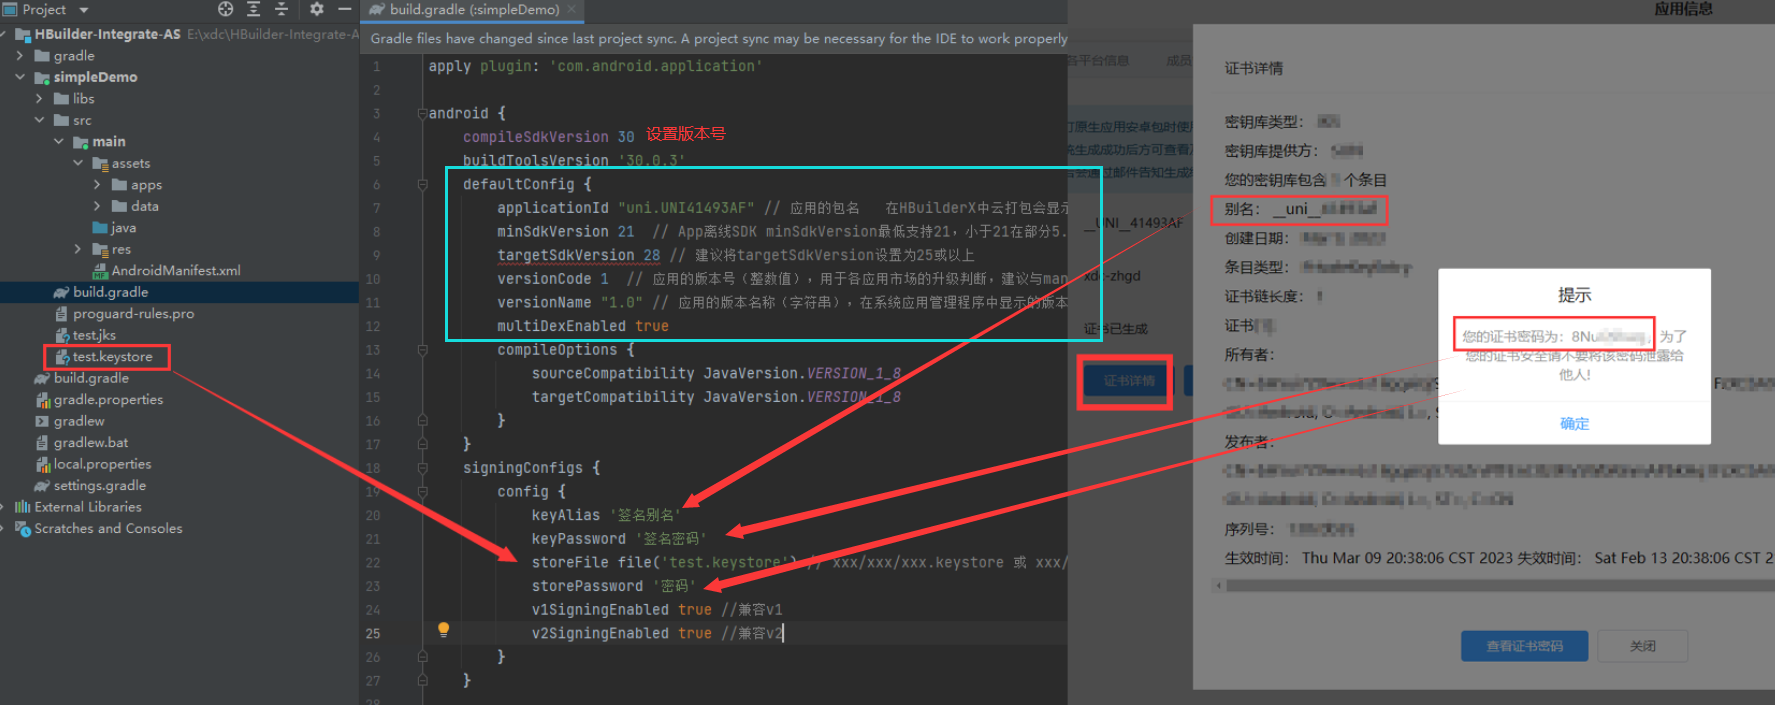
四、修改配置文件
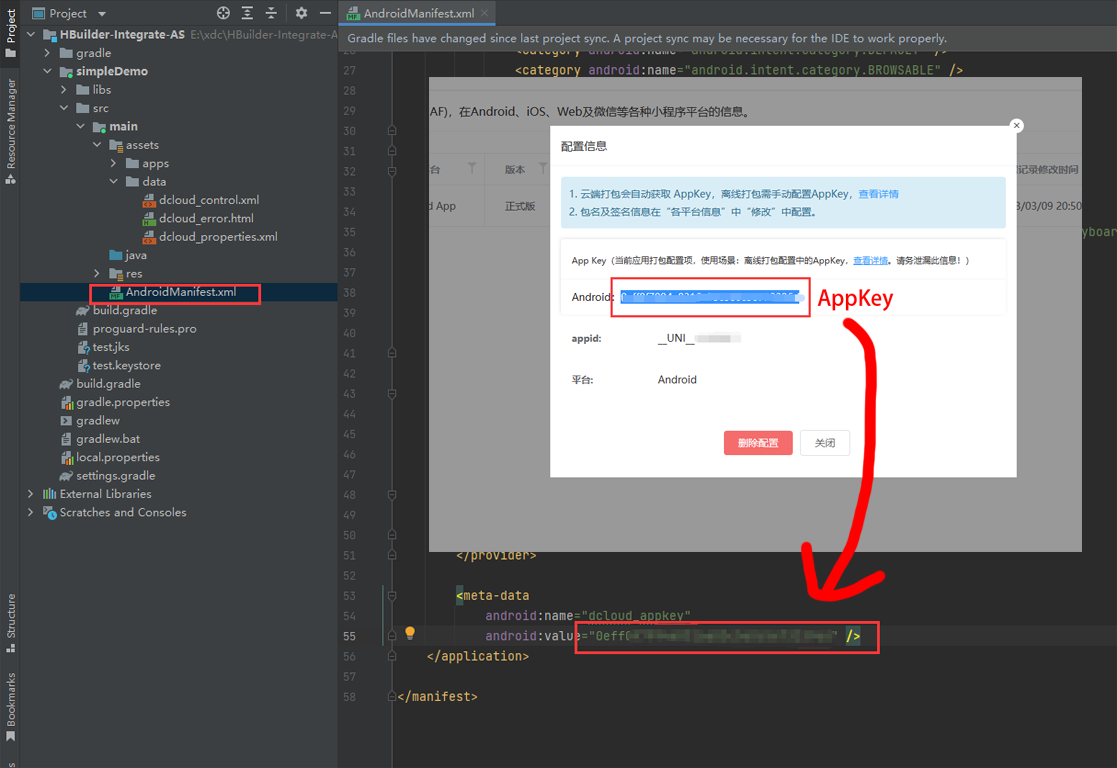
3.1.10版本起需要申请 Appkey,申请请参考
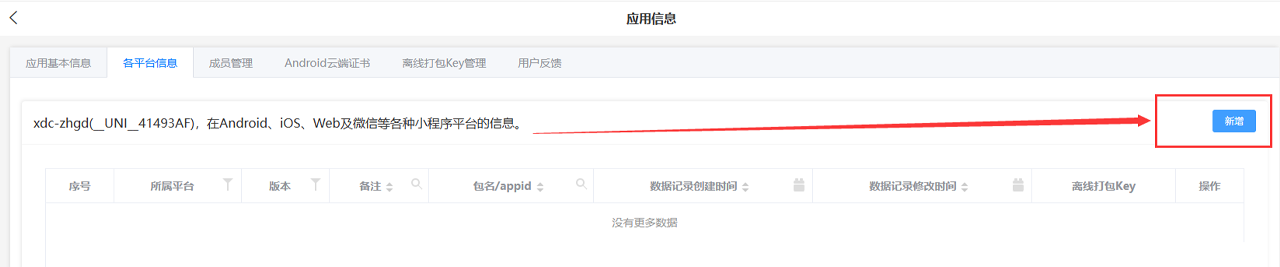
登录开发者中心
进入自己的应用

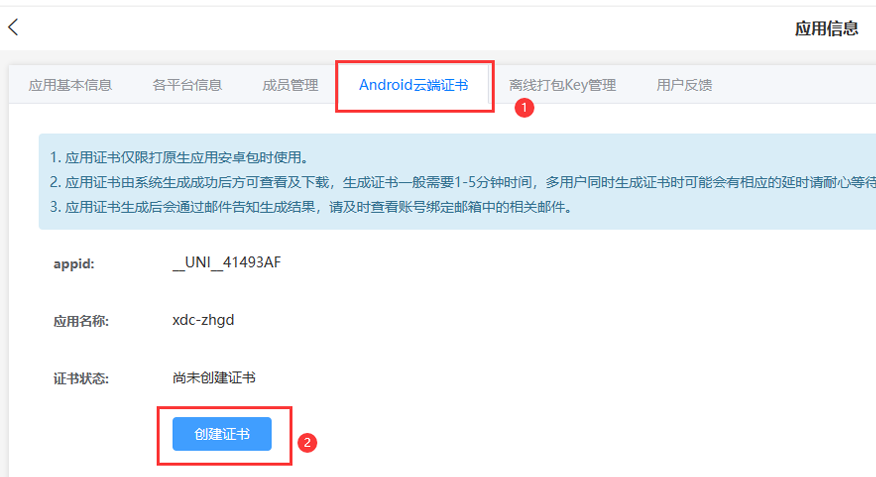
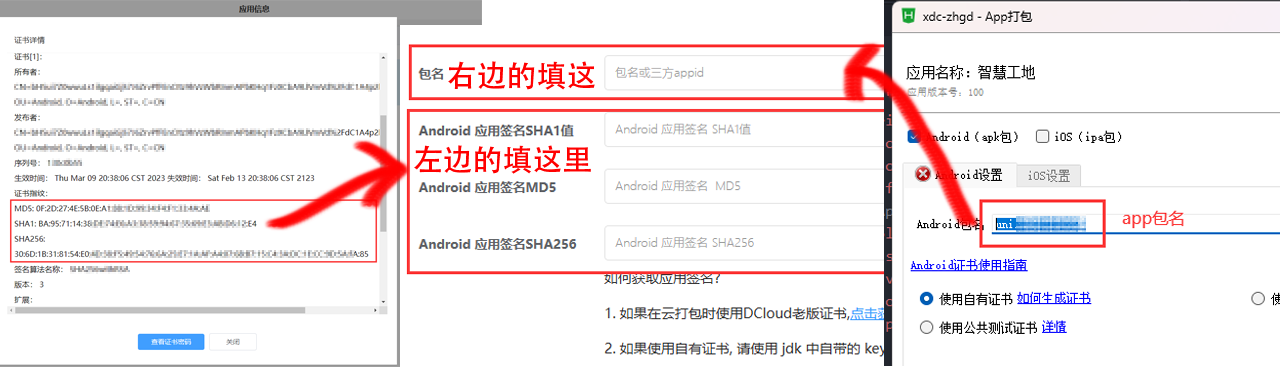
创建Android 证书
创建以及查看离线AppKey


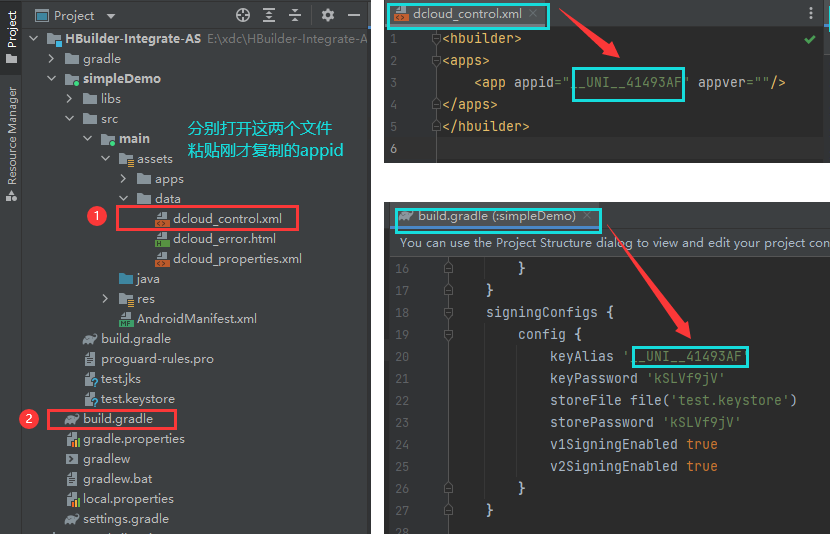
打开Androidmanifest.xml, 导航到Application节点,创建meta-data节点,name为dcloud_appkey,value为申请的AppKey如下:
<application
    ...>
    <meta-data
        android:name="dcloud_appkey"
        android:value="替换为自己申请的Appkey" />
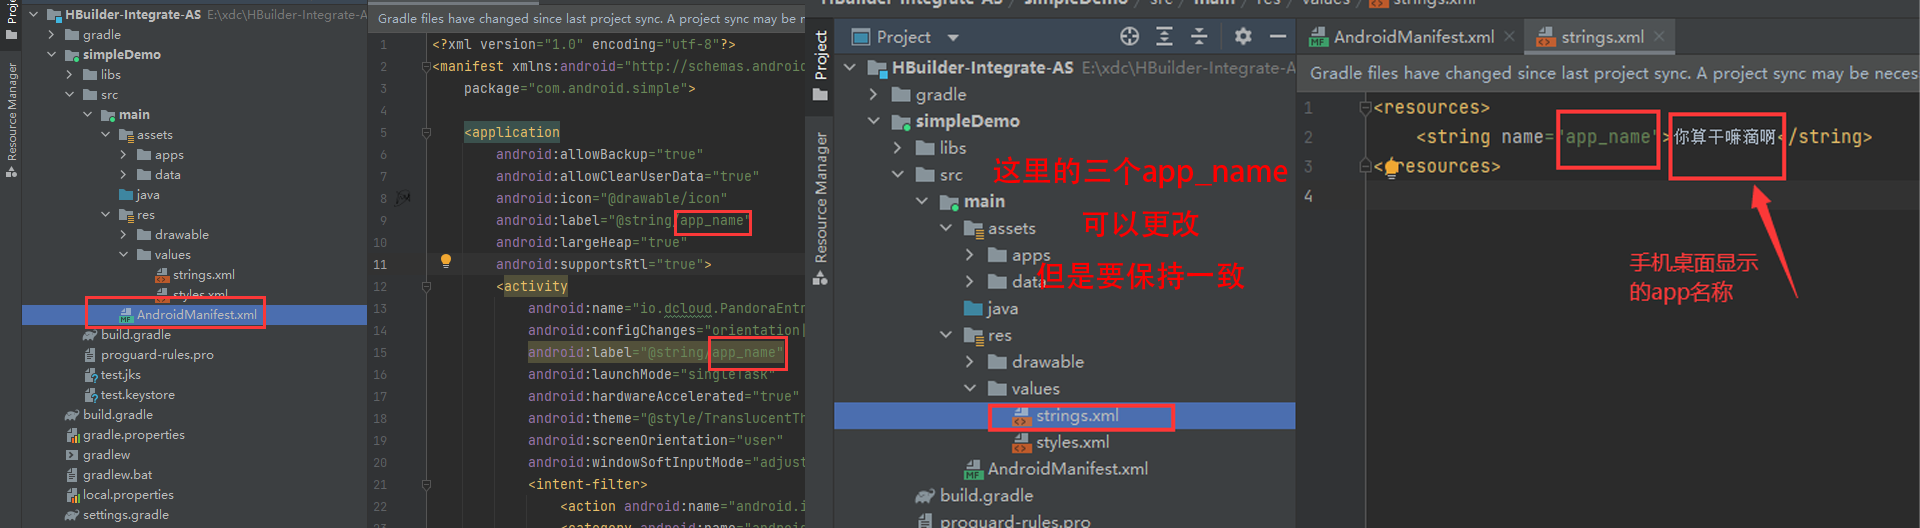
设置app名称
设置版本号以及AppKey
test.keystore 是下载下来的证书
配置应用启动页及provider节点
将下述activity信息添加到Androidmanifest.xml的application节点中
注意:新建的项目默认会有一个MainActivity的节点,必须删掉!
注意:为适配折叠屏,需要在PandoraEntryActivity的android:configChanges属性中追加“smallestScreenSize|screenLayout|screenSize”,参考如下配置。
注意:为适配暗黑模式,需要在PandoraEntryActivity的android:configChanges属性中追加“uiMode”,参考如下配置。
    <activity
        android:name="io.dcloud.PandoraEntry"
        android:configChanges="orientation|keyboardHidden|keyboard|navigation"
        android:label="@string/app_name"
        android:launchMode="singleTask"
        android:hardwareAccelerated="true"
        android:theme="@style/TranslucentTheme"
        android:screenOrientation="user"
        android:windowSoftInputMode="adjustResize" >
        <intent-filter>
            <action android:name="android.intent.action.MAIN" />
            <category android:name="android.intent.category.LAUNCHER" />
        </intent-filter>
        <intent-filter>
            <category android:name="android.intent.category.DEFAULT" />
            <category android:name="android.intent.category.BROWSABLE" />
            <action android:name="android.intent.action.VIEW" />
            <data android:scheme=" " />
        </intent-filter>
    </activity>
    <activity
        android:name="io.dcloud.PandoraEntryActivity"
        android:launchMode="singleTask"
        android:configChanges="orientation|keyboardHidden|screenSize|mcc|mnc|fontScale|keyboard|smallestScreenSize|screenLayout|screenSize|uiMode"
        android:hardwareAccelerated="true"
        android:permission="com.miui.securitycenter.permission.AppPermissionsEditor"
        android:screenOrientation="user"
        android:theme="@style/DCloudTheme"
        android:windowSoftInputMode="adjustResize">
    </activity>
添加provider信息到Androidmanifest.xml的application节点中(3.3.7及以上版本,可以不添加)
<!--provider节点必须添加-->
<provider
    android:name="io.dcloud.common.util.DCloud_FileProvider"
    android:authorities="${apk.applicationId}.dc.fileprovider"
    android:exported="false"
    android:grantUriPermissions="true">
    <meta-data
        android:name="android.support.FILE_PROVIDER_PATHS"
        android:resource="@xml/dcloud_file_provider" />
</provider>
注意:${apk.applicationId} 必须替换成当前应用的包名
如果集成离线SDK时需要重写application,必须继承自DCloudApplication,否则会导致SDK中业务逻辑无法正常运行。
将对应的application配置到Androidmanifest.xml中(如下),并添加tools:replace="android:name"以防出现冲突。(我没用过)
<application
    android:name="io.dcloud.test.TestApplication"
    android:icon="@drawable/icon"
    android:label="@string/app_name"
    tools:replace="android:name">
</application>
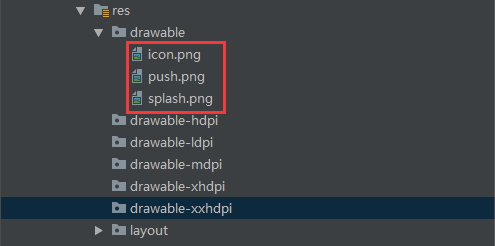
7. 配置应用图标和启动界面
图标名称
icon.png为应用的图标。
push.png为推送消息的图标。
splash.png为应用启动页的图标。
将icon.png、push.png、splash.png放置到drawable,drawable-ldpi,drawable-mdpi,drawable-hdpi,drawable-xhdpi,drawable-xxhdpi文件夹下,不同文件夹下对应不同图片尺寸,可参考文档
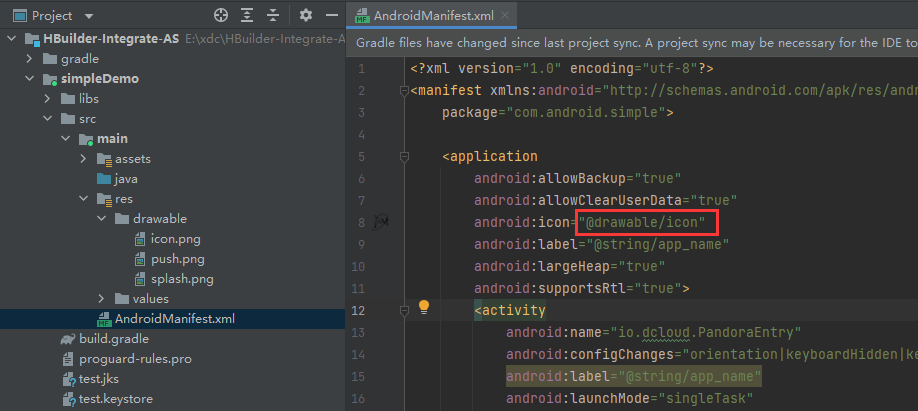
修改Androidmanifest.xml中application节点的icon属性为@drawable/icon。如下图:
注意:splash.png在不同设备上显示效果不一样,为防止出现拉伸的状况,建议使用Android studio生成.9.png类型图片,可参考文档
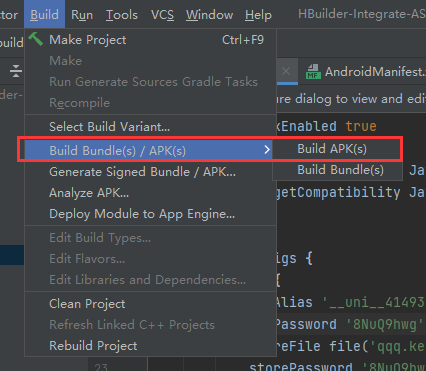
五、运行打包
build Bundle是谷歌应用商店的格式
六、打包后apk的路径
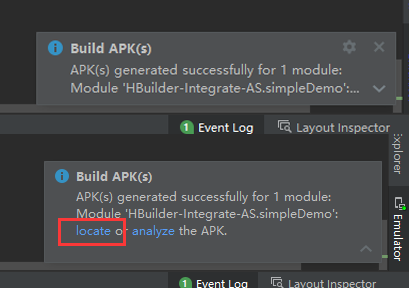
打包结束后Android Studio会在右下角提示 点一下就会变成下面的模样,然后点击locate就会在文件资源管理器中打开对应路径
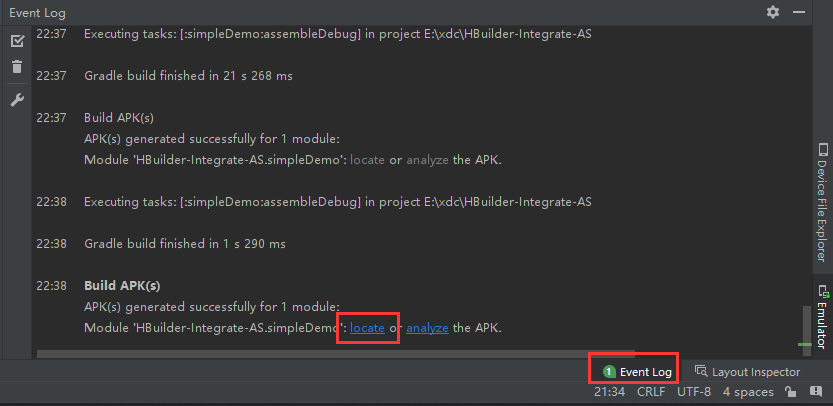
万一我错过了弹窗怎么办?
别着急,在Android Studio右下角有一个Tag ,叫做 Event Log , 点击它也可以打开apk目录
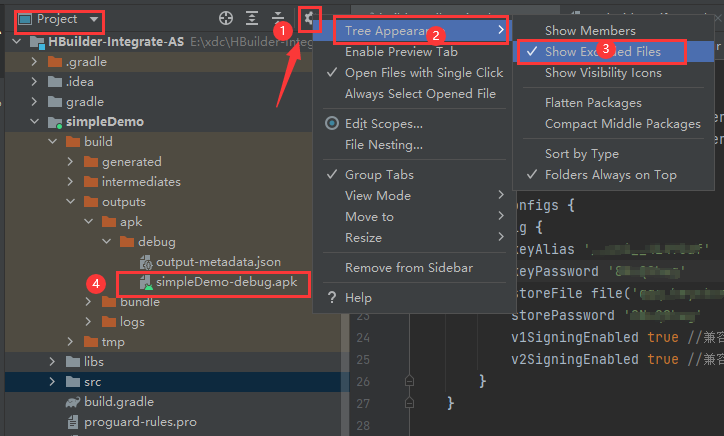
我的Android Studio没有Tag怎么办
同样不用着急,还有办法,一般打好的包都会在这个目录下


 5882
5882


 被折叠的 条评论
为什么被折叠?
被折叠的 条评论
为什么被折叠?
 到【灌水乐园】发言


