


目录
OrangepiPro初体验
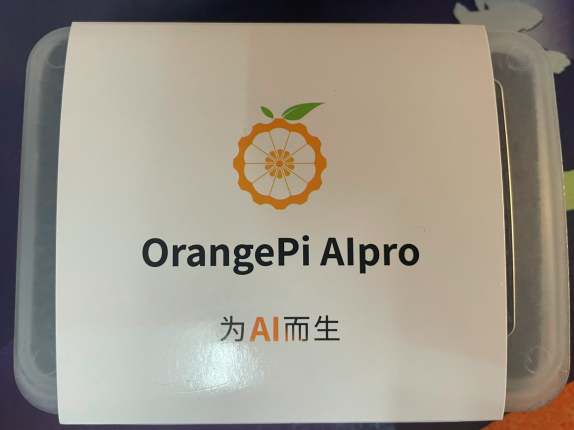
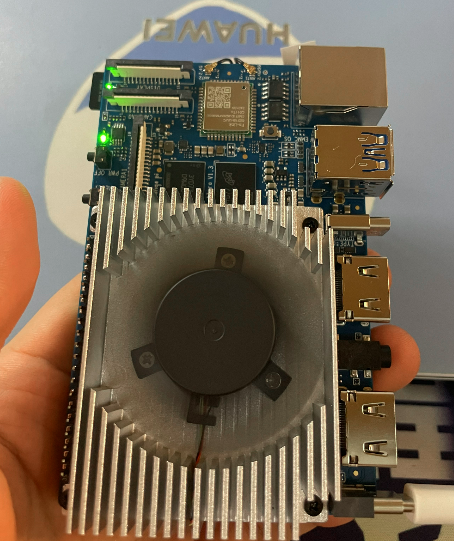
终于!怀着激动的心情拿到了期待已久的开发板,迫不及待赶紧拆箱,映入眼帘的只有一个字:酷!正如下面几个大字所写:为AI而生。该开发板搭载华为昇腾AI处理器。能覆盖生态开发板者的主流应用场景,让用户实践各种创新场景,并为其提供配套的软硬件。丰富的接口更是赋予了Orange Pi AIpro强大的可拓展性。包括两个HDMI输出、GPIO接口、Type-C电源接口、支持SATA/NVMe SSD 2280的M.2插槽、TF插槽、千兆网口、两个USB3.0、一个USB Type-C 3.0、一个Micro USB、两个MIPI摄像头、一个MIPI屏等,预留电池接口。在操作系统方面,Orange Pi AIpro可运行Ubuntu、openEuler操作系统,满足大多数AI算法原型验证、推理应用开发的需求。实物如下:
前述:
本文将不再介绍获取ip、连接wifi、vnc等操作,详情查看OrangpiPro官方手册即可。官方地址。
作者认为后续的进一步学习或开发都应该建立在有基本了解的前提下,所以本文的宗旨就是带刚入门的初级开发者实现模型部署的完整流程。且本文内容还涉及在部署模型时所遇到的问题及其解决方法。每一步都有详细的步骤,避免踩坑。对刚入门进行学习的开发者来说,简直是不要太友好。相信根据本文部署完成后,会对流程有一些较为清楚的认识,对以后其他模型部署以及学习会有很大的帮助。创造不易,且看且珍惜。
一、硬件准备
Ubuntu22.04_x86系统(虚拟机)
OrangepiPro开发板
二、安装CANN工具链(虚拟机)
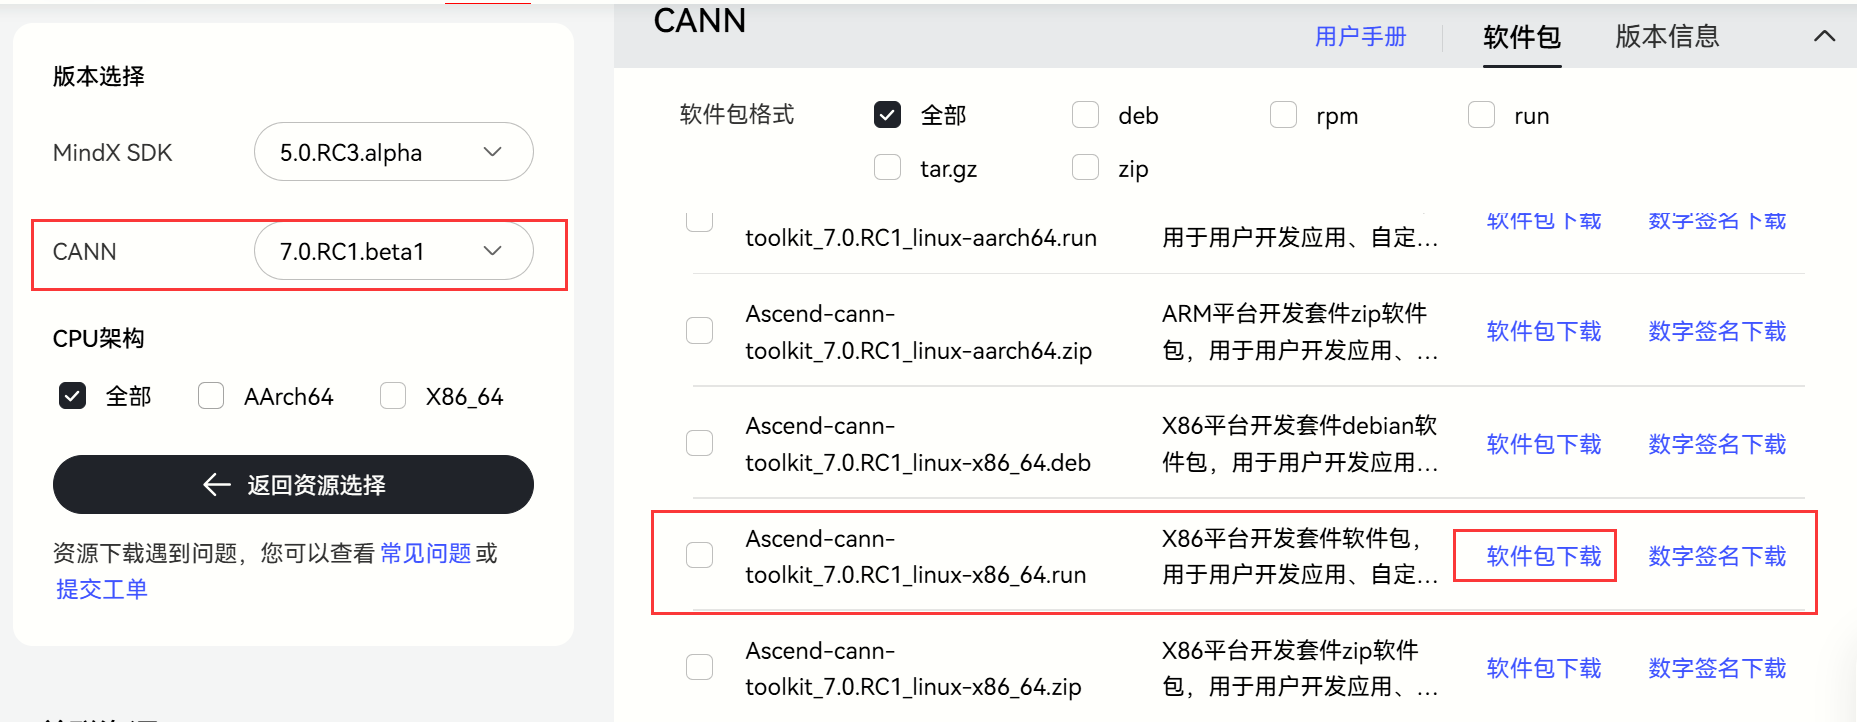
异构计算架构CANN是华为针对AI场景推出的异构计算架构,向上支持多种AI框架,包括MindSpore、PyTorch、TensorFlow等,向下服务AI处理器与编程,发挥承上启下的关键作用,是提升昇腾AI处理器计算效率的关键平台。所以CANN工具链是我们必备工具链。打开ubuntu的浏览器:资源下载地址。
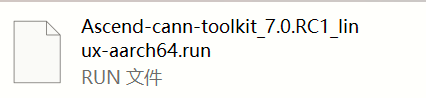
下载完成后,自动保存在Downloads目录下,如下所示:

这里我已经给软件包添加了执行权限,如果初次下载请使用添加可执行权限。后续使用安装命令进行安装。安装命令:
./Ascend-cann-toolkit_7.0.RC1_linux-x86_64.run --install。安装完成后,配置环境变量。使用命令:vi ~/.bashrc。将下述命令粘贴到文件里,这样就可以永久有效使用了,而不是只对当前命令窗口有效。
source /home/qjl/Ascend/ascend-toolkit/set_env.sh
export LD_LIBRARY_PATH=/home/qjl/Ascend/ascend-toolkit/7.0.RC1/x86_64-linux/devlib/x86_64:$LD_LIBRARY_PATH
添加成功后,使用
source ~/.bashrc命令来刷新使得文件配置生效。此时我们就可以使用atc命令来转换模型咯!如下,出现下面内容说明我们atc命令可以使用。

三、配置模型转换环境(虚拟机)
1.安装miniconda 。
//linux_x86架构下的conda
wget https://repo.anaconda.com/miniconda/Miniconda3-py37_4.12.0-Linux-x86_64.sh
bash Miniconda3-py37_4.12.0-Linux-x86_64.sh
2.创建环境。
这里使用conda来创建环境,这里我创建的为python 3.9版本。创建环境流程这里就不多赘述,具体详情查看创建环境教程。
3.安装依赖包
pip install attrs numpy decorator sympy cffi pyyaml pathlib2 psutil protobuf scipy requests absl-py wheel typing_extensions -i https://mirrors.huaweicloud.com/repository/pypi/simple
这里安装完成后,如果哪些包出现依赖问题,则单独装一下该包即可。
四、转换模型
1. 查看设备号(开发板)
使用命令:
npu-smi info,查看设备号这个操作是在开发板上进行的,上面的操作都是在ubuntu上进行的(当然也可以在开发板上进行,只不过本文演示是在ubuntu_x86)。

2. 使用ATC命令转换onnx模型为om模型(虚拟机)
atc --model=/home/qjl/cup.onnx --framework=5 --output=/home/qjl/cup --soc_version=Ascend310B4
该命令的具体参数这里不多介绍,详情请查看官方手册即可。
我们使用完命令后,等待几分钟转换好om模型。此时大功告成!废话不多说,立马部署到开发板上!
补:使用ATC命令时遇到问题
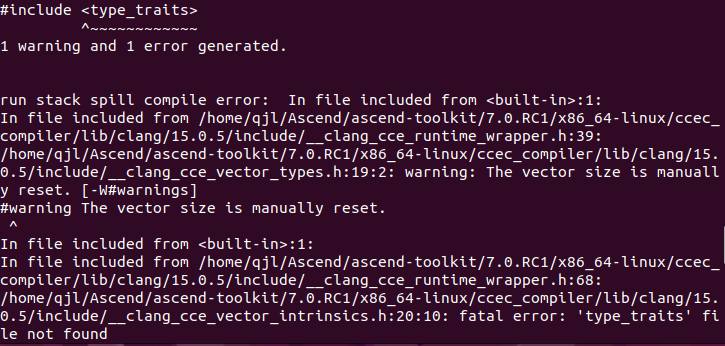
问题一:
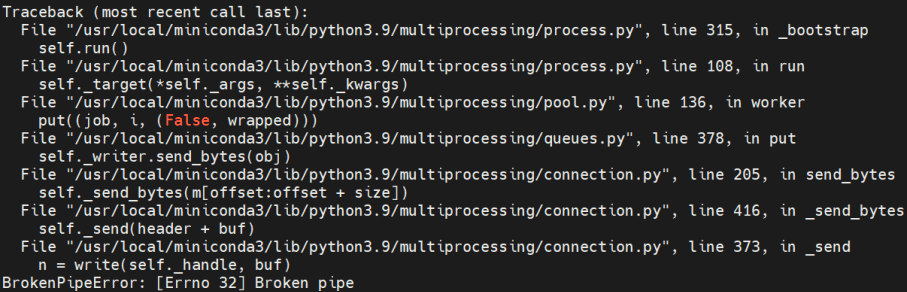
这个情况说明内存崩溃。这个问题原以为是因为训练模型的时候num_worker数量太大导致的问题,于是修改num_worker=0重新训练模型,将模型导入linux中转换时还是出现该错误,一时不知如何是好。但最终还是找到解决办法,将下面命令导入环境变量。设置最大核心数即可。编译过程仅使用一个核心,为了避免由于使用过多核心导致的资源竞争或内存不足问题。export TE_PARALLEL_COMPILER=1 export MAX_COMPILE_CORE_NUMBER=1这里和上面设置环境变量一样,可以设置到
~/.bashrc中,使其永久生效。
问题二:
找不到<type_traits>(C++库),这是因为缺失C++库导致的。于是我搜索本地gcc及g++库,结果发现还没有安装编译器,如下所示。
既然这样,我们使用命令:sudo apt install build-essential,来安装编译工具包。这个工具包里包含了编译时所需要的各种工具以及相应的库文件。安装完成以后,我们就可以使用之前的命令进行模型转换咯~

五、模型推理(开发板)
1. 在板端安装CANN
使用命令./Ascend-cann-toolkit_7.0.RC1_linux-aarch64.run --install进行安装。安装完成后,和在linux_x86端一样设置环境变量等操作,这里不再赘述。
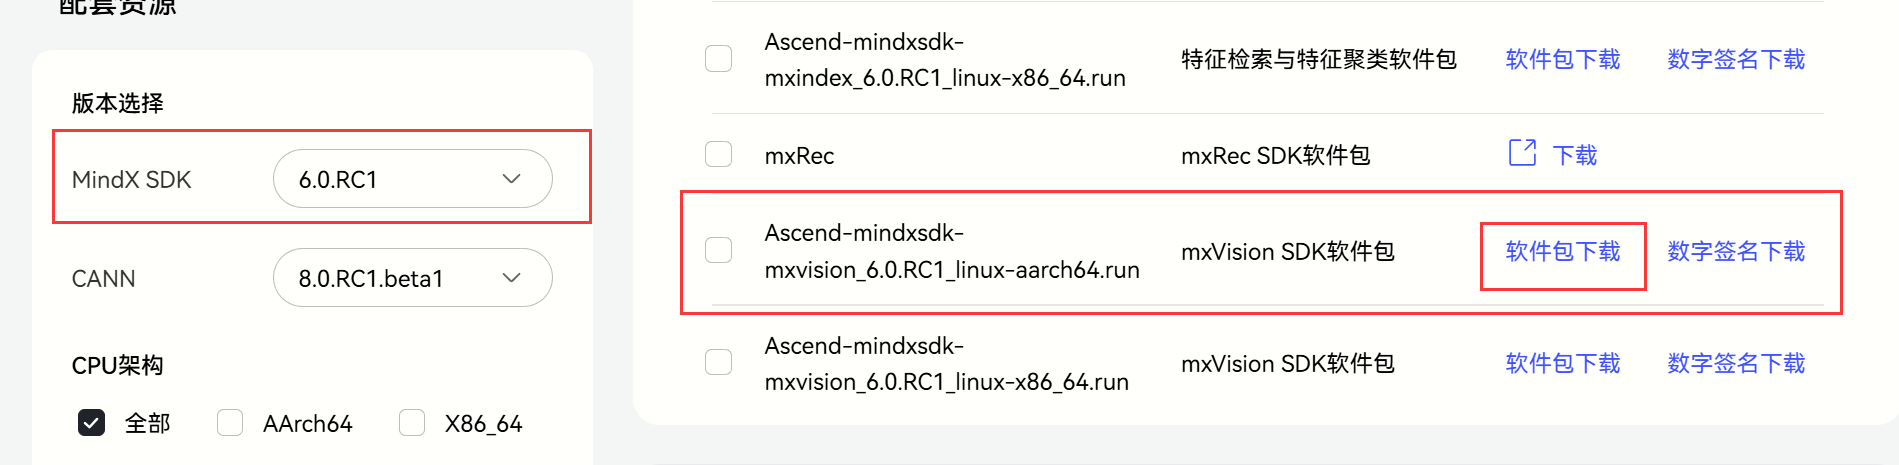
2. 安装Mindx,用于推理。
注意:这里只有当安装好CANN后再进行安装Mindx!
下载好以后,执行
./Ascend-mindxsdk-mxvision_6.0.RC1_linux-aarch64.run --install进行安装。
安装完成后vi ~/.bashrc,添加source /home/HwHiAiUser/Mindx/mxVision/set_env.sh。添加完成后使用source ~/.bashrc使得文件生效。
3. 使用conda创建虚拟环境- python=3.9
//arm架构下的conda
wget https://repo.anaconda.com/miniconda/Miniconda3-py37_4.9.2-Linux-aarch64.sh
bash Miniconda3-py37_4.9.2-Linux-aarch64.sh
(1)安装opencv:
pip install opencv-python
(2)安装numpy:pip install numpy
(3)安装torch以及torchvision。下载好whl文件安装即可。点击:下载地址。如果缺少哪个包就再pip安装一下即可。(4)安装mindx包。
进入Mindx安装目录,路径如下。找到whl文件使用pip进行安装即可。


4. python推理代码。
(1)后处理代码(公用)
def letterbox(img, new_shape=(640, 640), color=(114, 114, 114), auto=False, scaleFill=False, scaleup=True):
    # Resize image to a 32-pixel-multiple rectangle https://github.com/ultralytics/yolov3/issues/232
    shape = img.shape[:2]  # current shape [height, width]
    if isinstance(new_shape, int):
        new_shape = (new_shape, new_shape)

    # Scale ratio (new / old)
    r = min(new_shape[0] / shape[0], new_shape[1] / shape[1])
    if not scaleup:  # only scale down, do not scale up (for better test mAP)
        r = min(r, 1.0)

    # Compute padding
    ratio = r, r  # width, height ratios
    new_unpad = int(round(shape[1] * r)), int(round(shape[0] * r))
    dw, dh = new_shape[1] - new_unpad[0], new_shape[0] - new_unpad[1]  # wh padding
    if auto:  # minimum rectangle
        dw, dh = np.mod(dw, 64), np.mod(dh, 64)  # wh padding
    elif scaleFill:  # stretch
        dw, dh = 0.0, 0.0
        new_unpad = (new_shape[1], new_shape[0])
        ratio = new_shape[1] / shape[1], new_shape[0] / shape[0]  # width, height ratios

    dw /= 2  # divide padding into 2 sides
    dh /= 2

    if shape[::-1] != new_unpad:  # resize
        img = cv2.resize(img, new_unpad, interpolation=cv2.INTER_LINEAR)
    top, bottom = int(round(dh - 0.1)), int(round(dh + 0.1))
    left, right = int(round(dw - 0.1)), int(round(dw + 0.1))
    img = cv2.copyMakeBorder(img, top, bottom, left, right, cv2.BORDER_CONSTANT, value=color)  # add border
    return img, ratio, (dw, dh)


def non_max_suppression(
        prediction,
        conf_thres=0.25,
        iou_thres=0.45,
        classes=None,
        agnostic=False,
        multi_label=False,
        labels=(),
        max_det=300,
        nm=0,  # number of masks
):
    """Non-Maximum Suppression (NMS) on inference results to reject overlapping detections

    Returns:
         list of detections, on (n,6) tensor per image [xyxy, conf, cls]
    """

    if isinstance(prediction, (list, tuple)):  # YOLOv5 model in validation model, output = (inference_out, loss_out)
        prediction = prediction[0]  # select only inference output

    device = prediction.device
    mps = 'mps' in device.type  # Apple MPS
    if mps:  # MPS not fully supported yet, convert tensors to CPU before NMS
        prediction = prediction.cpu()
    bs = prediction.shape[0]  # batch size
    nc = prediction.shape[2] - nm - 5  # number of classes
    xc = prediction[..., 4] > conf_thres  # candidates

    # Checks
    assert 0 <= conf_thres <= 1, f'Invalid Confidence threshold {conf_thres}, valid values are between 0.0 and 1.0'
    assert 0 <= iou_thres <= 1, f'Invalid IoU {iou_thres}, valid values are between 0.0 and 1.0'

    # Settings
    # min_wh = 2  # (pixels) minimum box width and height
    max_wh = 7680  # (pixels) maximum box width and height
    max_nms = 30000  # maximum number of boxes into torchvision.ops.nms()
    time_limit = 0.5 + 0.05 * bs  # seconds to quit after
    multi_label &= nc > 1  # multiple labels per box (adds 0.5ms/img)

    t = time.time()
    mi = 5 + nc  # mask start index
    output = [torch.zeros((0, 6 + nm), device=prediction.device)] * bs
    for xi, x in enumerate(prediction):  # image index, image inference
        # Apply constraints
        # x[((x[..., 2:4] < min_wh) | (x[..., 2:4] > max_wh)).any(1), 4] = 0  # width-height
        x = x[xc[xi]]  # confidence

        # Cat apriori labels if autolabelling
        if labels and len(labels[xi]):
            lb = labels[xi]
            v = torch.zeros((len(lb), nc + nm + 5), device=x.device)
            v[:, :4] = lb[:, 1:5]  # box
            v[:, 4] = 1.0  # conf
            v[range(len(lb)), lb[:, 0].long() + 5] = 1.0  # cls
            x = torch.cat((x, v), 0)

        # If none remain process next image
        if not x.shape[0]:
            continue

        # Compute conf
        x[:, 5:] *= x[:, 4:5]  # conf = obj_conf * cls_conf

        # Box/Mask
        box = xywh2xyxy(x[:, :4])  # center_x, center_y, width, height) to (x1, y1, x2, y2)
        mask = x[:, mi:]  # zero columns if no masks

        # Detections matrix nx6 (xyxy, conf, cls)
        if multi_label:
            i, j = (x[:, 5:mi] > conf_thres).nonzero(as_tuple=False).T
            x = torch.cat((box[i], x[i, 5 + j, None], j[:, None].float(), mask[i]), 1)
        else:  # best class only
            conf, j = x[:, 5:mi].max(1, keepdim=True)
            x = torch.cat((box, conf, j.float(), mask), 1)[conf.view(-1) > conf_thres]

        # Filter by class
        if classes is not None:
            x = x[(x[:, 5:6] == torch.tensor(classes, device=x.device)).any(1)]

        # Check shape
        n = x.shape[0]  # number of boxes
        if not n:  # no boxes
            continue
        elif n > max_nms:  # excess boxes
            x = x[x[:, 4].argsort(descending=True)[:max_nms]]  # sort by confidence
        else:
            x = x[x[:, 4].argsort(descending=True)]  # sort by confidence

        # Batched NMS
        c = x[:, 5:6] * (0 if agnostic else max_wh)  # classes
        boxes, scores = x[:, :4] + c, x[:, 4]  # boxes (offset by class), scores
        i = torchvision.ops.nms(boxes, scores, iou_thres)  # NMS
        if i.shape[0] > max_det:  # limit detections
            i = i[:max_det]

        output[xi] = x[i]
        if mps:
            output[xi] = output[xi].to(device)
        if (time.time() - t) > time_limit:
            print(f'WARNING ⚠️ NMS time limit {time_limit:.3f}s exceeded')
            break  # time limit exceeded

    return output


def xywh2xyxy(x):
    # Convert nx4 boxes from [x, y, w, h] to [x1, y1, x2, y2] where xy1=top-left, xy2=bottom-right
    y = x.clone() if isinstance(x, torch.Tensor) else np.copy(x)
    y[:, 0] = x[:, 0] - x[:, 2] / 2  # top left x
    y[:, 1] = x[:, 1] - x[:, 3] / 2  # top left y
    y[:, 2] = x[:, 0] + x[:, 2] / 2  # bottom right x
    y[:, 3] = x[:, 1] + x[:, 3] / 2  # bottom right y
    return y


def get_labels_from_txt(path):
    labels_dict = dict()
    with open(path) as f:
        for cat_id, label in enumerate(f.readlines()):
            labels_dict[cat_id] = label.strip()
    return labels_dict


def scale_coords(img1_shape, coords, img0_shape, ratio_pad=None):
    # Rescale coords (xyxy) from img1_shape to img0_shape
    if ratio_pad is None:  # calculate from img0_shape
        gain = min(img1_shape[0] / img0_shape[0], img1_shape[1] / img0_shape[1])  # gain  = old / new
        pad = (img1_shape[1] - img0_shape[1] * gain) / 2, (img1_shape[0] - img0_shape[0] * gain) / 2  # wh padding
    else:
        gain = ratio_pad[0][0]
        pad = ratio_pad[1]

    coords[:, [0, 2]] -= pad[0]  # x padding
    coords[:, [1, 3]] -= pad[1]  # y padding
    coords[:, :4] /= gain
    clip_coords(coords, img0_shape)
    return coords


def clip_coords(boxes, shape):
    # Clip bounding xyxy bounding boxes to image shape (height, width)
    if isinstance(boxes, torch.Tensor):  # faster individually
        boxes[:, 0].clamp_(0, shape[1])  # x1
        boxes[:, 1].clamp_(0, shape[0])  # y1
        boxes[:, 2].clamp_(0, shape[1])  # x2
        boxes[:, 3].clamp_(0, shape[0])  # y2
    else:  # np.array (faster grouped)
        boxes[:, [0, 2]] = boxes[:, [0, 2]].clip(0, shape[1])  # x1, x2
        boxes[:, [1, 3]] = boxes[:, [1, 3]].clip(0, shape[0])  # y1, y2


def nms(box_out, conf_thres=0.4, iou_thres=0.5):
    try:
        boxout = non_max_suppression(box_out, conf_thres=conf_thres, iou_thres=iou_thres, multi_label=True)
    except:
        boxout = non_max_suppression(box_out, conf_thres=conf_thres, iou_thres=iou_thres)
    return boxout
(2)图片推理:将模型文件和图片、以及推理代码放在一个目录下。运行该文件即可。
# coding=utf-8
import cv2  # 图片处理三方库,用于对图片进行前后处理
import numpy as np  # 用于对多维数组进行计算
import torch  # 深度学习运算框架,此处主要用来处理数据
import time
import torchvision
from mindx.sdk import Tensor  # mxVision 中的 Tensor 数据结构
from mindx.sdk import base  # mxVision 推理接口

def draw_bbox(bbox, img0, color, wt, names):
    det_result_str = ''
    for idx, class_id in enumerate(bbox[:, 5]):
        if float(bbox[idx][4] < float(0.05)):
            continue
        img0 = cv2.rectangle(img0, (int(bbox[idx][0]), int(bbox[idx][1])), (int(bbox[idx][2]), int(bbox[idx][3])), color, wt)
        img0 = cv2.putText(img0, str(idx) + ' ' + names[int(class_id)], (int(bbox[idx][0]), int(bbox[idx][1] + 16)), cv2.FONT_HERSHEY_SIMPLEX, 0.5, (0, 0, 255), 1)
        img0 = cv2.putText(img0, '{:.4f}'.format(bbox[idx][4]), (int(bbox[idx][0]), int(bbox[idx][1] + 32)), cv2.FONT_HERSHEY_SIMPLEX, 0.5, (0, 0, 255), 1)
        det_result_str += '{} {} {} {} {} {}\n'.format(names[bbox[idx][5]], str(bbox[idx][4]), bbox[idx][0], bbox[idx][1], bbox[idx][2], bbox[idx][3])
    return img0

if __name__ == '__main__':

    # 初始化资源和变量
    base.mx_init()  # 初始化 mxVision 资源
    DEVICE_ID = 0  # 设备id
    model_path = 'best.om'  # 模型路径
    image_path = 'image.jpg'  # 测试图片路径

    # 数据前处理
    img_bgr = cv2.imread(image_path, cv2.IMREAD_COLOR)  # 读入图片
    img, scale_ratio, pad_size = letterbox(img_bgr, new_shape=[640, 640])  # 对图像进行缩放与填充,保持长宽比
    img = img[:, :, ::-1].transpose(2, 0, 1)  # BGR to RGB, HWC to CHW
    img = np.expand_dims(img, 0).astype(np.float32)  # 将形状转换为 channel first (1, 3, 640, 640),即扩展第一维为 batchsize
    img = np.ascontiguousarray(img) / 255.0  # 转换为内存连续存储的数组
    img = Tensor(img) # 将numpy转为转为Tensor类

    # 模型推理, 得到模型输出
    model = base.model(modelPath=model_path, deviceId=DEVICE_ID)  # 初始化 base.model 类
    output = model.infer([img])[0]  # 执行推理。输入数据类型:List[base.Tensor], 返回模型推理输出的 List[base.Tensor]

    # 后处理
    output.to_host()  # 将 Tensor 数据转移到内存
    output = np.array(output)  # 将数据转为 numpy array 类型
    boxout = nms(torch.tensor(output), conf_thres=0.4, iou_thres=0.5)  # 利用非极大值抑制处理模型输出,conf_thres 为置信度阈值,iou_thres 为iou阈值
    pred_all = boxout[0].numpy()  # 转换为numpy数组
    scale_coords([640, 640], pred_all[:, :4], img_bgr.shape, ratio_pad=(scale_ratio, pad_size))  # 将推理结果缩放到原始图片大小
    labels_dict = get_labels_from_txt('./coco_names.txt')  # 得到类别信息,返回序号与类别对应的字典
    img_dw = draw_bbox(pred_all, img_bgr, (0, 255, 0), 2, labels_dict)  # 画出检测框、类别、概率

    # 保存图片到文件
    cv2.imwrite('result.png', img_dw)
    print('save infer result success'
import cv2
import numpy as np
import torch
import time
import torchvision
from mindx.sdk import Tensor
from mindx.sdk import base

# 这里包括你已经提供的所有函数
# letterbox, non_max_suppression, xywh2xyxy, get_labels_from_txt, scale_coords, clip_coords, nms

def draw_bbox(bbox, img0, color, wt, names):
    det_result_str = ''
    for idx, class_id in enumerate(bbox[:, 5]):
        if float(bbox[idx][4] < float(0.05)):
            continue
        img0 = cv2.rectangle(img0, (int(bbox[idx][0]), int(bbox[idx][1])), (int(bbox[idx][2]), int(bbox[idx][3])), color, wt)
        img0 = cv2.putText(img0, str(idx) + ' ' + names[int(class_id)], (int(bbox[idx][0]), int(bbox[idx][1] - 10)), cv2.FONT_HERSHEY_SIMPLEX, 0.7, (0, 0, 255), 2)
        img0 = cv2.putText(img0, '{:.2f}'.format(bbox[idx][4]), (int(bbox[idx][0]), int(bbox[idx][1] - 30)), cv2.FONT_HERSHEY_SIMPLEX, 0.7, (0, 0, 255), 2)
        det_result_str += '{} {} {} {} {} {}\n'.format(names[bbox[idx][5]], str(bbox[idx][4]), bbox[idx][0], bbox[idx][1], bbox[idx][2], bbox[idx][3])
    return img0

def process_frame(frame, model, labels_dict, scale_ratio, pad_size, input_shape=(640, 640)):
    img, _, _ = letterbox(frame, new_shape=input_shape)
    img = img[:, :, ::-1].transpose(2, 0, 1)  # BGR to RGB, HWC to CHW
    img = np.expand_dims(img, 0).astype(np.float32)  # batch size 1
    img = np.ascontiguousarray(img) / 255.0
    img = Tensor(img)

    output = model.infer([img])[0]
    output.to_host()
    output = np.array(output)

    boxout = nms(torch.tensor(output), conf_thres=0.4, iou_thres=0.5)
    pred_all = boxout[0].numpy()
    scale_coords(input_shape, pred_all[:, :4], frame.shape, ratio_pad=(scale_ratio, pad_size))
    img_with_boxes = draw_bbox(pred_all, frame, (0, 255, 0), 2, labels_dict)

    return img_with_boxes

if __name__ == '__main__':
    # 初始化资源和变量
    base.mx_init()
    DEVICE_ID = 0
    model_path = 'best.om'
    video_path = 'video.mp4'
    output_video_path = 'result_video.mp4'

    # 初始化视频读取与写入
    cap = cv2.VideoCapture(video_path)
    fourcc = cv2.VideoWriter_fourcc(*'mp4v')
    fps = int(cap.get(cv2.CAP_PROP_FPS))
    frame_width = int(cap.get(cv2.CAP_PROP_FRAME_WIDTH))
    frame_height = int(cap.get(cv2.CAP_PROP_FRAME_HEIGHT))
    out = cv2.VideoWriter(output_video_path, fourcc, fps, (frame_width, frame_height))

    # 读取类别标签
    labels_dict = get_labels_from_txt('./coco_names.txt')

    # 加载模型
    model = base.model(modelPath=model_path, deviceId=DEVICE_ID)

    while cap.isOpened():
        ret, frame = cap.read()
        if not ret:
            break

        # 数据前处理
        img_bgr = frame
        img, scale_ratio, pad_size = letterbox(img_bgr, new_shape=[640, 640])

        # 处理帧
        processed_frame = process_frame(frame, model, labels_dict, scale_ratio, pad_size)

        # 写入处理后的帧
        out.write(processed_frame)

    # 释放资源
    cap.release()
    out.release()
    print('Video processing complete. Saved to', output_video_path)
遇到问题:
我们在运行推理代码时出现上述问题,原因是因为我们torch和torchvision的版本有点高,只需要降低版本即可。如使用torch==1.10.0 torchvision==0.11.0即可。当然这里不影响我们最后的结果,所以觉得烦的小伙伴可以降低版本,该问题就解决了。

六、效果展示(开发板)

图片推理结果: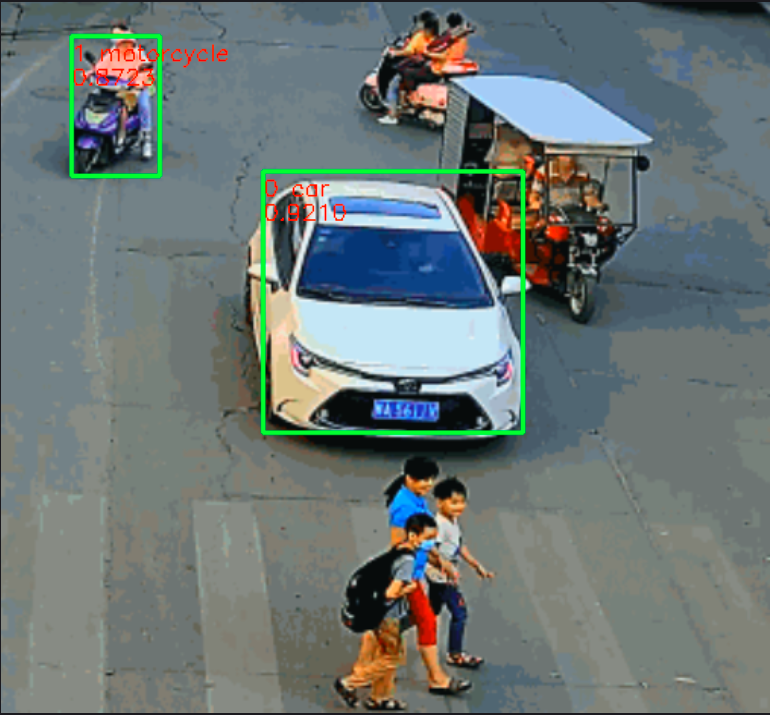
视频推理结果: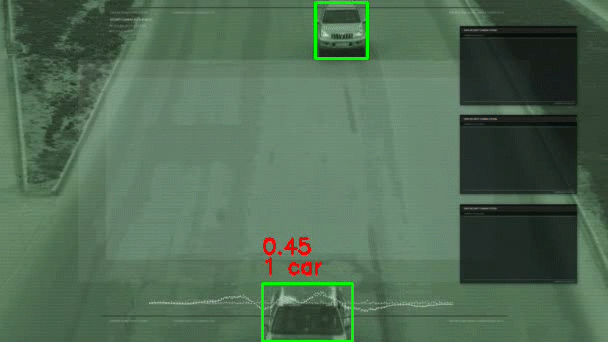
七、总结
这里我们使用自训练的车辆数据集模型,部署到开发板上可见效果很好,这里我们就完成了从0到1的全部流程,中间也遇到很多问题,也是通过查阅大量资料来解决的问题,这也是必备的学习方法之一。本人也是处于学习阶段,所以有错误的地方,希望各位积极指正,我们一起加油。


 680
680

 被折叠的 条评论
为什么被折叠?
被折叠的 条评论
为什么被折叠?
 到【灌水乐园】发言


