


图像增强的定义非常广泛,一般来说,图像增强是有目的地强调图像的整体或局部特性,例如改善图像的颜色、亮度和对比度等,将原来不清晰的图像变得清晰或强调某些感兴趣的特征,扩大图像中不同物体特征之间的差别,抑制不感兴趣的特征,提高图像的视觉效果。传统的图像增强已经被研究了很长时间,现有的方法可大致分为三类,空域方法是直接对像素值进行处理,如直方图均衡,伽马变换;频域方法是在某种变换域内操作,如小波变换;混合域方法是结合空域和频域的一些方法。传统的方法一般比较简单且速度比较快,但是没有考虑到图像中的上下文信息等,所以取得效果不是很好。
近年来,卷积神经网络在很多低层次的计算机视觉任务中取得了巨大突破,包括图像超分辨、去模糊、去雾、去噪、图像增强等。对比于传统方法,基于CNN的一些方法极大地改善了图像增强的质量。现有的方法大多是有监督的学习,对于一张原始图像和一张目标图像,学习它们之间的映射关系,来得到增强后的图像。但是这样的数据集比较少,很多都是人为调整的,因此需要自监督或弱监督的方法来解决这一问题。本实验采用经典算法对图像进行增强,并使用深度学习中的神经对抗网络模型对增强效果进行优化。
- 原始图像存在的问题
-
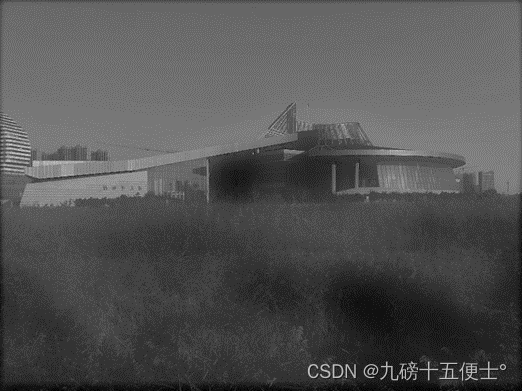
图1:原始图像
从图中可以看出,图片整体偏暗,亮度较低,而且对比度较低,图片与效果图像左右颠倒。通过绘制该图片的灰度直方图和累计直方图可以看出,图片中像素点的灰度值都集中在较低的区域。
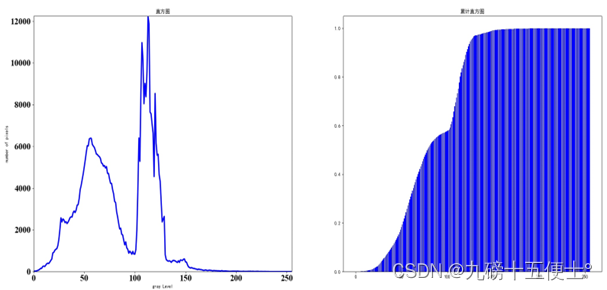
图2:原始图像灰度直方图和累计直方图
- 增强方法
- 直方图均衡化(HE)
一张图像的对比度可以理解为图像中细节可被肉眼分辨的程度,而图像的均衡化可以增强图像的对比度,可以通过灰度直方图来体现图像的对比度。在直方图中,较灰暗的图像颜色直方图分布往往分布在一个比较小的像素值范围内,而较为清晰图像的颜色直方图在整个像素灰度值范围内分布的比较均匀。因此我们可以得出图像对比度越高,在由灰度/像素个数构成的直角坐标系中横向跨度越大,纵向长度越趋于一致。在横坐标上跨度越长也就说明图像中使用的灰度值越多,也就能够更加清晰的反映图像中每一个细节与它周围的细节直接的差别。
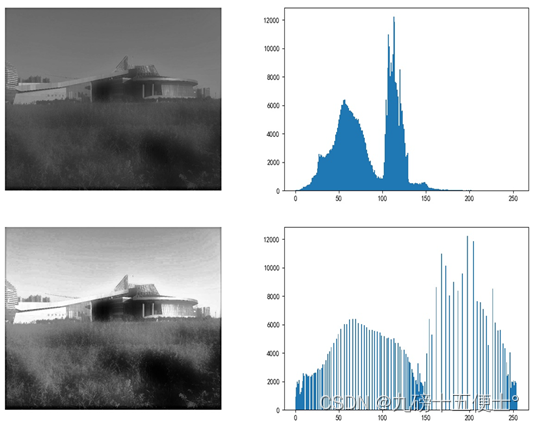
图3:直方图均衡化
从图像的灰度直方图可以看出,图片进行直方图均衡化后,像素点的灰度值范围被拉伸,图像灰度间距被拉开,使灰度分布均匀,从而增大对比度。
但直方图均衡化存在一些缺点:
1.增强效果不易控制,处理的结果总是得到全局均匀化的直方图。
2.均衡化图像的动态范围扩大,但量化级别反而减少了,导致某些图像细节消失。
3.对于直方图存在高峰的图像,经处理后对比度可能过分增强。
从图中可以看出均衡化后的图像填空亮度过高,且填空各部分之间存在不均匀,不平滑的问题。
- 对比度受限的自适应直方图均衡化(CLAHE):
为了提高图像的局部对比度,有人提出了AHE,即将图像划分为若干子块,对子块进行HE处理。对于这种处理方式,不难想到,AHE对局部对比度提高过大,会导致图像失真,此外,局部对比度过高还会放大图像中的噪声。
针对以上问题,就提出了对比度受限的自适应直方图均衡化(CLAHE),对子块中得到的直方图进行剪裁,使其幅值低于给定的上限。由于剪裁掉的部分是像素点的数量,因此不能丢掉。所以要将这部分像素点均匀的分布在整个灰度区间上,以保证没有像素点缺失,如下图:
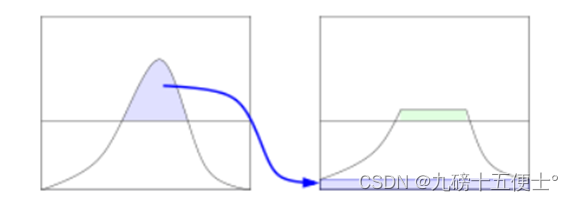
图4:对比度受限的自适应直方图均衡化
- 直方图规定化
所谓直方图规定化,就是通过一个灰度映像函数,将原灰度直方图改造成所希望的直方图。说的通俗一点就是,原图像的灰度是从0~255的,其分布是随机的,在一些情况下,我们可能需要一些特定的灰度值,比如我们只需要灰度值为0,3,40,240,255 这些值,除此之外的灰度值我们不需要,那么从原图像到我们需要的图像就可以理解成图像的规定化。
在运用均衡化原理基础上,通过建立原始图像和期望图像之间的关系,使原始图像的直方图匹配特定的形状,从而弥补直方图均衡化不具备交互作用的特性。
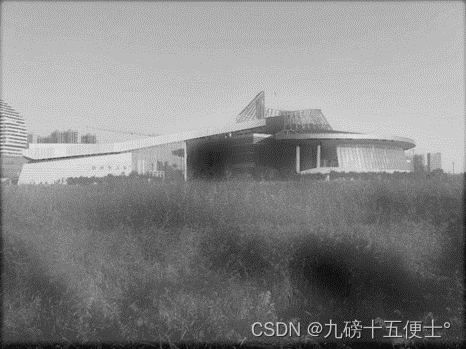
图5:直方图规定化
- 其他增强方法
线性变换:在曝光不足或过度的情况下,图像灰度可能会局限在一个很小的范围内。这时就形成一个模糊不清,似乎没有灰度层次的图像,采用线性变换对图像每个像素灰度做线性拉伸,可以有效改善图像视觉效果。原理:y = ax + b。
拉普拉斯变换:使用二阶微分线性算子,与一阶微分相比,二阶微分的边缘定位能力更强,锐化效果更好。使用二阶微分算子的基本方法是定义一种二阶微分的离散形式,然后根据这个形式生成一个滤波模板,与图像卷积。
伽马变换:图像曝光不足或过度时,伽马变换可调节图像的对比度。从而对较暗或较亮的图像进行校正。
原理:y=𝑐𝑥^"γ"
γ > 1: 对较亮的图像进行灰度级压缩
γ < 1: 对较暗的图像进行对比度增强,加强图像细节
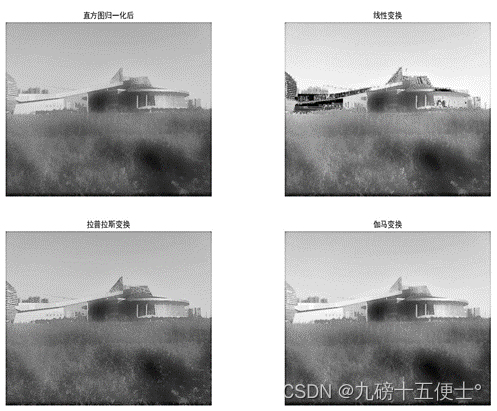
图6:其他增强方法
- 滤波
 最低0.47元/天 解锁文章


 被折叠的 条评论
为什么被折叠?
被折叠的 条评论
为什么被折叠?
 到【灌水乐园】发言


