


一、项目结构

1、WebContent
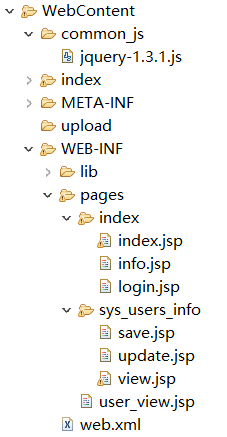
1.1 web.xml
<?xml version="1.0" encoding="UTF-8"?>
<web-app xmlns:xsi="http://www.w3.org/2001/XMLSchema-instance"
	xmlns="http://xmlns.jcp.org/xml/ns/javaee"
	xsi:schemaLocation="http://xmlns.jcp.org/xml/ns/javaee http://xmlns.jcp.org/xml/ns/javaee/web-app_3_1.xsd"
	id="WebApp_ID" version="3.1">
	<display-name>demo_back</display-name>
	<!-- 配置SpringMVC前端控制器 -->
	<servlet>
		<servlet-name>mvc</servlet-name>
		<servlet-class>org.springframework.web.servlet.DispatcherServlet</servlet-class>
		<!-- SpringMVC的配置文件的默认路径是/WEB-INF/${servlet-name}-servlet.xml -->
		<init-param>
			<param-name>contextConfigLocation</param-name>
			<!--<param-value>classpath:springmvc.xml</param-value> -->
			<param-value>classpath:spring/springmvc.xml</param-value>
		</init-param>
		<load-on-startup>2</load-on-startup>
	</servlet>
	<servlet-mapping>
		<servlet-name>mvc</servlet-name>
		<!-- 设置所有以action结尾的请求进入SpringMVC -->
		<url-pattern>*.action</url-pattern>
	</servlet-mapping>
	<context-param>
		<!-- 读取数据库配置文件 -->
		<param-name>contextConfigLocation</param-name>
		<param-value>classpath:spring/application_*.xml</param-value>
	</context-param>
	<listener>
		<listener-class>org.springframework.web.context.ContextLoaderListener</listener-class>
	</listener>
	<welcome-file-list>
		<welcome-file>index.action</welcome-file>
	</welcome-file-list>
</web-app>
1.2 index 和 sys_users_info
存放 jsp 页面
1.3 lib
存放各种 jar 包
1.4 upload
保存图片
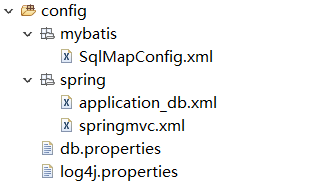
2、config
存放配置文件
3、src

3.1 common
存放公共通用类,一些时间方法、加密方法、设置 id 方法、String 工具类
3.2 controller
indexController
package com.demo.controller;

import java.io.IOException;
import java.io.PrintWriter;
import java.util.List;

import javax.servlet.http.HttpServletRequest;
import javax.servlet.http.HttpServletResponse;

import org.springframework.beans.factory.annotation.Autowired;
import org.springframework.stereotype.Controller;
import org.springframework.web.bind.annotation.RequestMapping;

import com.demo.common.ShaEncrypt;
import com.demo.model.SysUsersInfo;
import com.demo.service.SysUsersInfoService;

@Controller
public class indexController {


	@Autowired
	private SysUsersInfoService user_service;

	@RequestMapping(value = "login")
	public String login() {


		return "index/login";
	}

	@RequestMapping(value = "check_login")
	public void String(String login,String pwd,HttpServletRequest request,HttpServletResponse response) throws IOException{

		PrintWriter out = response.getWriter();

		SysUsersInfo u = new SysUsersInfo();
		u.setLoginname(login);
		//密码加密
		String p = ShaEncrypt.shaEncode(pwd);
		u.setPassword(p);
		List<SysUsersInfo> check_login = user_service.select_check_login(u);
		if(check_login.isEmpty()){

			out.print("error");
		}else{

			String check_user = "";
			for(SysUsersInfo s:check_login){

				check_user = s.getCheck_user();
			}
			if(check_user.equals("0")){

				request.getSession().setAttribute("loginname", login);
				request.getSession().setMaxInactiveInterval(18200);
				out.print("success");
			}else{

				out.print("err");
			}
		}
	}

	@RequestMapping(value = "index")
	public String index(HttpServletRequest request){

		String loginname = (String) request.getSession().getAttribute("loginname");
		request.setAttribute("loginname", loginname);
		return "index/index";
	}

	@RequestMapping(value = "find_info")
	public String find_info(HttpServletRequest request){

		String loginname = (String) request.getSessi
最低0.47元/天 解锁文章


 615
615


 被折叠的 条评论
为什么被折叠?
被折叠的 条评论
为什么被折叠?
 到【灌水乐园】发言


