


区块链职业院校技能大赛之Caliper部署教程
文章目录
Caliper部署
配置基本环境就不讲解了,不会的可以进入官方文档查看压力测试指南 — FISCO BCOS v2.7.2 文档 (fisco-doc.readthedocs.io)
第一步. 部署
Caliper提供了方便易用的命令行界面工具caliper-cli,推荐在本地进行局部安装:
1、建立一个工作目录
mkdir benchmarks && cd benchmarks
2、对NPM项目进行初始化
npm init
这一步主要是为在工作目录下创建package.json文件以方便后续依赖项的安装,如果不需要填写项目信息的话可以直接执行npm init -y。
3、安装caliper-cli
npm install --only=prod @hyperledger/caliper-cli@0.2.0
由于Caliper所有依赖项的安装较为耗时,因此使用--only=prod选项用于指定NPM只安装Caliper的核心组件,而不安装其他的依赖项(如各个区块链平台针对Caliper的适配器)。在部署完成后,可以通过caliper-cli显式绑定需要测试的区块链平台及相应的适配器。
4、验证caliper-cli安装成功
npx caliper --version
若安装成功,则会打印相应的版本信息,如:
root@admin:~/benchmarks$ npx caliper --version
v0.2.0
第二步. 绑定
由于Caliper采用了轻量级的部署方式,因此需要显式的绑定步骤指定要测试的平台及适配器版本,caliper-cli会自动进行相应依赖项的安装。使用npx caliper bind命令进行绑定,命令所需的各项参数可以通过如下命令查看:
root@admin:~/benchmarks$ npx caliper bind --help
Usage:
  caliper bind --caliper-bind-sut fabric --caliper-bind-sdk 1.4.1 --caliper-bind-cwd ./ --caliper-bind-args="-g"

Options:
  --help               Show help  [boolean]
  -v, --version        Show version number  [boolean]
  --caliper-bind-sut   The name of the platform to bind to  [string]
  --caliper-bind-sdk   Version of the platform SDK to bind to  [string]
  --caliper-bind-cwd   The working directory for performing the SDK install  [string]
  --caliper-bind-args  Additional arguments to pass to "npm install". Use the "=" notation when setting this parameter  [string]
其中,
–caliper-bind-sut :用于指定需要测试的区块链平台,即受测系统(System under Test); –caliper-bind-sdk:用于指定适配器版本; –caliper-bind-cwd:用于绑定caliper-cli的工作目录,caliper-cli在加载配置文件等场合时均是使用相对于工作目录的相对路径; caliper-bind-args:用于指定caliper-cli在安装依赖项时传递给npm的参数,如用于全局安装的-g。
对于FISCO BCOS,可以采用如下方式进行绑定:
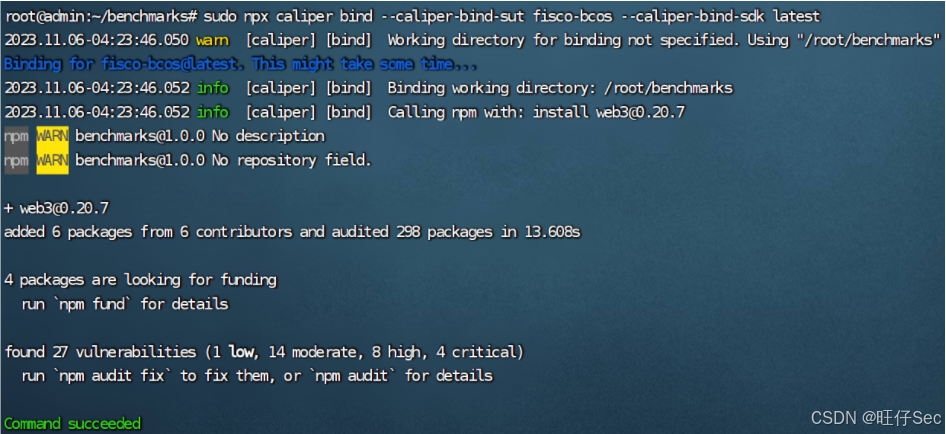
npx caliper bind --caliper-bind-sut fisco-bcos --caliper-bind-sdk latest
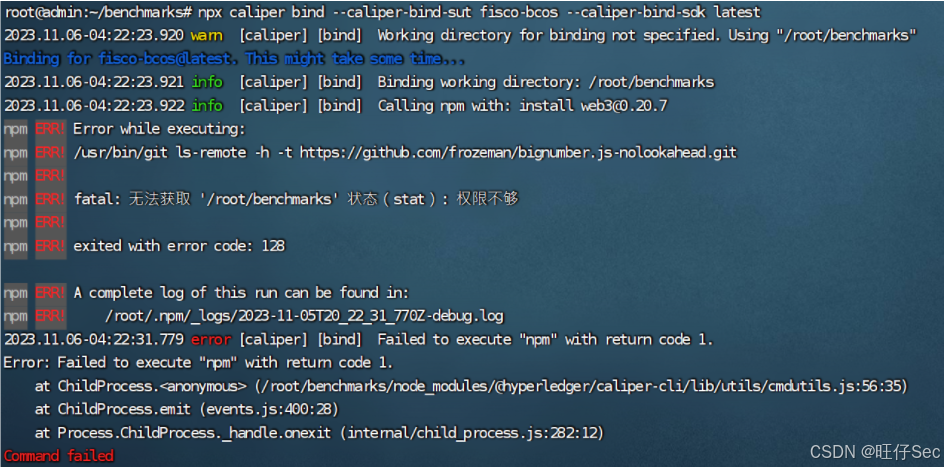
遇见此报错,在命令前面加上sudo命令:
sudo npx caliper bind --caliper-bind-sut fisco-bcos --caliper-bind-sdk latest
第三步. 快速体验FISCO BCOS基准测试
为方便测试人员快速上手,FISCO BCOS已经为Caliper提供了一组预定义的测试样例,测试对象涵盖HelloWorld合约、Solidity版转账合约及预编译版转账合约。同时在测试样例中,Caliper测试脚本会使用docker在本地自动部署及运行4个互连的节点组成的链,因此测试人员无需手工搭链及编写测试用例便可直接运行这些测试样例。
在工作目录下下载预定义测试用例
git clone https://github.com/vita-dounai/caliper-benchmarks.git
注意 若出现网络问题导致的长时间拉取代码失败,则尝试以下方式:
# 拉取gitee代码
git clone https://gitee.com/vita-dounai/caliper-benchmarks.git
执行HelloWorld合约测试
npx caliper benchmark run --caliper-workspace caliper-benchmarks --caliper-benchconfig benchmarks/samples/fisco-bcos/helloworld/config.yaml --caliper-networkconfig networks/fisco-bcos/4nodes1group/fisco-bcos.json
错误一:
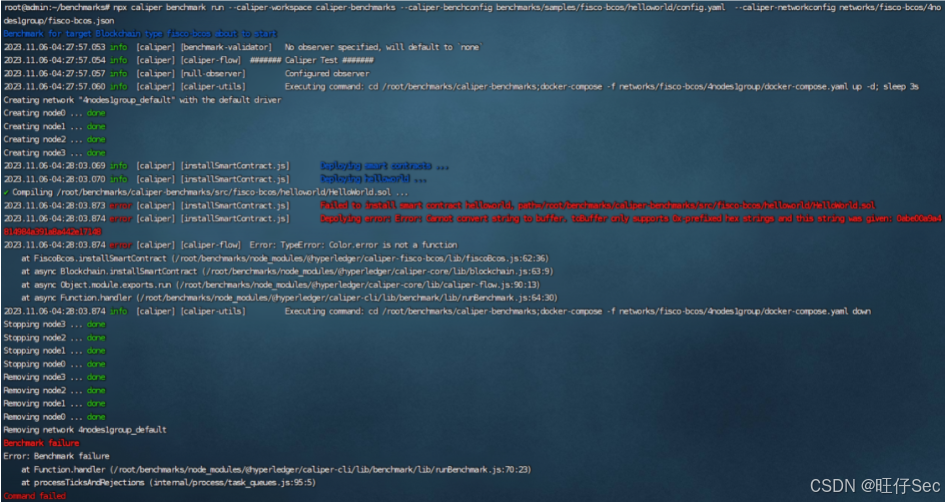
由于FISCO BCOS对于caliper 0.2.0版本的适配存在部分不兼容情况,需要手动按照(https://github.com/FISCO-BCOS/FISCO-BCOS/issues/1248)中的步骤修改代码后方可正常运行。
此报错需要修改源码才能解决:
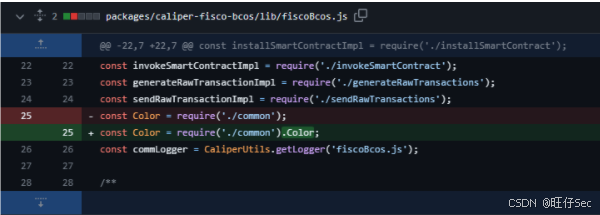
修改1:https://github.com/hyperledger/caliper/pull/677/files
cd /root/benchmarks/node_modules/@hyperledger/caliper-fisco-bcos/lib
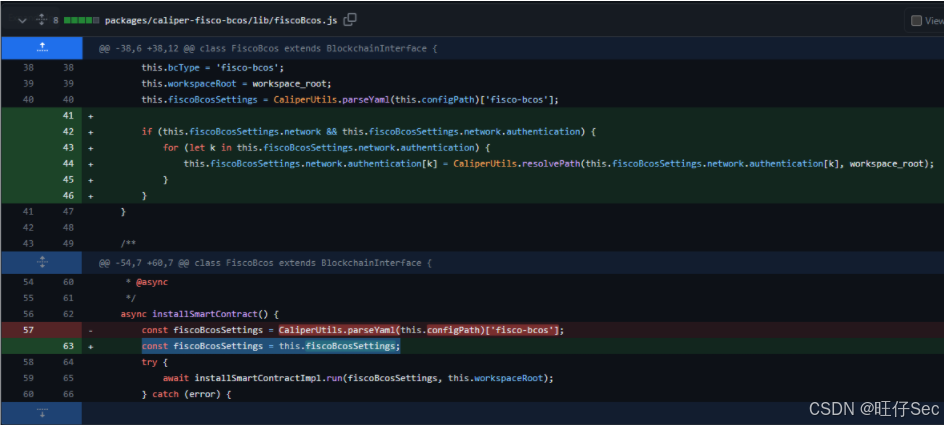
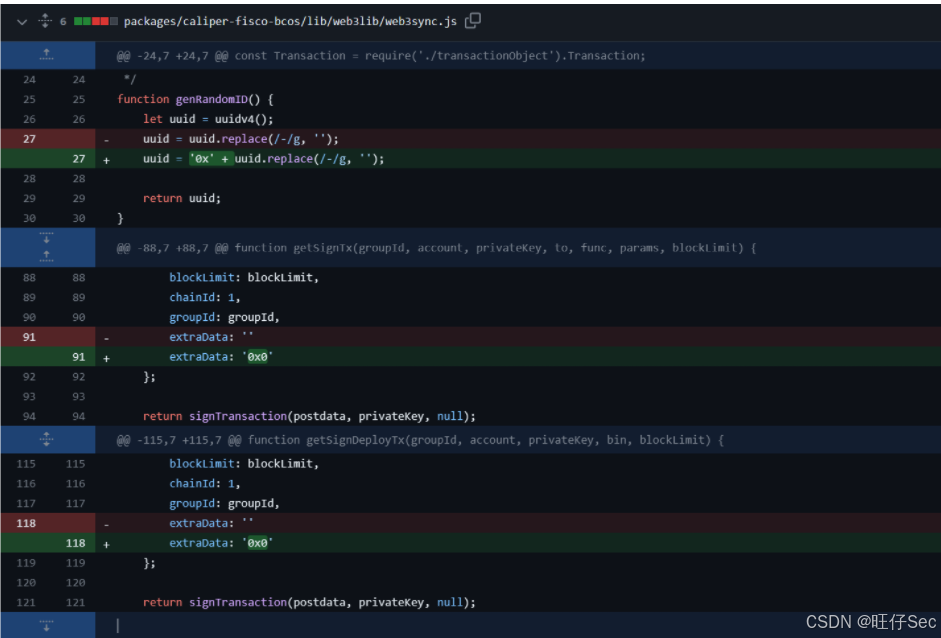
修改2:https://github.com/hyperledger/caliper/pull/647/files
cd /root/benchmarks/node_modules/@hyperledger/caliper-fisco-bcos/lib
cd /root/benchmarks/node_modules/@hyperledger/caliper-fisco-bcos/lib/web3lib

错误二:
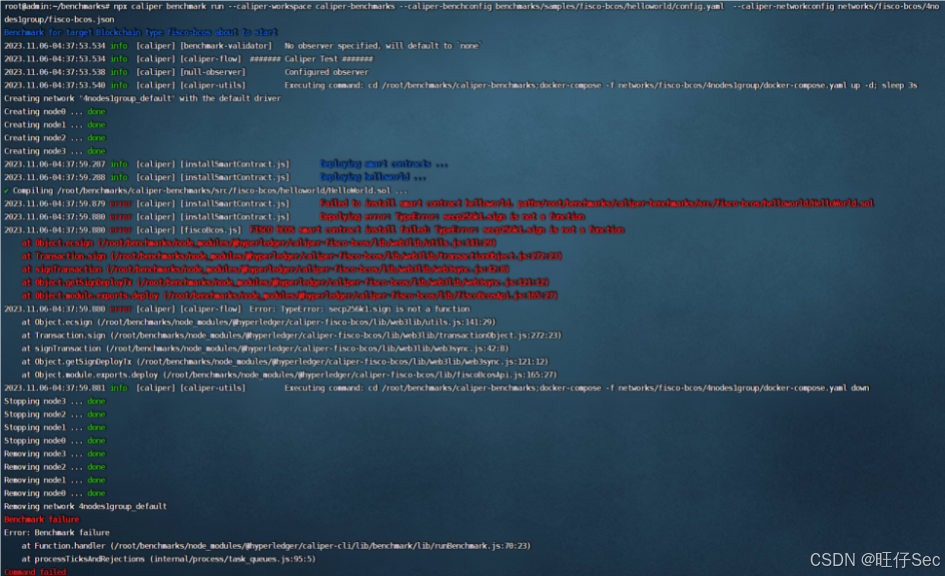
这是一个愚蠢的bug,指定secp256k1依赖包时版本限制没写对,导致在绑定时自动安装了4.0版本的secp256k1包,但是最新的4.0的包API全部变了,导致执行出错。
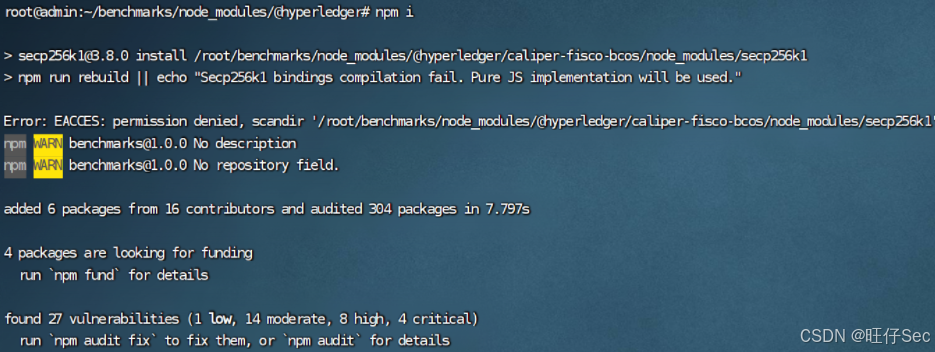
有一个临时的解决方案,进入node_modules/@hyperledger/caliper-fisco-bcos目录,编辑该目录下的package.json文件,在"dependencies"中添加一项"secp256k1": “^3.8.0”,随后在该目录下执行npm i,更新完成后测试程序就能启动了。
cd /root/benchmarks/node_modules/@hyperledger/caliper-fisco-bcos

cd /root/benchmarks/node_modules/@hyperledger && npm i
再次执行HelloWorld合约测试
执行Solidity版转账合约测试
cd /root/benchmarks/caliper-benchmarks

npx caliper benchmark run --caliper-benchconfig benchmarks/samples/fisco-bcos/transfer/solidity/config.yaml  --caliper-networkconfig networks/fisco-bcos/4nodes1group/fisco-bcos.json
执行预编译版转账合约测试
cd /root/benchmarks/caliper-benchmarks

npx caliper benchmark run --caliper-benchconfig benchmarks/samples/fisco-bcos/transfer/precompiled/config.yaml  --caliper-networkconfig networks/fisco-bcos/4nodes1group/fisco-bcos.json
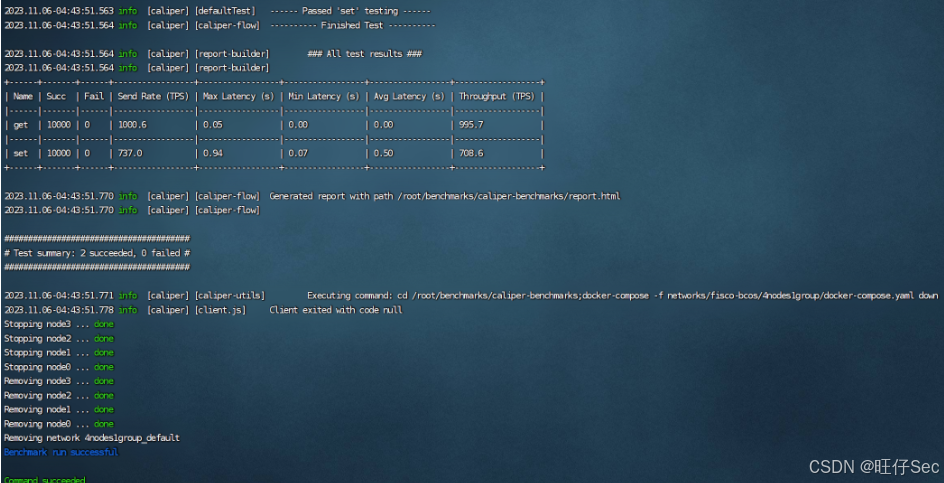
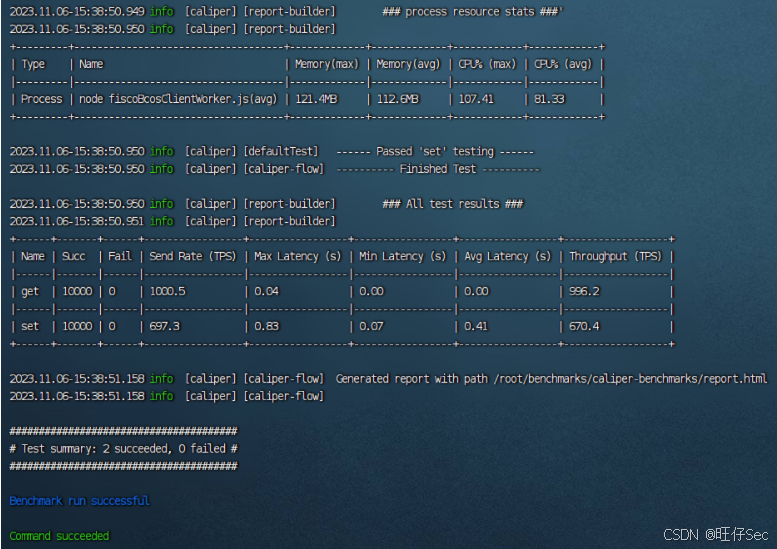
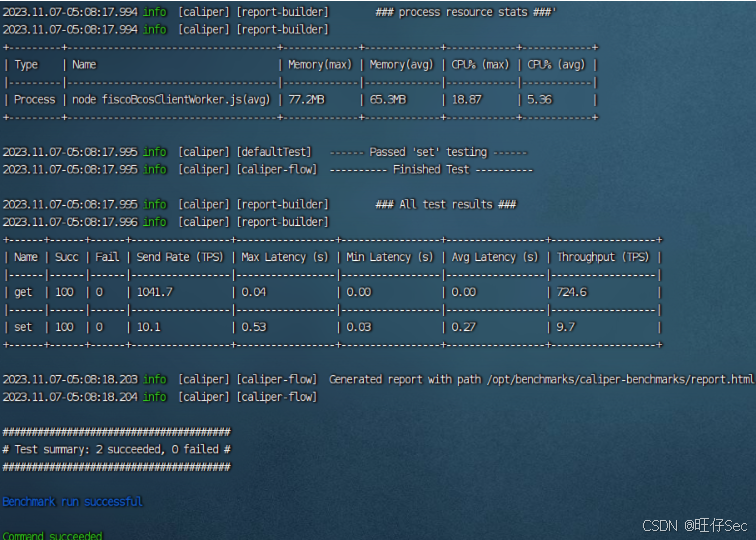
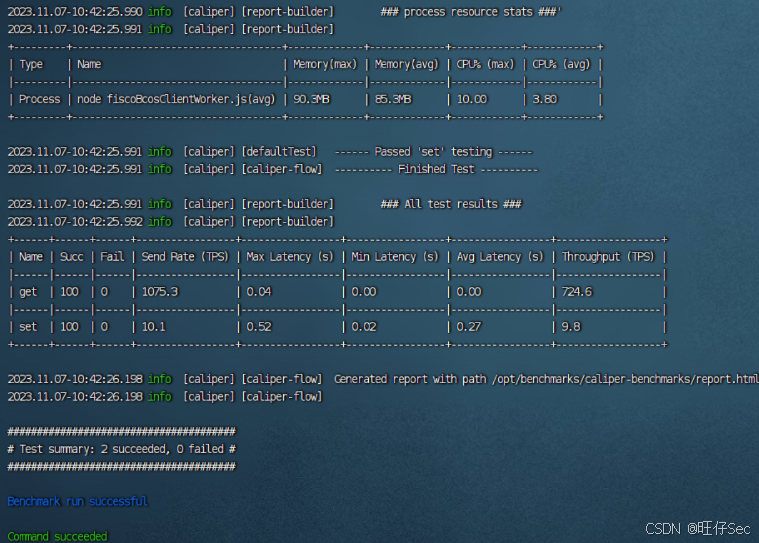
测试完成后,会在命令行界面中展示测试结果(TPS、延迟等)及资源消耗情况,同时会在caliper-benchmarks目录下生成一份包含上述内容的可视化HTML报告。
caliper benchmark run所需的各项参数可以通过如下命令查看:
root@admin:~/benchmarks$ npx caliper benchmark run --help
caliper benchmark run --caliper-workspace ~/myCaliperProject --caliper-benchconfig my-app-test-config.yaml --caliper-networkconfig my-sut-config.yaml

Options:
  --help                   Show help  [boolean]
  -v, --version            Show version number  [boolean]
  --caliper-benchconfig    Path to the benchmark workload file that describes the test client(s), test rounds and monitor.  [string]
  --caliper-networkconfig  Path to the blockchain configuration file that contains information required to interact with the SUT  [string]
  --caliper-workspace      Workspace directory that contains all configuration information  [string]
其中,
–caliper-workspace:用于指定caliper-cli的工作目录,如果没有绑定工作目录,可以通过该选项动态指定工作目录; –caliper-benchconfig:用于指定测试配置文件,测试配置文件中包含测试的具体参数,如交易的发送方式、发送速率控制器类型、性能监视器类型等; –caliper-networkconfig:用于指定网络配置文件,网络配置文件中会指定Caliper与受测系统的连接方式及要部署测试的合约等。
自定义测试用例
本节将会以测试HelloWorld合约为例,介绍如何使用Caliper测试自定义的测试用例。
Caliper前后端分离的设计原则使得只要后端的区块链系统开放了相关网络端口,Caliper便可以对该系统进行测试。
网络配置
使用已有的链对HelloWorld合约测试(webase-deploy)
前提条件:需要先启动webase-deploy,使用webase-deploy的链进行测试。
cd /fisco/webase-deploy/
python3 deploy.py startAll
新建一个名为test-nw的目录,本阶示例中的FISCO BCOS适配器的网络配置文件均会放置于此。新建一个名为fisco-bcos.json的配置文件,文件内容如下:
{
    "caliper": {
        "blockchain": "fisco-bcos"
    },
    "fisco-bcos": {
        "config": {
            "privateKey": "bcec428d5205abe0f0cc8a734083908d9eb8563e31f943d760786edf42ad67dd",
            "account": "0x64fa644d2a694681bd6addd6c5e36cccd8dcdde3"
        },
        "network": {
            "nodes": [
                {
                    "ip": "127.0.0.1",
                    "rpcPort": "8545",
                    "channelPort": "20200"
                },
                {
                    "ip": "127.0.0.1",
                    "rpcPort": "8546",
                    "channelPort": "20201"
                }
            ],
            "authentication": {
                "key": "/fisco/webase-deploy/nodes/127.0.0.1/sdk/node.key",
                "cert": "/fisco/webase-deploy/nodes/127.0.0.1/sdk/node.crt",
                "ca": "/fisco/webase-deploy/nodes/127.0.0.1/sdk/ca.crt"
            },
            "groupID": 1,
            "timeout": 100000
        },
        "smartContracts": [
            {
                "id": "helloworld",
                "path": "src/fisco-bcos/helloworld/HelloWorld.sol",
                "language": "solidity",
                "version": "v0"
            },
            {
                "id": "parallelok",
                "path": "src/fisco-bcos/transfer/ParallelOk.sol",
                "language": "solidity",
                "version": "v0"
            },
            {
                "id": "dagtransfer",
                "address": "0x0000000000000000000000000000000000005002",
                "language": "precompiled",
                "version": "v0"
            }
        ]
    },
    "info": {
        "Version": "2.0.0",
        "Size": "4 Nodes",
        "Distribution": "Single Host"
    }
}
验证
cd /root/benchmarks/caliper-benchmarks

npx caliper benchmark run --caliper-benchconfig benchmarks/samples/fisco-bcos/helloworld/config.yaml  --caliper-networkconfig networks/fisco-bcos/test-nw/fisco-bcos.json
使用已有的链对HelloWorld合约测试(四节点,单机构,单群组)
前提条件:需要先启动联盟链,使用联盟链进行测试。
cd /root/tools/

bash build_chain.sh -l 127.0.0.1:4 -p 30300,20200,8545 -e ./fisco-bcos -v 2.8.0

bash nodes/127.0.0.1/start_all.sh
新建一个名为test-nw的目录,本阶示例中的FISCO BCOS适配器的网络配置文件均会放置于此。新建一个名为fisco-bcos.json的配置文件,文件内容如下:
{
    "caliper": {
        "blockchain": "fisco-bcos"
    },
    "fisco-bcos": {
        "config": {
            "privateKey": "bcec428d5205abe0f0cc8a734083908d9eb8563e31f943d760786edf42ad67dd",
            "account": "0x0ff8981ebc130c7874ac7093a4d0c0e3d4f36b08"
        },
        "network": {
            "nodes": [
                {
                    "ip": "127.0.0.1",
                    "rpcPort": "8545",
                    "channelPort": "20200"
                },
                {
                    "ip": "127.0.0.1",
                    "rpcPort": "8546",
                    "channelPort": "20201"
                },
                {
                    "ip": "127.0.0.1",
                    "rpcPort": "8547",
                    "channelPort": "20202"
                },
                {
                    "ip": "127.0.0.1",
                    "rpcPort": "8548",
                    "channelPort": "20203"
                }
            ],
            "authentication": {
                "key": "/root/tools/nodes/127.0.0.1/sdk/sdk.key",
                "cert": "/root/tools/nodes/127.0.0.1/sdk/sdk.crt",
                "ca": "/root/tools/nodes/127.0.0.1/sdk/ca.crt"
            },
            "groupID": 1,
            "timeout": 100000
        },
        "smartContracts": [
            {
                "id": "helloworld",
                "path": "src/fisco-bcos/helloworld/HelloWorld.sol",
                "language": "solidity",
                "version": "v0"
            }
	]
    },
    "info": {
        "Version": "2.0.0",
        "Size": "4 Nodes",
        "Distribution": "Single Host"
    }
}
   }
        ]
    },
    "info": {
        "Version": "2.0.0",
        "Size": "4 Nodes",
        "Distribution": "Single Host"
    }
}
验证
cd /root/benchmarks/caliper-benchmarks

npx caliper benchmark run --caliper-benchconfig benchmarks/samples/fisco-bcos/helloworld/config.yaml  --caliper-networkconfig networks/fisco-bcos/test-nw/fisco-bcos.json
使用已有的链对HelloWorld合约测试(四节点,四机构,单群组)
前提条件:需要先启动联盟链,使用联盟链进行测试。
cd /root/tools/

vim ipconf
127.0.0.1 agencyA 1
127.0.0.1 agencyB 1
127.0.0.1 agencyC 1
127.0.0.1 agencyD 1

bash build_chain.sh -f ipconf -e ./fisco-bcos

bash nodes/127.0.0.1/start_all.sh
新建一个名为test-nw的目录,本阶示例中的FISCO BCOS适配器的网络配置文件均会放置于此。新建一个名为fisco-bcos.json的配置文件,文件内容如下:
{
    "caliper": {
        "blockchain": "fisco-bcos"
    },
    "fisco-bcos": {
        "config": {
            "privateKey": "bcec428d5205abe0f0cc8a734083908d9eb8563e31f943d760786edf42ad67dd",
            "account": "0x0ff8981ebc130c7874ac7093a4d0c0e3d4f36b08"
        },
        "network": {
            "nodes": [
                {
                    "ip": "127.0.0.1",
                    "rpcPort": "8545",
                    "channelPort": "20200"
                }
            ],
            "authentication": {
                "key": "/root/tools/nodes/127.0.0.1/node0/conf/node.key",
                "cert": "/root/tools/nodes/127.0.0.1/node0/conf/node.crt",
                "ca": "/root/tools/nodes/127.0.0.1/node0/conf/ca.crt"
            },
            "groupID": 1,
            "timeout": 100000
        },
        "smartContracts": [
            {
                "id": "helloworld",
                "path": "src/fisco-bcos/helloworld/HelloWorld.sol",
                "language": "solidity",
                "version": "v0"
            }
	]
    },
    "info": {
        "Version": "2.0.0",
        "Size": "4 Nodes",
        "Distribution": "Single Host"
    }
}
验证
cd /root/benchmarks/caliper-benchmarks

npx caliper benchmark run --caliper-benchconfig benchmarks/samples/fisco-bcos/helloworld/config.yaml  --caliper-networkconfig networks/fisco-bcos/test-nw/fisco-bcos.json
测试配置
测试配置用于指定测试的具体运行方式。测试配置是一个YAML文件,HelloWorld合约的测试配置文件内容如下所示:
---
test:
  name: Hello World
  description: This is a helloworld benchmark of FISCO BCOS for caliper
  clients:
    type: local
    number: 1
  rounds:
  - label: get
    description: Test performance of getting name
    txNumber:
    - 100
    rateControl:
    - type: fixed-rate
      opts:
        tps: 1000
    callback: benchmarks/samples/fisco-bcos/helloworld/get.js
  - label: set
    description: Test performance of setting name
    txNumber:
    - 100
    rateControl:
    - type: fixed-rate
      opts:
        tps: 1000
    callback: benchmarks/samples/fisco-bcos/helloworld/set.js
monitor:
  type:
  - docker
  - process
  docker:
    name:
    - node0
    - node1
    - node2
    - node3
  process:
    - command: node
      arguments: fiscoBcosClientWorker.js
      multiOutput: avg
  interval: 0.5
测试文件中主要包括两部分:
- 测试内容配置
test项负责对测试内容进行配置。配置主要集中在round字段中指定如何对区块链系统进行测试。每一个测试可以包含多轮,每一轮可以向区块链发起不同的测试请求。具体要HelloWorld合约测试,测试中包含两轮,分别对合约的get接口和set接口进行测试。在每一轮测试中,可以通过txNumber或txDuration字段指定测试的交易发送数量或执行时间,并通过rateControl字段指定交易发送时的速率控制器,在本节的示例中,使用了QPS为1000的匀速控制器,更多速率控制器的介绍可以参考官方文档。
- 性能监视器配置
如果是在本地搭好的链,则可以添加本地性能监视器,相应地监视器的配置更改如下:
monitor:
  type:
  - process
  process:
    - command: node0
      multiOutput: avg
    - command: node1
      multiOutput: avg
    - command: node2
      multiOutput: avg
    - command: node3
      multiOutput: avg
  interval: 0.1
其中每项配置项的解释如下:
1、monitor.type,需要指定为process,只对进程进行监控;
2、monitor.process,一个包含所有要监视的进称列表,其中每个进程的command属性为一个正则表达式,表示进程名称;每个进程还可以有一个arguments属性(未在上述示例中使用到),表示进程的参数。Caliper会先使用ps命令搜索commad + arguments,然后匹配以得到目标的进程的进程ID及系统资源的使用情况。每个进程的multiOutput属性用于指定结果的输出方式,目前支持平均值(avg)及总和(sum)两种方式;
3、monitor.interval,监视器的采样间隔,单位为秒。
需要注意的是,进程监控目前暂不支持监控进程对网络和磁盘的使用情况。


 2687
2687

 被折叠的 条评论
为什么被折叠?
被折叠的 条评论
为什么被折叠?
 到【灌水乐园】发言


