


在这里插入代码片
文章目录
一、Elasticsearch了解
1.1 概念
Elasticsearch是一个基于Apache Lucene™的开源搜索引擎,用于数据实时搜索和分析
ES数据架构的主要概念(与关系数据库Mysql对比)
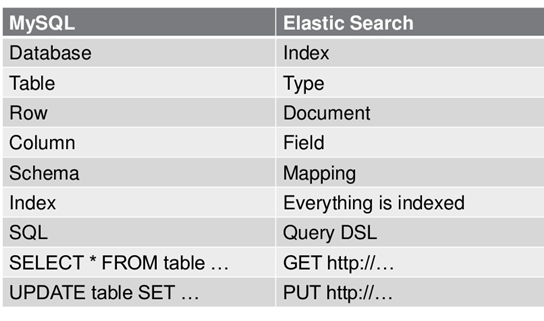
集群(cluster)
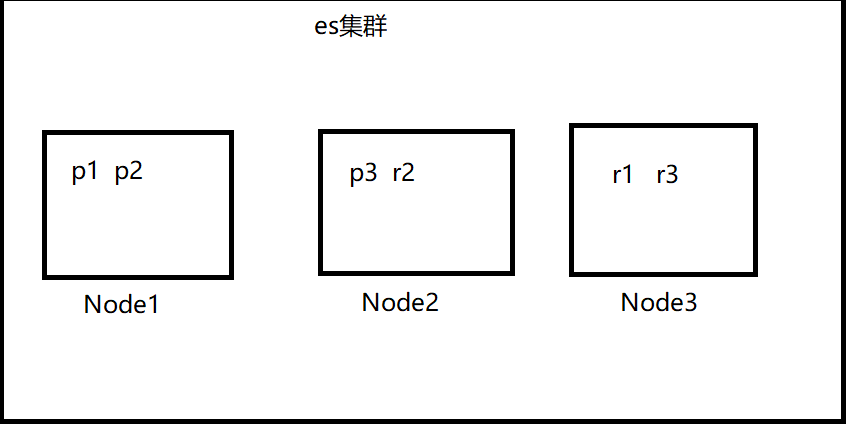
集群,一个ES集群由一个或多个节点(Node)组成,每个集群都有一个cluster name作为标识。一下是我们的4节点集群。
节点(node)
节点,一个ES实例就是一个node,一个机器可以有多个实例,所以并不能说一台机器就是一个node,大多数情况下每个node运行在一个独立的环境或虚拟机上。
索引(index)
索引,即一系列documents的集合。
类型(type)
分片(shard)
一个拥有两个主分片一份副本的索引可以在四个节点中横向扩展。
分片是什么?
简单来讲就是咱们在ES中所有数据的文件块,也是数据的最小单元块,整个ES集群的核心就是对所有分片的分布、索引、负载、路由等达到惊人的速度。
实列场景:
假设 IndexA 有2个分片,我们向 IndexA 中插入10条数据 (10个文档),那么这10条数据会尽可能平均的分为5条存储在第一个分片,剩下的5条会存储在另一个分片中。
和主流关系型数据库的表分区的概念有点类似,如果你比较熟悉关系型数据库的话。
创建 IndexName 索引时候,在 Mapping 中可以如下设置分片 (curl)
PUT indexName
{
    "settings": {
        "number_of_shards": 5
    }
}
Elastic 官方文档建议:一个 Node 最好不要多于三个 shards。注意 索引建立后,分片个数是不可以更改的。
在进行历史数据入库的时候,建议先在settings中将备份设为0,refresh关闭来提升索引效率,数据入库完毕可恢复需要值。
"settings": {
    "number_of_shards": 5,
    "number_of_replicas": 0,
    "refresh_interval": -1
  }
分片好处
1.分片,ES是分布式搜索引擎,每个索引有一个或多个分片,索引的数据被分配到各个分片上,相当于一桶水用了N个杯子装
2.分片有助于横向扩展,N个分片会被尽可能平均地(rebalance)分配在不同的节点上(例如你有2个节点,4个主分片(不考虑备份),那么每个节点会分到2个分片,后来你增加了2个节点,那么你这4个节点上都会有1个分片,这个过程叫relocation,ES感知后自动完成)
3.分片是独立的,对于一个Search Request的行为,每个分片都会执行这个Request.
4.每个分片都是一个Lucene Index,所以一个分片只能存放 Integer.MAX_VALUE - 128 = 2,147,483,519 个docs。
分片个数
建议:(仅参考)
1、每一个分片数据文件小于30GB
2、每一个索引中的一个分片对应一个节点
3、节点数大于等于分片数
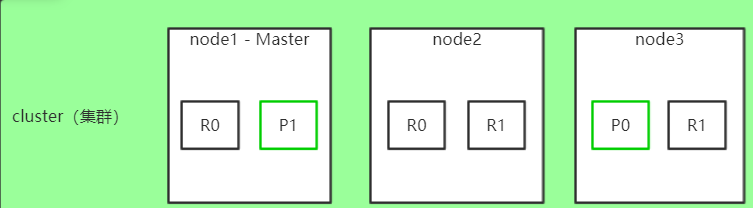
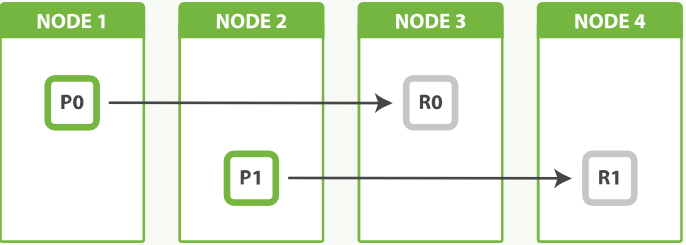
副本(replica)
1.复制,可以理解为备份分片,相应地有primary shard(主分片)
2.主分片和备分片不会出现在同一个节点上(防止单点故障),默认情况下一个索引创建5个分片一个备份(即5primary+5replica=10个分片)
3.如果你只有一个节点,那么5个replica都无法分配(unassigned),此时cluster status会变成Yellow。
通过调整副本数来均衡节点负载
事实上节点 3 持有两个副本分片,然而没有主分片并不重要。副本分片与主分片做着相同的工作;它们只是扮演着略微不同的角色。没有必要确保主分片均匀地分布在所有节点中。
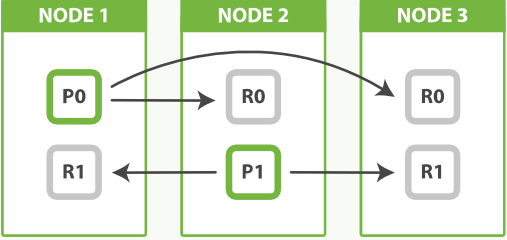
从这个图我发现两个Node节点 ,5个shard分片,1个replica备份,没毛病啊,每个节点就是有完整的信息:
1.2 特点
简单易用
部署简单:开箱即用(安装即可使用),作为中小型的应用,直接3分钟部署一下ES
使用方便:Elasticsearch也使用Java开发并使用Lucene作为其核心来实现所有索引和搜索的功能,但是它的目的是通过简单的RESTful API来隐藏Lucene的复杂性,从而让全文搜索变得简单
分布式
自动维护数据的分布到多个节点的索引的建立,还有搜索请求分布到多个节点的执行
高可用
自动维护数据的冗余副本,保证了一旦机器宕机,不会丢失数据
可伸缩
可以作为一个大型分布式集群(数百台服务器)技术,处理PB级数据,服务大公司;也可以运行在单机上,服务小公司
高性能
海量数据近实时处理
面向文档
JSON格式的文档
1.3 用途
-
分布式的搜索引擎和数据分析引擎
搜索:网站的站内搜索,IT系统的检索
数据分析:电商网站,统计销售排名前10的商家 -
全文检索,结构化检索,数据分析
全文检索:我想搜索商品名称包含某个关键字的商品
结构化检索:我想搜索商品分类为日化用品的商品都有哪些
数据分析:我们分析每一个商品分类下有多少个商品 -
对海量数据进行近实时的处理
分布式:ES自动可以将海量数据分散到多台服务器上去存储和检索
海联数据的处理:分布式以后,就可以采用大量的服务器去存储和检索数据,自然而然就可以实现海量数据的处理了
近实时:检索数据要花费1小时(这就不要近实时,离线批处理,batch-processing);在秒级别对数据进行搜索和分析
1.4 应用场景
- 维基百科
- The Guardian(国外新闻网站)
- Stack Overflow(国外的程序异常讨论论坛)
- GitHub(开源代码管理)
- 电商网站
- 日志数据分析
- 商品价格监控网站
- BI系统
- 站内搜索
1.5 哪些公司在使用
- ES 在全球的下载量已超过 3.5 亿次,腾讯、滴滴、今日头条、饿了么、360 安全、小米,vivo 等国内诸多知名公司都在使用 Elasticsearch
二、elasticsearch安装与配置
2.1 Java jdk依赖包安装
下载并安装最新版
环境变量配置
2.2 Elasticsearch安装
下载最新版本的Elasticsearch
curl -L -O http://download.elasticsearch.org/PATH/TO/VERSION.zip
unzip elasticsearch-$VERSION.zip
cd  elasticsearch-$VERSION
2.3 运行
开启运行: ./bin/elasticsearch
检测是否开启成功:curl 'http://localhost:9200/?pretty'
关闭:curl -XPOST 'http://localhost:9200/_shutdown'或ctr+c
2.4 配置文件主要参数了解
配置文件 elasticsearch.yml
cluster.name: elasticsearch
配置的集群名称,默认是elasticsearch,es服务会通过广播方式自动连接在同一网段下的es服务,通过多播方式进行通信,同一网段下可以有多个集群,通过集群名称这个属性来区分不同的集群。


node.name: "Franz Kafka"
当前配置所在机器的节点名,你不设置就默认随机指定一个name列表中名字,该name列表在es的jar包中config文件夹里name.txt文件中,其中有很多作者添加的有趣名字。


node.master: true
指定该节点是否有资格被选举成为node(注意这里只是设置成有资格, 不代表该node一定就是master),默认是true,es是默认集群中的第一台机器为master,如果这台机挂了就会重新选举master。


node.data: true
指定该节点是否存储索引数据,默认为true。


index.number_of_shards: 5
设置默认索引分片个数,默认为5片。


index.number_of_replicas: 1
设置默认索引副本个数,默认为1个副本。如果采用默认设置,而你集群只配置了一台机器,那么集群的健康度为yellow,也就是所有的数据都是可用的,但是某些复制没有被分配(

健康度可用 curl 'localhost:9200/_cat/health?v' 查看, 分为绿色、黄色或红色。绿色代表一切正常,集群功能齐全,黄色意味着所有的数据都是可用的,但是某些复制没有被分配,红色则代表因为某些原因,某些数据不可用)。


path.conf: /path/to/conf
设置配置文件的存储路径,默认是es根目录下的config文件夹。


path.data: /path/to/data
设置索引数据的存储路径,默认是es根目录下的data文件夹,可以设置多个存储路径,用逗号隔开,例:

path.data: /path/to/data1,/path/to/data2


path.work: /path/to/work
设置临时文件的存储路径,默认是es根目录下的work文件夹。


path.logs: /path/to/logs
设置日志文件的存储路径,默认是es根目录下的logs文件夹


path.plugins: /path/to/plugins
设置插件的存放路径,默认是es根目录下的plugins文件夹, 插件在es里面普遍使用,用来增强原系统核心功能。


bootstrap.mlockall: true
设置为true来锁住内存不进行swapping。因为当jvm开始swapping时es的效率 会降低,所以要保证它不swap,可以把ES_MIN_MEM和ES_MAX_MEM两个环境变量设置成同一个值,并且保证机器有足够的内存分配给es。 同时也要允许elasticsearch的进程可以锁住内存,linux下启动es之前可以通过`ulimit -l unlimited`命令设置。


network.bind_host: 192.168.0.1
设置绑定的ip地址,可以是ipv4或ipv6的,默认为0.0.0.0,绑定这台机器的任何一个ip。


network.publish_host: 192.168.0.1
设置其它节点和该节点交互的ip地址,如果不设置它会自动判断,值必须是个真实的ip地址。


network.host: 192.168.0.1
这个参数是用来同时设置bind_host和publish_host上面两个参数。


transport.tcp.port: 9300
设置节点之间交互的tcp端口,默认是9300。


transport.tcp.compress: true
设置是否压缩tcp传输时的数据,默认为false,不压缩。


http.port: 9200
设置对外服务的http端口,默认为9200。


http.max_content_length: 100mb
设置内容的最大容量,默认100mb


http.enabled: false
是否使用http协议对外提供服务,默认为true,开启。


gateway.type: local
gateway的类型,默认为local即为本地文件系统,可以设置为本地文件系统,分布式文件系统,hadoop的HDFS,和amazon的s3服务器等。


gateway.recover_after_nodes: 1
设置集群中N个节点启动时进行数据恢复,默认为1。


gateway.recover_after_time: 5m
设置初始化数据恢复进程的超时时间,默认是5分钟。


gateway.expected_nodes: 2
设置这个集群中节点的数量,默认为2,一旦这N个节点启动,就会立即进行数据恢复。


cluster.routing.allocation.node_initial_primaries_recoveries: 4
初始化数据恢复时,并发恢复线程的个数,默认为4。


cluster.routing.allocation.node_concurrent_recoveries: 2
添加删除节点或负载均衡时并发恢复线程的个数,默认为4。


indices.recovery.max_size_per_sec: 0
设置数据恢复时限制的带宽,如入100mb,默认为0,即无限制。


indices.recovery.concurrent_streams: 5
设置这个参数来限制从其它分片恢复数据时最大同时打开并发流的个数,默认为5。


discovery.zen.minimum_master_nodes: 1
设置这个参数来保证集群中的节点可以知道其它N个有master资格的节点。默认为1,对于大的集群来说,可以设置大一点的值(2-4)


discovery.zen.ping.timeout: 3s
设置集群中自动发现其它节点时ping连接超时时间,默认为3秒,对于比较差的网络环境可以高点的值来防止自动发现时出错。


discovery.zen.ping.multicast.enabled: false
设置是否打开多播发现节点,默认是true。


discovery.zen.ping.unicast.hosts: ["host1", "host2:port", "host3[portX-portY]"]
设置集群中master节点的初始列表,可以通过这些节点来自动发现新加入集群的节点。
2.5 Kibaba使用
下载与elasticsearch版本一致的
2.6 elasticsearch-head使用
下载 elasticsearch-head
elasticsearch-head,可以直接下压缩包,也可以通过 git clone。
输入命令,等待下载完成:
git clone git://github.com/mobz/elasticsearch-head.git
安装 grunt-cli
cnpm install -g grunt-cli
安装 grunt
elasticsearch-head 下载完成后,进入 elasticsearch-head 文件夹,执行命令:
cnpm install grunt --save
安装依赖的 npm 包
cnpm install
修改启动文件
所有依赖包安装成功后,修改 elasticsearch-head 目录下的 Gruntfile.js 文件,在 options 属性内增加 hostname,设置为 0.0.0.0。
connect: {
  server: {
    options: {
      hostname: '0.0.0.0',
      port: 9100,
      base: '.',
      keepalive: true
    }
  }
}
修改 Elasticsearch 配置文件 config/elasticsearch.yml
在配置文件最后增加两个配置项,这样 elasticsearch-head 插件才可以访问 Elasticsearch 。
http.cors.enabled: true
http.cors.allow-origin: "*"
启动 elasticsearch-head
在 elasticsearch-head 目录下,执行命令:
npm run start
输出如下内容表示启动成功:
Running "connect:server" (connect) task
Waiting forever...
Started connect web server on http://localhost:9100
访问 http://localhost:9100 地址,就可以看到当前 Elasticsearch 集群信息。
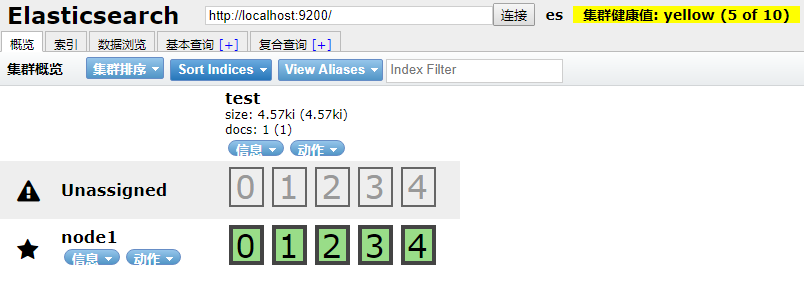
elasticsearch-head
三、API介绍
3.1 Restful API
3.1.1 Rest与Restful了解
基于HTTP协议,以JSON为数据交互格式的RESTful API
3.1.2 Restful优点
3.2 用途
与Elasticsearch交互
四、索引使用
4.1 存储结构
关系性数据库:数据库 -> 数据表 -> 数据行 -> 列
Elasticsearch: 索引-> 类型  -> 文档 -> 字段
Elasticsearch集群可以包含多个索引(indices)(数据库),每一个索引可以包含多个类型(types)(表),每一个类型包含多个文档(documents)(行),然后每个文档包含多个字段(Fields)(列)。
ES倒排索引:RDB增加索引
4.2 索引使用
4.2.1 索引数据
//添加
curl -XPOST 'http://localhost:9200/1702a/_doc' -H 'Content-Type:application/json' -d '
{
    "username" : "镡诗昭",
      "mobile":"13411111111",
    "age" :        25,
    "about" :      "我很牛",
    "interests": [ "游戏", "音乐" ]
}
'
//更新
curl -XPUT 'http://localhost:9200/1702a/_doc/tp5mrm0BHt3JUqYpjNBw' -H 'Content-Type:application/json' -d '
{
    "username" : "xfsss",
      "mobile":"13411111111",
    "age" :        25,
    "about" :      "我很牛",
    "interests": [ "游戏", "音乐" ]
}
'
//更新2
curl -XPOST 'http://localhost:9200/members/_doc/_yKcwm0BF1dfmaz_YZxF/_update' -H 'Content-Type:application/json' -d
{
	"doc":{
		"username":"xfsong"
	}
}

//删除
curl -XDELETE 'http://localhost:9200/1702a/_doc/tp5mrm0BHt3JUqYpjNBw'
4.2.2 索引删除
DELETE /my_index //单个索引删除
curl -XDELETE 'http://localhost:9200/1703'

//多个索引删除
DELETE /index_one,index_two
DELETE /index_*

//删除全部
DELETE /_all
DELETE /*
4.2.3 基本增删改查
获取一个document
curl -X GET http://localhost:9200/index/type/id
curl -X GET http://localhost:9200/accounts/_doc/_search?q=user:张三&sort=age:desc
获取同一type的所有元素
curl -X GET http://localhost:9200/index/type/_search
新增一个document
可以使用POST或PUT请求。
curl -X POST http://localhost:9200/index/type/id -d '
{
    "field": "value",
    ...
}
'
修改一个document
可以使用POST或PUT请求。
curl -X PUT http://localhost:9200/index/type/id -d '
{
    "field": "value",
    ...
}
'
删除一个document
curl -X DELETE http://localhost:9200/index/type/id
检索操作
基本语法如下:
curl -X POST http://localhost:9200/index/type/_search -d '
{
    "query": {
        ...
    }
}
'
4.2.4 _bulk 批量导入数据
新建 esdata文档
{"index":{"_index":"my_store","_type":"my_index","_id":"11"}}
{"price":10,"productID":"1111"}
{"index":{"_index":"my_store","_type":"my_index","_id":"12"}}
{"price":20,"productID":"1112"}
{"index":{"_index":"my_store","_type":"my_index","_id":"13"}}
{"price":30,"productID":"1113"}
{"index":{"_index":"my_store","_type":"my_index","_id":"14"}}
{"price":40,"productID":"1114"}

curl  -X PUT  'http://localhost:9200/_bulk' -H 'Content-Type:application/json'   --data-binary @esdata 或
curl  -XPOST  'http://localhost:9200/_bulk'   --data-binary @esdata
4.2.5 批量获取数据
curl -X GET http://localhost:9200/_mget -H 'Content-Type:application/json'  -d '
{
  "docs":[
     {
        "_index": "accounts",
        "_type": "_doc",
        "_id": "1"
     },
     {
        "_index": "accounts",
        "_type": "_doc",
        "_id": "2"
     },
     {
        "_index": "accounts",
        "_type": "_doc",
        "_id": "3"
     }
  ]
}'

//获取同索引同类型下的不同文档
GET /accounts/_doc/_mget
{
  "docs":[
     {
        "_id": "1"
     },
     {
        "_type": "user", //若是指定索引和类型必须和请求头上的保持一致,否者将会报错。
        "_id": "2"
     }
  ]
}
//也可以使用下面这种更为简化的写法
GET /accounts/_doc/_mget
{
  "ids":["1","2"]
}
match_all
匹配所有的文档
{
    "query": {
        "match_all": {}
    }
}
match_none
和match_all相反,不匹配任何文档
{
    "query": {
        "match_none": {}
    }
}
match
{
    "query": {
        "match": {
            "message": "hello world"
        }
    }
}
match中检索的文本会被分词。默认来说分词后各个词组间的关系为or。该例子为查找出message字段包含hello或world的文档。
{
    "query": {
        "match" : {
            "message" : {
                "query" : "this is a test",
                "operator" : "and"
            }
        }
    }
}
通过增加operator参数,可以把默认的or关系修改为and。
match_phrase
{
    "query": {
        "match_phrase": {
            "name": "软件公司"
        }
    }
}
匹配的文档要求“软件公司”这四个字必须都出现,且按照顺序出现。
{
    "query": {
        "match_phrase": {
            "name": {
                "query": "软件公司",
                "slop": 1
            }
        }
    }
}
slop用来指定各个分词匹配时的最大间隔,即“软件X公司”也会被匹配。
多字段匹配
{
  "query": {
    "multi_match" : {
      "query": "this is a test",
      "fields": [ "subject", "message" ]
    }
  }
}
分别用"subject"和"message"字段内容匹配"this is a test",如果任意一个字段匹配,该文档会出现在检索结果中。
匹配的fields也可以使用星号作为通配符。
{
  "query": {
    "multi_match" : {
      "query": "Will Smith",
      "fields": [ "title", "*_name" ]
    }
  }
}
查询title和以名称以_name结尾的字段。
{
  "query": {
    "multi_match" : {
      "query" : "this is a test",
      "fields" : [ "subject^3", "message" ]
    }
  }
}
提升subject的score权重(3倍于message)。
term
term查询关键字不进行分词处理。
官方文档原文描述如下:
The term query finds documents that contain the exact term specified in the inverted index.
{
    "query": {
        "term": {
            "message": "some text"
        }
    }
}
term的查询结果还与文档是否分词有关。如果文档内容不分词,大致相当于SQL中的"="。
match和term的区别为:如果文档的有关字段进行了分词,match是搜索关键字的分词和文档字段的分词逐个比较,而term则是搜索关键字不分词,整个和文档字段的分词进行比较。
terms
{
    "query": {
        "terms" : { "message" : ["some", "text"]}
    }
}
查找message字段包含some或text的文档。
multi_match
{
  "query": {
    "multi_match": {
        "query" : "我的宝马多少马力",
        "fields" : ["title", "content"]
    }
  }
}
Query String 查询
{
    "query": {
        "query_string" : {
            "default_field" : "content",
            "query" : "(new york city) OR (big apple)"
        }
    }
}
将new york city和big apple分别交给分词器处理。
Range Query
范围查询
{
    "query": {
        "range" : {
            "age" : {
                "gte" : 10,
                "lte" : 20,
                "boost" : 2.0
            }
        }
    }
}
可以使用的参数有:
- gt: greater than
- gte: greater than or equals
- lt: less than
- lte: less than or equals
Exists
字段存在查询
{
    "query": {
        "exists" : { "field" : "user" }
    }
}
文档中user字段的值不能为null,user字段必须要存在。
Prefix
前缀查询
{
    "query": {
        "prefix" : { "user" : "pe" }
    }
}
查找user字段以pe开头的文档(搜索关键字不分词)
wildcard
通配符查询
{
    "query": {
        "wildcard" : { "user" : "pa*l" }
    }
}
可以匹配paul或paal等。为了保证性能,最好不要在开头使用通配符(比如匹配*aul)。
通配符说明:
- 星号(*)匹配0个或多个字符
- 问号(?)匹配任意单个字符
中英文单字(字母)匹配场景
中文模糊搜索
{
    "query": {
        "match_phrase": {
            "name": "公司"
        }
    }
}
match_phrase 的意思为短语匹配,不仅要匹配短语的字,而且这些字出现的顺序也必须要匹配
英文按字母模糊搜索
{
    "query": {
        "wildcard": {
            "name": "*aster*"
        }
    }
}
布尔组合条件搜索
通过bool组合查询我们可以实现多个查询条件间and或or逻辑组合关系。例如:
{
    "query": {
        "bool": {
            "should": [
                {
                    "wildcard": {
                        "name": "*aster*"
                    }

                }, {
                    "match_phrase": {
                        "authorList.name": "张"
                    }
                }
            ]

        }
    }
}
bool组合查询内有多种子句:
- must 子句中的所有匹配必须都满足。
- must_not 和must相反,子句中的所有匹配必须都不满足。
- should 相当于或的关系,子句中的匹配只要至少有一个满足。如果存在must或filter子句,should中的条件默认不要求至少满足一个,即仅匹配must或filter子句且should中一个条件都不满足的文档也会被检索出来。如需设置至少满足的should条件个数,可以添加
minimum_should_match参数。 - filter 和must类似,不同的是搜索结果的匹配度评分会被忽略。
minimum_should_match示例:
{
    "query": {
        "bool": {
            "should": [
                {
                    "wildcard": {
                        "fieldList.fieldName": "*?0*"
                    }
                },
                {
                    "match_phrase": {
                        "fieldName.fieldComments": "?0"
                    }
                }
            ],
            "filter": [
                {
                    "term": {
                        "systemId": "?1"
                    }
                }
            ],
            "minimum_should_match": 1
        }
    }
}
以上查询不仅要求filter语句满足,而且should中的条件至少要满足一个。
Bool查询更详细的用法请参考:
https://www.elastic.co/guide/en/elasticsearch/reference/current/query-dsl-bool-query.html
嵌套对象字段的查询
{
    "query": {
        "match_phrase": {
            "author.name": "Paul Jackson"
        }
    }
}
检索出author对象中的name字段值为Paul Jackson的文档。
高亮显示
{
    "query" : {
        "match" : {
            "first_name" : "张"
        }
    },
    "highlight": {
        "fields" : {
            "first_name" : {}
        }
    }
}
五、IK分词器
5.1 概念了解
IK Analyzer 是一个开源的,基于java语言开发的轻量级的中文分词工具包。从2006年12月推出1.0版开始, IKAnalyzer已经推出了4个大版本。最初,它是以开源项目Luence为应用主体的,结合词典分词和文法分析算法的中文分词组件。从3.0版本开始,IK发展为面向Java的公用分词组件,独立于Lucene项目,同时提供了对Lucene的默认优化实现。在2012版本中,IK实现了简单的分词歧义排除算法,标志着IK分词器从单纯的词典分词向模拟语义分词衍化
5.2 安装
版本须与els保持一致
方法1:
./bin/elasticsearch-plugin install https://github.com/medcl/elasticsearch-analysis-ik/releases/download/v7.4.0/elasticsearch-analysis-ik-7.4.0.zip
方法2:
1).下载:
https://github.com/medcl/elasticsearch-analysis-ik/releases
2). 解压–>将文件复制到 es的安装目录/plugins/ik下面即可
3). 重启ElasticSearch
5.3 测试示例
5.3.1 未使用分词器
GET _analyze

{
	"text":"中华人民共和国"

}
5.3.2 最粗粒度
GET _analyze

{

"analyzer":"ik_smart",

"text":"中华人民共和国"

}
结果
{

  "tokens" : [

{

"token" : "中华人民共和国",

"start_offset" : 0,

"end_offset" : 7,

"type" : "CN_WORD",

"position" : 0

}

  ]

}
5.3.3 最细粒度
GET _analyze

{

"analyzer":"ik_max_word",

"text":"中华人民共和国"

}
结果:
{

  "tokens" : [

    {

      "token" : "中华人民共和国",

      "start_offset" : 0,

      "end_offset" : 7,

      "type" : "CN_WORD",

      "position" : 0

    },

    {

      "token" : "中华人民",

      "start_offset" : 0,

      "end_offset" : 4,

      "type" : "CN_WORD",

      "position" : 1

    },

    {

      "token" : "中华",

      "start_offset" : 0,

      "end_offset" : 2,

      "type" : "CN_WORD",

      "position" : 2

    },

    {

      "token" : "华人",

      "start_offset" : 1,

      "end_offset" : 3,

      "type" : "CN_WORD",

      "position" : 3

    },

    {

      "token" : "人民共和国",

      "start_offset" : 2,

      "end_offset" : 7,

      "type" : "CN_WORD",

      "position" : 4

    },

    {

      "token" : "人民",

      "start_offset" : 2,

      "end_offset" : 4,

      "type" : "CN_WORD",

      "position" : 5

    },

    {

      "token" : "共和国",

      "start_offset" : 4,

      "end_offset" : 7,

      "type" : "CN_WORD",

      "position" : 6

    },

    {

      "token" : "共和",

      "start_offset" : 4,

      "end_offset" : 6,

      "type" : "CN_WORD",

      "position" : 7

    },

    {

      "token" : "国",

      "start_offset" : 6,

      "end_offset" : 7,

      "type" : "CN_CHAR",

      "position" : 8

    }

  ]

}
5.4 自定义词条
//未添加新词条前,被断开
GET _analyze

{

  "analyzer": "ik_smart",

  "text":"洪荒之力"

}
# 添加新词条
cd /opt/softwares/elasticsearch-7.4.0/config/analysis-ik
mkdir custom
vim custom/new_word.dic
洪荒之力
vim IKAnalyzer.cfg.xml 通过相对路径定位,到扩展词条路径
<entry key="ext_dict">custom/new_word.dic</entry>
重启ES,新词项注册成功
GET _analyze

{

  "analyzer": "ik_smart",

  "text":"洪荒之力"

}
结果
{

  "tokens" : [

    {

      "token" : "洪荒之力",

      "start_offset" : 0,

      "end_offset" : 4,

      "type" : "CN_WORD",

      "position" : 0

    }

  ]

}
5.5 为索引字段指定分词
5.5.1 创建索引
curl -H "Content-Type: application/json" -X PUT 'localhost:9200/accounts' -d ' {

  "settings":{

			"number_of_shards":3,
			"number_of_replicas":2

  },

  "mappings": {

			"properties": {

				"user": {
						"type":"text",
						"analyzer":"ik_max_word",
						"search_analyzer": "ik_max_word"
				},

				"title": {
						"type":"text",
						"analyzer":"ik_max_word",
						"search_analyzer": "ik_max_word"
				},

				"desc":
				{
						"type":"text",
						"analyzer":"ik_max_word",
						"search_analyzer": "ik_max_word"
				}

				}

  }

}'
5.5.2 添加数据
curl -X PUT 'localhost:9200/accounts/_doc/1' -H "Content-Type: application/json" -d '
{
"user": "张三",
"title": "工程师",
"desc": "数据库管理"
}'

curl -X PUT 'localhost:9200/accounts/_doc/2' -d '
{
"user": "李三",
"title": "工程师",
"desc": "数据库管理"
}'
5.5.3 数据查询
查询全部
curl -X GET 'localhost:9200/accounts/_search'
根据条件查询
curl -X GET 'localhost:9200/accounts/_search'  -d '
{
  "query" : { "match" : { "desc" : "软件" }}
}'
指定返回数据条数
curl -X GET 'localhost:9200/accounts/_search'  -d '
{
		"query" : { "match" : { "desc" : "管理" }},
		"size": 1
}'
指定位移
curl -X GET 'localhost:9200/accounts/_search'  -d '
{
    "query" : { "match" : { "desc" : "管理" }},
    "from":1,
    "size": 1
}'
逻辑运算
如果有多个搜索关键字, Elastic 认为它们是or关系
curl 'localhost:9200/accounts/_search'  -d '
{
		"query" : { "match" : { "desc" : "软件 系统" }}
}'

//上面代码搜索的是软件 or 系统
多个关键词的and搜索
curl 'localhost:9200/accounts/_search'  -d '
{
"query": {
    "bool": {
        "must": [
            { "match": { "desc": "软件" } },
            { "match": { "desc": "系统" } }
        ]
    }
    }
}'
5.6 高亮显示
curl 'localhost:9200/accounts/_search'  -d '
{
    "query" : {
        "match" : {
            "desc" : "管理"
        }
    },
    "highlight": {
        "fields" : {
            "desc" : {}
        }
    }
}'
六、smartcn分词器
6.1 概念了解
6.2 安装
./bin/elasticsearch-plugin install analysis-smartcn
6.3 使用
重启es
//标准的分词
curl -X POST http://127.0.0.1:9200/_analyze

{"analyzer":"standard","text":"我是中国人"}
使用 smartcn
curl -X POST http://127.0.0.1:9200/_analyze

{"analyzer":"smartcn","text":"我是中国人"}
//创建索引
curl -H "Content-Type: application/json" -X PUT 'localhost:9200/accounts' -d ' {

  "settings":{

			"number_of_shards":3,
			"number_of_replicas":2

  },

  "mappings": {

			"properties": {

				"user": {
						"type":"text",
						"analyzer":"smartcn",
						"search_analyzer": "smartcn"
				},

				"title": {
						"type":"text",
						"analyzer":"smartcn",
						"search_analyzer": "smartcn"
				},

				"desc":
				{
						"type":"text",
						"analyzer":"smartcn",
						"search_analyzer": "smartcn"
				}

				}

  }

}'
七、Logstash
7.1 概念
Logstash 是一个开源的数据采集引擎。
Logstash 就像是一个管子,左面接数据源接收数据,右面接存储目的地,管子中间有过滤器,对接收到的数据进行过滤,只存储符合要求的数据
如图
[外链图片转存失败,源站可能有防盗链机制,建议将图片保存下来直接上传(img-ZNozhtUm-1615725597484)(/Users/xinfusong/Desktop/imgs/640.png)]
7.2 安装与配置
7.2.1 下载
https://www.elastic.co/downloads/logstash
7.2.2 解压
tar zxvf logstash-7.4.0.tar.gz
7.2.3 运行
进入解压目录,执行bin目录下的logstash命令
cd logstash-7.4.0
./bin/logstash -e "input { stdin { } } output { stdout {} }"
7.2.4 测试输入
hello world
{
       "message" => "hello,world",
      "@version" => "1",
    "@timestamp" => 2019-10-13T00:48:45.709Z,
          "host" => "xinfudembp"
}
7.2.5 输出到Elasticsearch
bin/logstash -e "input { stdin { } } output { elasticsearch { } }"
[INFO ][logstash.outputs.elasticsearch] Retrying individual bulk actions that failed or were rejected by the previous bulk request. {:count=>1}
解决办法
经过分析,发现是因为ES所在服务器磁盘空间太低引起,具体解决办法如下:
在kibana开发控制台执行下面语句即可:
PUT _settings
{
  "index": {
    "blocks": {
      "read_only_allow_delete": "false"
    }
  }
}
查询
curl -X POST http://localhost:9200/logstash-2019.10.13-000001/_search?pretty

{
  "query": { "match_all": {} },
  "size": 100
}
7.3 Redis/Elastic实时同步
7.3.1 订阅同步
下面把input改为redis,output还使用屏幕,便于查看
新建配置文件 esconf/redis-pub.conf
input {
    redis {
        data_type => "pattern_channel"
        key => "logstash-*"
        host => "localhost"
        port => 6379
    }
}
output {
  #stdout { codec => rubydebug }//输出到控制台
  elasticsearch { } //输出到elasticsearch
}
input 中配置了redis的连接信息和key的匹配规则
output 中的 codec 用来对输出信息进行美化
启动
./bin/logstash -f esconf/redis-pub.conf
启动完成后,等待redis的数据
然后在redis中输入命令
PUBLISH logstash-demo "hello world"
在logstash的控制台中就可以看到接收到的信息:
{
    "@timestamp" => 2016-12-07T09:37:51.533Z,
      "@version" => "1",
       "message" => "hello world",
          "tags" => [
        [0] "_jsonparsefailure"
    ]
}
7.3.2 队列同步
新建配置文件 esconf/redis-list.conf
input {
    redis {
        data_type => "list"
        key => "redislist"
        host => "127.0.0.1"
        port => 6379
    }

}
output {
  stdout { codec => rubydebug }
  elasticsearch { } //输出到elasticsearch
}
启动
./bin/logstash -f esconf/redis-list.conf --path.data =../data201910175
然后在redis中输入命令
LPUSH redislist mysql mongodb sqlserver
//json
'{"message":"hello world","@version":"1","@timestamp":"2014-08-08T16:34:21.865Z","host":"raochenlindeMacBook-Air.local","key1":"value1"}'
7.4 Elastic/Mysql实时同步
本文介绍如何使用logstash同步mysql数据库信息到ElasticSearch.
7.4.1 准备工作
7.4.1.1 安装JDK
网上文章比较多,可以参考:https://www.dalaoyang.cn/article/16。
7.4.1.2 安装Logstash
可以参考:https://www.dalaoyang.cn/article/80。
7.4.1.3 安装ruby
安装过程可以参考:https://blog.csdn.net/qq_26440803/article/details/82717244,已经非常详细了。
7.4.1.4 安装gem
安装
yum install gem
gem源修改
gem sources --add https://gems.ruby-china.com/ --remove https://rubygems.org/
7.4.2 修改logstash中的Gemfile和Gemfile.jruby-1.9.lock文件
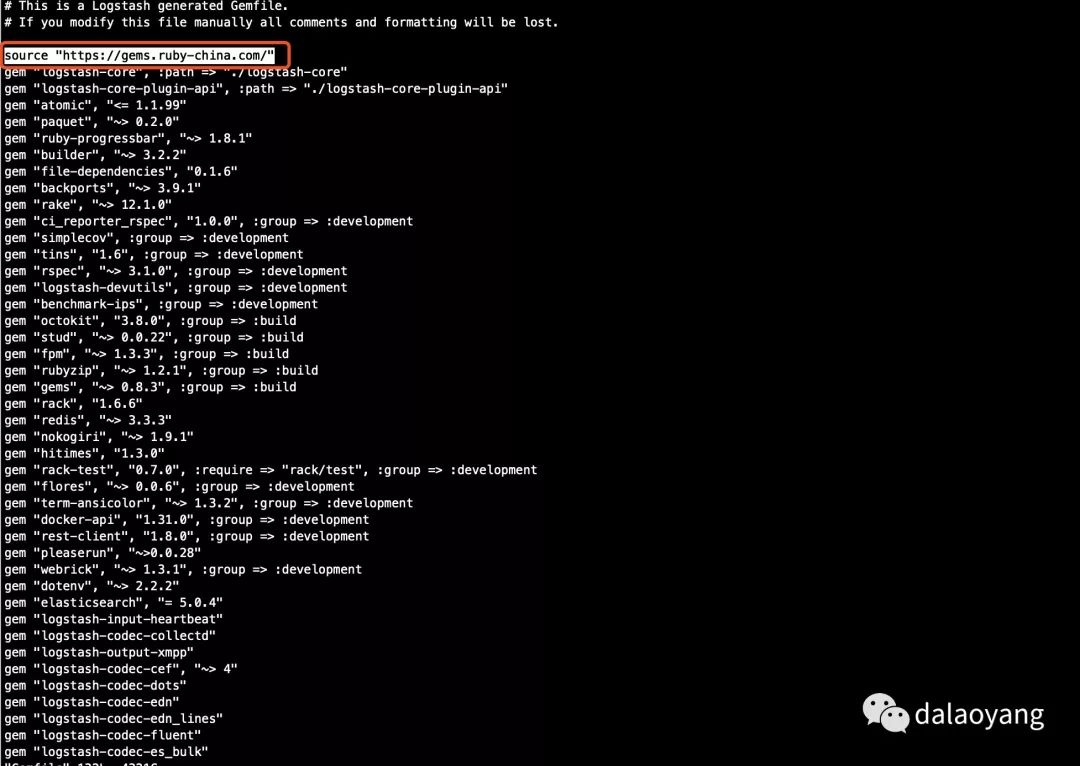
修改上图中Gemfile文件红框位置为
source "https://gems.ruby-china.com/"

修改上图中Gemfile.jruby-1.9.lock文件(其他版本logstash可能不叫这个名字,但是名字类似)红框位置为
remote: https://gems.ruby-china.com/
7.4.3 安装bundler
安装
gem install bundler
7.4.4 安装logstash-input-jdbc插件
安装
./bin/logstash-plugin install logstash-input-jdbc
7.4.5 准备mysql-connector-java-x.x.x.jar
需要准备一个mysql-connector-java-x.x.x.jar对应版本的jar,这里使用的是mysql-connector-java-5.1.6.jar。
这个可以去官网下载:https://dev.mysql.com/downloads/connector/j/5.1.html
7.4.6 配置logstash
创建mysql-es.conf配置文件,名称可以自定,这里数据表以我博客友情链接表为例,内容如下:
input
{
    jdbc
    {

        # 驱动包位置
        jdbc_driver_library => "/Users/xinfusong/Desktop/bawei/ELK/mysql-connector-java-5.1.48/mysql-connector-java-5.1.48.jar"

        # 驱动
        jdbc_driver_class => "com.mysql.jdbc.Driver"

        # 数据库地址
        jdbc_connection_string => "jdbc:mysql://127.0.0.1:3306/elk"

        # 数据库连接用户名
        jdbc_user => "root"

        # 数据库连接用户密码
        jdbc_password => "root"

        # 执行sql语句文件位置

        # statement_filepath => "filename.sql"

        # 执行sql
        statement => "SELECT * from pe_link"

        # 是否分页
        jdbc_paging_enabled => "true"

        # 分页数量
        jdbc_page_size => "50000"
        type => "jdbc"
        tracking_column => "update_date"
        use_column_value => false

        # 执行任务时间间隔,各字段含义(由左至右)分、时、天、月、年,全部为*默认含义为每分钟都更新
        schedule => "* * * * *"

    }


}

output
{
    elasticsearch
    {
        hosts => "127.0.0.1:9200"
        index => "test-elk"
        # 数据库中的id
        document_id => "%{link_id}"
    }
}
7.4.7 启动logstash
执行命令启动
logstash --path.settings instance1 //多实例
./bin/logstash -f esconf/mysql-es.conf --path.data=../data20191012
启动后可以看到如图所示

7.4.8 查看ElasticSearch
在ElasticSearch-head中可以看到对应mysql中的数据,如图

7.4.9 总结
总的来说过程还是很简单的,没有遇到太大的问题,这只是mysql同步es的一种方式,还有很多方式可以使用
7.5 日志文件同步
7.5.1 指定日志
配置文件
logstash/config/file.conf
input {
    file{
        path => "/Users/xinfusong/Desktop/bawei/testFile.txt"
    }
 }
output {
     stdout {}
 }
启动
./bin/logstash -f esconf/file.conf --path.data =../data20191016
7.5.2 指定目录
logstash/config/log.conf
input {
file {
type => "log"
path => "/Users/xinfusong/Desktop/bawei/ELK/testlog/*"
discover_interval => 10
start_position => "beginning"
}
}
filter {
}
output {
elasticsearch {
index => "log-%{+YYYY.MM.dd}"
}
stdout {codec => rubydebug}
}
启动
./bin/logstash -f esconf/log.conf --path.data =…/data201910176
7.6 logstash/kafka同步
配置文件
input {
	stdin { }
}

output {
  #stdout { codec => rubydebug }
  kafka {
    bootstrap_servers => 'localhost:9092'
    topic_id => 'test2'
    codec => plain
  }
}
启动logstash
./bin/logstash -f esconf/kafka.conf --path.data=1234data
参考资料
https://www.cnblogs.com/dyh004/p/9641377.html
八、PHP操作elastic
8.1 安装elasticsearch-php
在 composer.json 文件中引入 elasticsearch-php:
{
    "require": {
        "elasticsearch/elasticsearch": "~6.0"
    }
}
composer update
8.2 php els 操作
8.2.1 创建索引
	use Elasticsearch\ClientBuilder;

	//简单索引
	$client = ClientBuilder::create()->build();
	$params = [
    'index' => 'my_index'
	];

// Create the index
$response = $client->indices()->create($params);

//指定分词
			$client = ClientBuilder::create()->build();
	    $params = [
		    'index' => 'goods',
		    'body' => [
			    'settings' => [
				    'number_of_shards' => 3,
				    'number_of_replicas' => 2
			    ],
			    'mappings' => [

				    '_source' => [
					    'enabled' => true
				    ],
				    'properties' => [
					    'name' => [
						    'type' => 'text',
						    "analyzer" => "ik_max_word",
						    "search_analyzer" => "ik_max_word"
					    ],
					    'desc' => [
						    'type' => 'text',
						    "analyzer" => "ik_max_word",
						    "search_analyzer" => "ik_max_word"
					    ]
				    ]

			    ]
		    ]
	    ];

	    // Create the index with mappings and settings now
	    $response = $client->indices()->create($params);
8.2.2 索引文档
$client = ClientBuilder::create()->build();
$params = [
			'index' => 'goods',
			'type' => '_doc',
			//'id' => '1',
			'body' => ['name' => "iphone7手机",
			           'desc' => "iphone7手机"]

		];

$response = $client->index($params);
print_r($response);
8.2.3 搜索
8.2.3.1 单个按ID查询
$client = ClientBuilder::create()->build();
$params = [
    'index' => 'goods',
    'type' => '_doc',
    'id' => '1'
];

$response = $client->get($params);
print_r($response);
8.2.3.2 Match 查询
$client = ClientBuilder::create()->build();
$params = [
			'index' => 'goods',
			//'type' => '_doc',
			'body' => [
				'query' => [
					'match' => [
						'name' => '手机'
					]
				],
				'highlight' => [
                    'pre_tags' => ["<em>"],
                    'post_tags' => ["</em>"],
                    'fields' => [
                        "name" => new \stdClass()
                    ]
                ]
			]
		];
		//偏移
		$params["size"] = 1;
		$params["from"] = 1;

		$results = $client->search($params);
		print_r($results);
8.2.3.3 Bool 查询
$client = ClientBuilder::create()->build();
$params = [
			'index' => 'goods',
			'type' => '_doc',
			'body' => [
				'query' => [
					'bool' => [
						'must' => [
							[ 'match' => [ 'name' => '中华' ] ],
							[ 'match' => [ 'name' => '人民' ] ],
						]
					]
				]
			]
		];

$results = $client->search($params);
print_r($results);
8.2.3.4 复杂查询
$client = ClientBuilder::create()->build();
$params = [
   'index' => 'goods',
   'type' => '_doc',
   'body' => [
      'query' => [
         'bool' => [
            'filter' => [
               'term' => [ 'age' => 12 ]
            ],
            'should' => [
               'match' => [ 'name' => '中国' ]
            ]
         ]
      ]
   ]
];

$results = $client->search($params);
print_r($results);
8.2.3.4 高亮显示
$client = ClientBuilder::create()->build();
$params = [
			'index' => 'goods',
			//'type' => '_doc',
			'body' => [
				'query' => [
					'match' => [
						'name' => '中华人民'
					]
				],
				'highlight' => [
					'pre_tags' => ["<em>"],
					'post_tags' => ["</em>"],
					'fields' => [
						"name" => new \stdClass()
					]
				]
			]
		];

		$results = $client->search($params);
		print_r($results);
第二种
use NunoMaduro\Collision\Highlighter;

    /**
     * @param Request $request Elasticsearch 高亮搜索
     * @return \Illuminate\Http\JsonResponse
     */
    public function search(Request $request){
        $searchKey = $request->input('search');
        if($searchKey){
            $params = [
                'index' => 'jokes',

                'body' => [
                    '_source' => true,
                    'query' => [
                        'multi_match' => [
                            'query' => $searchKey, //搜索条件
                            "fields" => [ // 搜索过程中涉及的字段
                                "content",
                                "hashId",
                                "unixtime"
                            ]
                        ]
                    ],
                    'highlight' => [
                        'pre_tags'=>'<span style="color: red"></span>',  // 高亮颜色匹配
                        'post_tags'=>'<span style="color: red"></span>',
                        'fields' => [
                            'content' => new Highlighter(),
                            'hashId' => new Highlighter(),
                             'unixtime' => new Highlighter()
                        ]
                    ]
                ]
            ];
            $response = $this->esClient->search($params);

            $tmp = $tmpResult = [];

            if($response['hits']['total']['value'] > 0){
                foreach ($response['hits']['hits'] as $res){
                    $tmp['id'] = $res['_id'];
                    $tmp['content'] = isset($res['highlight']['content'][0]) ? $res['highlight']['content'][0] : $res['_source']['content'];
                    $tmp['hashId'] = isset($res['highlight']['hashId'][0]) ? $res['highlight']['hashId'][0] : $res['_source']['hashId'];
                    $tmp['unixtime'] = isset($res['highlight']['unixtime'][0]) ? $res['highlight']['unixtime'][0] : $res['_source']['unixtime'];
                    $tmpResult[]=$tmp;
                }
            }

        }
        return response()->json(['code'=>200,'msg'=>'查询成功','data'=>$tmpResult]);
    }
8.2.4 删除索引
$client = ClientBuilder::create()->build();
$params = ['index' => 'goods'];
$response = $client->indices()->delete($params);
8.2.5 更新索引
$client = ClientBuilder::create()->build();
$params = [
			'index' => 'goods',
			'type' => '_doc',
			'id' => 'srgiyW0BpEEPDQFsRhIK',
			'body' => [
				'doc' => [
					'name' => 'abc'
				]
			]
		];
		$response = $client->update($params);
		print_r($response);exit;


 1117
1117


 被折叠的 条评论
为什么被折叠?
被折叠的 条评论
为什么被折叠?
 到【灌水乐园】发言


