


NIO:ByteBuffer
1 ByteBuffer使用
这里先对ByteBuffer的使用方式进行简单演示,演示中代码的细节将在后文中慢慢解释,这里我们只需对整体流程留下大致印象即可
第一步:新建一个maven工程,导入pom依赖
 <dependencies>
        <dependency>
            <groupId>io.netty</groupId>
            <artifactId>netty-all</artifactId>
            <version>4.1.39.Final</version>
        </dependency>
        <dependency>
            <groupId>org.projectlombok</groupId>
            <artifactId>lombok</artifactId>
            <version>1.16.18</version>
        </dependency>
<!--        json转换的工具类-->
        <dependency>
            <groupId>com.google.code.gson</groupId>
            <artifactId>gson</artifactId>
            <version>2.8.5</version>
        </dependency>
<!--        谷歌的工具类合集-->
        <dependency>
            <groupId>com.google.guava</groupId>
            <artifactId>guava</artifactId>
            <version>19.0</version>
        </dependency>
        <dependency>
            <groupId>ch.qos.logback</groupId>
            <artifactId>logback-classic</artifactId>
            <version>1.2.3</version>
        </dependency>
        <dependency>
            <groupId>com.google.protobuf</groupId>
            <artifactId>protobuf-java</artifactId>
            <version>3.11.3</version>
        </dependency>
    </dependencies>
第二步:在resources目录下准备一个logback.xml,用作日志打印
<?xml version="1.0" encoding="UTF-8"?>
<configuration
xmlns="http://ch.qos.logback/xml/ns/logback"
xmlns:xsi="http://www.w3.org/2001/XMLSchema-instance"
xsi:schemaLocation="http://ch.qos.logback/xml/ns/logback logback.xsd">
<!-- 输出控制,格式控制-->
<appender name="STDOUT" class="ch.qos.logback.core.ConsoleAppender">
<encoder>
<pattern>%date{HH:mm:ss} [%-5level] [%thread] %logger{17} - %m%n </pattern>
</encoder>
</appender>
<!--<appender name="FILE" class="ch.qos.logback.core.rolling.RollingFileAppender">
<!– 日志文件名称 –>
<file>logFile.log</file>
<rollingPolicy class="ch.qos.logback.core.rolling.TimeBasedRollingPolicy">
<!– 每天产生一个新的日志文件 –>
<fileNamePattern>logFile.%d{yyyy-MM-dd}.log</fileNamePattern>
<!– 保留 15 天的日志 –>
<maxHistory>15</maxHistory>
</rollingPolicy>
<encoder>
<pattern>%date{HH:mm:ss} [%-5level] [%thread] %logger{17} - %m%n </pattern>
</encoder>
</appender>-->
<!--需要打印日志的包以及打印日志级别 -->
<logger name="cn.itcast" level="DEBUG" additivity="false">
<appender-ref ref="STDOUT"/>
</logger>
<logger name="io.netty.handler.logging.LoggingHandler" level="DEBUG" additivity="false">
<appender-ref ref="STDOUT"/>
</logger>
<root level="ERROR">
<appender-ref ref="STDOUT"/>
</root>
</configuration>
第三步:准备一个data.txt,内容为
1234567890abcd
第四步:新建一个cn.itcast包,在包中编写以下代码,目的是使用 FileChannel 来读取文件内容
@Slf4j
public class ChannelDemo {
    public static void main(String[] args) {
        try (RandomAccessFile file = new RandomAccessFile("data.txt", "rw")) {

            // 使用任意输入输出流的getChannel()方法获取channel通道
            FileChannel channel = file.getChannel();

            // 通过ByteBuffer的静态方法allocate()方法获取实例,参数为缓冲区大小
            ByteBuffer buffer = ByteBuffer.allocate(10);

            do {
                // 使用channel读取数据,即向buffer写入数据
                int len = channel.read(buffer);
                log.debug("读到字节数:{}", len);

                // 当读取的长度为-1时,结束读取
                if (len == -1) {
                    break;
                }

                // 获取buffer中存储的数据,获取前需要切换buffer为读写模式
                buffer.flip();

                // hasRemaining()方法:判断buffer是否还有数据
                // get()方法:获取buffer中一个单位的数据
                while(buffer.hasRemaining()) {
                    log.debug("{}", (char)buffer.get());
                }

                // channel准备进入下一次读取,在此之前需要切换buffer为写模式
                buffer.clear();

            } while (true);

        } catch (IOException e) {
            e.printStackTrace();
        }
    }
}
输出结果如下
10:39:03 [DEBUG] [main] c.i.n.ChannelDemo - 读到字节数:10
10:39:03 [DEBUG] [main] c.i.n.ChannelDemo - 1
10:39:03 [DEBUG] [main] c.i.n.ChannelDemo - 2
10:39:03 [DEBUG] [main] c.i.n.ChannelDemo - 3
10:39:03 [DEBUG] [main] c.i.n.ChannelDemo - 4
10:39:03 [DEBUG] [main] c.i.n.ChannelDemo - 5
10:39:03 [DEBUG] [main] c.i.n.ChannelDemo - 6
10:39:03 [DEBUG] [main] c.i.n.ChannelDemo - 7
10:39:03 [DEBUG] [main] c.i.n.ChannelDemo - 8
10:39:03 [DEBUG] [main] c.i.n.ChannelDemo - 9
10:39:03 [DEBUG] [main] c.i.n.ChannelDemo - 0
10:39:03 [DEBUG] [main] c.i.n.ChannelDemo - 读到字节数:4
10:39:03 [DEBUG] [main] c.i.n.ChannelDemo - a
10:39:03 [DEBUG] [main] c.i.n.ChannelDemo - b
10:39:03 [DEBUG] [main] c.i.n.ChannelDemo - c
10:39:03 [DEBUG] [main] c.i.n.ChannelDemo - d
10:39:03 [DEBUG] [main] c.i.n.ChannelDemo - 读到字节数:-1
2 ByteBuffer核心属性
字节缓冲区的父类Buffer中有几个核心属性,如下
// Invariants: mark <= position <= limit <= capacity
private int mark = -1;
private int position = 0;
private int limit;
private int capacity;
- capacity:缓冲区的容量。通过构造函数赋予,一旦设置,无法更改
- limit:缓冲区的界限。位于limit 后的数据不可读写。缓冲区的界限不能为负,并且不能大于其容量
- position:缓冲区的位置,也就是下一个读写位置的索引。缓冲区的位置不能为负,并且不能大于limit
- mark:记录当前position的值。position被改变后,可以通过调用reset() 方法恢复到mark的位置。
以上四个属性必须满足:mark <= position <= limit <= capacity
如果我们初始化一个ByteBuffer对象,其各个属性的初始状态图解如下:
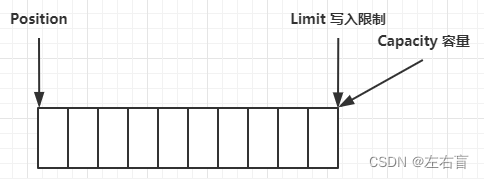
如图所示:Position=0,limit=capacity
此时的ByteBuffer默认为写模式
写模式规则:position始终指向最后一个元素的下一个位置,limit=position
写模式下,position 是写入位置,limit 等于容量,下图表示写入了 4 个字节后的状态,此时position=4,指向第五个位置

我们可以通过一些方法将写模式切换为读模式
读模式规则:limit指向最后一个元素的下一个位置,position最小值为0,最大值为limit
读模式下,position 切换为读取位置,limit 切换为读取限制,limit 限制之后的数据均不可读

需要我们注意的是,读模式是可以进行写入操作的,写模式也是可以进行读取操作的
事实上,ByteBuffer本身是没有所谓读写限制的,有的只是对Limit范围外的元素限制为无法读写,limit范围内的所有元素都是可读可写的。但我们进行读写操作时需要考虑position指向的位置,因为ByteBuffer的读写根本上来说就是对position所指向的位置上的元素进行获取/覆盖,而写模式下的position正常指向的位置永远都是没有元素的,如果我们在写模式下进行读取,读取到的值只会为零。与之相对的,读模式下position指向的位置永远都是有元素的,因此如果我们在读模式下进行写入,会对现有元素进行覆盖
3 ByteBuffer核心方法
在对ByteBuffer核心方法进行演示之前,我们可以先导入一个工具类:
import io.netty.util.internal.StringUtil;

import java.nio.ByteBuffer;

import static io.netty.util.internal.MathUtil.isOutOfBounds;
import static io.netty.util.internal.StringUtil.NEWLINE;

public class ByteBufferUtil {
    private static final char[] BYTE2CHAR = new char[256];
    private static final char[] HEXDUMP_TABLE = new char[256 * 4];
    private static final String[] HEXPADDING = new String[16];
    private static final String[] HEXDUMP_ROWPREFIXES = new String[65536 >>> 4];
    private static final String[] BYTE2HEX = new String[256];
    private static final String[] BYTEPADDING = new String[16];

    static {
        final char[] DIGITS = "0123456789abcdef".toCharArray();
        for (int i = 0; i < 256; i++) {
            HEXDUMP_TABLE[i << 1] = DIGITS[i >>> 4 & 0x0F];
            HEXDUMP_TABLE[(i << 1) + 1] = DIGITS[i & 0x0F];
        }

        int i;

        // Generate the lookup table for hex dump paddings
        for (i = 0; i < HEXPADDING.length; i++) {
            int padding = HEXPADDING.length - i;
            StringBuilder buf = new StringBuilder(padding * 3);
            for (int j = 0; j < padding; j++) {
                buf.append("   ");
            }
            HEXPADDING[i] = buf.toString();
        }

        // Generate the lookup table for the start-offset header in each row (up to 64KiB).
        for (i = 0; i < HEXDUMP_ROWPREFIXES.length; i++) {
            StringBuilder buf = new StringBuilder(12);
            buf.append(NEWLINE);
            buf.append(Long.toHexString(i << 4 & 0xFFFFFFFFL | 0x100000000L));
            buf.setCharAt(buf.length() - 9, '|');
            buf.append('|');
            HEXDUMP_ROWPREFIXES[i] = buf.toString();
        }

        // Generate the lookup table for byte-to-hex-dump conversion
        for (i = 0; i < BYTE2HEX.length; i++) {
            BYTE2HEX[i] = ' ' + StringUtil.byteToHexStringPadded(i);
        }

        // Generate the lookup table for byte dump paddings
        for (i = 0; i < BYTEPADDING.length; i++) {
            int padding = BYTEPADDING.length - i;
            StringBuilder buf = new StringBuilder(padding);
            for (int j = 0; j < padding; j++) {
                buf.append(' ');
            }
            BYTEPADDING[i] = buf.toString();
        }

        // Generate the lookup table for byte-to-char conversion
        for (i = 0; i < BYTE2CHAR.length; i++) {
            if (i <= 0x1f || i >= 0x7f) {
                BYTE2CHAR[i] = '.';
            } else {
                BYTE2CHAR[i] = (char) i;
            }
        }
    }

    /**
     * 打印所有内容
     * @param buffer
     */
    public static void debugAll(ByteBuffer buffer) {
        int oldlimit = buffer.limit();
        buffer.limit(buffer.capacity());
        StringBuilder origin = new StringBuilder(256);
        appendPrettyHexDump(origin, buffer, 0, buffer.capacity());
        System.out.println("+--------+-------------------- all ------------------------+----------------+");
        System.out.printf("position: [%d], limit: [%d]\n", buffer.position(), oldlimit);
        System.out.println(origin);
        buffer.limit(oldlimit);
    }

    /**
     * 打印可读取内容
     * @param buffer
     */
    public static void debugRead(ByteBuffer buffer) {
        StringBuilder builder = new StringBuilder(256);
        appendPrettyHexDump(builder, buffer, buffer.position(), buffer.limit() - buffer.position());
        System.out.println("+--------+-------------------- read -----------------------+----------------+");
        System.out.printf("position: [%d], limit: [%d]\n", buffer.position(), buffer.limit());
        System.out.println(builder);
    }

    private static void appendPrettyHexDump(StringBuilder dump, ByteBuffer buf, int offset, int length) {
        if (isOutOfBounds(offset, length, buf.capacity())) {
            throw new IndexOutOfBoundsException(
                    "expected: " + "0 <= offset(" + offset + ") <= offset + length(" + length
                            + ") <= " + "buf.capacity(" + buf.capacity() + ')');
        }
        if (length == 0) {
            return;
        }
        dump.append(
                "         +-------------------------------------------------+" +
                        NEWLINE + "         |  0  1  2  3  4  5  6  7  8  9  a  b  c  d  e  f |" +
                        NEWLINE + "+--------+-------------------------------------------------+----------------+");

        final int startIndex = offset;
        final int fullRows = length >>> 4;
        final int remainder = length & 0xF;

        // Dump the rows which have 16 bytes.
        for (int row = 0; row < fullRows; row++) {
            int rowStartIndex = (row << 4) + startIndex;

            // Per-row prefix.
            appendHexDumpRowPrefix(dump, row, rowStartIndex);

            // Hex dump
            int rowEndIndex = rowStartIndex + 16;
            for (int j = rowStartIndex; j < rowEndIndex; j++) {
                dump.append(BYTE2HEX[getUnsignedByte(buf, j)]);
            }
            dump.append(" |");

            // ASCII dump
            for (int j = rowStartIndex; j < rowEndIndex; j++) {
                dump.append(BYTE2CHAR[getUnsignedByte(buf, j)]);
            }
            dump.append('|');
        }

        // Dump the last row which has less than 16 bytes.
        if (remainder != 0) {
            int rowStartIndex = (fullRows << 4) + startIndex;
            appendHexDumpRowPrefix(dump, fullRows, rowStartIndex);

            // Hex dump
            int rowEndIndex = rowStartIndex + remainder;
            for (int j = rowStartIndex; j < rowEndIndex; j++) {
                dump.append(BYTE2HEX[getUnsignedByte(buf, j)]);
            }
            dump.append(HEXPADDING[remainder]);
            dump.append(" |");

            // Ascii dump
            for (int j = rowStartIndex; j < rowEndIndex; j++) {
                dump.append(BYTE2CHAR[getUnsignedByte(buf, j)]);
            }
            dump.append(BYTEPADDING[remainder]);
            dump.append('|');
        }

        dump.append(NEWLINE +
                "+--------+-------------------------------------------------+----------------+");
    }

    private static void appendHexDumpRowPrefix(StringBuilder dump, int row, int rowStartIndex) {
        if (row < HEXDUMP_ROWPREFIXES.length) {
            dump.append(HEXDUMP_ROWPREFIXES[row]);
        } else {
            dump.append(NEWLINE);
            dump.append(Long.toHexString(rowStartIndex & 0xFFFFFFFFL | 0x100000000L));
            dump.setCharAt(dump.length() - 9, '|');
            dump.append('|');
        }
    }

    public static short getUnsignedByte(ByteBuffer buffer, int index) {
        return (short) (buffer.get(index) & 0xFF);
    }
}
这个工具类可以快捷帮我们打印bytebuffer中的元素以及属性值,示例如下:
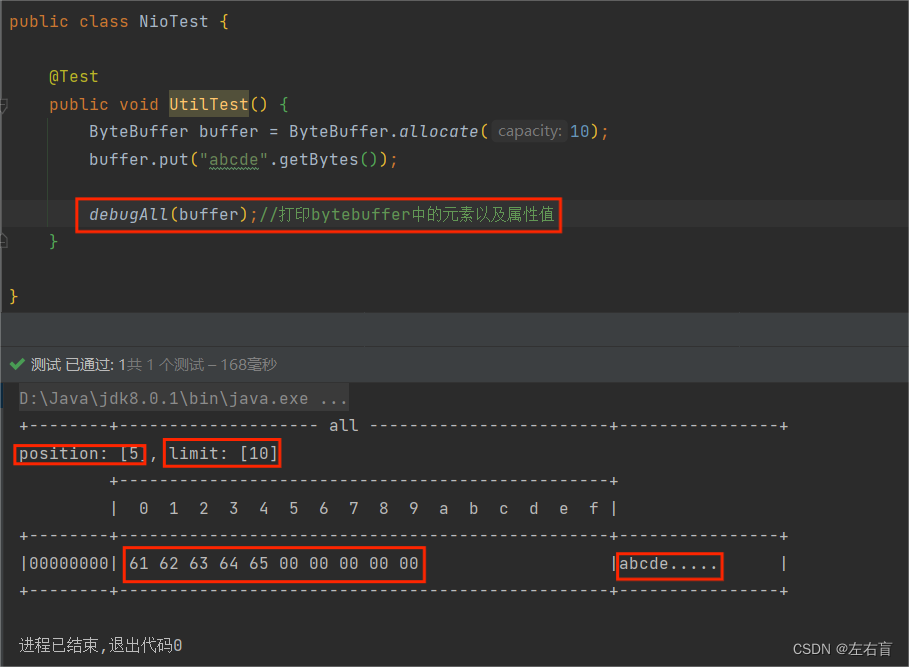
3.1 put方法
put()方法将从当前position的位置开始,将一个数据或一组数据放入到缓冲区中。同时position的值+N(N为存入数据的长度),如果如果此时postition>=limit,则会抛出 BufferOverflowException 异常
put()方法在写模式和读模式下均能使用,读模式下的使用将会对position所在位置的元素进行覆盖
代码演示
    @Test
    public void putTest(){
        ByteBuffer buffer = ByteBuffer.allocate(10);

        // 存放多个数据
        buffer.put("abcde".getBytes());
        debugAll(buffer);
        // 存放单个数据
        buffer.put("f".getBytes());
        debugAll(buffer);

        // 切换至读模式
        buffer.flip();

        // 读模式下存放多个数据
        buffer.put("ghigk".getBytes());
        debugAll(buffer);

        // 读模式存放单个数据
        buffer.put("l".getBytes());
        debugAll(buffer);

        // 当position等于limit时继续存放数据,运行将抛出异常
        // buffer.put("i".getBytes());
        // debugAll(buffer);

    }
}
运行结果
// buffer.put("abcde".getBytes());
+--------+-------------------- all ------------------------+----------------+
position: [5], limit: [10]
         +-------------------------------------------------+
         |  0  1  2  3  4  5  6  7  8  9  a  b  c  d  e  f |
+--------+-------------------------------------------------+----------------+
|00000000| 61 62 63 64 65 00 00 00 00 00                   |abcde.....      |
+--------+-------------------------------------------------+----------------+

// buffer.put("f".getBytes());
+--------+-------------------- all ------------------------+----------------+
position: [6], limit: [10]
         +-------------------------------------------------+
         |  0  1  2  3  4  5  6  7  8  9  a  b  c  d  e  f |
+--------+-------------------------------------------------+----------------+
|00000000| 61 62 63 64 65 66 00 00 00 00                   |abcdef....      |
+--------+-------------------------------------------------+----------------+

// buffer.flip();
+--------+-------------------- all ------------------------+----------------+
position: [0], limit: [6]
         +-------------------------------------------------+
         |  0  1  2  3  4  5  6  7  8  9  a  b  c  d  e  f |
+--------+-------------------------------------------------+----------------+
|00000000| 61 62 63 64 65 66 00 00 00 00                   |abcdef....      |
+--------+-------------------------------------------------+----------------+

// buffer.put("ghigk".getBytes());
+--------+-------------------- all ------------------------+----------------+
position: [5], limit: [6]
         +-------------------------------------------------+
         |  0  1  2  3  4  5  6  7  8  9  a  b  c  d  e  f |
+--------+-------------------------------------------------+----------------+
|00000000| 67 68 69 67 6b 66 00 00 00 00                   |ghigkf....      |
+--------+-------------------------------------------------+----------------+

// buffer.put("l".getBytes());
+--------+-------------------- all ------------------------+----------------+
position: [6], limit: [6]
         +-------------------------------------------------+
         |  0  1  2  3  4  5  6  7  8  9  a  b  c  d  e  f |
+--------+-------------------------------------------------+----------------+
|00000000| 67 68 69 67 6b 6c 00 00 00 00                   |ghigkl....      |
+--------+-------------------------------------------------+----------------+
3.2 flip方法
flip()方法源码如下:
public Buffer flip() {
    this.limit = this.position;
    this.position = 0;
    this.mark = -1;
    return this;
}
看起来其实很好理解,flip()方法会让limit值等于当前position的值,然后再将position的位置置于零
通过代码对这部分进行测试
 public void flipTest(){
        ByteBuffer buffer = ByteBuffer.allocate(10);

        //存放多个数据
        buffer.put("abcde".getBytes());
        debugAll(buffer);

        //使用第一次
        buffer.flip();
        debugAll(buffer);

        //使用第二次
        buffer.flip();
        debugAll(buffer);

    }
测试结果如下
// buffer.put("abcde".getBytes());
+--------+-------------------- all ------------------------+----------------+
position: [5], limit: [10]
         +-------------------------------------------------+
         |  0  1  2  3  4  5  6  7  8  9  a  b  c  d  e  f |
+--------+-------------------------------------------------+----------------+
|00000000| 61 62 63 64 65 00 00 00 00 00                   |abcde.....      |
+--------+-------------------------------------------------+----------------+

// 第一次buffer.flip();
+--------+-------------------- all ------------------------+----------------+
position: [0], limit: [5]
         +-------------------------------------------------+
         |  0  1  2  3  4  5  6  7  8  9  a  b  c  d  e  f |
+--------+-------------------------------------------------+----------------+
|00000000| 61 62 63 64 65 00 00 00 00 00                   |abcde.....      |
+--------+-------------------------------------------------+----------------+

//第二次buffer.flip();
+--------+-------------------- all ------------------------+----------------+
position: [0], limit: [0]
         +-------------------------------------------------+
         |  0  1  2  3  4  5  6  7  8  9  a  b  c  d  e  f |
+--------+-------------------------------------------------+----------------+
|00000000| 61 62 63 64 65 00 00 00 00 00                   |abcde.....      |
+--------+-------------------------------------------------+----------------+
可以看到,我们在第一次flip()操作时可以将ByteBuffer的写模式规则切换为读模式规则,在这种情况下如果我们再进行第二次flip()操作,ByteBuffer的position和limit都会变成零,此时ByteBuffer已经失去了意义,无法进行读操作和写操作
那如果我们在第二次使用flip()操作时之前先对position的位置进行改变,那结果又会如何?
@Test
public void flipTest(){
    ByteBuffer buffer = ByteBuffer.allocate(10);

    //存放多个数据
    buffer.put("abcde".getBytes());
    debugAll(buffer);

    //使用第一次
    buffer.flip();
    debugAll(buffer);

    //读取两次数据
    buffer.get();
    buffer.get();
    debugAll(buffer);

    //使用第二次
    buffer.flip();
    debugAll(buffer);

}
测试结果
// buffer.put("abcde".getBytes())
+--------+-------------------- all ------------------------+----------------+
position: [5], limit: [10]
         +-------------------------------------------------+
         |  0  1  2  3  4  5  6  7  8  9  a  b  c  d  e  f |
+--------+-------------------------------------------------+----------------+
|00000000| 61 62 63 64 65 00 00 00 00 00                   |abcde.....      |
+--------+-------------------------------------------------+----------------+

// buffer.flip();
+--------+-------------------- all ------------------------+----------------+
position: [0], limit: [5]
         +-------------------------------------------------+
         |  0  1  2  3  4  5  6  7  8  9  a  b  c  d  e  f |
+--------+-------------------------------------------------+----------------+
|00000000| 61 62 63 64 65 00 00 00 00 00                   |abcde.....      |
+--------+-------------------------------------------------+----------------+


// buffer.get();
// buffer.get();
+--------+-------------------- all ------------------------+----------------+
position: [2], limit: [5]
         +-------------------------------------------------+
         |  0  1  2  3  4  5  6  7  8  9  a  b  c  d  e  f |
+--------+-------------------------------------------------+----------------+
|00000000| 61 62 63 64 65 00 00 00 00 00                   |abcde.....      |
+--------+-------------------------------------------------+----------------+

//buffer.flip();
+--------+-------------------- all ------------------------+----------------+
position: [0], limit: [2]
         +-------------------------------------------------+
         |  0  1  2  3  4  5  6  7  8  9  a  b  c  d  e  f |
+--------+-------------------------------------------------+----------------+
|00000000| 61 62 63 64 65 00 00 00 00 00                   |abcde.....      |
+--------+-------------------------------------------------+----------------+
当我们在读写模式下进行两次读写操作之后,再次调用flip()方法,可以发现此时limit的值为2,这意味着此时我们可以对已经进行读写操作过的数据再次进行读写操作(但实际上这样做的意义应该不大)
3.3 hasRemaining方法
hasRemaining()做了很简单的一件事,即判断position是否小于limit,源码如下:
public final boolean hasRemaining() {
    return this.position < this.limit;
}
我们可以使用这个方法控制我们的读写操作始终在limit控制范围内
3.4 get方法
get()方法会获取取缓冲区中当前position所指向的元素。进行该操作后,position+1,如果超过了limit则会抛出异常,需要注意的是,我们在写模式下同样可以使用get()方法,position同样会+1,且获取到的值为0。由于position后移的缘故,此时这个0会变成ByteBuffer的一个元素。
get(i)方法可以获取 i 对应的位置上的元素,并且不会改变position的值
代码演示如下:
@Test
public void getTest(){
    ByteBuffer buffer = ByteBuffer.allocate(10);

    //存放多个数据
    buffer.put("abc".getBytes());
    //写模式下读写数据
    buffer.get();
    buffer.put("f".getBytes());
    debugAll(buffer);

    //获取指定索引上的数据,此操作不会改变position的位置
    buffer.get(2);
    debugAll(buffer);

    //切换至读模式
    buffer.flip();
    while (buffer.hasRemaining()){
        System.out.println(buffer.get());
        debugAll(buffer);
    }
}
输出结果如下:
// buffer.put("abc".getBytes());
// buffer.get();
// buffer.put("f".getBytes());
+--------+-------------------- all ------------------------+----------------+
position: [5], limit: [10]
         +-------------------------------------------------+
         |  0  1  2  3  4  5  6  7  8  9  a  b  c  d  e  f |
+--------+-------------------------------------------------+----------------+
|00000000| 61 62 63 00 66 00 00 00 00 00                   |abc.f.....      |
+--------+-------------------------------------------------+----------------+

// buffer.get(2);
+--------+-------------------- all ------------------------+----------------+
position: [5], limit: [10]
         +-------------------------------------------------+
         |  0  1  2  3  4  5  6  7  8  9  a  b  c  d  e  f |
+--------+-------------------------------------------------+----------------+
|00000000| 61 62 63 00 66 00 00 00 00 00                   |abc.f.....      |
+--------+-------------------------------------------------+----------------+

97
+--------+-------------------- all ------------------------+----------------+
position: [1], limit: [5]
         +-------------------------------------------------+
         |  0  1  2  3  4  5  6  7  8  9  a  b  c  d  e  f |
+--------+-------------------------------------------------+----------------+
|00000000| 61 62 63 00 66 00 00 00 00 00                   |abc.f.....      |
+--------+-------------------------------------------------+----------------+


98
+--------+-------------------- all ------------------------+----------------+
position: [2], limit: [5]
         +-------------------------------------------------+
         |  0  1  2  3  4  5  6  7  8  9  a  b  c  d  e  f |
+--------+-------------------------------------------------+----------------+
|00000000| 61 62 63 00 66 00 00 00 00 00                   |abc.f.....      |
+--------+-------------------------------------------------+----------------+


99
+--------+-------------------- all ------------------------+----------------+
position: [3], limit: [5]
         +-------------------------------------------------+
         |  0  1  2  3  4  5  6  7  8  9  a  b  c  d  e  f |
+--------+-------------------------------------------------+----------------+
|00000000| 61 62 63 00 66 00 00 00 00 00                   |abc.f.....      |
+--------+-------------------------------------------------+----------------+


0
+--------+-------------------- all ------------------------+----------------+
position: [4], limit: [5]
         +-------------------------------------------------+
         |  0  1  2  3  4  5  6  7  8  9  a  b  c  d  e  f |
+--------+-------------------------------------------------+----------------+
|00000000| 61 62 63 00 66 00 00 00 00 00                   |abc.f.....      |
+--------+-------------------------------------------------+----------------+


102
+--------+-------------------- all ------------------------+----------------+
position: [5], limit: [5]
         +-------------------------------------------------+
         |  0  1  2  3  4  5  6  7  8  9  a  b  c  d  e  f |
+--------+-------------------------------------------------+----------------+
|00000000| 61 62 63 00 66 00 00 00 00 00                   |abc.f.....      |
+--------+-------------------------------------------------+----------------+
3.5 rewind方法
rewind()方法的作用很简单,它可以将position的值变为0,源码如下:
public Buffer rewind() {
    this.position = 0;
    this.mark = -1;
    return this;
}
需要注意的是,rewind()不会对limit的值产生任何影响,它只会影响position的值
通过这个方法,我们可以完成之前做不到的一些事情,例如:
- 在写模式下获取元素
- 在写模式对已有元素进行覆盖
代码案例如下:
@Test
public void rewindTest(){
    ByteBuffer buffer = ByteBuffer.allocate(10);
    buffer.put("abc".getBytes());
    debugAll(buffer);

    buffer.rewind();
    debugAll(buffer);

    //在写模式下进行读操作
    System.out.println(buffer.get());
    debugAll(buffer);

    //此时调用put方法,将会对已有元素进行覆盖
    buffer.put("def".getBytes());
    debugAll(buffer);
}
运行结果如下:
// buffer.put("abc".getBytes());
+--------+-------------------- all ------------------------+----------------+
position: [3], limit: [10]
         +-------------------------------------------------+
         |  0  1  2  3  4  5  6  7  8  9  a  b  c  d  e  f |
+--------+-------------------------------------------------+----------------+
|00000000| 61 62 63 00 00 00 00 00 00 00                   |abc.......      |
+--------+-------------------------------------------------+----------------+

// buffer.rewind();
+--------+-------------------- all ------------------------+----------------+
position: [0], limit: [10]
         +-------------------------------------------------+
         |  0  1  2  3  4  5  6  7  8  9  a  b  c  d  e  f |
+--------+-------------------------------------------------+----------------+
|00000000| 61 62 63 00 00 00 00 00 00 00                   |abc.......      |
+--------+-------------------------------------------------+----------------+

// System.out.println(buffer.get());
97
+--------+-------------------- all ------------------------+----------------+
position: [1], limit: [10]
         +-------------------------------------------------+
         |  0  1  2  3  4  5  6  7  8  9  a  b  c  d  e  f |
+--------+-------------------------------------------------+----------------+
|00000000| 61 62 63 00 00 00 00 00 00 00                   |abc.......      |
+--------+-------------------------------------------------+----------------+

buffer.put("def".getBytes());
+--------+-------------------- all ------------------------+----------------+
position: [4], limit: [10]
         +-------------------------------------------------+
         |  0  1  2  3  4  5  6  7  8  9  a  b  c  d  e  f |
+--------+-------------------------------------------------+----------------+
|00000000| 61 64 65 66 00 00 00 00 00 00                   |adef......      |
+--------+-------------------------------------------------+----------------+
3.6 clean方法
clean()方法会将缓冲区中的各个属性恢复为最初的状态,position = 0, capacity = limit,此时缓冲区的数据依然存在,我们可以通过读操作获取这些数据,也可以通过写操作覆盖这些数据。clean()方法源码如下
public Buffer clear() {
    this.position = 0;
    this.limit = this.capacity;
    this.mark = -1;
    return this;
}
测试代码如下:
@Test
public void cleanTest(){
    ByteBuffer buffer = ByteBuffer.allocate(10);
    buffer.put("abc".getBytes());
    debugAll(buffer);

    //调用clear方法
    buffer.clear();
    debugAll(buffer);

    //进行读操作
    System.out.println(buffer.get());
    debugAll(buffer);

    //进行写操作
    buffer.put("def".getBytes());
    debugAll(buffer);

    //切换为读模式
    buffer.flip();
    debugAll(buffer);

    //再次调用clear方法
    buffer.clear();
    debugAll(buffer);
}
测试结果如下:
// buffer.put("abc".getBytes());
+--------+-------------------- all ------------------------+----------------+
position: [3], limit: [10]
         +-------------------------------------------------+
         |  0  1  2  3  4  5  6  7  8  9  a  b  c  d  e  f |
+--------+-------------------------------------------------+----------------+
|00000000| 61 62 63 00 00 00 00 00 00 00                   |abc.......      |
+--------+-------------------------------------------------+----------------+

// buffer.clear();
+--------+-------------------- all ------------------------+----------------+
position: [0], limit: [10]
         +-------------------------------------------------+
         |  0  1  2  3  4  5  6  7  8  9  a  b  c  d  e  f |
+--------+-------------------------------------------------+----------------+
|00000000| 61 62 63 00 00 00 00 00 00 00                   |abc.......      |
+--------+-------------------------------------------------+----------------+

// System.out.println(buffer.get());
97
+--------+-------------------- all ------------------------+----------------+
position: [1], limit: [10]
         +-------------------------------------------------+
         |  0  1  2  3  4  5  6  7  8  9  a  b  c  d  e  f |
+--------+-------------------------------------------------+----------------+
|00000000| 61 62 63 00 00 00 00 00 00 00                   |abc.......      |
+--------+-------------------------------------------------+----------------+

// buffer.put("def".getBytes());
+--------+-------------------- all ------------------------+----------------+
position: [4], limit: [10]
         +-------------------------------------------------+
         |  0  1  2  3  4  5  6  7  8  9  a  b  c  d  e  f |
+--------+-------------------------------------------------+----------------+
|00000000| 61 64 65 66 00 00 00 00 00 00                   |adef......      |
+--------+-------------------------------------------------+----------------+

// buffer.flip();
+--------+-------------------- all ------------------------+----------------+
position: [0], limit: [4]
         +-------------------------------------------------+
         |  0  1  2  3  4  5  6  7  8  9  a  b  c  d  e  f |
+--------+-------------------------------------------------+----------------+
|00000000| 61 64 65 66 00 00 00 00 00 00                   |adef......      |
+--------+-------------------------------------------------+----------------+

// buffer.clear();
+--------+-------------------- all ------------------------+----------------+
position: [0], limit: [10]
         +-------------------------------------------------+
         |  0  1  2  3  4  5  6  7  8  9  a  b  c  d  e  f |
+--------+-------------------------------------------------+----------------+
|00000000| 61 64 65 66 00 00 00 00 00 00                   |adef......      |
+--------+-------------------------------------------------+----------------+
3.7 mark&reset方法
mark()方法会将postion的值保存到mark属性中,reset()方法会将position的值改为mark中保存的值
这两个方法的操作比较容易理解,我们简单演示一下即可
代码演示:
@Test
public void markAndRestTest(){
    ByteBuffer buffer = ByteBuffer.allocate(10);
    buffer.put("abc".getBytes());
    debugAll(buffer);

    //记录当前position位置
    buffer.mark();

    //再进行一次数据写入
    buffer.put("f".getBytes());
    debugAll(buffer);

    //将position变为记录的位置
    buffer.reset();
    debugAll(buffer);

}
演示结果
// buffer.put("abc".getBytes());
+--------+-------------------- all ------------------------+----------------+
position: [3], limit: [10]
         +-------------------------------------------------+
         |  0  1  2  3  4  5  6  7  8  9  a  b  c  d  e  f |
+--------+-------------------------------------------------+----------------+
|00000000| 61 62 63 00 00 00 00 00 00 00                   |abc.......      |
+--------+-------------------------------------------------+----------------+

// buffer.put("f".getBytes());
+--------+-------------------- all ------------------------+----------------+
position: [4], limit: [10]
         +-------------------------------------------------+
         |  0  1  2  3  4  5  6  7  8  9  a  b  c  d  e  f |
+--------+-------------------------------------------------+----------------+
|00000000| 61 62 63 66 00 00 00 00 00 00                   |abcf......      |
+--------+-------------------------------------------------+----------------+

// buffer.reset();
+--------+-------------------- all ------------------------+----------------+
position: [3], limit: [10]
         +-------------------------------------------------+
         |  0  1  2  3  4  5  6  7  8  9  a  b  c  d  e  f |
+--------+-------------------------------------------------+----------------+
|00000000| 61 62 63 66 00 00 00 00 00 00                   |abcf......      |
+--------+-------------------------------------------------+----------------+
注意一些可能会出现异常的情况:
- 当记录的位置位于limit之外时(虽然不太可能出现这种情况),调用
reset()会抛出异常 - 当mark属性的值为-1时,调用
reset()会出现异常。在这一点上我们需要注意的是当我们在调用一些方法时,方法内部会将mark属性重置为-1,例如flip()、rewind()、clean()等
3.8 compact方法
此方法为ByteBuffer的方法,而不是Buffer的方法
compact()方法的具体作用为将**从当前postion所指向的数据开始,到limit限制前的最后一个数据结束(包括未被写入过值的空数据,这些数据将以0的形式成为compact()方法调用后ByteBuffer的元素)**的N个数据往前进行覆盖,并将position=N,limit的值变为capacity(缓冲区容量)
如果N个元素并不足以完全覆盖position之前的数据,则会只对前N个数据进行覆盖,并保留未被覆盖的数据
如果当前position=limit,则不进行任何覆盖操作,但position将=0
方法演示
@Test
public void compactTest(){
    ByteBuffer buffer1 = ByteBuffer.allocate(10);
    buffer1.put("abc".getBytes());
    debugAll(buffer1);

    //写模式下使用compact()
    buffer1.compact();
    debugAll(buffer1);

    //新建一个已写入部分的长度大于未写入部分的ByteBuffer
    ByteBuffer buffer2 = ByteBuffer.allocate(7);
    buffer2.put("abcde".getBytes());
    debugAll(buffer2);

    //对该ByteBuffer进行compact操作
    buffer2.compact();
    debugAll(buffer2);


    //新建一个满元素的ByteBuffer
    ByteBuffer buffer3 = ByteBuffer.allocate(5);
    buffer3.put("abcde".getBytes());
    debugAll(buffer3);

    //对该ByteBuffer进行compact操作
    buffer3.compact();
    debugAll(buffer3);
}
运行结果如下:
// buffer1.put("abc".getBytes());
+--------+-------------------- all ------------------------+----------------+
position: [3], limit: [10]
         +-------------------------------------------------+
         |  0  1  2  3  4  5  6  7  8  9  a  b  c  d  e  f |
+--------+-------------------------------------------------+----------------+
|00000000| 61 62 63 00 00 00 00 00 00 00                   |abc.......      |
+--------+-------------------------------------------------+----------------+

// buffer1.compact();
+--------+-------------------- all ------------------------+----------------+
position: [7], limit: [10]
         +-------------------------------------------------+
         |  0  1  2  3  4  5  6  7  8  9  a  b  c  d  e  f |
+--------+-------------------------------------------------+----------------+
|00000000| 00 00 00 00 00 00 00 00 00 00                   |..........      |
+--------+-------------------------------------------------+----------------+

// buffer2.put("abcde".getBytes());
+--------+-------------------- all ------------------------+----------------+
position: [5], limit: [7]
         +-------------------------------------------------+
         |  0  1  2  3  4  5  6  7  8  9  a  b  c  d  e  f |
+--------+-------------------------------------------------+----------------+
|00000000| 61 62 63 64 65 00 00                            |abcde..         |
+--------+-------------------------------------------------+----------------+

// buffer2.compact();
+--------+-------------------- all ------------------------+----------------+
position: [2], limit: [7]
         +-------------------------------------------------+
         |  0  1  2  3  4  5  6  7  8  9  a  b  c  d  e  f |
+--------+-------------------------------------------------+----------------+
|00000000| 00 00 63 64 65 00 00                            |..cde..         |
+--------+-------------------------------------------------+----------------+

// buffer3.put("abcde".getBytes());
+--------+-------------------- all ------------------------+----------------+
position: [5], limit: [5]
         +-------------------------------------------------+
         |  0  1  2  3  4  5  6  7  8  9  a  b  c  d  e  f |
+--------+-------------------------------------------------+----------------+
|00000000| 61 62 63 64 65                                  |abcde           |
+--------+-------------------------------------------------+----------------+

// buffer3.compact();
+--------+-------------------- all ------------------------+----------------+
position: [0], limit: [5]
         +-------------------------------------------------+
         |  0  1  2  3  4  5  6  7  8  9  a  b  c  d  e  f |
+--------+-------------------------------------------------+----------------+
|00000000| 61 62 63 64 65                                  |abcde           |
+--------+-------------------------------------------------+----------------+
读模式下compact()方法规则与写模式完全一致,这里不再进行演示
3.9 allocate方法
可以使用 allocate 方法为 ByteBuffer 分配空间,其它 buffer 类也有该方法。
我们可以使用的分配空间的方法有如下两种:
-
ByteBuffer.allocate(16)创建的实例为
java.nio.HeapByteBuffer,使用java 堆内存进行存储,读写效率较低,受到 GC 的影响,但是分配效率较高 -
ByteBuffer.allocateDirect(16)创建的实例为
java.nio.DirectByteBuffer,使用直接内存,读写效率高(少一次拷贝),由于使用的是系统内存,因此不会受 到GC 影响,但是分配的效率低,且由于无法被自动释放,容易出现内存泄露问题
更加详细的对比将在之后进行介绍。
4 String转换
这里我们将讲解将String写入buffer然后将buffer中的字节转换成String的几种方式:
4.1 方式一
编码:字符串调用getByte方法获得byte数组,将byte数组放入ByteBuffer中
解码:先调用ByteBuffer的flip方法,然后通过StandardCharsets的decode方法解码
代码演示
public class Translate {
    public static void main(String[] args) {
        // 准备两个字符串
        String str1 = "hello";
        String str2 = "";

        ByteBuffer buffer1 = ByteBuffer.allocate(16);
        // 通过字符串的getByte方法获得字节数组,放入缓冲区中
        buffer1.put(str1.getBytes());
        debugAll(buffer1);

        // 将缓冲区中的数据转化为字符串
        // 切换模式
        buffer1.flip();

        // 通过StandardCharsets解码,获得CharBuffer,再通过toString获得字符串
        str2 = StandardCharsets.UTF_8.decode(buffer1).toString();
        System.out.println(str2);

        //decode方法之后,buffer1的posiotion=limit
        debugAll(buffer1);
    }
}
运行结果
+--------+-------------------- all ------------------------+----------------+
position: [5], limit: [16]
         +-------------------------------------------------+
         |  0  1  2  3  4  5  6  7  8  9  a  b  c  d  e  f |
+--------+-------------------------------------------------+----------------+
|00000000| 68 65 6c 6c 6f 00 00 00 00 00 00 00 00 00 00 00 |hello...........|
+--------+-------------------------------------------------+----------------+
hello
+--------+-------------------- all ------------------------+----------------+
position: [5], limit: [5]
         +-------------------------------------------------+
         |  0  1  2  3  4  5  6  7  8  9  a  b  c  d  e  f |
+--------+-------------------------------------------------+----------------+
|00000000| 68 65 6c 6c 6f 00 00 00 00 00 00 00 00 00 00 00 |hello...........|
+--------+-------------------------------------------------+----------------+
4.2 方式二
编码:通过StandardCharsets的encode方法获得ByteBuffer,此时获得的ByteBuffer为读模式,无需通过flip切换模式
解码:通过StandardCharsets的decode方法解码
代码演示
public class Translate {
    public static void main(String[] args) {
        // 准备两个字符串
        String str1 = "hello";
        String str2 = "";

        // 通过StandardCharsets的encode方法获得ByteBuffer
        // 此时获得的ByteBuffer为读模式,无需通过flip切换模式
        ByteBuffer buffer1 = StandardCharsets.UTF_8.encode(str1);
        debugAll(buffer1);

        // 将缓冲区中的数据转化为字符串
        // 通过StandardCharsets解码,获得CharBuffer,再通过toString获得字符串
        str2 = StandardCharsets.UTF_8.decode(buffer1).toString();
        System.out.println(str2);

        //decode方法之后,buffer1的posiotion=limit
        debugAll(buffer1);
    }
}
运行结果
+--------+-------------------- all ------------------------+----------------+
position: [0], limit: [5]
         +-------------------------------------------------+
         |  0  1  2  3  4  5  6  7  8  9  a  b  c  d  e  f |
+--------+-------------------------------------------------+----------------+
|00000000| 68 65 6c 6c 6f                                  |hello           |
+--------+-------------------------------------------------+----------------+
hello
+--------+-------------------- all ------------------------+----------------+
position: [5], limit: [5]
         +-------------------------------------------------+
         |  0  1  2  3  4  5  6  7  8  9  a  b  c  d  e  f |
+--------+-------------------------------------------------+----------------+
|00000000| 68 65 6c 6c 6f                                  |hello           |
+--------+-------------------------------------------------+----------------+
4.3 方式三
编码:字符串调用getByte()方法获得字节数组,将字节数组传给ByteBuffer的wrap()方法,通过该方法获得ByteBuffer。同样无需调用flip方法切换为读模式
解码:通过StandardCharsets的decode方法解码
代码演示
public class Translate {
    public static void main(String[] args) {
        // 准备两个字符串
        String str1 = "hello";
        String str2 = "";

        // 通过StandardCharsets的encode方法获得ByteBuffer
        // 此时获得的ByteBuffer为读模式,无需通过flip切换模式
        ByteBuffer buffer1 = ByteBuffer.wrap(str1.getBytes());
        debugAll(buffer1);

        // 将缓冲区中的数据转化为字符串
        // 通过StandardCharsets解码,获得CharBuffer,再通过toString获得字符串
        str2 = StandardCharsets.UTF_8.decode(buffer1).toString();
        System.out.println(str2);

        //decode方法之后,buffer1的posiotion=limit
        debugAll(buffer1);
    }
}
运行结果
+--------+-------------------- all ------------------------+----------------+
position: [0], limit: [5]
         +-------------------------------------------------+
         |  0  1  2  3  4  5  6  7  8  9  a  b  c  d  e  f |
+--------+-------------------------------------------------+----------------+
|00000000| 68 65 6c 6c 6f                                  |hello           |
+--------+-------------------------------------------------+----------------+
hello
+--------+-------------------- all ------------------------+----------------+
position: [5], limit: [5]
         +-------------------------------------------------+
         |  0  1  2  3  4  5  6  7  8  9  a  b  c  d  e  f |
+--------+-------------------------------------------------+----------------+
|00000000| 68 65 6c 6c 6f                                  |hello           |
+--------+-------------------------------------------------+----------------+
5 分散读集中写
在处理一些文件的读写操作时,我们可能会需要将一个文本文件的内容写入到多个缓冲池进行存储,或者将多个缓冲池的内容读取到同一个文本文件中进行集中处理,但是这样的操作会对ByteBuffer进行多次拷贝,十分影响效率,这时我们就可以使用**“分散读集中写”**的思想进行代码编写
5.1 分散读
对文本文件3parts.txt进行分散读取
onetwothree
使用如下方式,将数据读取至多个ByteBuffer之中
try (RandomAccessFile file = new RandomAccessFile("3parts.txt", "rw")) {
    FileChannel channel = file.getChannel();
    ByteBuffer a = ByteBuffer.allocate(3);
    ByteBuffer b = ByteBuffer.allocate(3);
    ByteBuffer c = ByteBuffer.allocate(5);
    channel.read(new ByteBuffer[]{a, b, c});
    a.flip();
    b.flip();
    c.flip();
    debug(a);
    debug(b);
    debug(c);
} catch (IOException e) {
    e.printStackTrace();
}
结果
         +-------------------------------------------------+
         |  0  1  2  3  4  5  6  7  8  9  a  b  c  d  e  f |
+--------+-------------------------------------------------+----------------+
|00000000| 6f 6e 65                                        |one             |
+--------+-------------------------------------------------+----------------+
         +-------------------------------------------------+
         |  0  1  2  3  4  5  6  7  8  9  a  b  c  d  e  f |
+--------+-------------------------------------------------+----------------+
|00000000| 74 77 6f                                        |two             |
+--------+-------------------------------------------------+----------------+
         +-------------------------------------------------+
         |  0  1  2  3  4  5  6  7  8  9  a  b  c  d  e  f |
+--------+-------------------------------------------------+----------------+
|00000000| 74 68 72 65 65                                  |three           |
+--------+-------------------------------------------------+----------------+
5.2 集中写
使用如下方式写入,可以将多个 buffer 的数据填充至 channel
ByteBuffer b1 = StandardCharsets.UTF_8.encode("hello");
ByteBuffer b2 = StandardCharsets.UTF_8.encode("world");
ByteBuffer b3 = StandardCharsets.UTF_8.encode("你好");

try (FileChannel channel = new RandomAccessFile("words2.txt", "rw").getChannel()) {
    channel.write(new ByteBuffer[]{b1, b2, b3});
} catch (IOException e) {
}
words2.txt内容
helloworld你好
6 黏包半包问题
黏包半包现象
网络上有多条数据发送给服务端,数据之间使用 \n 进行分隔,但这些数据在接收时可能会被重新组合,例如原始数据有3条为
- Hello,world\n
- I’m Nyima\n
- How are you?\n
变成了下面的两个 byteBuffer (粘包,半包)
- Hello,world\nI’m Nyima\nHo
- w are you?\n
出现原因
-
粘包:发送方在发送数据时,并不是一条一条地发送数据,而是将数据整合在一起,当数据达到一定的数量后再一起发送。这就会导致多条信息被放在一个缓冲区中被一起发送出去
-
半包:接收方的缓冲区的大小是有限的,当接收方的缓冲区满了以后,就需要将信息截断,等缓冲区空了以后再继续放入数据。这就会发生一段完整的数据最后被截断的现象
解决办法
-
通过get(index)方法遍历ByteBuffer,遇到分隔符时进行处理。如果遍历完ByteBuffer仍然没有遇到分隔符就直接对ByteBuffer进行处理
注意:get(index)不会改变position的值
- 记录该段数据长度,以便于申请对应大小的缓冲区
- 将缓冲区的数据通过get()方法写入到target中
-
调用compact方法切换模式,因为缓冲区中可能还有未读的数据
具体代码如下:
public class ByteBufferDemo {
    public static void main(String[] args) {
        ByteBuffer buffer = ByteBuffer.allocate(32);
        // 模拟粘包+半包
        buffer.put("Hello,world\nI'm Nyima\nHo".getBytes());
        // 调用split函数处理
        split(buffer);

        buffer.put("w are you?\n".getBytes());

        split(buffer);
    }

    private static void split(ByteBuffer buffer) {
        // 切换为读模式
        buffer.flip();
        for(int i = 0; i < buffer.limit(); i++) {

            // 遍历寻找分隔符
            // 如果遍历完ByteBuffer仍然没有遇到分隔符就直接对ByteBuffer进行处理
            // get(i)不会移动position
            if (buffer.get(i) == '\n'||(i==buffer.limit()-1&&buffer.position()==0)) {
                // 缓冲区长度
                int length = i+1-buffer.position();
                ByteBuffer target = ByteBuffer.allocate(length);
                // 将前面的内容写入target缓冲区
                for(int j = 0; j < length; j++) {
                    // 将buffer中的数据写入target中
                    target.put(buffer.get());
                }
                // 打印查看结果
                ByteBufferUtil.debugAll(target);
            }
        }
        // 切换为写模式,但是缓冲区可能未读完,这里需要使用compact
        buffer.compact();
    }
}
运行结果
+--------+-------------------- all ------------------------+----------------+
position: [12], limit: [12]
         +-------------------------------------------------+
         |  0  1  2  3  4  5  6  7  8  9  a  b  c  d  e  f |
+--------+-------------------------------------------------+----------------+
|00000000| 48 65 6c 6c 6f 2c 77 6f 72 6c 64 0a             |Hello,world.    |
+--------+-------------------------------------------------+----------------+

+--------+-------------------- all ------------------------+----------------+
position: [10], limit: [10]
         +-------------------------------------------------+
         |  0  1  2  3  4  5  6  7  8  9  a  b  c  d  e  f |
+--------+-------------------------------------------------+----------------+
|00000000| 49 27 6d 20 4e 79 69 6d 61 0a                   |I'm Nyima.      |
+--------+-------------------------------------------------+----------------+

+--------+-------------------- all ------------------------+----------------+
position: [13], limit: [13]
         +-------------------------------------------------+
         |  0  1  2  3  4  5  6  7  8  9  a  b  c  d  e  f |
+--------+-------------------------------------------------+----------------+
|00000000| 48 6f 77 20 61 72 65 20 79 6f 75 3f 0a          |How are you?.   |
+--------+-------------------------------------------------+----------------+
上面的方式虽然能解决黏包半包问题,但是效率较低。在后续文章中将讲解其他处理黏包半包的方法


 503
503


 被折叠的 条评论
为什么被折叠?
被折叠的 条评论
为什么被折叠?
 到【灌水乐园】发言


