


SSM框架整合——以图书管理为例


SSM框架整合=SpringMVC+Spring+MyBatis
一、环境准备
需要的环境如下:
- IDEA旗舰版
- MySQL 8.19
- Tomcat9
- Maven3.8.4
- DataGrip
需要熟练掌握MySQL数据库、Spring、JavaWeb及MyBatis,简单的前端知识点
(一)数据库环境
创建一个存放书籍的数据库表
CREATE DATABASE ssmbuild;
USE ssmbuild;
DROP TABLE IF EXISTS books;
CREATE TABLE books(
    bookID INT(10) NOT NULL  AUTO_INCREMENT PRIMARY KEY COMMENT '书的id',
    bookName VARCHAR(100) NOT NULL COMMENT '书名',
    bookCounts INT(11) NOT NULL  COMMENT '数量',
    detail VARCHAR(200) NOT NULL  COMMENT '描述'

)ENGINE =INNODB DEFAULT CHARSET =utf8;

INSERT INTO  books(bookID, bookName, bookCounts, detail) VALUES (1,'Java',1,'从入门到入土'),(2,'MySQL',10,'从删库到跑路'),(3,'Linux',5,'从进门到进牢');
(二)基本环境的搭建
- 新建一个Maven项目,并且是一个Web项目
- 导入相关的pom依赖
 <dependencies>
        <dependency>
            <groupId>javax.servlet</groupId>
            <artifactId>javax.servlet-api</artifactId>
            <version>4.0.1</version>
            <scope>provided</scope>
        </dependency>
        <dependency>
            <groupId>junit</groupId>
            <artifactId>junit</artifactId>
            <version>4.12</version>
        </dependency>
        <dependency>
            <groupId>com.mchange</groupId>
            <artifactId>c3p0</artifactId>
            <version>0.9.5.5</version>
        </dependency>
        <dependency>
            <groupId>mysql</groupId>
            <artifactId>mysql-connector-java</artifactId>
            <version>8.0.16</version>
        </dependency>
        <dependency>
            <groupId>org.mybatis</groupId>
            <artifactId>mybatis-spring</artifactId>
            <version>2.0.6</version>
        </dependency>
        <dependency>
            <groupId>org.mybatis</groupId>
            <artifactId>mybatis</artifactId>
            <version>3.4.6</version>
        </dependency>
        <dependency>
            <groupId>org.springframework</groupId>
            <artifactId>spring-jdbc</artifactId>
            <version>5.3.14</version>
        </dependency>
        <dependency>
            <groupId>org.springframework</groupId>
            <artifactId>spring-webmvc</artifactId>
            <version>5.3.14</version>
        </dependency>
        <dependency>
            <groupId>org.springframework</groupId>
            <artifactId>spring-test</artifactId>
            <version>5.3.14</version>
        </dependency>
        <dependency>
            <groupId>org.springframework</groupId>
            <artifactId>spring-context</artifactId>
            <version>5.3.14</version>
        </dependency>
        <dependency>
            <groupId>org.projectlombok</groupId>
            <artifactId>lombok</artifactId>
            <version>1.18.22</version>
        </dependency>
        <dependency>
            <groupId>javax.servlet.jsp</groupId>
            <artifactId>jsp-api</artifactId>
            <version>2.2</version>
        </dependency>
        <dependency>
            <groupId>javax.servlet</groupId>
            <artifactId>jstl</artifactId>
            <version>1.2</version>
        </dependency>
        <dependency>
            <groupId>org.aspectj</groupId>
            <artifactId>aspectjweaver</artifactId>
            <version>1.9.6</version>
        </dependency>
    </dependencies>
主要包括:Servlet的支持、Junit单元测试的支持、C3P0数据库连接池的相关支持、MySQL的支持、MyBatis-Spring的支持、MyBatis框架依赖的支持、Spring-jdbc的支持、Spring系列的支持(MVC、test、context)、Lombok的支持、JSP-api的支持、JSTL的支持以及AOP织入的支持。
- 与此同时配置相关静态资源导出的支持(Maven资源过滤)
 <build>
        <resources>
            <resource>
                <directory>src/main/java</directory>
                <includes>
                    <include>**/*.properties</include>
                    <include>**/*.xml</include>
                </includes>
                <filtering>false</filtering>
            </resource>
            <resource>
                <directory>src/main/resources</directory>
                <includes>
                    <include>**/*.properties</include>
                    <include>**/*.xml</include>
                </includes>
                <filtering>false</filtering>
            </resource>
        </resources>
    </build>
-
连接相应的数据库ssmBuild
-
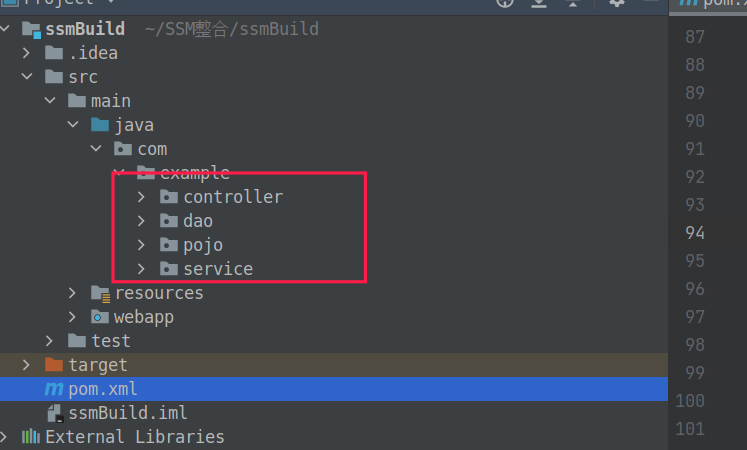
完善相应的包目录结构 :主要包括pojo(entity包-实体类)、dao(数据库交互)、service(业务逻辑)、controller(控制视图跳转)
(三)完善资源文件配置
1. MyBatis-Config配置文件
<?xml version="1.0" encoding="UTF-8" ?>
<!DOCTYPE configuration
        PUBLIC "-//mybatis.org//DTD Config 3.0//EN"
        "http://mybatis.org/dtd/mybatis-3-config.dtd">
<configuration>
     <settings>
        <setting name="logImpl" value="STDOUT_LOGGING"/>
    </settings>
</configuration>
以上是MyBatis的核心配置文件,settings表示对项目开启日志支持。此处表示标准输出日志。也可使用Log4j
2. applicationContext配置文件
<?xml version="1.0" encoding="UTF-8"?>
<beans xmlns="http://www.springframework.org/schema/beans"
       xmlns:xsi="http://www.w3.org/2001/XMLSchema-instance"
       xsi:schemaLocation="http://www.springframework.org/schema/beans
       http://www.springframework.org/schema/beans/spring-beans.xsd">

    <import resource="classpath:spring-dao.xml"/>
    <import resource="classpath:spring-service.xml"/>
    <import resource="classpath:spring-mvc.xml"/>
</beans>
以上是Spring项目的核心配置文件,与此同时它需要导入其他层的相关配置文件(spring-dao.xml、spring-service.xm、spring-mvc.xml),作为整个spring项目的总配置文件。
3.spring-dao配置文件
<?xml version="1.0" encoding="UTF-8"?>
<beans xmlns="http://www.springframework.org/schema/beans"
       xmlns:xsi="http://www.w3.org/2001/XMLSchema-instance"
       xmlns:context="http://www.springframework.org/schema/context"
       xmlns:mvc="http://www.springframework.org/schema/mvc"
       xsi:schemaLocation="http://www.springframework.org/schema/beans
       http://www.springframework.org/schema/beans/spring-beans.xsd
        http://www.springframework.org/schema/context
       http://www.springframework.org/schema/context/spring-context.xsd ">
</beans>
以上是dao层的配置文件,主要是针对dao包和pojo包下的数据进行相应的配置,主要使用到了context和mvc的支持。
4. spring-service配置文件
<?xml version="1.0" encoding="UTF-8"?>
<beans xmlns="http://www.springframework.org/schema/beans"
       xmlns:xsi="http://www.w3.org/2001/XMLSchema-instance"
       xmlns:context="http://www.springframework.org/schema/context"
       xmlns:mvc="http://www.springframework.org/schema/mvc"
       xmlns:aop="http://www.springframework.org/schema/aop"
       xmlns:tx="http://www.springframework.org/schema/tx"
       xsi:schemaLocation="http://www.springframework.org/schema/beans
       http://www.springframework.org/schema/beans/spring-beans.xsd
        http://www.springframework.org/schema/context
       http://www.springframework.org/schema/context/spring-context.xsd
        http://www.springframework.org/schema/aop
        http://www.springframework.org/schema/aop/spring-aop.xsd
        http://www.springframework.org/schema/tx
        http://www.springframework.org/schema/tx/spring-tx.xsd
">
以上是service层的配置文件,主要针对service层包的内容进行相应的配置,主要需要context、aop、mvc、tx等的支持。同时需要注意的是Spring的声明式事务主要是在Service层实现。
5.spring-mvc配置文件
<?xml version="1.0" encoding="UTF-8"?>
<beans xmlns="http://www.springframework.org/schema/beans"
       xmlns:xsi="http://www.w3.org/2001/XMLSchema-instance"
       xmlns:context="http://www.springframework.org/schema/context"
       xmlns:mvc="http://www.springframework.org/schema/mvc"
       xsi:schemaLocation="http://www.springframework.org/schema/beans
       http://www.springframework.org/schema/beans/spring-beans.xsd
        http://www.springframework.org/schema/context
       http://www.springframework.org/schema/context/spring-context.xsd
        http://www.springframework.org/schema/mvc
        http://www.springframework.org/schema/mvc/spring-mvc.xsd">
以上是controller层的配置文件,主要对controller包下的内容进行相应的配置,主要使用了context、mvc等的支持。
6.database.properties配置文件
db.driver = com.mysql.cj.jdbc.Driver
db.url = jdbc:mysql://localhost:3306/ssmbuild?userSSL=true&useUnicode=true&characterEncoding=utf8&serverTimezone=UTC
db.username = root
db.password = 123456
以上是数据库连接所需要的相关配置信息,可被后续读取。
注意点:
- MySQL8以下的驱动类使用的
com.mysql.jdbc.Driver,MySQL8则使用的是com.mysql.cj.jdbc.Driver - url需要指定要操作的数据库(本例中指定的是ssmbuild数据库),后续包括使用SSL加密连接、使用Unicode、设置字体编码格式为UTF-8,最后设置时区为UTC(世界协调时间)
- username为本机MySQL的用户名(本机用户采用管理员登录)
- password为本机MySQL用户登录的密码(本机采用管理员登录密码)
二、完善Dao层与POJO层
(一)编写实体类——POJO层
@Data
@AllArgsConstructor
@NoArgsConstructor
public class Books {
    private int bookID;
    private String bookName;
    private int bookCounts;
    private String detail;
}
需要注意的是我们使用了Lombok自动生成对应的getter和setter文件
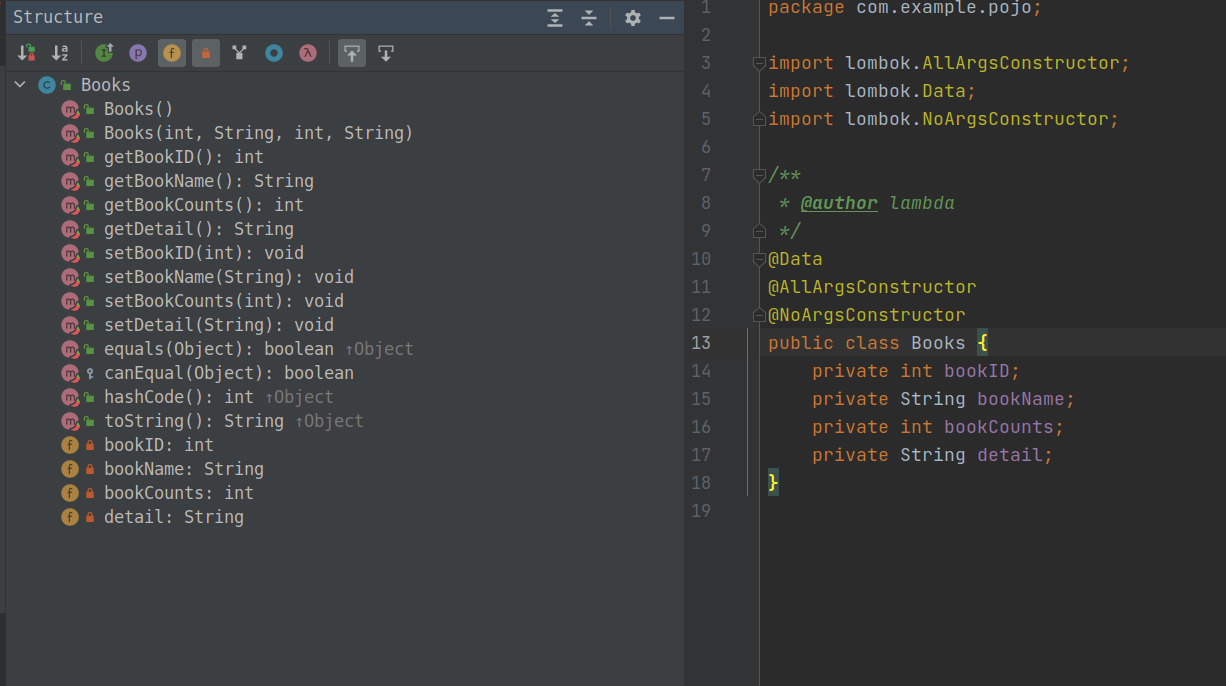
实体类的各个属性最好要与数据库中的列名保持一致,以便后续的交互。
(二)编写Dao层
1. 编写底层dao接口
public interface BookMapper {
    /**
     * Add book int.
     *
     * @param books the books
     * @return the int
     */
    int addBook(Books books);

    /**
     * Delete book by id int.
     *
     * @param id the id
     * @return the int
     */
    int deleteBookById(@Param("bookID") int id);

    /**
     * Update book int.
     *
     * @param books the books
     * @return the int
     */
    int updateBook(Books books);

    /**
     * Query book by id books.
     *
     * @param id the id
     * @return the books
     */
    Books queryBookById(@Param("bookID") int id);

    /**
     * Query all book list.
     *
     * @return the list
     */
    List<Books> queryAllBook();

    /**
     * Query book by book name books.
     *
     * @param bookName the book name
     * @return the books
     */
    Books queryBookByBookName(@Param("bookName") String bookName);


}
主要包括6个方法,包括:
- 添加一本书返回受影响的行数
- 通过bookID从数据库删除一本书,返回受影响的行数
- 更新一本书,并返回受影响的行数
- 通过bookID查询书籍,并返回一本书
- 查询所有的书籍,返回一个书籍的集合
- 通过书名查询一本书,返回一本书。
2.编写dao层接口的实现
<?xml version="1.0" encoding="UTF-8" ?>
<!DOCTYPE mapper
        PUBLIC "-//mybatis.org//DTD Config 3.0//EN"
        "http://mybatis.org/dtd/mybatis-3-mapper.dtd">
<mapper namespace="com.example.dao.BookMapper">
    <insert id="addBook" parameterType="Books">
        INSERT INTO ssmbuild.books(bookName, bookCounts, detail)
        VALUES(#{bookName},#{bookCounts},#{detail});
    </insert>

    <delete id="deleteBookById" parameterType="int">
        DELETE FROM ssmbuild.books WHERE bookID=#{bookID};
    </delete>

    <update id="updateBook" parameterType="Books">
        UPDATE ssmbuild.books SET bookName=#{bookName},bookCounts=#{bookCounts},detail=#{detail}
        WHERE bookID=#{bookID};
    </update>

    <select id="queryBookById" parameterType="int" resultType="Books">
        SELECT * FROM ssmbuild.books WHERE bookID=#{bookID};
    </select>

    <select id="queryAllBook" resultType="Books">
        SELECT * FROM ssmbuild.books;
    </select>

    <select id="queryBookByBookName" resultType="Books">
        SELECT * FROM ssmbuild.books WHERE bookName=#{bookName}
    </select>

</mapper>
此文件主要涉及到增删改查的相关操作以及相关的绑定问题(如相对应的mapper需要绑定到命名空间为com.example.dao.BookMapper的类上去)。
-
添加一本书返回受影响的行数
INSERT INTO ssmbuild.books(bookName, bookCounts, detail) VALUES(#{bookName},#{bookCounts},#{detail}); -
通过bookID从数据库删除一本书,返回受影响的行数
DELETE FROM ssmbuild.books WHERE bookID=#{bookID};
- 更新一本书,并返回受影响的行数
 UPDATE ssmbuild.books SET bookName=#{bookName},bookCounts=#{bookCounts},detail=#{detail}
        WHERE bookID=#{bookID};
- 通过bookID查询书籍,并返回一本书
SELECT * FROM ssmbuild.books WHERE bookID=#{bookID};
- 查询所有的书籍,返回一个书籍的集合
SELECT * FROM ssmbuild.books;
- 通过书名查询一本书,返回一本书。
SELECT * FROM ssmbuild.books WHERE bookName=#{bookName}
3.Mapper注册
<?xml version="1.0" encoding="UTF-8" ?>
<!DOCTYPE configuration
        PUBLIC "-//mybatis.org//DTD Config 3.0//EN"
        "http://mybatis.org/dtd/mybatis-3-config.dtd">
<configuration>
    <settings>
        <setting name="logImpl" value="STDOUT_LOGGING"/>
    </settings>
   <typeAliases>
       <package name="com.example.pojo"/>
   </typeAliases>

    <mappers>
        <mapper class="com.example.dao.BookMapper"/>
    </mappers>
</configuration>
将上述dao层实现注册至MyBatis-config.xml配置文件中,其中typeAliases表示为给某个包下的实体类起别名。
class属性适用于Mapper接口与Mapper实现同名的时候使用。
resources属性适用于Mapper接口与Mpaper实现不同名的时候使用。
4.整合dao层
<?xml version="1.0" encoding="UTF-8"?>
<beans xmlns="http://www.springframework.org/schema/beans"
       xmlns:xsi="http://www.w3.org/2001/XMLSchema-instance"
       xmlns:context="http://www.springframework.org/schema/context"
       xmlns:mvc="http://www.springframework.org/schema/mvc"
       xsi:schemaLocation="http://www.springframework.org/schema/beans
       http://www.springframework.org/schema/beans/spring-beans.xsd
        http://www.springframework.org/schema/context
       http://www.springframework.org/schema/context/spring-context.xsd ">

    <!--1.首先关联数据库配置文件-->
    <context:property-placeholder location="classpath:database.properties"/>
    <!--2.配置连接池-->
    <bean id="dataSource" class="com.mchange.v2.c3p0.ComboPooledDataSource">
        <property name="driverClass" value="${db.driver}"/>
        <property name="jdbcUrl" value="${db.url}"/>
        <property name="user" value="${db.username}"/>
        <property name="password" value="${db.password}"/>

    </bean>

    <!--生成sqlSessionFactoryBean-->
    <bean id="sqlSessionFactory" class="org.mybatis.spring.SqlSessionFactoryBean">
        <property name="dataSource" ref="dataSource"/>
        <!--绑定mybatis的配置文件-->
        <property name="configLocation" value="classpath:mybatis-config.xml"/>
    </bean>

    <!--配置dao接口的扫描包,将dao接口注入到spring中-->
    <bean class="org.mybatis.spring.mapper.MapperScannerConfigurer">
        <!--表示将sqlSessionFactory注入到其中-->
        <property name="sqlSessionFactoryBeanName" value="sqlSessionFactory"/>
        <!--设置自动化扫描所有的包-->
        <property name="basePackage" value="com.example.dao"/>
    </bean>


</beans>
在之前的spring-dao.xml文件完善相关配置。整合编写的dao层文件
- 关联相应的数据库配置文件,定位到database.properties
- 配置数据库的连接池C3P0,注册为bean(datasource),对应的实现类为
ComboPooledDataSource,并对照database.properties设置相应的属性及属性值,主要包括jdbcurl、driverClass、user、password等。对应的值使用${值}从database.properties中取出。 - 注册sqlSessionFacttory对象,需要注入数据源datasource、绑定mybatis-config的配置文件。
- 配置接口扫描包(扫描注册dao层的接口),动态地将dao接口注入到spring容器中。通过
MapperScannerConfigurer类实现动态注入。最后注册要扫描的包com.example.dao
三、编写Service层(业务层)
(一) 编写Service层的相关业务接口
public interface BookService {
    /**
     * Add book int.
     *
     * @param books the books
     * @return the int
     */
    int addBook(Books books);

    /**
     * Delete book by id int.
     *
     * @param id the id
     * @return the int
     */
    int deleteBookById( int id);

    /**
     * Update book int.
     *
     * @param books the books
     * @return the int
     */
    int updateBook(Books books);

    /**
     * Query book by id books.
     *
     * @param id the id
     * @return the books
     */
    Books queryBookById( int id);

    /**
     * Query all book list.
     *
     * @return the list
     */
    List<Books> queryAllBook();

    /**
     * Query book by book name books.
     *
     * @param bookName the book name
     * @return the books
     */
    Books queryBookByBookName( String bookName);

}
类似于dao层的接口,主要包括6个方法。
(二)编写Service层接口实现
public class BookServiceImpl implements BookService {
    /**此处需要调用dao层*/
    private BookMapper bookMapper;

    public void setBookMapper(BookMapper bookMapper) {
        this.bookMapper = bookMapper;
    }

    @Override
    public int addBook(Books books) {
        return bookMapper.addBook(books);
    }

    @Override
    public int deleteBookById(int id) {
        return bookMapper.deleteBookById(id);
    }

    @Override
    public int updateBook(Books books) {
        return bookMapper.updateBook(books);
    }

    @Override
    public Books queryBookById(int id) {
        return bookMapper.queryBookById(id);
    }

    @Override
    public List<Books> queryAllBook() {
        return bookMapper.queryAllBook();
    }

    @Override
    public Books queryBookByBookName(String bookName) {
        return bookMapper.queryBookByBookName(bookName);
    }
}
此处由于是service层,需要调用dao层的相关方法来处理,
因此需要将BookMapper接口作为属性值注入service层的实现类。并设置相应的set方法
最后对每个方法执行相应的业务操作。
(三)整合service层
<?xml version="1.0" encoding="UTF-8"?>
<beans xmlns="http://www.springframework.org/schema/beans"
       xmlns:xsi="http://www.w3.org/2001/XMLSchema-instance"
       xmlns:context="http://www.springframework.org/schema/context"
       xmlns:mvc="http://www.springframework.org/schema/mvc"
       xmlns:aop="http://www.springframework.org/schema/aop"
       xmlns:tx="http://www.springframework.org/schema/tx"
       xsi:schemaLocation="http://www.springframework.org/schema/beans
       http://www.springframework.org/schema/beans/spring-beans.xsd
        http://www.springframework.org/schema/context
       http://www.springframework.org/schema/context/spring-context.xsd
        http://www.springframework.org/schema/aop
        http://www.springframework.org/schema/aop/spring-aop.xsd
        http://www.springframework.org/schema/tx
        http://www.springframework.org/schema/tx/spring-tx.xsd
">

    <!--自动化扫描service下的包-->
    <context:component-scan base-package="com.example.service"/>

    <!--将业务类注入到spring-->

    <bean id="bookService" class="com.example.service.BookServiceImpl">
        <property name="bookMapper" ref="bookMapper"/>
     </bean>

    <!--声明式事务配置-->
    <bean id="transactionManager" class="org.springframework.jdbc.datasource.DataSourceTransactionManager">
        <!--注入数据源-->
        <property name="dataSource" ref="dataSource"/>
    </bean>
<!--配置事务通知-->
    <tx:advice id="txAdvice" transaction-manager="transactionManager">
        <!--给方法配置事务-->
        <tx:attributes>
            <tx:method name="addBook" propagation="REQUIRED"/>
            <tx:method name="deleteBookById" propagation="REQUIRED"/>
            <tx:method name="updateBook" propagation="REQUIRED"/>
            <tx:method name="queryBookById" propagation="REQUIRED"/>
            <tx:method name="queryAllBook" propagation="REQUIRED"/>
            <tx:method name="*" propagation="REQUIRED"/>
         </tx:attributes>

    </tx:advice>

    <!--配置事务切入-->
    <aop:config>
        <aop:pointcut id="txPointCut" expression="execution(* com.example.dao.*.*(..))"/>
        <aop:advisor advice-ref="txAdvice" pointcut-ref="txPointCut"/>
    </aop:config>
</beans>
- 首先开启自动化扫描service层下的所有类,注册到spring中。
com.example.service包下的所有类都会被扫描到 - 将service层的book实现类注入到spring中,其中的参数为BookMapper对象。(由于service层的配置文件与dao层的配置文件都被关联在核心配置文件中,属性的ref可以直接导入BookMapper对象)
- 由于在service层,经常需要使用到事务,所以首先创建声明式事务配置bean,主要将
DataSourceTransactionManager类注入到spring中,并且设置相应的属性值为dao层配置文件中的数据源dataSource。 - 由于需要使用声明式事务(实现事务的自动提交),所以要配置事务通知,使用tx标签设置
transactionManager管理事务通知,通知的id属性自选(本例为txAdvice),之后再给对应的方法配置事务,使用tx:attributes标签为各个方法配置相应的事务。也可以使用<tx:method name="*" propagation="REQUIRED"/>通配符为所有的方法配置事务。其中propagation属性的属性值为REQUIRED的时候,表示在有transaction状态下执行;如当前没有transaction,则创建新的transaction - 最后需要在spring中配置对应的事务切入。使用
aop:config·配置AOP的切入,先配置事务的切入点,即在需要满足何种条件下进行事务切入,expression后的内容为过滤条件,id为txPointCut。最后使用aop advisor实现事务切入,对应通知的引用为上述的txAdvice,对应的切入点为刚配置的txPointCut。最终完成事务切入。
propagation取值及意义
| propagation取值 | propagation取值的意义 |
|---|---|
| REQUIRED(默认) | 在有transaction状态下执行;如当前没有transaction,则创建新的transaction; |
| SUPPORTS | 如当前有transaction,则在transaction状态下执行;如果当前没有transaction,在无transaction状态下执行; |
| MANDATORY | 必须在有transaction状态下执行,如果当前没有transaction,则抛出异常IllegalTransactionStateException; |
| REQUIRES_NEW | 创建新的transaction并执行;如果当前已有transaction,则将当前transaction挂起; |
| NOT_SUPPORTED | 在无transaction状态下执行;如果当前已有transaction,则将当前transaction挂起; |
| NEVER | 在无transaction状态下执行;如果当前已有transaction,则抛出异常IllegalTransactionStateException。 |
四、编写Controller层
(一)配置web项目
<?xml version="1.0" encoding="UTF-8"?>
<web-app xmlns="http://xmlns.jcp.org/xml/ns/javaee"
         xmlns:xsi="http://www.w3.org/2001/XMLSchema-instance"
         xsi:schemaLocation="http://xmlns.jcp.org/xml/ns/javaee http://xmlns.jcp.org/xml/ns/javaee/web-app_4_0.xsd"
         version="4.0">

    <!--DispatcherServlet-->
    <servlet>
        <servlet-name>springmvc</servlet-name>
        <servlet-class>org.springframework.web.servlet.DispatcherServlet</servlet-class>
        <init-param>
            <param-name>contextConfigLocation</param-name>
            <param-value>classpath:applicationContext.xml</param-value>
        </init-param>
      <load-on-startup>1</load-on-startup>
    </servlet>
    <servlet-mapping>
        <servlet-name>springmvc</servlet-name>
        <url-pattern>/</url-pattern>
    </servlet-mapping>

    <!--乱码过滤-->
    <filter>
        <filter-name>filter</filter-name>
        <filter-class>org.springframework.web.filter.CharacterEncodingFilter</filter-class>
        <init-param>
            <param-name>encoding</param-name>
            <param-value>utf-8</param-value>
        </init-param>
    </filter>
    <filter-mapping>
        <filter-name>filter</filter-name>
        <url-pattern>/*</url-pattern>
    </filter-mapping>

    <!--配置session过期时间-->
    <session-config>
        <session-timeout>15</session-timeout>
    </session-config>
</web-app>
配置webapp目录下的web.xml文件,为其设置DispatcherServlet和过滤器filter
-
配置前端请求控制器
DispatcherServlet -
配置init-param的时候需要注意
contextConfigLocation的值不是springmvc.xml而是applicationContext.xml核心配置文件,因为controller层需要使用到前2层的一些内容做支持。 -
配置
load -on -startup标签时设置为1,表示与Tomcat服务器同时启动。 -
servlet-mapping配置burl-pattern的时候需要保证配置为/,表示所有的请求都会到DispatcherServlet中来。 -
设置乱码过滤,需要注意使用到
CharacterEncodingFilter类,init-param设置为encoding,value设置为utf-8,表示过滤为utf-8的内容 -
filter-mapping中的url-pattern需要设置为/*,以便过滤所有的乱码请求。 -
最后可以配置session会话的过期时间,为15分钟。
(二)配置springmvc.xml文件
<?xml version="1.0" encoding="UTF-8"?>
<beans xmlns="http://www.springframework.org/schema/beans"
       xmlns:xsi="http://www.w3.org/2001/XMLSchema-instance"
       xmlns:context="http://www.springframework.org/schema/context"
       xmlns:mvc="http://www.springframework.org/schema/mvc"
       xsi:schemaLocation="http://www.springframework.org/schema/beans
       http://www.springframework.org/schema/beans/spring-beans.xsd
        http://www.springframework.org/schema/context
       http://www.springframework.org/schema/context/spring-context.xsd
        http://www.springframework.org/schema/mvc
        http://www.springframework.org/schema/mvc/spring-mvc.xsd">

    <!--扫描包-->
    <context:component-scan base-package="com.example.controller"/>
    <!--注解驱动-->
    <mvc:annotation-driven/>
    <!--静态资源过滤-->
    <mvc:default-servlet-handler/>

    <!--视图解析器-->
    <bean class="org.springframework.web.servlet.view.InternalResourceViewResolver" id="internalResourceViewResolver">
        <property name="prefix" value="/WEB-INF/jsp/"/>
        <property name="suffix" value=".jsp"/>
    </bean>

</beans>
- 配置扫描包,使用
context:component-scan base-package指定为com.example.controller表示IOC会自动扫描controller包下的所有类。 - 配置注解驱动
<mvc:annotation-driven/> - 配置静态资源过滤
<mvc:default-servlet-handler/> - 配置对应的视图解析器,对应的类为
InternalResourceViewResolver,并设置相应的前缀和后缀,以便后期视图的自动匹配。 - 配置完成后在webapp目录下的WEB-INF下新建一个jsp的包(根据实际情况而定)
如果存在JSON字符串乱码问题,可以在该配置文件下配置乱码过滤
    <!--JSON乱码问题-->
        <mvc:message-converters register-defaults="true">
            <bean class="org.springframework.http.converter.StringHttpMessageConverter">
                <constructor-arg value="UTF-8"/>
            </bean>
            <bean class="org.springframework.http.converter.json.MappingJackson2HttpMessageConverter">
                <property name="objectMapper">
                    <bean class="org.springframework.http.converter.json.Jackson2ObjectMapperFactoryBean">
                        <property name="failOnEmptyBeans" value="false"/>
                    </bean>
                </property>
            </bean>
        </mvc:message-converters>
    </mvc:annotation-driven>
(三)编写controller层与相应的页面
@Controller
@RequestMapping("/book")
public class BookController {
      /**注入service层*/
    @Autowired
    private BookService bookService;

}
编写了一个controller层的类,
- 使用
@Controller表示自动注入到spring中 - 使用
@RequestMapping(“/book”)指定该项目的书籍查询的父路径 - 由于controller需要调用service层的业务,所以需要将service层的类作为controller类的属性
- 使用
@Autowired将service层的对象注入到controller层中
(四)编写controller层视图跳转
1. 编写前端视图
- allBook.jsp
<%@ taglib prefix="c" uri="http://java.sun.com/jsp/jstl/core" %>
<%@ page contentType="text/html;charset=UTF-8" language="java" %>
<%--bootstrap美化页面--%>
<html>
<head>
<title>书籍展示</title>
<link href="https://cdn.staticfile.org/twitter-bootstrap/3.3.7/css/bootstrap.min.css" rel="stylesheet">
</head>
<body>
<div class="container">
<%--表示清除浮动 row clearfix--%>
<div class="row clearfix">
<div class="col-md-12 column">
<div class="page-header">
<h1>
<small>书籍列表——显示所有书籍</small>
</h1>
</div>
</div>
<div class="row">
<div class="col-md-4 column">
<%--跳转到指定的toAddBook页面--%>
<a class="btn btn-primary" href="/book/toAddBook" >添加书籍</a>
<a class="btn btn-primary" href="/book/allBook" >显示全部书籍</a>
</div>
<div class="col-md-4 column"></div>
<div class="col-md-4 column">
<%--查询书籍--%>
<form action="/book/queryBook" method="post" style="float: right">
<span style="color: red" >${error}</span>
<input type="text" class="form-control"name="queryBookName" placeholder="请输入要查询的书籍名称">
<input type="submit" value="查询" class="btn btn-primary">
</form>
</div>
</div>
</div>
<div class="row clearfix">
<div class="col-md-12 column">
<table class="table table-hover table-striped">
<thead>
<tr>
<th>书籍编号</th>
<th>书籍名称</th>
<th>书籍数量</th>
<th>书籍描述</th>
<th>操作</th>
</tr>
</thead>
<%--书籍从数据库中查出来,需要从list中遍历出来--%>
<tbody>
<c:forEach var="book" items="${list}">
<tr>
<td>${book.bookID}</td>
<td>${book.bookName}</td>
<td>${book.bookCounts}</td>
<td>${book.detail}</td>
<td>
<%--传递要修改书籍的id--%>
<a href="/book/toUpdateBook?id=${book.bookID}">修改</a>
|
<a href="/book/deleteBook/${book.bookID}"> 删除</a>
</td>
</tr>
</c:forEach>
</tbody>
</table>
</div>
</div>
</div>
</body>
</html>
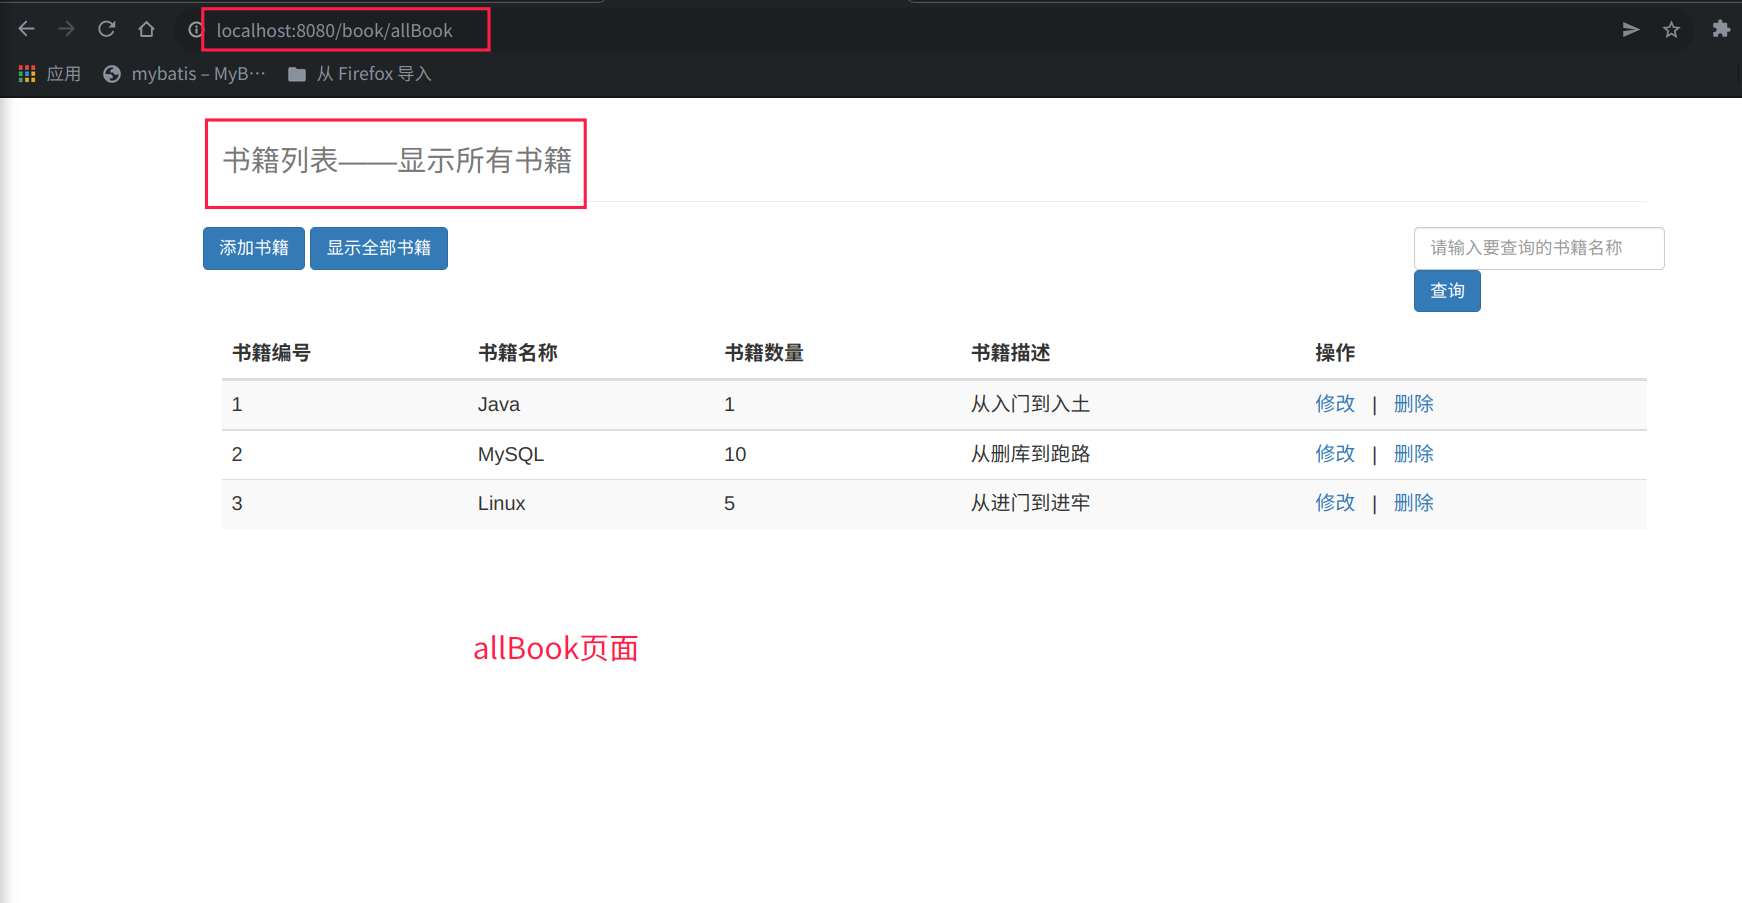
主页面allBook,主要使用到了div标签、table标签、td标签等以及相应的超链接a标签。
- toAddBook.jsp
<%@ page contentType="text/html;charset=UTF-8" language="java" %>
<html>
<head>
    <title>添加书籍</title>
    <link href="https://cdn.staticfile.org/twitter-bootstrap/3.3.7/css/bootstrap.min.css" rel="stylesheet">
</head>
<body>
<div class="container">
    <%--表示清除浮动 row clearfix--%>
    <div class="row clearfix">
        <div class="col-md-12 column">
            <div class="page-header">
                <h1>
                    <small>书籍列表——添加书籍</small>
                </h1>
            </div>
        </div>
        <form action="/book/addBook"  method="post">
            <%--其中需要注意的是name属性值必须要与实体类属性名保持一致,否则会出现空指针
            使用required表示表单必须写完之后才能提交--%>
            <div class="form-group">
                <label for="bookName">书籍名称</label>
                <input type="text"  name="bookName" class="form-control" id="bookName" required >
            </div>
            <div class="form-group">
                <label for="bookCounts">书籍数量</label>
                <input type="text" name="bookCounts" class="form-control" id="bookCounts" required >
            </div>
            <div class="form-group">
                <label for="detail">书籍描述</label>
                <input type="text" name="detail" class="form-control" id="detail" required>
            </div>
            <div class="form-group">
                <input type="submit" class="form-group" value="添加">
            </div>

        </form>

</div>
</body>
</html>
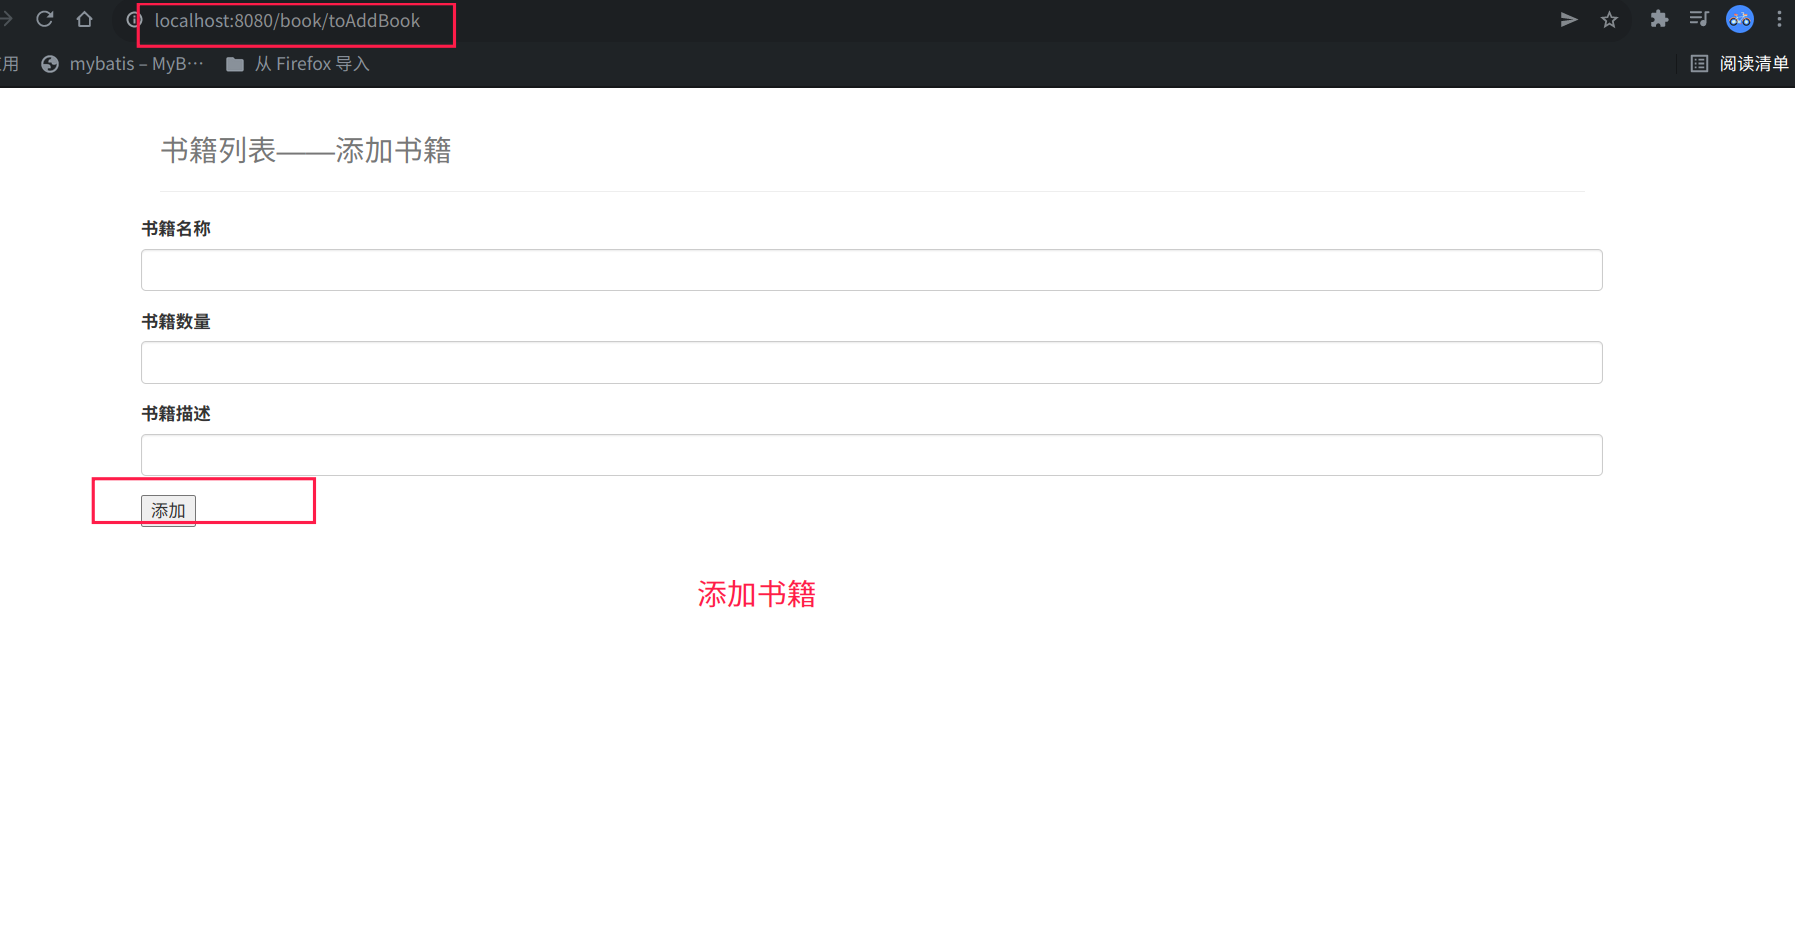
此页面主要是包括form表单的提交,同样使用到了bootstrap框架
- updateBook.jsp
<%@ page contentType="text/html;charset=UTF-8" language="java" %>
<html>
<head>
    <title>修改书籍</title>
    <link href="https://cdn.staticfile.org/twitter-bootstrap/3.3.7/css/bootstrap.min.css" rel="stylesheet">

</head>
<body>
<div class="container">
    <%--表示清除浮动 row clearfix--%>
    <div class="row clearfix">
        <div class="col-md-12 column">
            <div class="page-header">
                <h1>
                    <small>书籍列表——修改书籍</small>
                </h1>
            </div>
        </div>
        <form action="/book/updateBook"  method="post">
            <%--其中需要注意的是name属性值必须要与实体类属性名保持一致,否则会出现空指针
            使用required表示表单必须写完之后才能提交
            value表示默认值--%>

            <!--由于需要对应的id,需要从前端隐藏域传给后端-->
            <input type="hidden" name="bookID" value="${books.bookID}">
            <div class="form-group">
                <label for="bookName">书籍名称</label>
                <input type="text"  name="bookName" class="form-control" value="${books.bookName}" id="bookName" required >
            </div>
            <div class="form-group">
                <label for="bookCounts">书籍数量</label>
                <input type="text" name="bookCounts" class="form-control" id="bookCounts" value="${books.bookCounts}" required >
            </div>
            <div class="form-group">
                <label for="detail">书籍描述</label>
                <input type="text" name="detail" class="form-control" id="detail" value="${books.detail}" required>
            </div>
            <div class="form-group">
                <input type="submit" class="form-group" value="修改">
            </div>

</body>
</html>

此处表示修改书籍,也主要使用到了form标签和相应的bootstrap框架
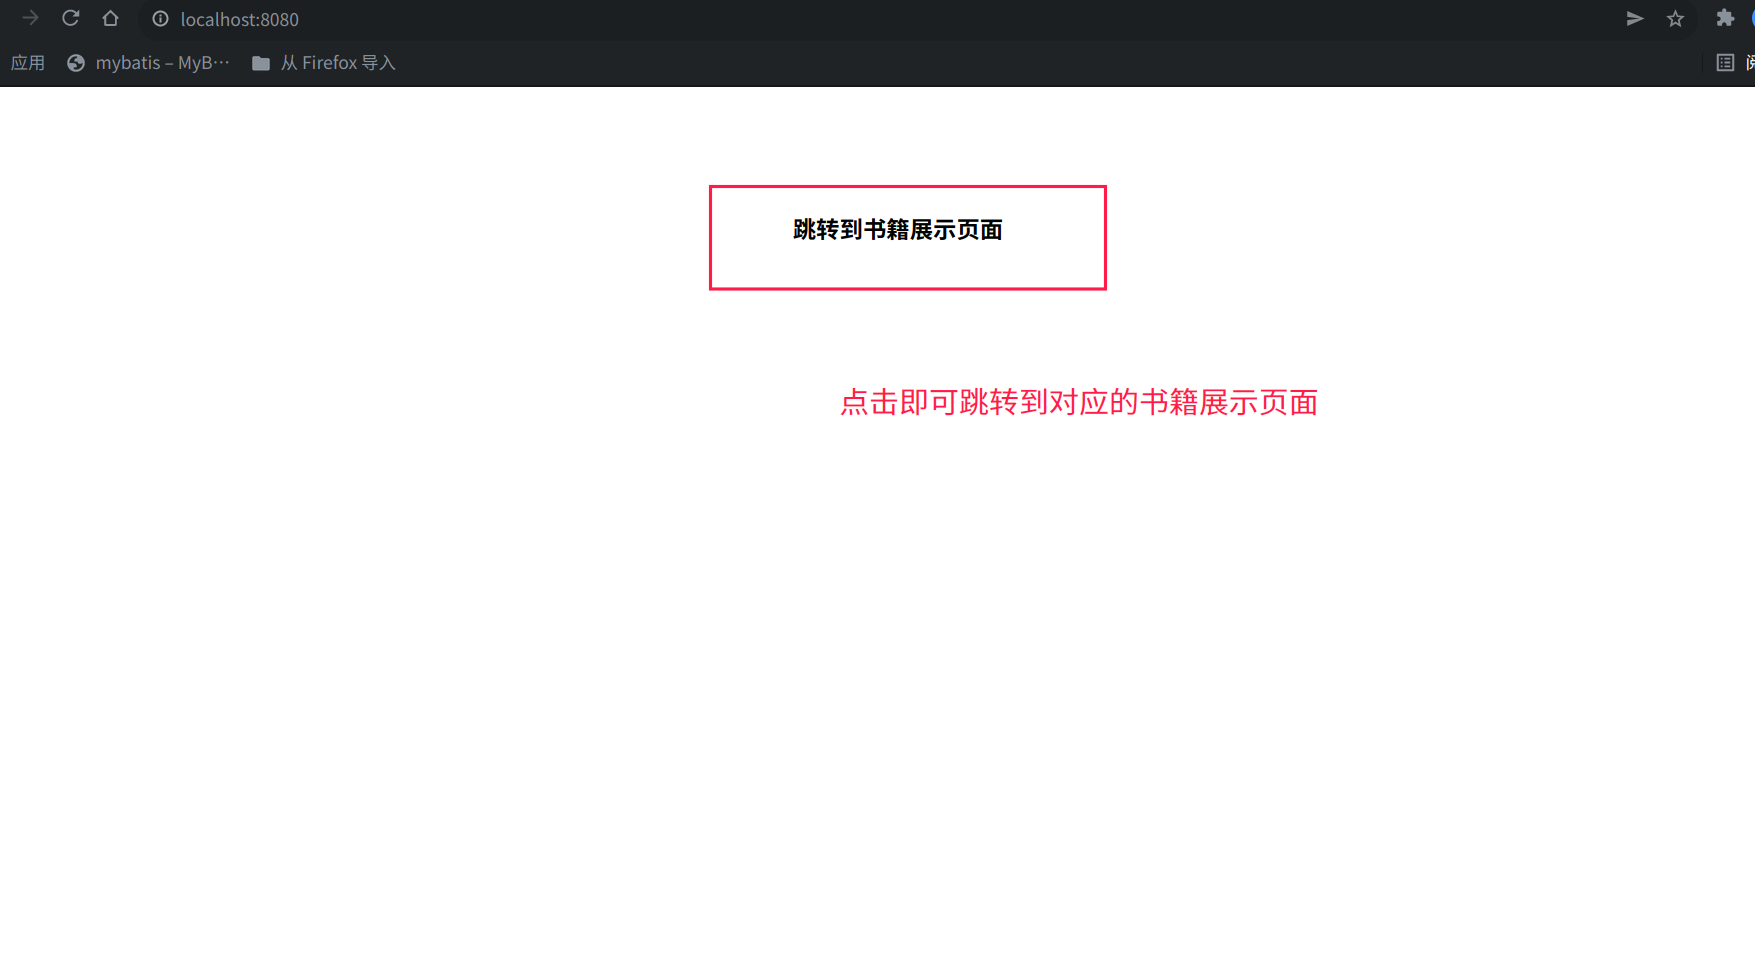
- 欢迎的主页
<%@ page contentType="text/html; charset=UTF-8" pageEncoding="UTF-8" %>
<!DOCTYPE html>
<html>
<head>
    <title>JSP - Hello World</title>
</head>
<style>
    a{
        text-decoration: none;
        color: black;
    }
    h3{
        width: 180px;
        height: 30px;
        margin: 100px auto;
        text-align: center;
        border-radius: 5px;

    }
</style>
<body>
<h3>
    <a href="/book/allBook">跳转到书籍展示页面</a>
</h3>
</body>
</html>
此处是直接跳转到书籍的展示页面allBook.jsp。
2. 跳转到allBook
/**查询全部书籍并跳转到一个页面*/
    @RequestMapping("/allBook")
    public String list(Model model){
        List<Books> books = bookService.queryAllBook();
        model.addAttribute("list",books);
        return "allBook";
    }
- 此处的访问路径为http://localhost:8080/book/allBook
- 此处传入的model对象会携带数据返回到前端,
addAttribute方法表示将后台处理的数据添加到model中返回给前端视图 return "allBook前端视图的名称为“allBook”
3. 跳转到AddBook
 @RequestMapping("/toAddBook")
    public String toAddBook(){
        return "toAddBook";
    }


    @RequestMapping("/addBook")
    public String addBook(Books books){
        System.out.println("addBook====>"+books);
        bookService.addBook(books);
        //此时需要重定向到主页
        return "redirect:/book/allBook";

    }
- 第一个方法表示从前端点击添加书籍,会跳转到该方法上,该方法返回
toAddBook.jsp视图上,以便继续后续的添加操作。 - 第二个方法表示在
toAddBook.jsp视图添加完成以后会跳转到此方法上,之后与后端的数据库进行交互。调用添加书籍的方法,获取前端的数据,进行反馈,最后重定向到主页allBook.jsp页面。
4.跳转到updateBook
  @RequestMapping("/toUpdateBook")
    public String toUpdatePaper(int id,Model model){
        Books books = bookService.queryBookById(id);
        model.addAttribute("books",books);
        return "updateBook";
    }

    @RequestMapping("/updateBook")
    public String updateBook(Books books){
        System.out.println("updateBook=====>"+books);
        bookService.updateBook(books);
        return "redirect:/book/allBook";
    }
- 第一个方法表示从主页的修改按钮上跳转到
/toUpdateBook,由于在点击修改之后我们需要保证在修改之前有默认值存在,所以在此方法中需要首先从数据库中获取对应要修改的行的id,并从后台查询到对应的元数据,通过model返回给前端。跳转到updateBook.jsp视图。 - 第二个方法表示接收从
updateBook.jsp视图返回给后端的数据(此处主要指books),该方法接收到数据之后调用service层对数据库进行更改。最后修改完成重定向回主页。
5. 删除书籍
 @RequestMapping("/deleteBook/{bookID}")
    public String deleteBook( @PathVariable("bookID") int id){
        bookService.deleteBookById(id);
        return "redirect:/book/allBook";
    }
此方法会在allBook.jsp的删除按钮上进行跳转,跳转至此方法,并且在url地址上采用RestFul风格,将要删除的书本的id返回给controller,之后调用service层根据id对数据库中的数据进行相应的删除操作,完毕之后重定向到主页面allBook.jsp
6.根据书名查询对应书籍
    @RequestMapping("/queryBook")
    public String queryBook(String queryBookName,Model model){
        Books books = bookService.queryBookByBookName(queryBookName);
        List<Books> list = new ArrayList<>();
        if (books==null){
            list=bookService.queryAllBook();
            model.addAttribute("error","对不起,未查到信息!");
        }else {
            list.add(books);
        }
        model.addAttribute("list", list);
        return "allBook";

    }
此方法表示在allBook.jsp主页面中点击查询书籍,会跳转到此方法,此方法需要对应的要查询的书籍的名字,以及对应的可携带数据的model。
- 首先根据前端传入的书籍名返回一个对应的books(此时是否为空不可得知,如果存在,不为空,如果不存在该书名,则为空。),再创建一个List集合存放查询到的书籍
- 其次,对从后台查询到书籍进行非空判断,如果为空,则直接将全部的书籍信息赋值到书籍的list集合中,并反馈信息未能查到信息,定义的信息类型为
error - 再次,如果不为空,则将查询到的书籍直接赋值给list集合。
- 最后将model内的信息传递给前端的list属性。最终返回到主页面
allBook.jsp


 969
969


 被折叠的 条评论
为什么被折叠?
被折叠的 条评论
为什么被折叠?
 到【灌水乐园】发言


