


 本文介绍了一种结合SwinTransformer和RGB-D、RGB-T数据的显著目标检测模型SwinNet。模型利用SwinTransformer的特性融合模态特征,并通过空间对齐、通道校准和边缘引导提升性能。文章还详细描述了如何在GitHub上的代码库中复现实验以及遇到的常见问题及其解决方案。
期刊:IEEE Transactions on Circuits and Systems for Video Technology(2022)
代码网址:GitHub - liuzywen/SwinNet
目录
3.2 Two-stream Swin Transformer backbone
3.3 Spatial alignment and channel re-calibration module
3.2 将根目录下的options.py里的路径更改成自己的路径
3.3 上传预训练模型 swin_base_patch4_window12_384_22k.pth
{Errno 2} No such file or directory:'./swin_base_patch4_window12_384_22k.pth'
{Errno 2} No such file or directory:'/root/autodl-tmp/SwinNet/cpts/RGBDSwinTransNet.log'
BUG3:SystemError: tile cannot extend outside image
BUG4:ZeroDivisionError:float division by zero
一、论文阅读笔记
1、摘要
卷积神经网络 (CNN) 擅长提取某些感受野内的上下文特征,而Transformers可以对全局远程依赖特征进行建模。通过吸收变压器的优势和CNN的优点,Swin Transformer具有较强的特征表示能力。在此基础上,我们提出了一种用于 RGB-D 和 RGB-T 显着目标检测的跨模态融合模型 SwinNet。由 Swin Transformer 驱动以提取分层特征,通过注意力机制增强来弥合两种模态之间的差距,并以边缘信息引导以锐化显着对象的轮廓。具体来说,双流 Swin Transformer 编码器首先提取多模态特征,然后提出空间对齐和通道重新校准模块来优化层内跨模态特征。为了澄清模糊边界,边缘引导解码器在边缘特征的指导下实现层间跨模态融合。所提出的模型在 RGB-D 和 RGB-T 数据集上优于最先进的模型,表明它提供了对跨模态互补任务的更多见解。 https://github.com/liuzzywen/SwinNet
2、主要贡献点:
1、提出了一种基于Swin Transformer主干的RGB-D和RGB-T任务的新型SOD模型(SwinNet)。它从 Swin Transformer 主干中提取判别特征,该主干吸收卷积神经网络的局部优势和 Transformer 的远程依赖优点,优于最先进的 (SOTA) RGB-D 和 RGB-T SOD 模型。
2、新设计的空间对齐和通道重新校准模块用于基于注意机制优化每个模态的特征,实现 层跨模态融合从空间和通道方面。
3、该算法在边缘感知模块的引导下实现了层间跨模态融合,生成了更清晰的图像轮廓。
3、方法:
3.1 网络的总体结构图:
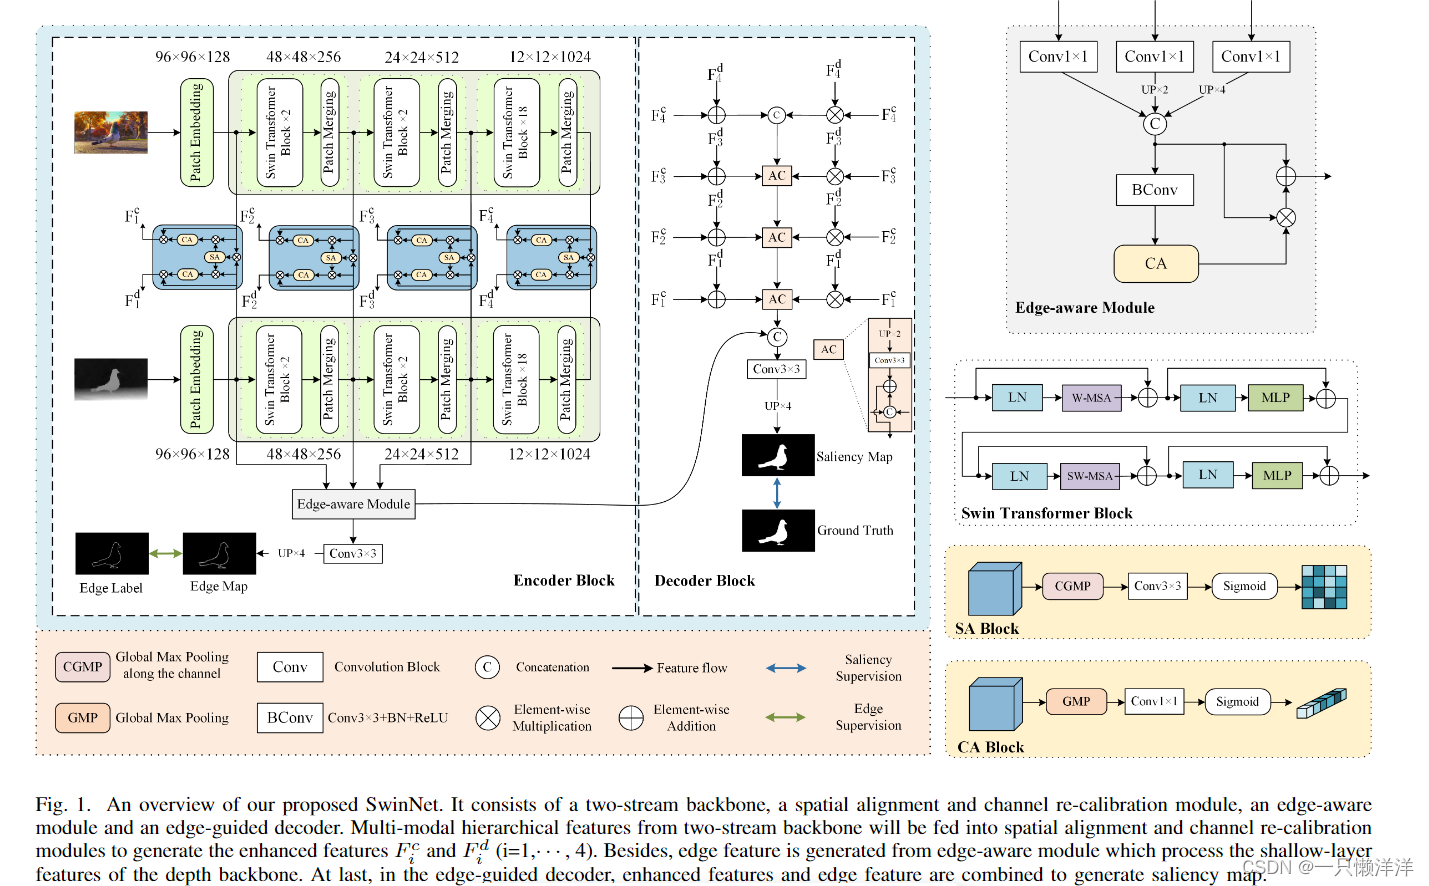
3.2 Two-stream Swin Transformer backbone
每个Swin Transformer首先通过块嵌入将输入的单模态图像分割成不重叠的块。颜色流中每个patch的特征被设置为原始像素RGB值的拼接,而深度流的特征被设置为三个复制深度值的拼接。然后,将它们送入多阶段特征变换中。随着网络深度的增加,通过补丁合并层逐渐减少令牌数,得到各模态的层次表示,分别为和
。
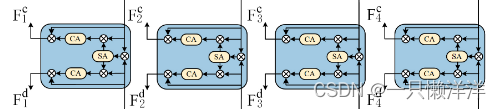
3.3 Spatial alignment and channel re-calibration module
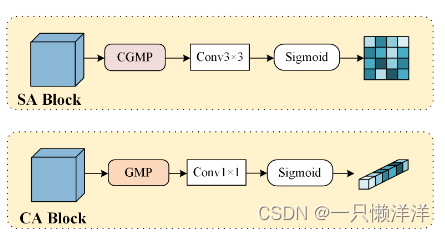
首先对空间部分的两种模态进行对齐,然后对各自的通道部分进行重新校准,以更加关注每个模态中的突出内容。
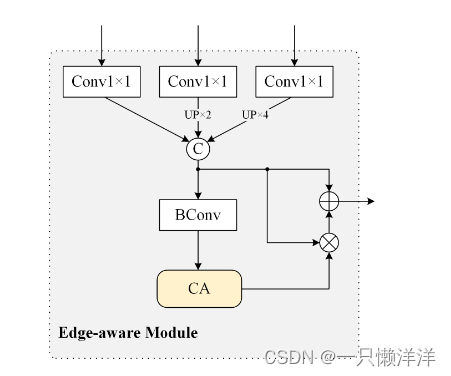
3.4 Edge-aware module
众所周知,高层特征表达了更多的语义信息,而浅层特征承载了更多的细节信息。同时,在深度图像中,显著物体更容易呈现弹出结构。用深度对比法很容易描绘出物体的轮廓。因此,利用深度骨干的浅层特征来产生边缘特征。
具体公式:
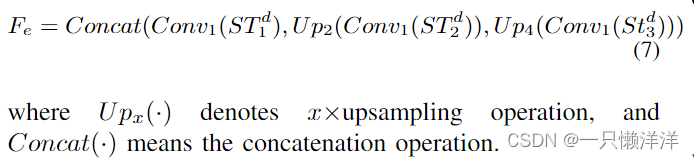
边缘感知模块输出边缘特征,用于指导模型的解码过程和增强细节。
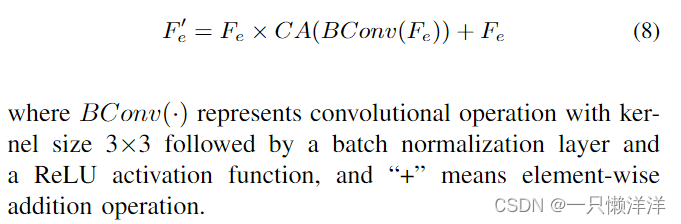
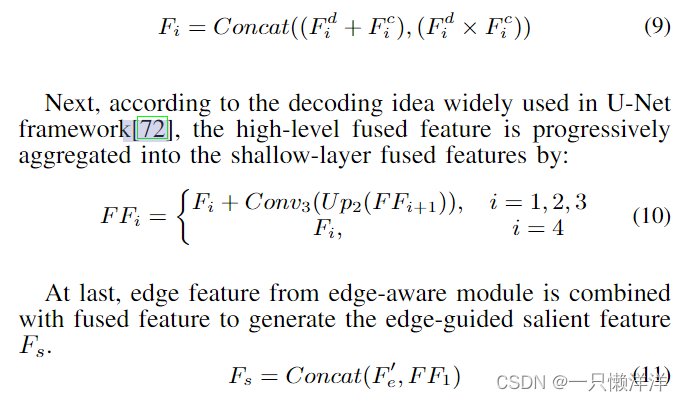
3.5 Edge-guided decoder
解码器经过空间对准、通道重新校准和边缘特征提取后,将不同模态增强的层次特征与边缘特征结合,得到边缘引导的显著特征。
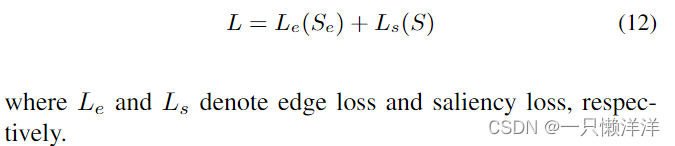
3.6 Loss function
 最低0.47元/天 解锁文章


 3418
3418

 被折叠的 条评论
为什么被折叠?
被折叠的 条评论
为什么被折叠?
 到【灌水乐园】发言


