


1. 配置云主机
| 名称 | IP地址 | 配置 |
|---|---|---|
| nfs | 192.168.1.60 | 1CPU,1G内存 |
| apache-0001 | 192.168.1.71 | 2CPU,4G内存 |
| apache-0002 | 192.168.1.72 | 2CPU,4G内存 |
| apache-0003 | 192.168.1.73 | 2CPU,4G内存 |
部署NFS服务
# 拷贝网站页面到 NFS 云主机
[root@ecs-proxy s4]# rsync -av public/website.tar.gz 192.168.1.10:/root/
#----------------------------------------------------------------------#
# 创建共享目录,并部署网站页面
[root@nfs ~]# mkdir -p /var/webroot
[root@nfs ~]# tar -zxf website.tar.gz -C /var/webroot/

# 部署 NFS 服务
[root@nfs ~]# dnf install -y nfs-utils
[root@nfs ~]# vim /etc/exports
/var/webroot    192.168.1.0/24(rw,no_root_squash)

[root@nfs ~]# systemctl enable --now nfs-server.service
部署web服务
[root@ecs-proxy ~]# mkdir website
[root@ecs-proxy ~]# cd website
[root@ecs-proxy website]# vim ansible.cfg
[defaults]
inventory         = hostlist
host_key_checking = False
[root@ecs-proxy website]# vim hostlist
[web]
192.168.1.[11:13]
[apache]
192.168.1.[71:73]
[root@ecs-proxy website]# vim web_install.yaml
---
- name: web 集群安装
  hosts: web
  tasks:
  - name: 安装 apache 服务
    dnf:
      name: httpd,php,nfs-utils
      state: latest
      update_cache: yes
  - name: 配置 httpd 服务
    service:
      name: httpd
      state: started
      enabled: yes
  - name: 编辑 fstab 文件,添加 NFS 配置
    lineinfile:
      path: /etc/fstab
      regexp: '^192.168.1.60:/.*'
      line: '192.168.1.60:/var/webroot /var/www/html nfs defaults,_netdev,nolock 1 1'
      create: yes
  - name: 挂载 NFS
    shell:
      cmd: mount /var/www/html

# 设置语言环境
[root@ecs-proxy website]# locale
[root@ecs-proxy website]# export LANG="en_US.UTF-8" LC_ALL="en_US.UTF-8"
[root@ecs-proxy website]# echo 'export LANG="en_US.UTF-8"' >>/etc/profile.d/lang.sh
# 执行 playbook 完成安装
[root@ecs-proxy website]# ansible-playbook web_install.yaml
负载均衡(ELB)
配置华为云负责均衡对外发布服务

[root@ecs-proxy ~]# curl http://192.168.1.250/info.php
<pre>
Array
(
    [REMOTE_ADDR] => 100.125.99.180
    [REQUEST_METHOD] => GET
    [HTTP_USER_AGENT] => curl/7.29.0
    [REQUEST_URI] => /info.php
)
php_host: web-0001
1229
Elasticsearch 安装
添加软件包

# 添加 ELK 软件包到自定义 Yum 仓库
[root@ecs-proxy s4]# rsync -av elk/ /var/localrepo/elk/
[root@ecs-proxy s4]# createrepo --update /var/localrepo
购买云主机
主机 IP地址 配置
es-0001 192.168.1.81 最低配置2核4G
es-0002 192.168.1.82 最低配置2核4G
es-0003 192.168.1.83 最低配置2核4G
es-0004 192.168.1.84 最低配置2核4G
es-0005 192.168.1.85 最低配置2核4G
集群安装
部署 es-0001

[root@es-0001 ~]# vim /etc/hosts
192.168.1.81    es-0001
192.168.1.82    es-0002
192.168.1.83    es-0003
192.168.1.84    es-0004
192.168.1.85    es-0005
[root@es-0001 ~]# dnf install -y elasticsearch
[root@es-0001 ~]# vim /etc/elasticsearch/elasticsearch.yml
17:  cluster.name: my-es
23:  node.name: es-0001
56:  network.host: 0.0.0.0
70:  discovery.seed_hosts: ["es-0001", "es-0002", "es-0003"]
74:  cluster.initial_master_nodes: ["es-0001", "es-0002", "es-0003"]
[root@es-0001 ~]# systemctl enable --now elasticsearch
# 服务启动成功
[root@es-0001 ~]# curl http://127.0.0.1:9200
{
  "name" : "es-0001",
  "cluster_name" : "my-es",
  "cluster_uuid" : "_na_",
  "version" : {
    "number" : "7.17.8",
    "build_flavor" : "default",
    "build_type" : "rpm",
    "build_hash" : "120eabe1c8a0cb2ae87cffc109a5b65d213e9df1",
    "build_date" : "2022-12-02T17:33:09.727072865Z",
    "build_snapshot" : false,
    "lucene_version" : "8.11.1",
    "minimum_wire_compatibility_version" : "6.8.0",
    "minimum_index_compatibility_version" : "6.0.0-beta1"
  },
  "tagline" : "You Know, for Search"
}
部署 es-0002

# 验证集群状态失败
[root@es-0002 ~]# curl http://es-0001:9200/_cat/nodes?pretty
{
  "error" : {
    "root_cause" : [
      {
        "type" : "master_not_discovered_exception",
        "reason" : null
      }
    ],
    "type" : "master_not_discovered_exception",
    "reason" : null
  },
  "status" : 503
}
# 部署服务
[root@es-0002 ~]# vim /etc/hosts
192.168.1.81    es-0001
192.168.1.82    es-0002
192.168.1.83    es-0003
192.168.1.84    es-0004
192.168.1.85    es-0005
[root@es-0002 ~]# dnf install -y elasticsearch
[root@es-0002 ~]# vim /etc/elasticsearch/elasticsearch.yml
17:  cluster.name: my-es
23:  node.name: es-0002
56:  network.host: 0.0.0.0
70:  discovery.seed_hosts: ["es-0001", "es-0002", "es-0003"]
74:  cluster.initial_master_nodes: ["es-0001", "es-0002", "es-0003"]
[root@es-0002 ~]# systemctl enable --now elasticsearch
# 验证集群状态
[root@es-0002 ~]# curl http://es-0001:9200/_cat/nodes?pretty
192.168.1.81 16 89  2 0.15 0.06 0.04 cdfhilmrstw * es-0001
192.168.1.82  6 88 61 1.00 0.23 0.08 cdfhilmrstw - es-0002
集群扩容
在所有 es 主机安装 Elasticsearch

[root@ecs-proxy ~]# mkdir es
[root@ecs-proxy ~]# cd es
[root@ecs-proxy es]# vim ansible.cfg
[defaults]
inventory         = hostlist
host_key_checking = False
[root@ecs-proxy es]# vim hostlist
[ES]
192.168.1.[81:85]
[root@ecs-proxy es]# rsync -av 192.168.1.81:/etc/elasticsearch/elasticsearch.yml elasticsearch.j2
[root@ecs-proxy es]# vim elasticsearch.j2
23:  node.name: {{ ansible_hostname }}
[root@ecs-proxy es]# vim es_install.yaml
---
- name: Elasticsearch 集群安装
  hosts: ES
  tasks:
  - name: 设置 /etc/hosts
    copy:
      dest: /etc/hosts
      owner: root
      group: root
      mode: '0644'
      content: |
        ::1     localhost localhost.localdomain localhost6 localhost6.localdomain6
        127.0.0.1   localhost localhost.localdomain localhost4 localhost4.localdomain4
        {% for i in groups.es %}
        {{ hostvars[i].ansible_eth0.ipv4.address }} {{ hostvars[i].ansible_hostname }}
        {% endfor %}
  - name: 安装 ES 服务
    dnf:
      name: elasticsearch
      state: latest
      update_cache: yes
  - name: 拷贝配置文件
    template:
      src: elasticsearch.j2
      dest: /etc/elasticsearch/elasticsearch.yml
      owner: root
      group: elasticsearch
      mode: '0660'
  - name: 配置 ES 服务
    service:
      name: elasticsearch
      state: started
      enabled: yes

[root@ecs-proxy es]# ansible-playbook es_install.yaml
[root@ecs-proxy es]# curl http://192.168.1.21:9200/_cat/nodes?pretty
192.168.1.21 32 88 0 0.04 0.01 0.00 cdfhilmrstw * es-0001
192.168.1.22 16 87 0 0.13 0.04 0.01 cdfhilmrstw - es-0002
192.168.1.23  6 86 1 0.64 0.21 0.07 cdfhilmrstw - es-0003
192.168.1.24 18 86 0 0.44 0.13 0.05 cdfhilmrstw - es-0004
192.168.1.25  6 86 1 0.67 0.21 0.07 cdfhilmrstw - es-0005
插件管理
Head插件图例
华为云
es-0001
用户认证
反向代理
负载均衡
ELB:8080
公网IP
ES服务
Port:9200
web服务
Port:80
用户
部署插件页面

# 拷贝插件 public/head.tar.gz 到 es-0001 主机
[root@ecs-proxy s4]# rsync -av public/head.tar.gz 192.168.1.21:./
#-------------------------------------------------
# 在 es-0001 上安装 web 服务,并部署插件
[root@es-0001 ~]# dnf install -y nginx
[root@es-0001 ~]# systemctl enable --now nginx
[root@es-0001 ~]# tar zxf head.tar.gz -C /usr/share/nginx/html/
通过 ELB 的 8080 端口,发布服务到互联网
认证和代理

[root@es-0001 ~]# vim /etc/nginx/default.d/esproxy.conf
location ~* ^/es/(.*)$ {
    proxy_pass http://127.0.0.1:9200/$1;
    auth_basic "Elasticsearch admin";
    auth_basic_user_file /etc/nginx/auth-user;
}
[root@es-0001 ~]# dnf install -y httpd-tools
[root@es-0001 ~]# htpasswd -cm /etc/nginx/auth-user admin
New password:
Re-type new password:
Adding password for user admin
[root@es-0001 ~]# systemctl reload nginx
通过 head 插件管理 elasticsearch 集群
Logstash 配置管理
安装 logstash
主机名称	IP地址	配置
logstash	192.168.1.87	最低配置4核8G
安装部署

[root@logstash ~]# vim /etc/hosts
192.168.1.81    es-0001
192.168.1.82    es-0002
192.168.1.83    es-0003
192.168.1.84    es-0004
192.168.1.85    es-0005
192.168.1.87    logstash
[root@logstash ~]# dnf install -y logstash
[root@logstash ~]# ln -s /etc/logstash /usr/share/logstash/config
最简单的配置
[root@logstash ~]# vim /etc/logstash/conf.d/my.conf
input {
  stdin {}
}

filter{

}

output{
  stdout{}
}
[root@logstash ~]# /usr/share/logstash/bin/logstash
插件与调试格式
json格式字符串:  {"a":"1", "b":"2", "c":"3"}
[root@logstash ~]# vim /etc/logstash/conf.d/my.conf
input {
  stdin { codec => "json" }
}

filter{

}

output{
  stdout{ codec => "rubydebug" }
}
[root@logstash ~]# /usr/share/logstash/bin/logstash
input 模块
file 插件
手册地址:[https://www.elastic.co/guide/en/logstash/current/index.html]
file插件基本配置

[root@logstash ~]# touch /tmp/{a,b}.log
[root@logstash ~]# echo 'string 01' >>/tmp/a.log
[root@logstash ~]# echo 'string 02' >>/tmp/a.log
[root@logstash ~]# echo 'string 03' >>/tmp/a.log
[root@logstash ~]# vim /etc/logstash/conf.d/my.conf
input {
  file {
    path => ["/tmp/a.log", "/tmp/b.log"]
  }
}
# filter { 不做任何修改 }
# output { 不做任何修改 }

# 启动程序,等待数据输出
[root@logstash ~]# /usr/share/logstash/bin/logstash

#---------------------------------------------------
# 在另一个终端模拟写入日志
[root@logstash ~]# echo 'string 04' >>/tmp/b.log
[root@logstash ~]# echo 'string 05' >>/tmp/a.log
file插件高级配置

# 删除默认书签文件
[root@logstash ~]# rm -rf /var/lib/logstash/plugins/inputs/file/.sincedb_*
[root@logstash ~]# cat /tmp/{a.log,b.log} >/tmp/c.log
[root@logstash ~]# vim /etc/logstash/conf.d/my.conf
input {
  file {
    path => ["/tmp/c.log"]
    start_position => "beginning"
    sincedb_path => "/var/lib/logstash/sincedb"
  }
}
# filter { 不做任何修改 }
# output { 不做任何修改 }

[root@logstash ~]# /usr/share/logstash/bin/logstash
filter 模块
grok 插件
正则表达式分组匹配格式: (?<名字>正则表达式)
正则表达式宏调用格式: %{宏名称:名字}
宏文件路径 :
/usr/share/logstash/vendor/bundle/jruby/2.5.0/gems/logstash-patterns-core-4.3.4/patterns

准备测试数据

# 从 web 服务器查找一条日志写入到日志文件
[root@logstash ~]# echo '60.26.217.109 - admin [13/Jan/2023:14:31:52 +0800] "GET /es/ HTTP/1.1" 200 148209 "http://127.70.79.1/es/" "curl/7.61.1"' >/tmp/c.log

# 调试技巧:设置路径为 /dev/null 可以多次反复测试
[root@logstash ~]# vim /etc/logstash/conf.d/my.conf
input {
  file {
    path => ["/tmp/c.log"]
    start_position => "beginning"
    sincedb_path => "/dev/null"
  }
}
# filter { 不做任何修改 }
# output { 不做任何修改 }

[root@logstash ~]# /usr/share/logstash/bin/logstash
匹配IP地址测试

[root@logstash ~]# vim /etc/logstash/conf.d/my.conf
# input { 不做任何修改 }

filter {
  grok {
    match => { "message" => "(?<userIP>((25[0-5]|2[0-4]\d|1?\d?\d)\.){3}(25[0-5]|2[0-4]\d|1?\d?\d))" }
  }
  grok {
    match => { "message" => "%{IP:clientIP}" }
  }
}

# output { 不做任何修改 }

[root@logstash ~]# /usr/share/logstash/bin/logstash
使用宏格式化日志

[root@logstash ~]# vim /etc/logstash/conf.d/my.conf
# input { 不做任何修改 }

filter{
  grok {
    match => { "message" => "%{HTTPD_COMBINEDLOG}" }
    remove_field => ["message"]
  }
}

# output { 不做任何修改 }

[root@logstash ~]# /usr/share/logstash/bin/logstash
output 模块
elasticsearch 插件
[root@logstash ~]# vim /etc/logstash/conf.d/my.conf
# input { 不做任何修改 }
# filter { 不做任何修改 }

output{
  stdout{ codec => "rubydebug" }
  elasticsearch {
    hosts => ["es-0002:9200","es-0003:9200"]
    index => "weblog-%{+YYYY.MM.dd}"
  }
}

[root@logstash ~]# /usr/share/logstash/bin/logstash
访问页面,查看 Head 插件,验证数据写入 Elasticsearch  成功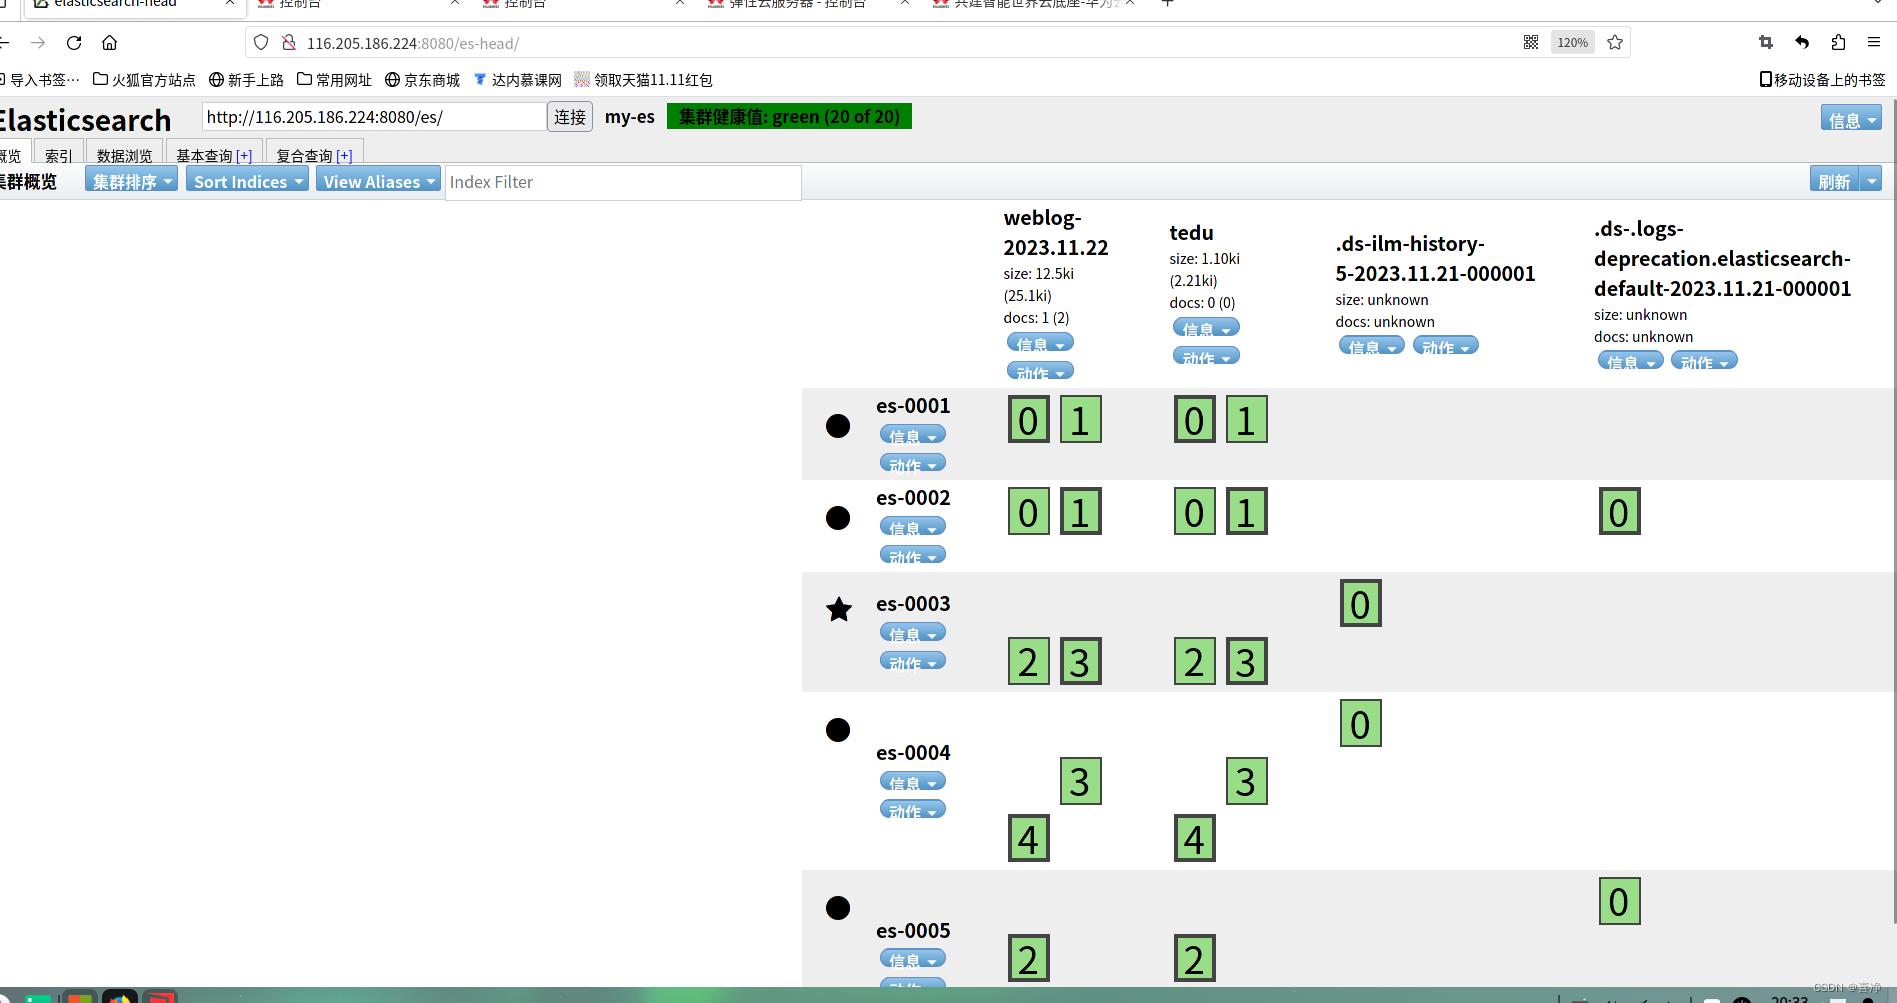
Web 日志实时分析
beats 插件

[root@logstash ~]# vim /etc/logstash/conf.d/my.conf
input {
beats {
port => 5044
}
}
# filter { 不做任何修改 }
# output { 不做任何修改 }
[root@logstash ~]# /usr/share/logstash/bin/logstash
filebeat 安装配置

[root@web-0001 ~]# dnf install -y filebeat
[root@web-0001 ~]# systemctl enable filebeat
[root@web-0001 ~]# vim /etc/filebeat/filebeat.yml
25: id: my-filestream-id # 如果同时配置多个收集器,id不能重复
28: enabled: true # 打开收集模块
32: - /var/log/httpd/access_log # 日志文件路径
135: # 注释掉 Elasticsearch 配置
137: # 注释掉 Elasticsearch 配置
148: output.logstash: # 设置输出模块
150: hosts: ["192.168.1.27:5044"] # 输出给logstash
163: # processors: 注释(用于收集系统信息)
164: # - add_host_metadata: 注释掉(收集主机信息)
165: # when.not.contains.tags: forwarded 注释掉(判断是否为容器)
166: # - add_cloud_metadata: ~ 注释掉(收集 cloud 信息)
167: # - add_docker_metadata: ~ 注释掉(收集 docker 信息)
168: # - add_kubernetes_metadata: ~ 注释掉(收集 kubernetes 信息)
[root@web-0001 ~]# rm -f /var/log/httpd/*
[root@web-0001 ~]# systemctl restart filebeat httpd
# 测试验证: 访问页面,观察 logstash 是否能够获取数据
[root@web-0001 ~]# curl http://192.168.1.11/info.php
多日志标签
添加标签

[root@web ~]# vim /etc/filebeat/filebeat.yml
# 设置识别标签
49: fields:
50: logtype: apache_log
# 清理冗余数据
164: processors:
165: - drop_fields:
166: fields:
167: - log
168: - offset
169: - agent
170: - ecs
[root@web ~]# systemctl restart filebeat
# 测试验证: 访问页面,观察 logstash 输出的数据变化
[root@web-0001 ~]# curl http://192.168.1.11/info.php
匹配标签

[root@logstash ~]# cat /etc/logstash/conf.d/my.conf
input {
beats {
port => 5044
}
}
filter{
if [fields][logtype] == "apache_log" {
grok {
match => { "message" => "%{HTTPD_COMBINEDLOG}" }
remove_field => ["message"]
}}
}
output{
stdout{ codec => "rubydebug" }
if [fields][logtype] == "apache_log" {
elasticsearch {
hosts => ["es-0004:9200", "es-0005:9200"]
index => "weblog-%{+YYYY.MM.dd}"
}}
}
[root@logstash ~]# /usr/share/logstash/bin/logstash
批量安装部署

[root@ecs-proxy ~]# cd website
[root@ecs-proxy website]# rsync -av 192.168.1.11:/etc/filebeat/filebeat.yml filebeat.j2
[root@ecs-proxy website]# vim filebeat.yaml
---
- name: 集群安装部署 filebeat
hosts: web
tasks:
- name: 安装 filebeat
dnf:
name: filebeat
state: latest
update_cache: yes
- name: 同步配置文件
template:
src: filebeat.j2
dest: /etc/filebeat/filebeat.yml
owner: root
group: root
mode: '0600'
- name: 设置启动服务
service:
name: filebeat
enabled: yes
- name: 清理历史日志
file:
path: "{{ item }}"
state: absent
loop:
- /var/log/httpd/access_log
- /var/log/httpd/error_log
- name: 重启服务
service:
name: "{{ item }}"
state: restarted
loop:
- httpd
- filebeat
[root@ecs-proxy website]# ansible-playbook filebeat.yaml
验证日志收集

# 删除日志数据
[root@ecs-proxy ~]# curl -XDELETE "http://192.168.1.21:9200/weblog-*"
{"acknowledged":true}
# 通过浏览器访问 Web 集群页面,观察 head 插件,是否有数据写入
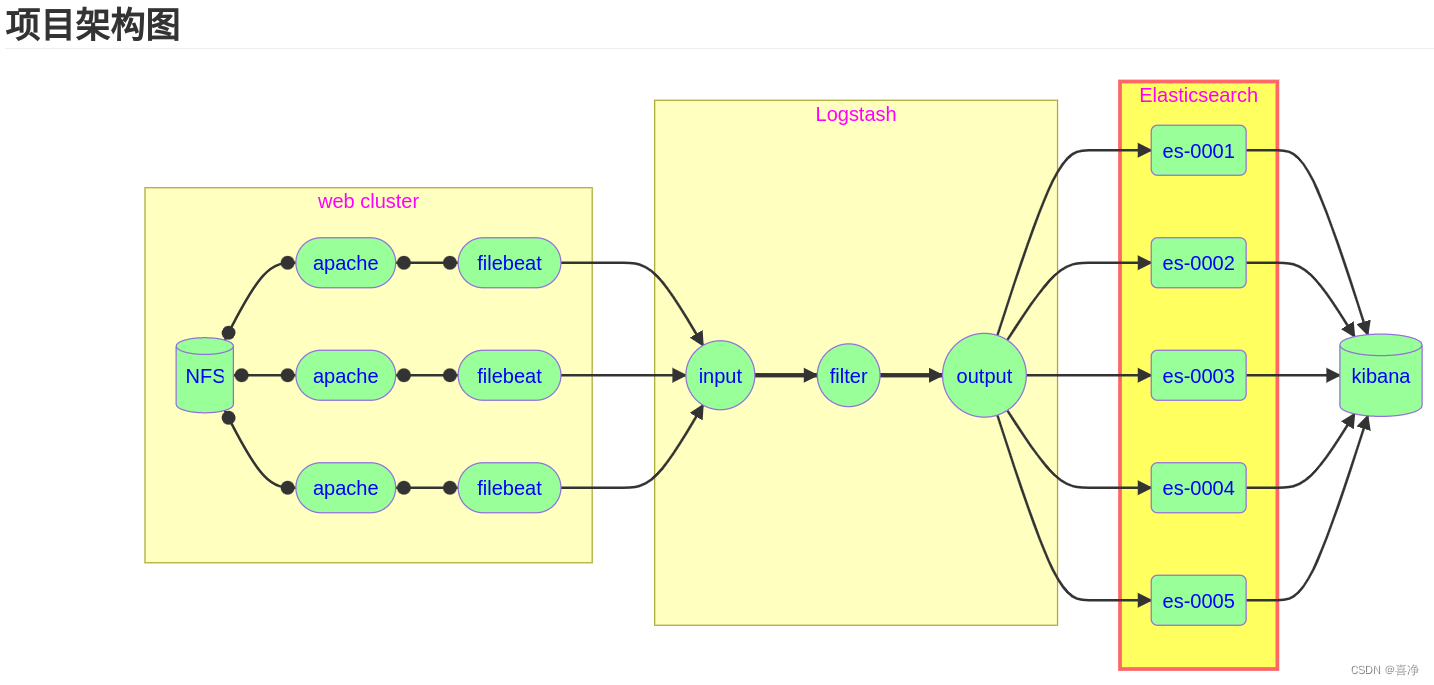
项目架构图
Elasticsearch
Logstash
web cluster
es-0001
es-0002
es-0003
es-0004
es-0005
output
filter
input
filebeat
apache
filebeat
apache
filebeat
apache
NFS
kibana
kibana 安装部署
购买云主机
主机 IP地址 配置
kibana 192.168.1.26 最低配置2核4G
安装 kibana

[root@kibana ~]# vim /etc/hosts
192.168.1.21 es-0001
192.168.1.22 es-0002
192.168.1.23 es-0003
192.168.1.24 es-0004
192.168.1.25 es-0005
192.168.1.26 kibana
[root@kibana ~]# dnf install -y kibana
[root@kibana ~]# vim /etc/kibana/kibana.yml
02: server.port: 5601
07: server.host: "0.0.0.0"
23: server.publicBaseUrl: "http://192.168.1.26:5601"
32: elasticsearch.hosts: ["http://es-0004:9200", "http://es-0005:9200"]
115: i18n.locale: "zh-CN"
[root@kibana ~]# systemctl enable --now kibana
使用 ELB 发布端口 5601,通过 WEB 浏览器访问验证
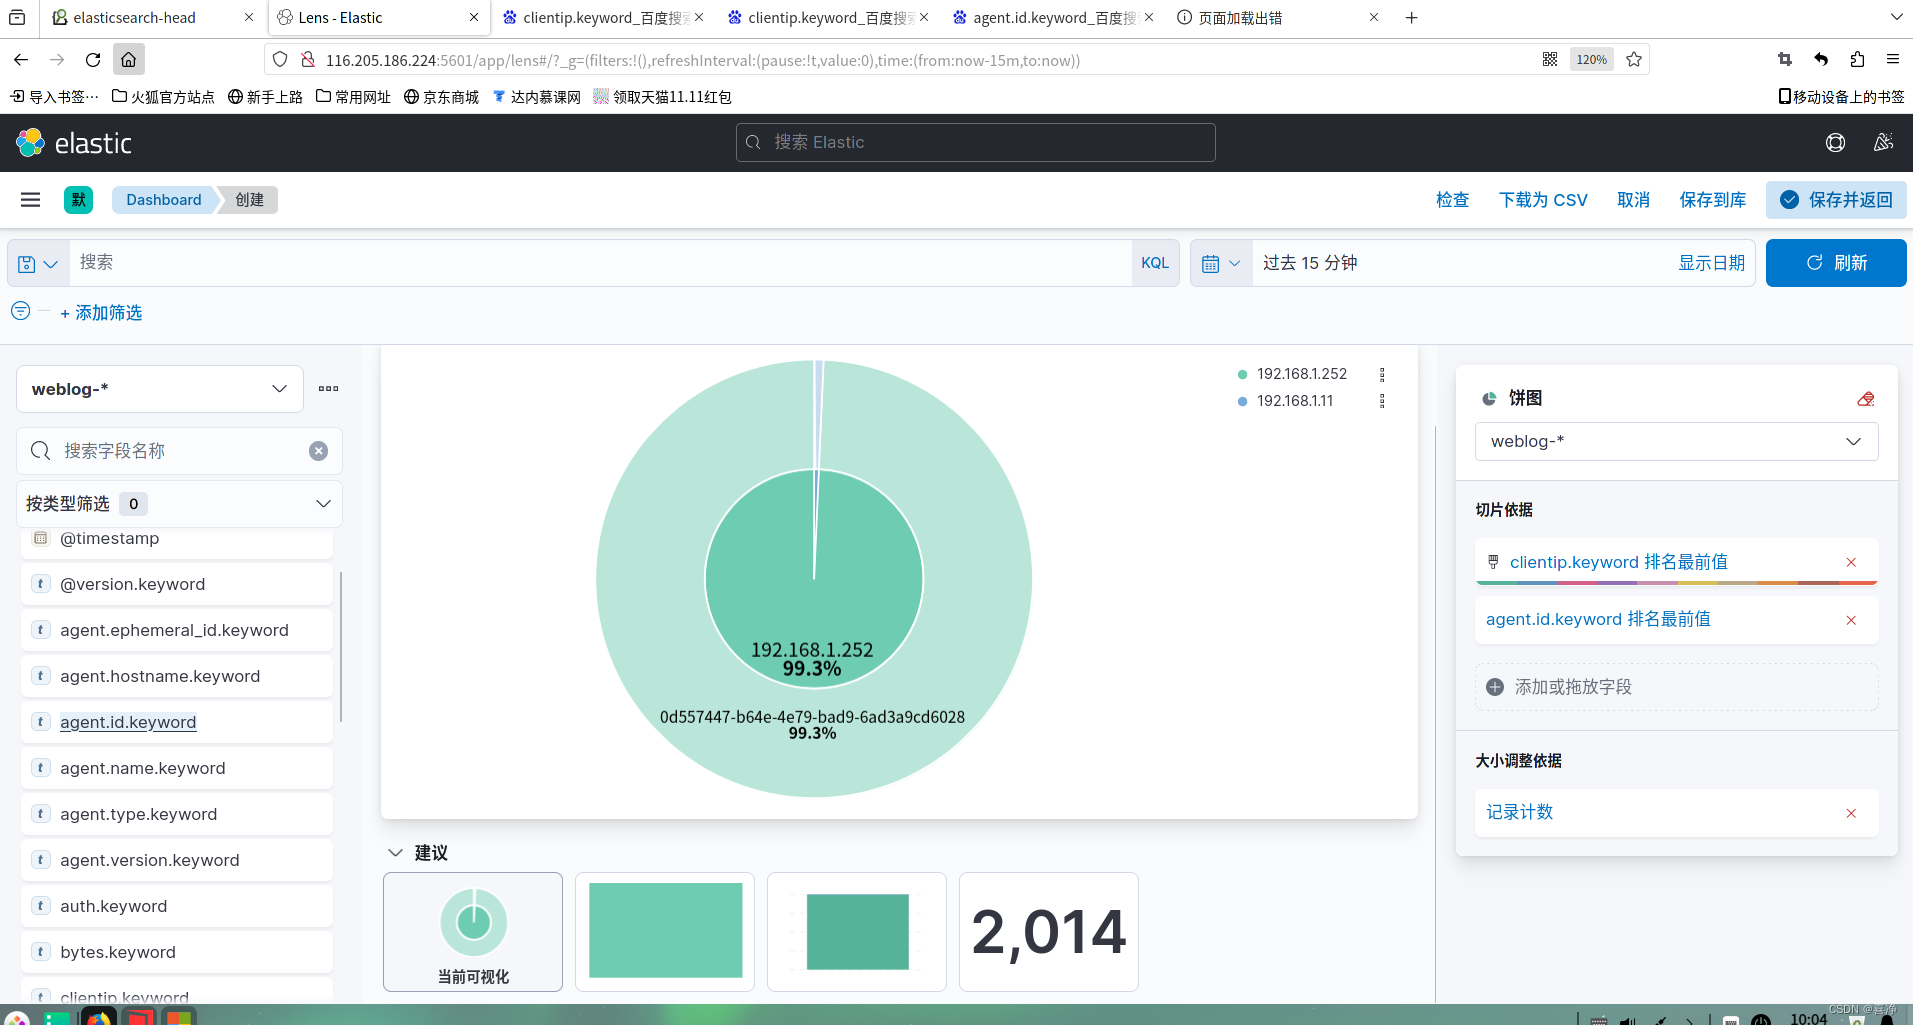
使用 kibana 完成数据统计分析安装http-tools工具进行压力测试
yum -y install httpd-tools
[root@jumpserver ~]# ab -n 2000 -c 2000 http://192.168.1.11/ #进行2000请求压力测试
kibana图表展示如下:


 729
729


 被折叠的 条评论
为什么被折叠?
被折叠的 条评论
为什么被折叠?
 到【灌水乐园】发言


