1、在res/xml中 的代码解析
① Preference是采用SharedPreference保存数据的,这里的属性key表示默认存储的键 ,defaultValue表示默认存储的值
②如果是使用preference的话,样式的编写时存放在res/xml中进行编写
 <EditTextPreference
            app:key="signature"
            app:title="@string/signature_title"
            app:useSimpleSummaryProvider="true" />
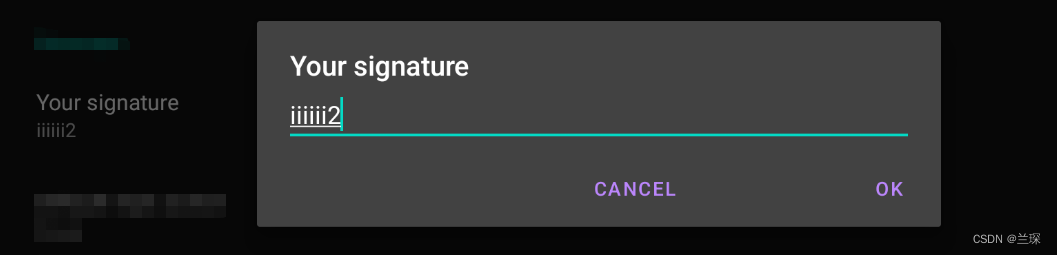
EditTextPreference: 与EditText的作用一样,存在弹窗,确定则显示输入的值,取消则显示的值不变。
呈现效果如下所示:

其中title定义的时Your signature , 而useSimpleSummaryProvider属性控制的输入的值是否显示即Not set的显示。
如下所示:
对于输入的值已经封装,如果想要获取具体的值可以通过方法provideSummary(editTextPreference)进行拿取。
所有res/xml中的代码
<PreferenceScreen xmlns:app="http://schemas.android.com/apk/res-auto">

    <PreferenceCategory app:title="@string/messages_header">

        <EditTextPreference
            app:key="signature"
            app:title="@string/signature_title"
            app:useSimpleSummaryProvider="true" />

        <ListPreference
            app:defaultValue="reply"
            app:entries="@array/reply_entries"
            app:entryValues="@array/reply_values"
            app:key="reply"
            app:title="@string/reply_title"
            app:useSimpleSummaryProvider="true" />

    </PreferenceCategory>

    <PreferenceCategory app:title="@string/sync_header">

        <SwitchPreferenceCompat
            app:key="sync"
            app:title="@string/sync_title" />

        <SwitchPreferenceCompat
            app:dependency="sync"
            app:key="attachment"
            app:summaryOff="@string/attachment_summary_off"
            app:summaryOn="@string/attachment_summary_on"
            app:title="@string/attachment_title" />

    </PreferenceCategory>


</PreferenceScreen>
效果为:

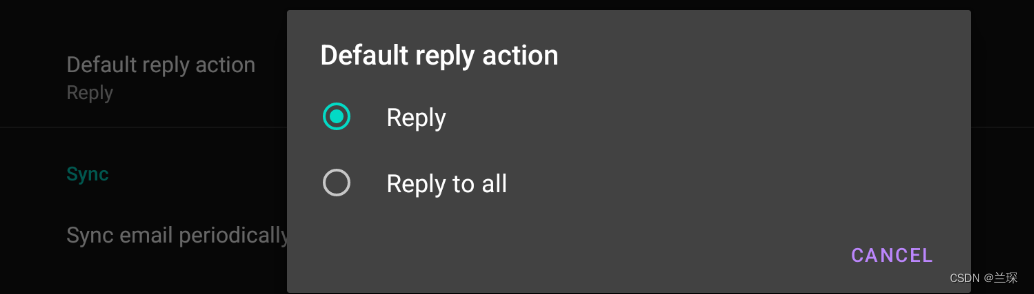
ListPreference的使用
  <ListPreference
            app:defaultValue="reply"
            app:entries="@array/reply_entries"
            app:entryValues="@array/reply_values"
            app:key="reply"
            app:title="@string/reply_title"
            app:useSimpleSummaryProvider="true" />
key属性表示展示的具体值,传入sharedepreference的值,defaultValue属性传入sharedepreference的键,sharedepreference是以键值对的形式存在。entries表示显示的列表,entryValues表示保存显示列表entries的值。
在value/string中存储的数据
<resources>
    <!-- Reply Preference -->
    <string-array name="reply_entries">
        <item>Reply</item>
        <item>Reply to all</item>
    </string-array>

    <string-array name="reply_values">
        <item>reply</item>
        <item>reply_all</item>
    </string-array>
</resources>
效果展示
SwitchPreference的使用
 <PreferenceCategory app:title="@string/sync_header">

        <SwitchPreferenceCompat
            app:key="sync"
            app:title="@string/sync_title" />

        <SwitchPreferenceCompat
            app:dependency="sync"
            app:key="attachment"
            app:summaryOff="@string/attachment_summary_off"
            app:summaryOn="@string/attachment_summary_on"
            app:title="@string/attachment_title" />

    </PreferenceCategory>
根据switch的状态进行修改summaryOff、summaryOn,表示的是下方的小字
效果展示:直接在sharedpreference中已经保存了switch的状态。

2、activity.xml
代码展示:
<LinearLayout xmlns:android="http://schemas.android.com/apk/res/android"
    android:layout_width="match_parent"
    android:layout_height="match_parent">

    <FrameLayout
        android:id="@+id/settings"
        android:layout_width="match_parent"
        android:layout_height="match_parent" />
</LinearLayout>
保存fragment的数据
3、activity.java代码数据
public class SettingsActivity extends AppCompatActivity {
private final static String TAG = "SettingsActivity";
@Override
protected void onCreate(Bundle savedInstanceState) {
super.onCreate(savedInstanceState);
setContentView(R.layout.settings_activity);
if (savedInstanceState == null) {
getSupportFragmentManager()
.beginTransaction()
.replace(R.id.settings, new SettingsFragment())
.commit();
}
ActionBar actionBar = getSupportActionBar();
if (actionBar != null) {
actionBar.setDisplayHomeAsUpEnabled(true);
}
}
@Override
public boolean onOptionsItemSelected(@NonNull MenuItem item) {
switch (item.getItemId()) {
case android.R.id.home:
finish();
break;
}
return true;
}
public static class SettingsFragment extends PreferenceFragmentCompat {
@Override
public void onCreatePreferences(Bundle savedInstanceState, String rootKey) {
setPreferencesFromResource(R.xml.setting_fragment, rootKey);
}
}
}


 606
606

 被折叠的 条评论
为什么被折叠?
被折叠的 条评论
为什么被折叠?
 到【灌水乐园】发言


