


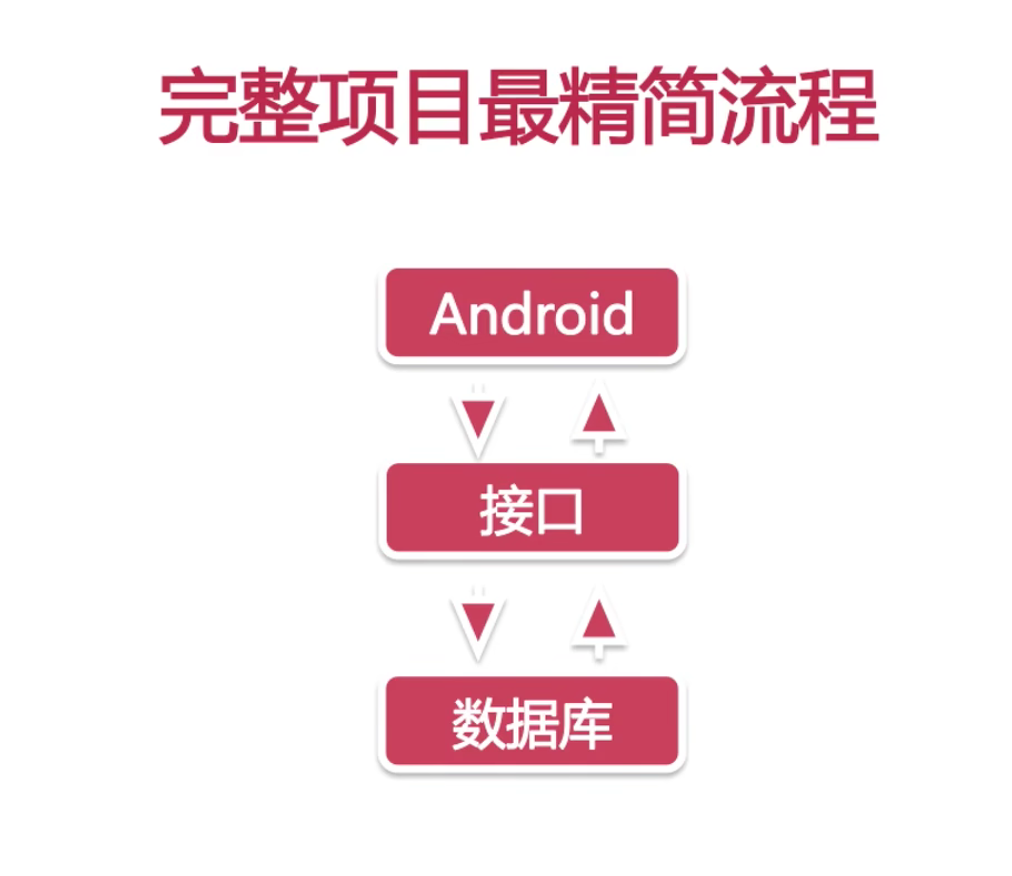
Android基础学习【Android】
前言
2024-5-29 21:41:04
以下内容源自《【Android】》
仅供学习交流使用
版权
禁止其他平台发布时删除以下此话
本文首次发布于CSDN平台
作者是CSDN@日星月云
博客主页是https://jsss-1.blog.csdn.net
禁止其他平台发布时删除以上此话
推荐
【天哥】Android开发视频教程最新版 Android Studio开发
图片资源来自:
https://github.com/jinjungle/skypan-yes-code
开源
日星月云 / 安卓基础学习:https://gitee.com/jsss-1/android-basic-learning
jsss-1 / android-basic-learning:https://github.com/jsss-1/android-basic-learning
Android基础学习
第一章 Android初体验
1-1 Android开发概述
- Android是Google开发的操作系统
- Android开发是移动应用开发的表现形式之一
Android、iOs、H5 App、Native+H5、RN、ionic、MUI…
1-2 Android开发工具
Eclipse Android Studio
- 下载安装JDK
- 为什么使用Android Studio ?
Android Studio是Google自己推出的Android集成开发工具
且Google已经停止对Eclipse的支持。
1-3 第一个Android应用
运行第一个程序
package com.example.helloworld;

import androidx.appcompat.app.AppCompatActivity;

import android.os.Bundle;

public class MainActivity extends AppCompatActivity {

    @Override
    protected void onCreate(Bundle savedInstanceState) {
        super.onCreate(savedInstanceState);
        setContentView(R.layout.activity_main);
    }
}
<?xml version="1.0" encoding="utf-8"?>
<LinearLayout xmlns:android="http://schemas.android.com/apk/res/android"
    xmlns:app="http://schemas.android.com/apk/res-auto"
    xmlns:tools="http://schemas.android.com/tools"
    android:layout_width="match_parent"
    android:layout_height="match_parent"
    tools:context=".MainActivity">

    <TextView
        android:layout_width="wrap_content"
        android:layout_height="wrap_content"
        android:text="Hello World!"
        app:layout_constraintBottom_toBottomOf="parent"
        app:layout_constraintEnd_toEndOf="parent"
        app:layout_constraintStart_toStartOf="parent"
        app:layout_constraintTop_toTopOf="parent" />

</LinearLayout>
第二章 UI组件
2-1 布局管理器
LinearLayout:线性布局
RelativeLayout:相对布局
2-1-1 LinearLayout
最常用属性
| 属性 | 解释 |
|---|---|
| android:id | id |
| android:layout_width | 宽度 |
| android:layout_height | 高度 |
| android:layout _margin | 镶边 |
| android:layout_padding | 填充 |
| android:orientation | 排列 |
| android:background | 背景 |
<?xml version="1.0" encoding="utf-8"?>
<LinearLayout xmlns:android="http://schemas.android.com/apk/res/android"
    xmlns:app="http://schemas.android.com/apk/res-auto"
    xmlns:tools="http://schemas.android.com/tools"
    android:layout_width="match_parent"
    android:layout_height="match_parent"
    android:orientation="vertical"
    tools:context=".MainActivity">

    <LinearLayout
        android:id="@+id/ll_1"
        android:layout_width="200dp"
        android:layout_height="200dp"
        android:orientation="vertical"
        android:background="#000000"
        android:paddingLeft="20dp"
        android:paddingRight="20dp"
        android:paddingTop="50dp"
        android:paddingBottom="10dp"
        android:layout_marginBottom="20dp">
        <View
            android:layout_width="match_parent"
            android:layout_height="match_parent"
            android:background="#FF0033"/>

    </LinearLayout>

    <LinearLayout
        android:layout_width="match_parent"
        android:layout_height="200dp"
        android:background="#0066FF"
        android:orientation="horizontal"
        android:layout_marginLeft="15dp"
        android:layout_marginRight="15dp"
        >
        <View
            android:layout_width="0dp"
            android:layout_height="match_parent"
            android:background="#000000"
            android:layout_weight="1"/>
        <View
            android:layout_width="0dp"
            android:layout_height="match_parent"
            android:background="#FF0033"
            android:layout_weight="2"/>
        <View
            android:layout_width="0dp"
            android:layout_height="match_parent"
            android:background="#55AA99"
            android:layout_weight="2"/>


    </LinearLayout>


</LinearLayout>
2-1-2 RelativeLayout
最常用属性
和LinearLayout对比,新增的属性
| 属性 | 解释 |
|---|---|
| android:layout_toLeftOf | 在…左边 |
| android:layout_toRightOf | 在…右边 |
| android:layout_alignBottom | 和…底部对齐 |
| android:layout alignParentBottom | 和父空间底部对齐 |
| android:layout_below | 在…下边 |
<?xml version="1.0" encoding="utf-8"?>
<RelativeLayout xmlns:android="http://schemas.android.com/apk/res/android"
    android:layout_width="match_parent"
    android:layout_height="match_parent">

    <View
        android:id="@+id/view_1"
        android:layout_width="100dp"
        android:layout_height="100dp"
        android:background="#000000" />

    <View
        android:id="@+id/view_2"
        android:layout_width="100dp"
        android:layout_height="100dp"
        android:layout_below="@id/view_1"
        android:background="#FF0033" />

    <LinearLayout
        android:id="@+id/ll_1"
        android:layout_width="match_parent"
        android:layout_height="200dp"
        android:layout_below="@id/view_2"
        android:orientation="horizontal"
        android:background="#0066FF"
        android:padding="15dp">
        <View
            android:layout_width="100dp"
            android:layout_height="match_parent"
            android:background="#FF0033"/>
        <RelativeLayout
            android:layout_width="match_parent"
            android:layout_height="match_parent"
            android:background="#000000"
            android:padding="15dp">
            <View
                android:id="@+id/view_3"
                android:layout_width="100dp"
                android:layout_height="match_parent"
                android:background="#FF9900" />
            <View
                android:id="@+id/view_4"
                android:layout_width="100dp"
                android:layout_height="match_parent"
                android:background="#FF9900"
                android:layout_toRightOf="@id/view_3"
                android:layout_marginLeft="10dp"/>
        </RelativeLayout>

    </LinearLayout>

</RelativeLayout>
2-2 TextView
- 文字大小、颜色
- 显示不下使用…
- 文字+icon
- 中划线、下划线
- 跑马灯
package com.example.helloworld;

import androidx.appcompat.app.AppCompatActivity;

import android.content.Intent;
import android.os.Bundle;
import android.view.View;
import android.widget.Button;

public class MainActivity extends AppCompatActivity {

    private Button mBtnTextView;

    @Override
    protected void onCreate(Bundle savedInstanceState) {
        super.onCreate(savedInstanceState);
        setContentView(R.layout.activity_main);
        mBtnTextView=(Button) findViewById(R.id.btn_textview);
        mBtnTextView.setOnClickListener(new View.OnClickListener() {
            @Override
            public void onClick(View view) {
                //跳转到TextView演示界面
                Intent intent=new Intent(MainActivity.this,TextViewActivity.class);
                startActivity(intent);

            }
        });
    }
}
package com.example.helloworld;

import androidx.appcompat.app.AppCompatActivity;

import android.annotation.SuppressLint;
import android.graphics.Paint;
import android.os.Bundle;
import android.text.Html;
import android.widget.TextView;

public class TextViewActivity extends AppCompatActivity {


    private TextView mTv4;
    private TextView mTv5;
    private TextView mTv6;
    private TextView mTv7;

    @SuppressLint("MissingInflatedId")
    @Override
    protected void onCreate(Bundle savedInstanceState) {
        super.onCreate(savedInstanceState);
        setContentView(R.layout.activity_text_view);
        mTv4 = (TextView) findViewById(R.id.tv_4);
        mTv4.getPaint().setFlags(Paint.STRIKE_THRU_TEXT_FLAG);//中划线
        mTv4.getPaint().setAntiAlias(true);//去除锯齿

        mTv5 = (TextView) findViewById(R.id.tv_5);
        mTv5.getPaint().setFlags(Paint.UNDERLINE_TEXT_FLAG);//下划线

        mTv6 = (TextView) findViewById(R.id.tv_6);
        mTv6.setText(Html.fromHtml("<u>学习安卓学习安卓</u>"));

        // android:clickable="true"
        mTv7 = (TextView) findViewById(R.id.tv_7);
        mTv7.setSelected(true);
    }
}
<?xml version="1.0" encoding="utf-8"?>
<LinearLayout xmlns:android="http://schemas.android.com/apk/res/android"
    android:layout_width="match_parent"
    android:layout_height="match_parent"
    android:orientation="vertical"
    android:padding="10dp">

    <TextView
        android:id="@+id/tv_1"
        android:layout_width="wrap_content"
        android:layout_height="wrap_content"
        android:text="学习安卓学习安卓"
        android:textColor="#000000"
        android:textSize="24sp" />
    <TextView
        android:id="@+id/tv_2"
        android:layout_width="100dp"
        android:layout_height="wrap_content"
        android:maxLines="1"
        android:ellipsize="end"
        android:text="学习安卓学习安卓"
        android:textColor="#000000"
        android:textSize="24sp"
        android:layout_marginTop="10dp"/>

    <TextView
        android:id="@+id/tv_3"
        android:layout_width="wrap_content"
        android:layout_height="wrap_content"
        android:maxLines="1"
        android:ellipsize="end"
        android:text="筛选"
        android:drawableRight="@drawable/icon_arrow_off"
        android:drawablePadding="5dp"
        android:textColor="#000000"
        android:textSize="24sp"
        android:layout_marginTop="10dp"/>

    <TextView
        android:id="@+id/tv_4"
        android:layout_width="wrap_content"
        android:layout_height="wrap_content"
        android:text="学习安卓学习安卓"
        android:textColor="#000000"
        android:textSize="24sp"
        android:layout_marginTop="10dp"/>

    <TextView
        android:id="@+id/tv_5"
        android:layout_width="wrap_content"
        android:layout_height="wrap_content"
        android:text="学习安卓学习安卓"
        android:textColor="#000000"
        android:textSize="24sp"
        android:layout_marginTop="10dp"/>
    <TextView
        android:id="@+id/tv_6"
        android:layout_width="wrap_content"
        android:layout_height="wrap_content"
        android:text=""
        android:textColor="#000000"
        android:textSize="24sp"
        android:layout_marginTop="10dp"/>
    <TextView
        android:id="@+id/tv_7"
        android:layout_width="wrap_content"
        android:layout_height="wrap_content"
        android:text="学习安卓学习安卓学习安卓学习安卓学习安卓学习安卓学习安卓学习安卓学习安卓学习安卓学习安卓学习安卓"
        android:textColor="#000000"
        android:textSize="24sp"
        android:singleLine="true"
        android:ellipsize="marquee"
        android:marqueeRepeatLimit="marquee_forever"
        android:focusable="true"
        android:focusableInTouchMode="true"/>
</LinearLayout>
2-3 Button
- 文字大小、颜色
- 自定义背景形状
- 自定义按压效果
- 点击事件
package com.example.helloworld;

import androidx.appcompat.app.AppCompatActivity;

import android.annotation.SuppressLint;
import android.content.Intent;
import android.os.Bundle;
import android.view.View;
import android.widget.Button;


public class MainActivity extends AppCompatActivity {

    private Button mBtnTextView;
    private Button mBtnButton;

    @SuppressLint("MissingInflatedId")
    @Override
    protected void onCreate(Bundle savedInstanceState) {
        super.onCreate(savedInstanceState);
        setContentView(R.layout.activity_main);
        mBtnTextView=(Button) findViewById(R.id.btn_textview);
        mBtnTextView.setOnClickListener(new View.OnClickListener() {
            @Override
            public void onClick(View view) {
                //跳转到TextView演示界面
                Intent intent=new Intent(MainActivity.this, TextViewActivity.class);
                startActivity(intent);

            }
        });

        mBtnButton=(Button) findViewById(R.id.btn_button);
        mBtnButton.setOnClickListener(new View.OnClickListener() {
            @Override
            public void onClick(View view) {
                //跳转到Button演示界面
                Intent intent=new Intent(MainActivity.this, ButtonActivity.class);
                startActivity(intent);
            }
        });
    }
}
package com.example.helloworld;

import androidx.appcompat.app.AppCompatActivity;

import android.annotation.SuppressLint;
import android.os.Bundle;
import android.view.View;
import android.widget.Button;
import android.widget.TextView;
import android.widget.Toast;

public class ButtonActivity extends AppCompatActivity {

    private Button mBtn3;
    private TextView mTv1;

    @SuppressLint("MissingInflatedId")
    @Override
    protected void onCreate(Bundle savedInstanceState) {
        super.onCreate(savedInstanceState);
        setContentView(R.layout.activity_button);
        mBtn3 = (Button) findViewById(R.id.btn_3);
        mBtn3.setOnClickListener(new View.OnClickListener() {
            @Override
            public void onClick(View view) {
                Toast.makeText(ButtonActivity.this,"btn3被点击了",Toast.LENGTH_SHORT).show();
            }
        });
        mTv1 = (TextView) findViewById(R.id.tv_1);
        mTv1.setOnClickListener(new View.OnClickListener() {
            @Override
            public void onClick(View view) {
                Toast.makeText(ButtonActivity.this,"tv1被点击了",Toast.LENGTH_SHORT).show();
            }
        });
    }

    public void showToast(View view){
        Toast.makeText(this,"btn4被点击了",Toast.LENGTH_SHORT).show();
    }

}
<?xml version="1.0" encoding="utf-8"?>
<RelativeLayout xmlns:android="http://schemas.android.com/apk/res/android"
    android:layout_width="match_parent"
    android:layout_height="match_parent"
    android:padding="15dp">
    <Button
        android:id="@+id/btn_1"
        android:layout_width="match_parent"
        android:layout_height="50dp"
        android:text="按钮1"
        android:textSize="20sp"
        android:textColor="#FFFFFF"
        android:background="#FF0000">
    </Button>

    <Button
        android:id="@+id/btn_2"
        android:layout_width="match_parent"
        android:layout_height="50dp"
        android:text="按钮2"
        android:textSize="20sp"
        android:textColor="#FFFFFF"
        android:background="@drawable/bg_btn2"
        android:layout_below="@+id/btn_1"
        android:layout_marginTop="10dp"/>

    <Button
        android:id="@+id/btn_3"
        android:layout_width="match_parent"
        android:layout_height="50dp"
        android:text="按钮3"
        android:textSize="20sp"
        android:textColor="#FF9900"
        android:background="@drawable/bg_btn3"
        android:layout_below="@+id/btn_2"
        android:layout_marginTop="10dp"/>

    <Button
        android:id="@+id/btn_4"
        android:layout_width="match_parent"
        android:layout_height="50dp"
        android:text="按钮4"
        android:textSize="20sp"
        android:textColor="#FFFFFF"
        android:background="@drawable/bg_btn4"
        android:layout_below="@+id/btn_3"
        android:onClick="showToast"
        android:layout_marginTop="10dp">
    </Button>

    <TextView
        android:id="@+id/tv_1"
        android:layout_width="match_parent"
        android:layout_height="50dp"
        android:textColor="#000000"
        android:textSize="20sp"
        android:text="文字1"
        android:layout_below="@id/btn_4"
        android:layout_marginTop="10dp"
        android:background="#FFAD33"
        android:gravity="center"/>

</RelativeLayout>
2-4 EditText
- 常用属性
- 监听事件
- 制作登录界面
2-5 RadioButton
- 常用属性
- 自定义样式
- 监听事件
2024-6-3 00:45:01
2-6 复选框CheckBox
2024-6-3 15:39:16
- 常用属性
- 自定义样式
- 监听事件
package com.example.helloworld;

import androidx.appcompat.app.AppCompatActivity;

import android.os.Bundle;
import android.widget.CheckBox;
import android.widget.CompoundButton;
import android.widget.Toast;

public class CheckBoxActivity extends AppCompatActivity {

    private CheckBox mCb5, mCb6;

    @Override
    protected void onCreate(Bundle savedInstanceState) {
        super.onCreate(savedInstanceState);
        setContentView(R.layout.activity_check_box);

        mCb5 = (CheckBox) findViewById(R.id.cb_5);
        mCb6 = (CheckBox) findViewById(R.id.cb_6);

        mCb5.setOnCheckedChangeListener(new CompoundButton.OnCheckedChangeListener() {
            @Override
            public void onCheckedChanged(CompoundButton compoundButton, boolean b) {
                Toast.makeText(CheckBoxActivity.this,b?"5选中":"5未选中",Toast.LENGTH_SHORT).show();
            }
        });

        mCb6.setOnCheckedChangeListener(new CompoundButton.OnCheckedChangeListener() {
            @Override
            public void onCheckedChanged(CompoundButton compoundButton, boolean b) {
                Toast.makeText(CheckBoxActivity.this,b?"6选中":"6未选中",Toast.LENGTH_SHORT).show();
            }
        });
    }
}
<?xml version="1.0" encoding="utf-8"?>
<RelativeLayout xmlns:android="http://schemas.android.com/apk/res/android"
    android:layout_width="match_parent"
    android:layout_height="match_parent"
    android:padding="15dp">


    <TextView
        android:id="@+id/tv_title"
        android:layout_width="wrap_content"
        android:layout_height="wrap_content"
        android:text="你会哪些移动开发:"
        android:textSize="20sp"
        android:textColor="#000"
        android:layout_marginBottom="10dp"/>

    <CheckBox
        android:id="@+id/cb_1"
        android:layout_width="wrap_content"
        android:layout_height="wrap_content"
        android:text="Android"
        android:textSize="20sp"
        android:layout_below="@+id/tv_title"/>

    <CheckBox
        android:id="@+id/cb_2"
        android:layout_width="wrap_content"
        android:layout_height="wrap_content"
        android:text="iOS"
        android:textSize="20sp"
        android:layout_below="@+id/cb_1"/>

    <CheckBox
        android:id="@+id/cb_3"
        android:layout_width="wrap_content"
        android:layout_height="wrap_content"
        android:text="H5"
        android:textSize="20sp"
        android:layout_below="@+id/cb_2"/>

    <CheckBox
        android:id="@+id/cb_4"
        android:layout_width="wrap_content"
        android:layout_height="wrap_content"
        android:text="其他"
        android:textSize="20sp"
        android:layout_below="@+id/cb_3"/>

    <LinearLayout
        android:layout_width="match_parent"
        android:layout_height="wrap_content"
        android:orientation="vertical"
        android:layout_below="@id/cb_4"
        android:layout_marginTop="20dp">
        <TextView
            android:layout_width="wrap_content"
            android:layout_height="wrap_content"
            android:text="你的兴趣"
            android:textSize="20sp"
            android:textColor="#000" />
        <CheckBox
            android:id="@+id/cb_5"
            android:layout_width="wrap_content"
            android:layout_height="wrap_content"
            android:text="编程"
            android:button="@drawable/bg_checkbox"
            android:paddingLeft="10dp"
            android:textSize="20sp"
            android:layout_marginTop="10dp"/>

        <CheckBox
            android:id="@+id/cb_6"
            android:layout_width="wrap_content"
            android:layout_height="wrap_content"
            android:text="做饭"
            android:button="@drawable/bg_checkbox"
            android:paddingLeft="10dp"
            android:textSize="20sp"
            android:layout_marginTop="10dp"/>

    </LinearLayout>

</RelativeLayout>
2-7 ImageView
- Button的其他行生控件:ToggleButton、Switch
- 常用属性
- 加载网络图片
scaleType
- fitXY:撑满控件,宽高比可能发生改变
- fitCenter:保持宽高比缩放,直至能够完全显示
- centerCrop:保持宽高比缩放,直至完全覆盖控件,裁剪显示
https://github.com/bumptech/glide
2-8 列表视图 ListView
- 常用属性
- Adapter
- 演示Demo
package com.example.helloworld.listview;

import android.annotation.SuppressLint;
import android.app.Activity;
import android.os.Bundle;
import android.view.View;
import android.widget.AdapterView;
import android.widget.ListView;
import android.widget.Toast;

import androidx.annotation.Nullable;

import com.example.helloworld.R;

public class ListViewActivity extends Activity {

    private ListView mLv1;

    @SuppressLint("MissingInflatedId")
    @Override
    protected void onCreate(@Nullable Bundle savedInstanceState) {
        super.onCreate(savedInstanceState);
        setContentView(R.layout.acticity_listview);
        mLv1 = (ListView) findViewById(R.id.lv_1);
        mLv1.setAdapter(new MyListAdapter(ListViewActivity.this));
        mLv1.setOnItemClickListener(new AdapterView.OnItemClickListener() {
            @Override
            public void onItemClick(AdapterView<?> adapterView, View view, int i, long l) {
                Toast.makeText(ListViewActivity.this,"点击pos:"+i,Toast.LENGTH_SHORT).show();
                //挑转
            }
        });

        mLv1.setOnItemLongClickListener(new AdapterView.OnItemLongClickListener() {
            @Override
            public boolean onItemLongClick(AdapterView<?> adapterView, View view, int i, long l) {
                Toast.makeText(ListViewActivity.this,"长按pos:"+i,Toast.LENGTH_SHORT).show();
                return true;//结束处理
            }
        });

    }
}
package com.example.helloworld.listview;

import android.content.Context;
import android.view.LayoutInflater;
import android.view.View;
import android.view.ViewGroup;
import android.widget.BaseAdapter;
import android.widget.ImageView;
import android.widget.TextView;

import com.bumptech.glide.Glide;
import com.example.helloworld.R;


public class MyListAdapter extends BaseAdapter {

    private Context mContext;
    private LayoutInflater mLayoutInflater;

    MyListAdapter(Context context) {
        this.mContext = context;
        mLayoutInflater = LayoutInflater.from(context);
    }


    @Override
    public int getCount() {
        return 10;
    }

    @Override
    public Object getItem(int i) {
        return null;
    }

    @Override
    public long getItemId(int i) {
        return 0;
    }

    static class ViewHolder {
        public ImageView imageView;
        public TextView tvTitle, tvTime, tvContent;
    }

    @Override
    public View getView(int i, View view, ViewGroup viewGroup) {
        ViewHolder holder = null;
        if (view == null) {
            view = mLayoutInflater.inflate(R.layout.layout_list_item, null);
            holder = new ViewHolder();
            holder.imageView = (ImageView) view.findViewById(R.id.iv);
            holder.tvTitle = (TextView) view.findViewById(R.id.tv_title);
            holder.tvTime = (TextView) view.findViewById(R.id.tv_time);
            holder.tvContent = (TextView) view.findViewById(R.id.tv_content);
            view.setTag(holder);
        }else {
            holder = (ViewHolder) view.getTag();
        }
        //给控件赋值
        holder.tvTitle.setText("这是标题");
        holder.tvTime.setText("2088-08-08");
        holder.tvContent.setText("这是内容");
        Glide.with(mContext).load("https://www.baidu.com/img/PCtm_d9c8750bed0b3c7d089fa7d55720d6cf.png").into(holder.imageView);
        return view;
    }
}
acticity_listview.xml
<?xml version="1.0" encoding="utf-8"?>
<LinearLayout xmlns:android="http://schemas.android.com/apk/res/android"
    android:orientation="vertical"
    android:layout_width="match_parent"
    android:layout_height="match_parent">
    <ListView
        android:id="@+id/lv_1"
        android:layout_width="match_parent"
        android:layout_height="wrap_content"
        android:listSelector="@drawable/list_item"/>
</LinearLayout>
layout_list_item.xml
<?xml version="1.0" encoding="utf-8"?>
<LinearLayout xmlns:android="http://schemas.android.com/apk/res/android"
    android:layout_width="match_parent"
    android:layout_height="match_parent"
    android:orientation="horizontal"
    android:paddingLeft="15dp"
    android:paddingRight="15dp"
    android:paddingTop="10dp"
    android:paddingBottom="10dp">
    <ImageView
        android:id="@+id/iv"
        android:layout_width="100dp"
        android:layout_height="100dp"
        android:scaleType="fitCenter"
        android:background="#000"/>
    <LinearLayout
        android:layout_width="match_parent"
        android:layout_height="wrap_content"
        android:orientation="vertical"
        android:paddingLeft="10dp">
        <TextView
            android:id="@+id/tv_title"
            android:layout_width="wrap_content"
            android:layout_height="wrap_content"
            android:text="Hello"
            android:textSize="20sp"
            android:textColor="@color/colorBlack"/>

        <TextView
            android:id="@+id/tv_time"
            android:layout_width="wrap_content"
            android:layout_height="wrap_content"
            android:textSize="18sp"
            android:layout_marginTop="10dp"
            android:text="2017-08-26"
            android:textColor="@color/colorGrayDark"/>

        <TextView
            android:id="@+id/tv_content"
            android:layout_width="wrap_content"
            android:layout_height="wrap_content"
            android:layout_marginTop="10dp"
            android:textColor="@color/colorGrayDark"
            android:textSize="18sp"
            android:text="这是内容"/>


    </LinearLayout>
</LinearLayout>
2-9 网格视图 GridView
- 常用属性
- Adapter
- 演示Demo
GridViewActivity
MyGridViewAdapter
activity_gridview.xml
layout_grid_item.xml
2-10 滚动视图 ScrollView
- 垂直滚动:ScrollView
- 水平滚动:HorizontalScrollView
子元素只能有一个
activity_main.xml
<?xml version="1.0" encoding="utf-8"?>
<ScrollView xmlns:android="http://schemas.android.com/apk/res/android"
    android:layout_width="match_parent"
    android:layout_height="match_parent"
    >

    <LinearLayout
        android:layout_width="match_parent"
        android:layout_height="wrap_content"
        android:orientation="vertical">
        <Button
            android:id="@+id/btn_textview"
            android:layout_width="match_parent"
            android:layout_height="wrap_content"
            android:text="TextView"/>

        <Button
            android:id="@+id/btn_button"
            android:layout_width="match_parent"
            android:layout_height="wrap_content"
            android:text="Button"/>

        <Button
            android:id="@+id/btn_edittext"
            android:layout_width="match_parent"
            android:layout_height="wrap_content"
            android:text="EditText"
            android:textAllCaps="false"/>

        <Button
            android:id="@+id/btn_radiobutton"
            android:layout_width="match_parent"
            android:layout_height="wrap_content"
            android:text="RadioButton"
            android:textAllCaps="false"/>

        <Button
            android:id="@+id/btn_checkbox"
            android:layout_width="match_parent"
            android:layout_height="wrap_content"
            android:text="CheckBox"
            android:textAllCaps="false" />

        <Button
            android:id="@+id/btn_imageview"
            android:layout_width="match_parent"
            android:layout_height="wrap_content"
            android:text="ImageView"
            android:textAllCaps="false" />

        <Button
            android:id="@+id/btn_listview"
            android:layout_width="match_parent"
            android:layout_height="wrap_content"
            android:text="ListView"
            android:textAllCaps="false" />

        <Button
            android:id="@+id/btn_gridview"
            android:layout_width="match_parent"
            android:layout_height="wrap_content"
            android:text="GridView"
            android:textAllCaps="false" />

        <HorizontalScrollView
            android:layout_width="wrap_content"
            android:layout_height="wrap_content">
            <LinearLayout
                android:layout_width="wrap_content"
                android:layout_height="wrap_content"
                android:orientation="horizontal">
                <Button
                    android:layout_width="200dp"
                    android:layout_height="300dp"
                    android:text="Test"
                    android:textAllCaps="false"/>
                <Button
                    android:layout_width="200dp"
                    android:layout_height="300dp"
                    android:text="Test"
                    android:textAllCaps="false"/>
                <Button
                    android:layout_width="200dp"
                    android:layout_height="300dp"
                    android:text="Test"
                    android:textAllCaps="false"/>
                <Button
                    android:layout_width="200dp"
                    android:layout_height="300dp"
                    android:text="Test"
                    android:textAllCaps="false"/>
            </LinearLayout>
        </HorizontalScrollView>

    </LinearLayout>


</ScrollView>
2-11-1 RecyclerView (一)
RecyclerView能够灵活实现大数据集的展示,视图的复用管理比ListView更好,能够显示列表、网格、瀑布流等形式,且不同的ViewHolder能够实现item多元化的功能。
但是使用起来会稍微麻烦一点,并且没有类似ListView的onItemClickListener监听事件,需要开发者自己实现。
新版不用加
implementation 'com.android.support.design:25.3.1'
使用的是这个
androidx.recyclerview.widget.RecyclerView
LinearAdapter
LinearRecyclerViewActivity
RecyclerViewActivity
activity_linear_recycler_view.xml
activity_recycler.xml
layout_linear_item.xml
2-11-2 RecyclerView (二)
- 水平滚动
- 网格布局
HorAdapter
HorRecyclerActivity
activity_hor_recycler.xml
layout_hor_item.xml
GridAdapter
GridRecyclerActivity
activity_grid_recycler.xml
layout_grid_recyclerview_item.xml
2-11-3 RecyclerView (三)
- 瀑布流
PuRecyclerActivity
StaggeredGridAdapter
layout_staggered_grid_recyclerview_item.xml
activity_pu_recycler.xml
2-11-4 RecyclerView (四)
- 不同的ViewHolder
- XRecyclerView:addHeadView、addFootView、下拉刷新、上拉加载
LinearAdapter
layout_linear_item.xml
layout_linear_item_2.xml
2-12 WebView
- 加载网页加载URL(网络或者本地assets文件夹下的html文件)
- 加载html代码
- Native和JavaScript相互调用
加载网络URL
- webview.loadUrl( “http://www.tiantiantech.cn” );
加载assets下的html文件
- webview.loadUrl( “file:///android_asset/test.html”);
加载html代码
- webview.loadData();
- webview.loadDataWithBaseURL();
网页的前进后退
- webview.canGoBack()
- webview.goBack()
- webview.canGoForward()
- webview.goForward()
- webview.canGoBackOrForward(int steps)
- webview.goBackOrForward(int steps)
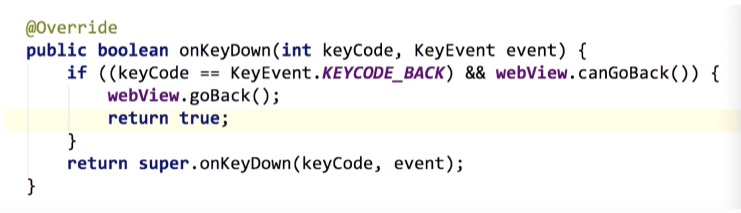
按下返回键,默认是退出当前Activity,如果希望是WebView内页面后退
第三章 UI组件之弹出组件
3-1 Toast
- Toast是一个消息提示组件
- 设置显示的位置
- 自定义显示内容(示例:添加一个图片)
- 简单封装
ToastActivity
activity_toast.xml
ToastUtil
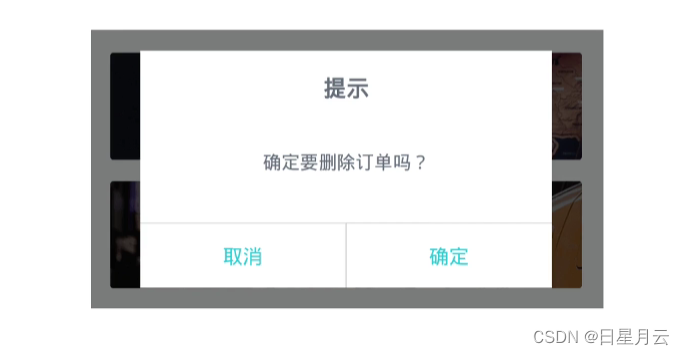
3-2 AlterDialog
- 默认样式
- 单选样式
- 多选样式
- 自定义
DialogActivity
activity_dialog.xml
layout_dialog.xml
3-3 ProgressBar & ProgressDialog
ProgressActivity
activity_progress.xml
    <ProgressBar
        android:id="@+id/pb5"
        android:layout_width="match_parent"
        android:layout_height="wrap_content"
        style="@android:style/Widget.ProgressBar"
        android:indeterminateDrawable="@drawable/bg_progress"
        android:layout_marginTop="10dp"/>
	 <ProgressBar
        android:id="@+id/pb5"
        android:layout_width="match_parent"
        android:layout_height="wrap_content"
        style="@style/MyProgressBar"
        android:layout_marginTop="10dp"/>
3-4 自定义Dialog
CustomDialog
CustomDialogActivity
bg_custom_dialog.xml
activity_custom.xml
layout_custom_dialog.xml
3-5 PopupWindow
2024-6-8 15:33:52
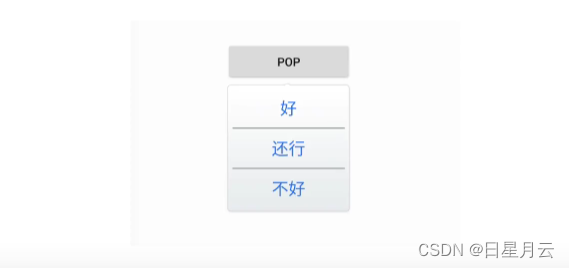
PopupWindowActivity
activity_popup_window.xml
layout_pop.xml
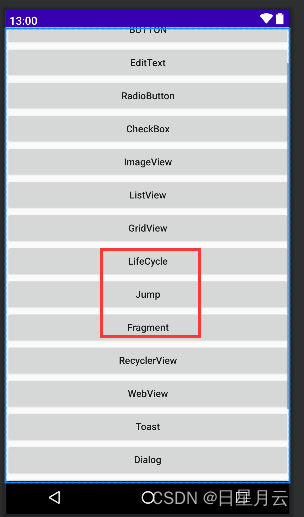
第四章 不可不会的Activity和Fragment
这章的界面LifeCycle、Jump、Fragment在UI界面的GridView和RecyclerView中间
4-1-1 Activity创建三部曲
- 新建类继承Activity或其子类
- 在AndroidManifest中声明
- 创建layout并在Activity的onCreate中设置
TestActivity
activity_test.xml
AndroidManifest.xml设置Activity属性
- android:theme=“test” 标签
- android:theme="@style/Theme.AppCompat.Light.NoActionBar"无,可以application中设置
- android:screenOrientation=“portrait” 竖屏显示
- android:launchMode=""启动模式
- intent-filter设置启动Activity
   <activity
            android:name=".MainActivity"
            android:exported="true"
            android:theme="test"
            android:theme="@style/Theme.AppCompat.Light.NoActionBar"
            android:screenOrientation="portrait"
            android:launchMode="">
            <intent-filter>
                <action android:name="android.intent.action.MAIN" />

                <category android:name="android.intent.category.LAUNCHER" />
            </intent-filter>
        </activity>
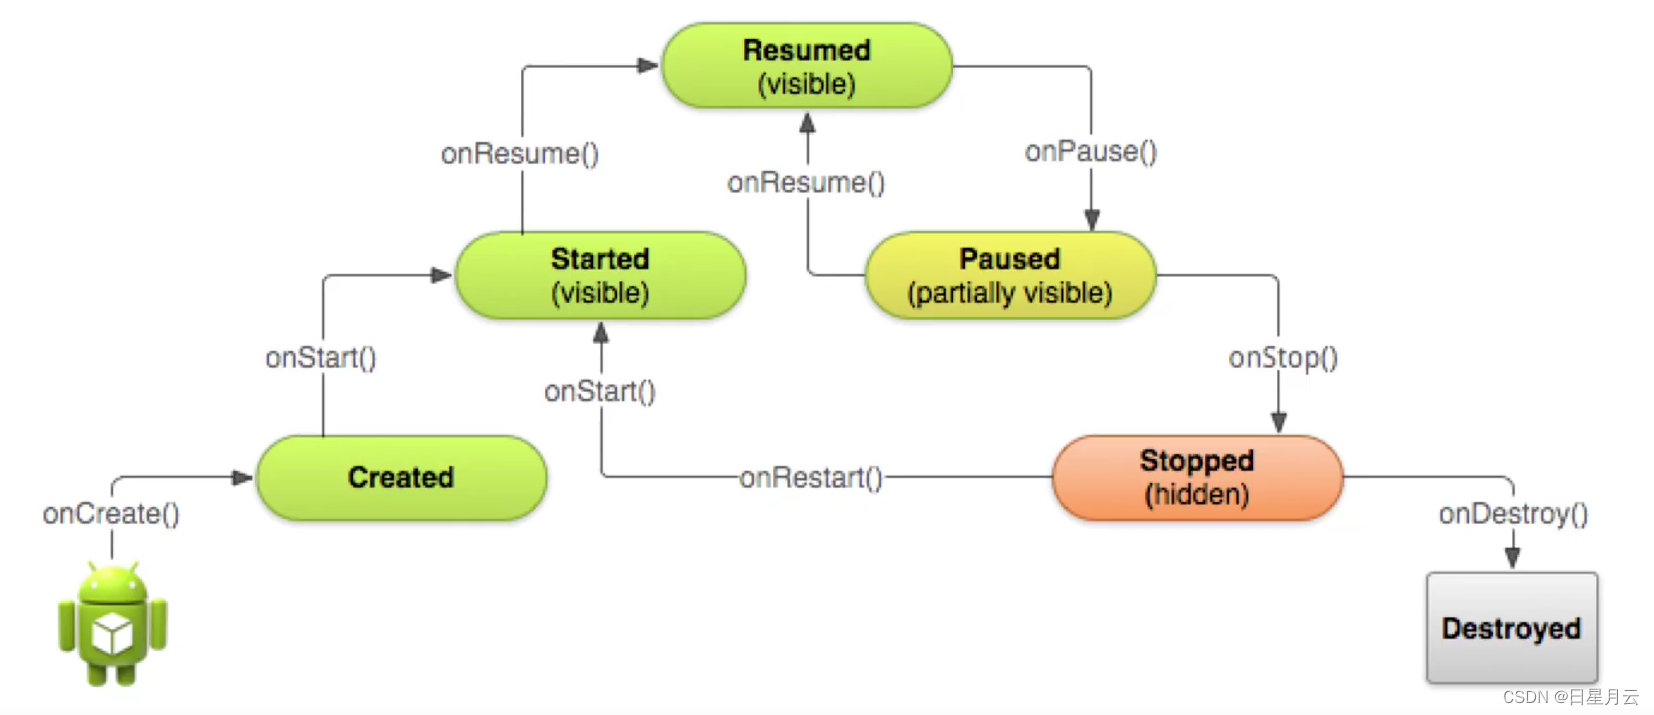
4-1-2 Activity的生命周期
LifeCycleActivity
启动
----onCreate----
----onStart----
----onResume----
退出
----onPause----
----onStop----
----onDestroy----
退到后台
----onPause----
----onStop----
切回前台
----onRestart----
----onStart----
----onResume----
最常用
启动:onCreate
切到后台:onPause
切回前台:onResume
退出:onDestroy
4-1-3 Activity的跳转和数据传递
- 显式跳转和隐式跳转
- Activity之间的数据传递
- startActivityForResult:启动Activity,结束后返回结果
AActivity
BActivity
activity_a.xml
activity_b.xml
4-1-4 Activity的4种启动模式
Activity的android:launchMode属性
- standard:标准模式,默认
- singleTop:Task栈顶复用模式
- singleTask:Task栈内复用模式
- singleInstance:全局单例模式
standard
Activity是由任务栈管理的,每启动一个Activity,就会被放入栈中,按返回键,就会从栈顶移除一个Activity。
standard是默认的启动模式,即标准模式。每启动一个Activity,都会创建一个新的实例。
taskid:任务栈
hash:实例
默认的栈名称:包名
可以通过android:taskAffinity=".asdfghjkdfghj",设置栈名称,必须前面有个.
设置android:launchMode为standard
        <activity
            android:name=".jump.AActivity"
            android:label="A"
            android:launchMode="standard"
            android:exported="false" />
        <activity
            android:name=".jump.BActivity"
            android:label="B"
            android:launchMode="standard"
            android:exported="true">
            <intent-filter>
                <action android:name="com.example.test.BActivity" />

                <category android:name="android.intent.category.DEFAULT" />
            </intent-filter>
        </activity>
测试:在A中点击跳转到A
现象:创建了不同的实例
//进入A
2024-06-08 19:08:08.644 10434-10434 AActivity               com.example.helloworld               D  ----onCreate----
2024-06-08 19:08:08.646 10434-10434 AActivity               com.example.helloworld               D  taskid:225 ,hash:205697094
2024-06-08 19:08:08.648 10434-10434 AActivity               com.example.helloworld               D  com.example.helloworld
//跳转到A
2024-06-08 19:10:43.285 10434-10434 AActivity               com.example.helloworld               D  ----onCreate----
2024-06-08 19:10:43.293 10434-10434 AActivity               com.example.helloworld               D  taskid:225 ,hash:265426351
2024-06-08 19:10:43.296 10434-10434 AActivity               com.example.helloworld               D  com.example.helloworld
测试:在A中点击jump跳转到B
现象:创建了不同的实例
(视频中B是onNewIntent,是因为他的BActivity.onCreate()信息写错了,应该是onCreate)
//进入A
2024-06-08 19:18:16.649  2148-2148  AActivity               com.example.helloworld               D  ----onCreate----
2024-06-08 19:18:16.649  2148-2148  AActivity               com.example.helloworld               D  taskid:228 ,hash:165672095
2024-06-08 19:18:16.651  2148-2148  AActivity               com.example.helloworld               D  com.example.helloworld
//跳转到B
2024-06-08 19:18:35.546  2148-2148  BActivity               com.example.helloworld               D  ----onCreate----
2024-06-08 19:18:35.554  2148-2148  BActivity               com.example.helloworld               D  taskid:228 ,hash:125393259
2024-06-08 19:18:35.586  2148-2148  BActivity               com.example.helloworld               D  com.example.helloworld
singleTop
当要启动的目标Activity已经位于栈顶时,不会创建新的实例,会复栈用顶的Activity,并且其onNewntent()方法会被调用;
如果目标Activity不在栈顶,则跟standard一样创建新的实例。
设置android:launchMode为singleTop
        <activity
            android:name=".jump.AActivity"
            android:label="A"
            android:launchMode="singleTop"
            android:exported="false" />
        <activity
            android:name=".jump.BActivity"
            android:label="B"
            android:launchMode="singleTop"
            android:exported="true">
            <intent-filter>
                <action android:name="com.example.test.BActivity" />

                <category android:name="android.intent.category.DEFAULT" />
            </intent-filter>
        </activity>
测试:在A中点击跳转到A,再跳转到B
现象:跳转到A,hash码一致,在栈顶,所以复用实例
//进入A
2024-06-08 19:30:57.559  5429-5429  AActivity               com.example.helloworld               D  ----onCreate----
2024-06-08 19:30:57.560  5429-5429  AActivity               com.example.helloworld               D  taskid:230 ,hash:106511291
2024-06-08 19:30:57.562  5429-5429  AActivity               com.example.helloworld               D  com.example.helloworld
//跳转到A
2024-06-08 19:31:18.483  5429-5429  AActivity               com.example.helloworld               D  ----onNewIntent----
2024-06-08 19:31:18.488  5429-5429  AActivity               com.example.helloworld               D  taskid:230 ,hash:106511291
2024-06-08 19:31:18.490  5429-5429  AActivity               com.example.helloworld               D  com.example.helloworld
//跳转到B
2024-06-08 19:33:15.637  5429-5429  BActivity               com.example.helloworld               D  ----onCreate----
2024-06-08 19:33:15.638  5429-5429  BActivity               com.example.helloworld               D  taskid:230 ,hash:147131998
2024-06-08 19:33:15.641  5429-5429  BActivity               com.example.helloworld               D  com.example.helloworld
singleTask
在同一个任务栈中,如果要启动的目标Activity已经在栈中,则会复用该Activity,并调用其onNewIntent()方法,并且该Activity上面的Activity会被清除;如果栈中没有,则创建新的实例。
没有演示
singleInstance
全局复用,不管哪个Task栈,只要存在目标Activity,就复用。每个Activity占有一个新的Task栈。
不经常使用
2024-6-8 19:55:05
4-2-1 Fragment详解(一)
2024-6-9 22:18:01
- Fragment有自己的生命周期
- Fragment依赖于Activity
- Fragment通过getActivity()可以获取所在的Activity;Activity通过FragmentManager的findFragmentById()或findFragmentByTag()获取Fragment
- Fragment和Activity是多对多的关系
AFragment
BFragment
ContainerActivity
activity_container.xml
fragment_a.xml
fragment_b.xml
4-2-2 Fragment详解(二)
- Fragment中getActivity()为null的问题
- 向Fragment传递参数
    public static AFragment newInstance(String title) {
        AFragment fragment = new AFragment();
        Bundle bundle = new Bundle();
        bundle.putString("title", title);
        fragment.setArguments(bundle);
        return fragment;
    }


		aFragment = AFragment.newInstance("我是参数");
		getArguments().getString("title")
4-2-3 Fragment详解(三)
- Fragment回退栈
getParentFragmentManager().beginTransaction().replace(R.id.fl_container, bFragment).commitAllowingStateLoss();
开始测试
进入AFragment中
点击跳转BFragment
点击返回
直接到了UI界面了
addToBackStack放到回退栈中
getParentFragmentManager().beginTransaction().replace(R.id.fl_container, bFragment).addToBackStack(null).commitAllowingStateLoss();
测试一
进入AFragment中,打印---onCreateView----
点击跳转BFragment
点击返回
返回到AFragment,打印---onCreateView----
再点击返回
直接到了UI界面了
打印---onCreateView----说明:实例是同一个实例,但是视图会重新创建
测试二
进入AFragment中
点击替换文字,A变为新文字
点击跳转BFragment
点击返回
返回到AFragment,但是文字还原了
但是我们希望是改变之后的状态
replace是remove和add的组合操作
// ContainerActivity:添加tag标签a
//        getSupportFragmentManager().beginTransaction().add(R.id.fl_container, aFragment).commitAllowingStateLoss();
        getSupportFragmentManager().beginTransaction().add(R.id.fl_container, aFragment,"a").commitAllowingStateLoss();
先隐藏A再把B添加,放到回退栈中
Fragment fragment = getParentFragmentManager().findFragmentByTag("a");
if (fragment != null) {
	getParentFragmentManager().beginTransaction().hide(fragment).add(R.id.fl_container, bFragment).addToBackStack(null).commitAllowingStateLoss();
}else {
	getParentFragmentManager().beginTransaction().replace(R.id.fl_container, bFragment).addToBackStack(null).commitAllowingStateLoss();
}
进入AFragment中,打印---onCreateView----
点击替换文字,A变为新文字
点击跳转BFragment
点击返回,没有打印---onCreateView----
返回到AFragment,是替换后的状态
就是hide替代replace,因为hide不是清空只是隐藏,从而实现了堆叠效果,所以返回时能回退到非重置状态
4-2-4 Fragment详解(四)
- Fragment和Activity的通信
公共方法
回调接口
公共方法编写步骤
1在ContainerActivity中写一个公共方法setData
2在AFragment中直接调用((ContainerActivity) getActivity()).setData("你好");
回调接口编写步骤
1在AFragment中编写接口IOnMessageClick,声明方法onClick
2ContainerActivity实现AFragment.IOnMessageClick,变重写onClick
3在AFragment中onAttach中关联Activity listener = (IOnMessageClick) context;
4AFragment中调用listener.onClick(“你好”);
2024-6-10 00:05:48
第五章 必须深刻理解的Android事件处理
2024-6-10 15:08:32
这章的界面在main界面中
当用户在应用界面上执行各种操作时,应用程序需要为用户的动作提供响应,这种响应的过程就是事件处理。
5-1 基于监听的事件处理机制
监听三要素
Event Source(事件源)
Event(事件)
Event Listener(事件监听器)
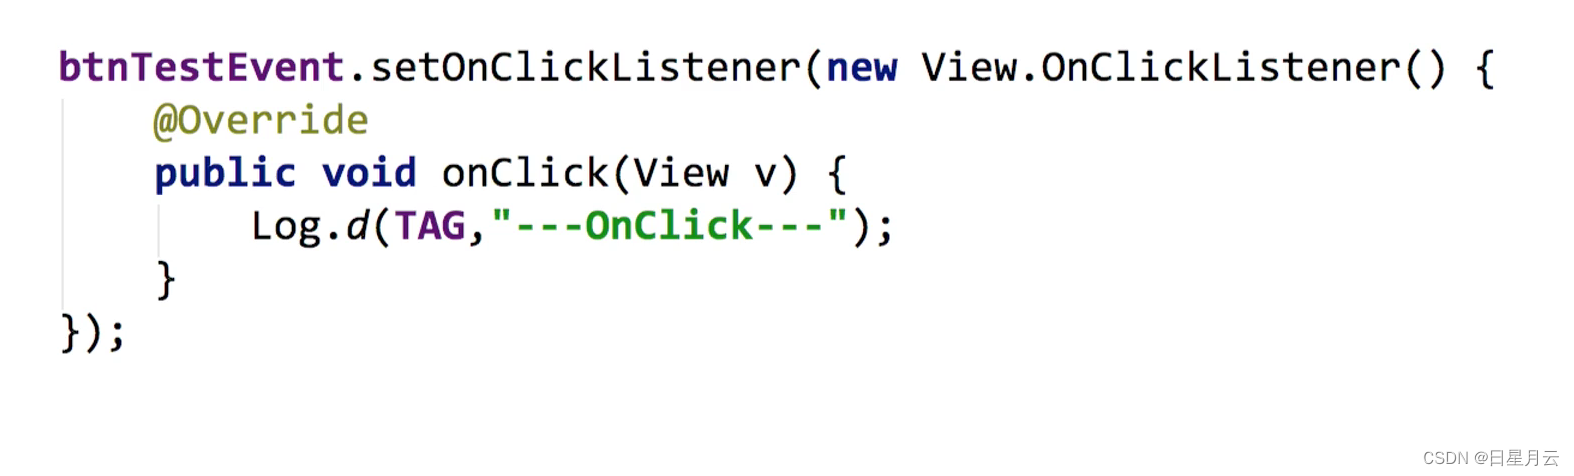
示例1:
事件源:btnTestEvent
事件监听器:new View.0nclickListener()
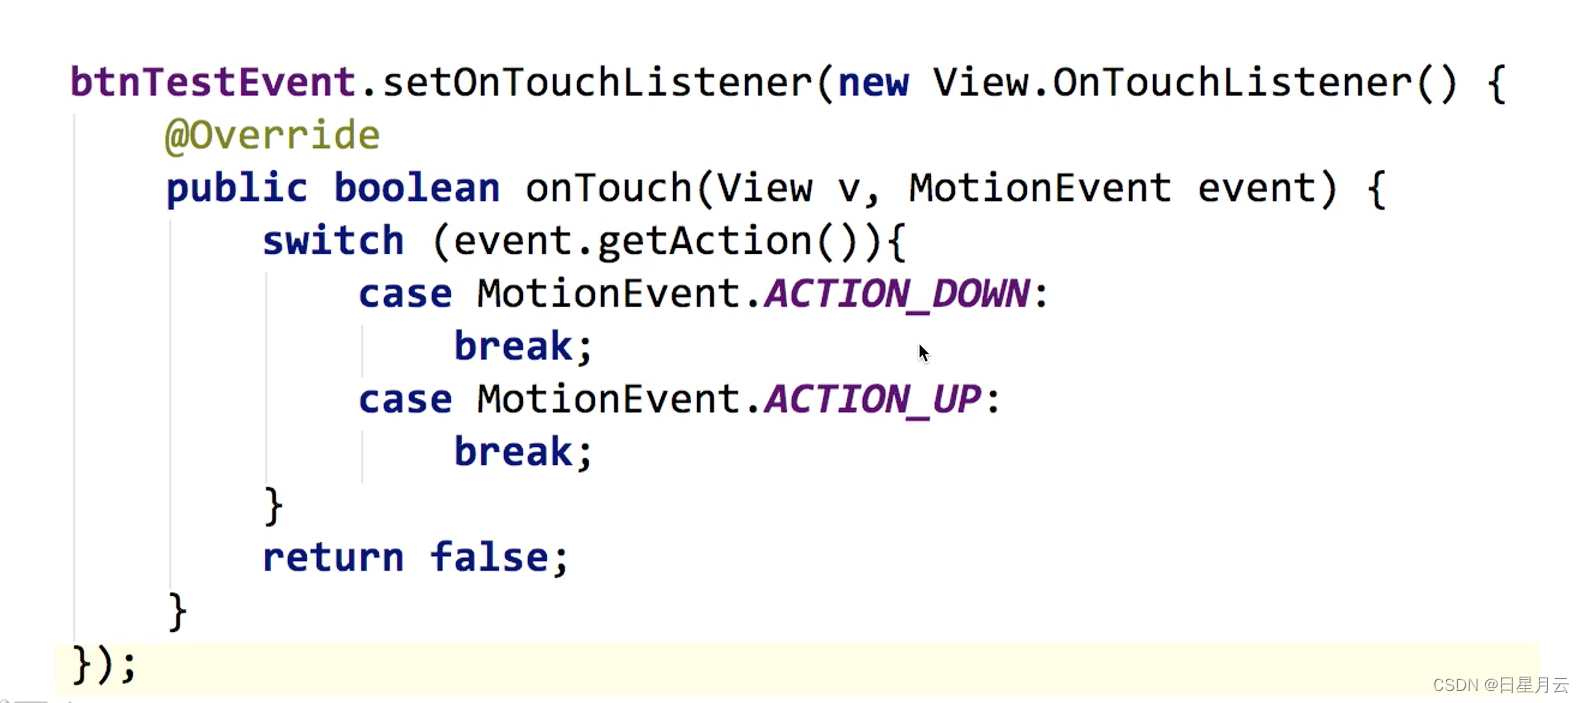
示例2:
事件源:btnTestEvent
事件:MotionEvent event
事件监听器:new View.onTouchListener()
实现监听事件的方法:
- 通过内部类实现
- 通过匿名内部类实现
- 通过事件源所在类实现
- 通过外部类实现
- 布局文件中onClick属性(针对点击事件)
给同一事件源添加多个同种类型监听器会怎样?
最后一个生效,后面会覆盖前面,但是布局实现认为是最先设置的
EventActivity
MyClickListener
activity_event.xml
5-2 基于回调的事件处理机制
- 回调机制与监听机制的区别
- 基于回调的事件传播
回调机制:先从控件本身开始回调,然后到Activity的回调
2024-06-10 16:03:27.380  8774-8774  MyButton                com.example.helloworld               D  ---onTouchEvent---
2024-06-10 16:03:27.380  8774-8774  Activity                com.example.helloworld               D  ---onTouchEvent---
因为是return false,继续传播,没有消费停止
如果是return true,就是消费完成,不需要传播了
2024-06-10 16:06:43.507 9064-9064 MyButton com.example.helloworld D ---onTouchEvent---
如果设置监听器
他会优先执行监听器中的方法,然后再是回调
2024-06-10 16:08:58.987  9279-9279  Listener                com.example.helloworld               D  ---onTouch---
2024-06-10 16:08:58.990  9279-9279  MyButton                com.example.helloworld               D  ---onTouchEvent---
都是return false的结果
2024-06-10 16:10:12.621  9444-9444  Listener                com.example.helloworld               D  ---onTouch---
2024-06-10 16:10:12.622  9444-9444  MyButton                com.example.helloworld               D  ---onTouchEvent---
2024-06-10 16:10:12.623  9444-9444  Activity                com.example.helloworld               D  ---onTouchEvent---
总结:
优先监听,然后回调
监听是最后一个设置生效
回调是从控件内部开始的
MyButton
EventActivity
activity_event.xml
5-3 源码剖析,了解View的事件分发
- dispatchTouchEvent->setOnTouchListenert->onTouchEvent
- onClick/onLongClick来自onTouchEvent的处理
dispatchTouchEvent->setOnTouchListenert->onTouchEvent
dispatchTouchEvent:入口方法
setOnTouchListener:监听器onTouch
onTouchEvent:回调
setOnClickListener:监听器onClick
2024-06-10 16:26:00.924  3314-3314  MyButton                com.example.helloworld               D  ---dispatchTouchEvent---
2024-06-10 16:26:00.924  3314-3314  Listener                com.example.helloworld               D  ---onTouch---
2024-06-10 16:26:00.924  3314-3314  MyButton                com.example.helloworld               D  ---onTouchEvent---
// 这行是ACTION_UP
2024-06-10 16:26:00.995  3314-3314  MyButton                com.example.helloworld               D  --- dispatchTouchEvent---
2024-06-10 16:26:00.997  3314-3314  Listener                com.example.helloworld               D  ---onClick---
源码dispatchTouchEvent:这个是父类View中的方法(需要下载源文件)

		  	ListenerInfo li = mListenerInfo;
            if (li != null && li.mOnTouchListener != null
                    && (mViewFlags & ENABLED_MASK) == ENABLED
                    //onTouch如果return false,result就是false
                    //onTouch如果return true,result就是true
                    && li.mOnTouchListener.onTouch(this, event)) {
                result = true;
            }

			//result就是false就会执行onTouchEvent方法
			//result就是true就不会执行onTouchEvent方法
            if (!result && onTouchEvent(event)) {
                result = true;
            }
onClick/onLongClick来自onTouchEvent的处理
onTouchEvent:ACTION_DOWN
源码总结:
如果手指按下,100ms内有ACTION_UP,就是点击事件Click
如果再过400ms,手指没有离开,就是长按事件LongClick
要在ACTION_MOVED,没有划出界面
setOnLongClickListener:
如果return false;还会执行setOnClickListener
如果return true;就不会执行setOnClickListener
 btnMy.setOnLongClickListener(new View.OnLongClickListener() {
            @Override
            public boolean onLongClick(View v) {
                return false;
            }
        });
5-5 Handler消息处理
这个界面在Event中
主要用途
-
未来某时做某事
to schedule messages and runnables to be excuted as some
point in the future -
线程间通信
to enqueue an action to be performed on a different thread
than you own
HandlerActivity
activity_handler.xml
package com.example.helloworld;

import androidx.annotation.NonNull;
import androidx.appcompat.app.AppCompatActivity;

import android.content.Intent;
import android.os.Bundle;
import android.os.Handler;
import android.os.Message;

import com.example.helloworld.util.ToastUtil;

public class HandlerActivity extends AppCompatActivity {

    private Handler mHandler;

    @Override
    protected void onCreate(Bundle savedInstanceState) {
        super.onCreate(savedInstanceState);
        setContentView(R.layout.activity_handler);

//        mHandler = new Handler();
//        mHandler.postDelayed(new Runnable() {
//            @Override
//            public void run() {
//                Intent intent = new Intent(HandlerActivity.this, ButtonActivity.class);
//                startActivity(intent);
//            }
//        }, 3000);

        mHandler = new Handler() {
            @Override
            public void handleMessage(@NonNull Message msg) {
                super.handleMessage(msg);
                switch (msg.what) {
                    case 1:
                        ToastUtil.showMsg(HandlerActivity.this, "线程通信成功");
                        break;
                }
            }
        };

        new Thread() {
            @Override
            public void run() {
                super.run();
                Message message = new Message();
                message.what = 1;
                mHandler.sendMessage(message);
            }
        }.start();

    }
}
2024-6-10 17:19:02
第六章 动画
这个在P41视频中
属性动画
属性动画:真正改变了属性的值
- ValueAnimator
- ObjectAnimator.ofFloat()
propertyName:动画类型参数的值:translationX translationY alpha rotation rotationX…
```java
        ValueAnimator valueAnimator = ValueAnimator.ofInt(0, 100);
        valueAnimator.setDuration(2000);
        valueAnimator.addUpdateListener(new ValueAnimator.AnimatorUpdateListener() {
            @Override
            public void onAnimationUpdate(@NonNull ValueAnimator animation) {
                //valueAnimator 实际的值
                Log.d("aaaa", animation.getAnimatedValue() + "");
                //动画的进度0-1
                Log.d("aaaa", animation.getAnimatedFraction() + "");
            }
        });
        valueAnimator.start();
```java
        //沿Y方向从0到500到200再到800
        ObjectAnimator objectAnimator = ObjectAnimator.ofFloat(tvTest, "translationY", 0, 500,200,800);
        objectAnimator.setDuration(2000);
        objectAnimator.start();
ObjectAnimActivity
activity_object_anim.xml
2024-6-11 20:39:22
第七章 数据存储
2024-6-10 20:55:08
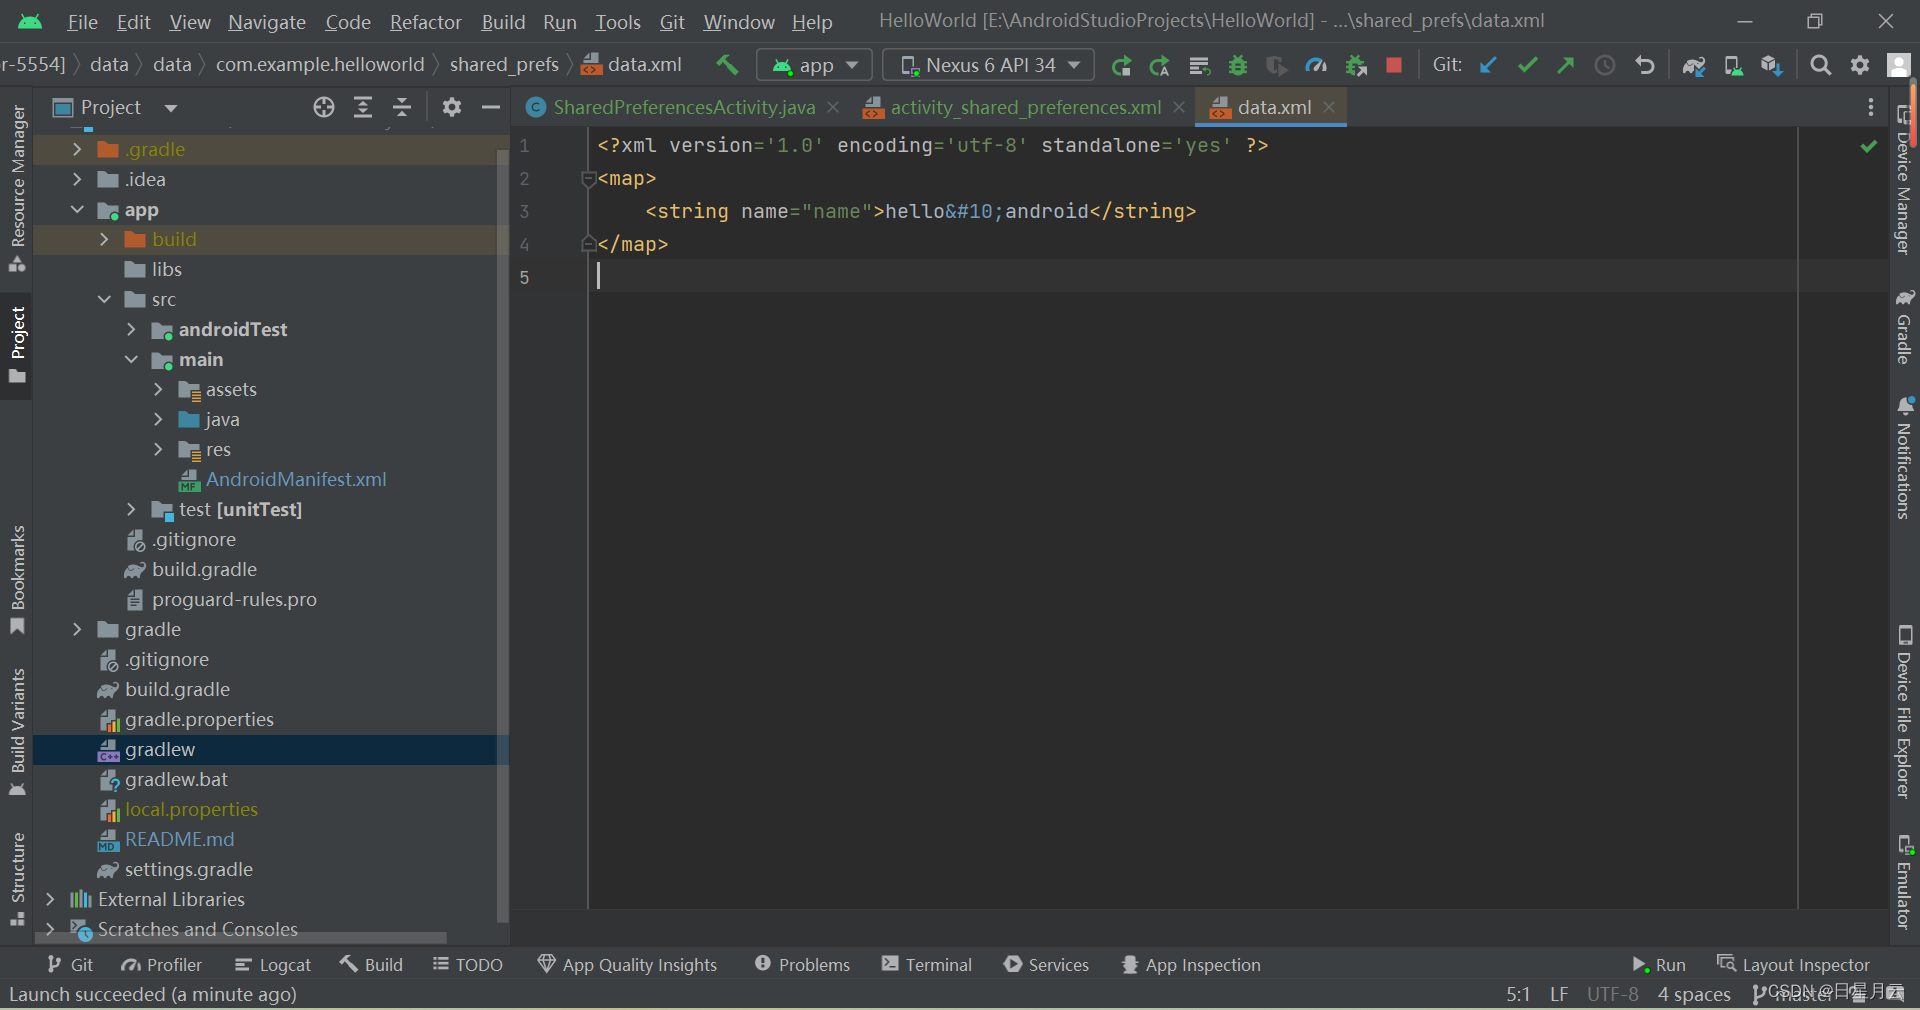
7-1 SharedPreferences 轻量数据存储
- Xml文件,K-V形式
- SharedPreferences
- SharedPreferences.Editor
实例化
//MODE_PRIVATE:只在本应用内读写
//MODE_WORLD_READABLE:其他应用可以读,存在安全性问题,废弃了
//MODE_WORLD_WRITEABLE:其他应用可以写,存在安全性问题,废弃了
//MODE_APPEND:追加文件而不是覆盖文件
mSharedPreferences = getSharedPreferences("data", MODE_PRIVATE);
mEditor = mSharedPreferences.edit();
读操作
mEditor.putString("name", mEtName.getText().toString());
//同步存储
mEditor.commit();
//异步存储:先从到内存中,异步刷盘到手机
mEditor.apply();
写操作
mTvContent.setText(mSharedPreferences.getString("name",""));
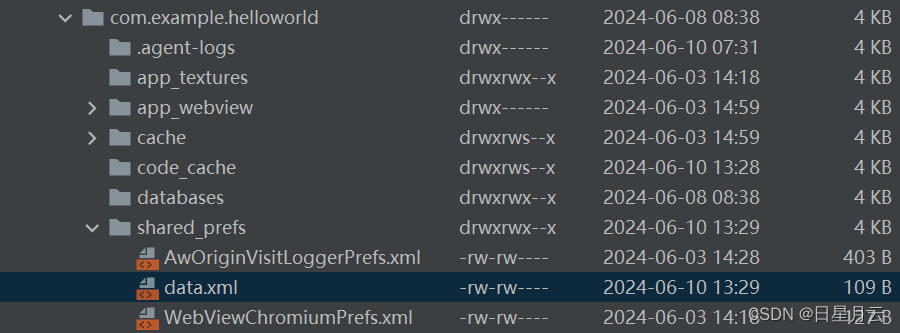
文件目录
/data/data/<applicationId>/shared_prefs
applicationId:默认是包名

DataStorageActivity
SharedPreferencesActivity
activity_data_storage.xml
activity_shared_preferences.xml
7-2 File
- 利用Java的I/O流
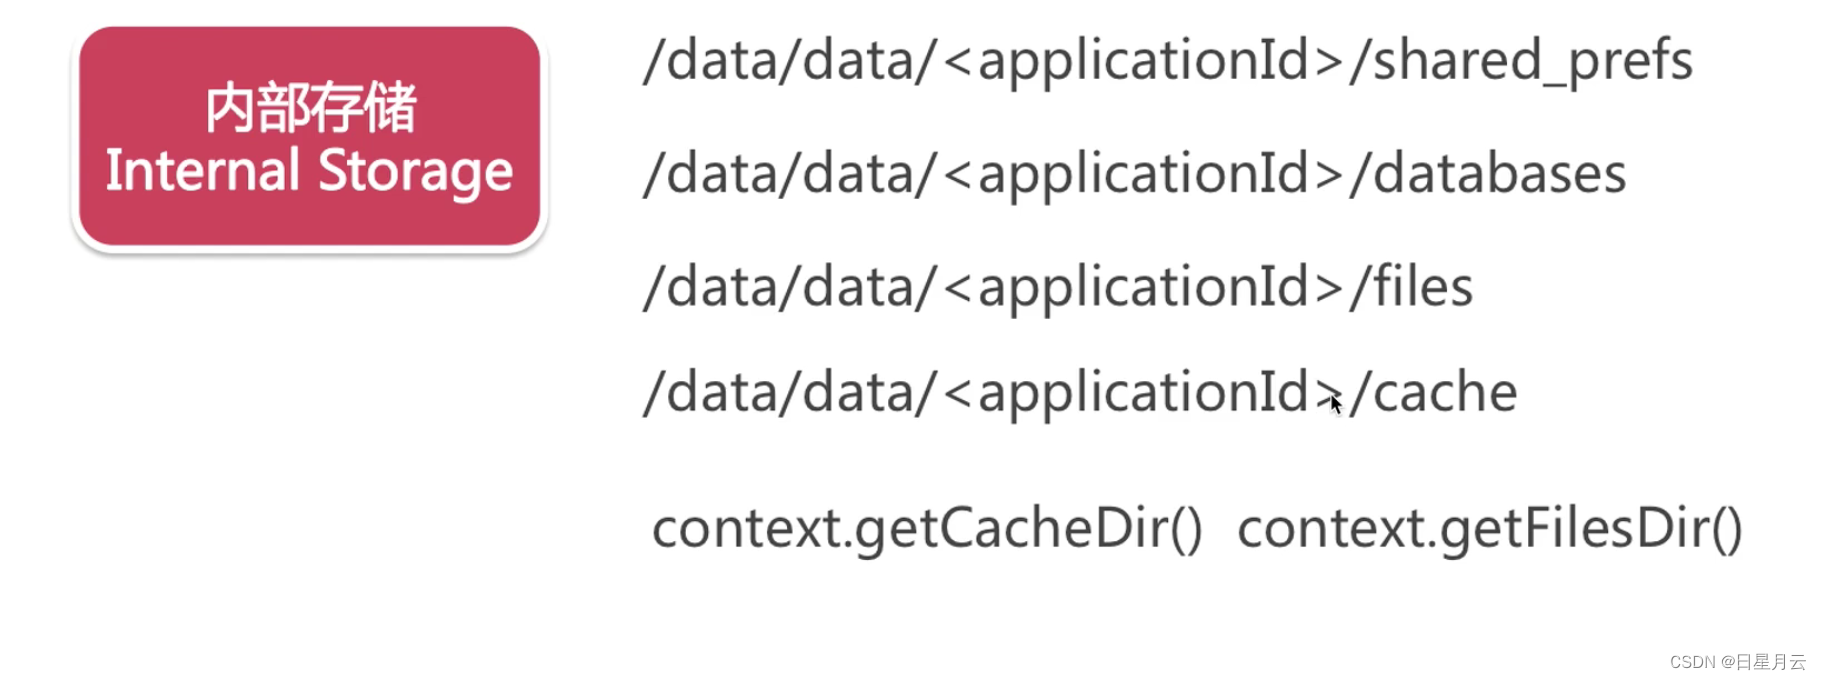
7-2-1 Android存储概念

2024-6-10 21:55:54
7-2-2 File 内部存储
2024-6-11 16:57:13
- FileOutputStream FileInputStream
	//存储数据
    private void save(String content) {
        FileOutputStream fileOutputStream = null;
        try {
            fileOutputStream = openFileOutput(mFileName, MODE_PRIVATE);
            fileOutputStream.write(content.getBytes());
        } catch (IOException e) {
            e.printStackTrace();
        } finally {
            if (fileOutputStream != null) {
                try {
                    fileOutputStream.close();
                } catch (IOException e) {
                    e.printStackTrace();
                }
            }
        }
    }

    //读取数据
    private String read() {
        FileInputStream fileInputStream = null;
        try {
            fileInputStream = openFileInput(mFileName);
            byte[] buff = new byte[1024];
            StringBuilder sb = new StringBuilder("");
            int len = 0;
            while ((len = fileInputStream.read(buff)) > 0) {
                sb.append(new String(buff, 0, len));
            }
            return sb.toString();
        } catch (IOException e) {
            e.printStackTrace();
        } finally {
            if (fileInputStream != null) {
                try {
                    fileInputStream.close();
                } catch (IOException e) {
                    e.printStackTrace();
                }
            }
        }
        return null;
    }
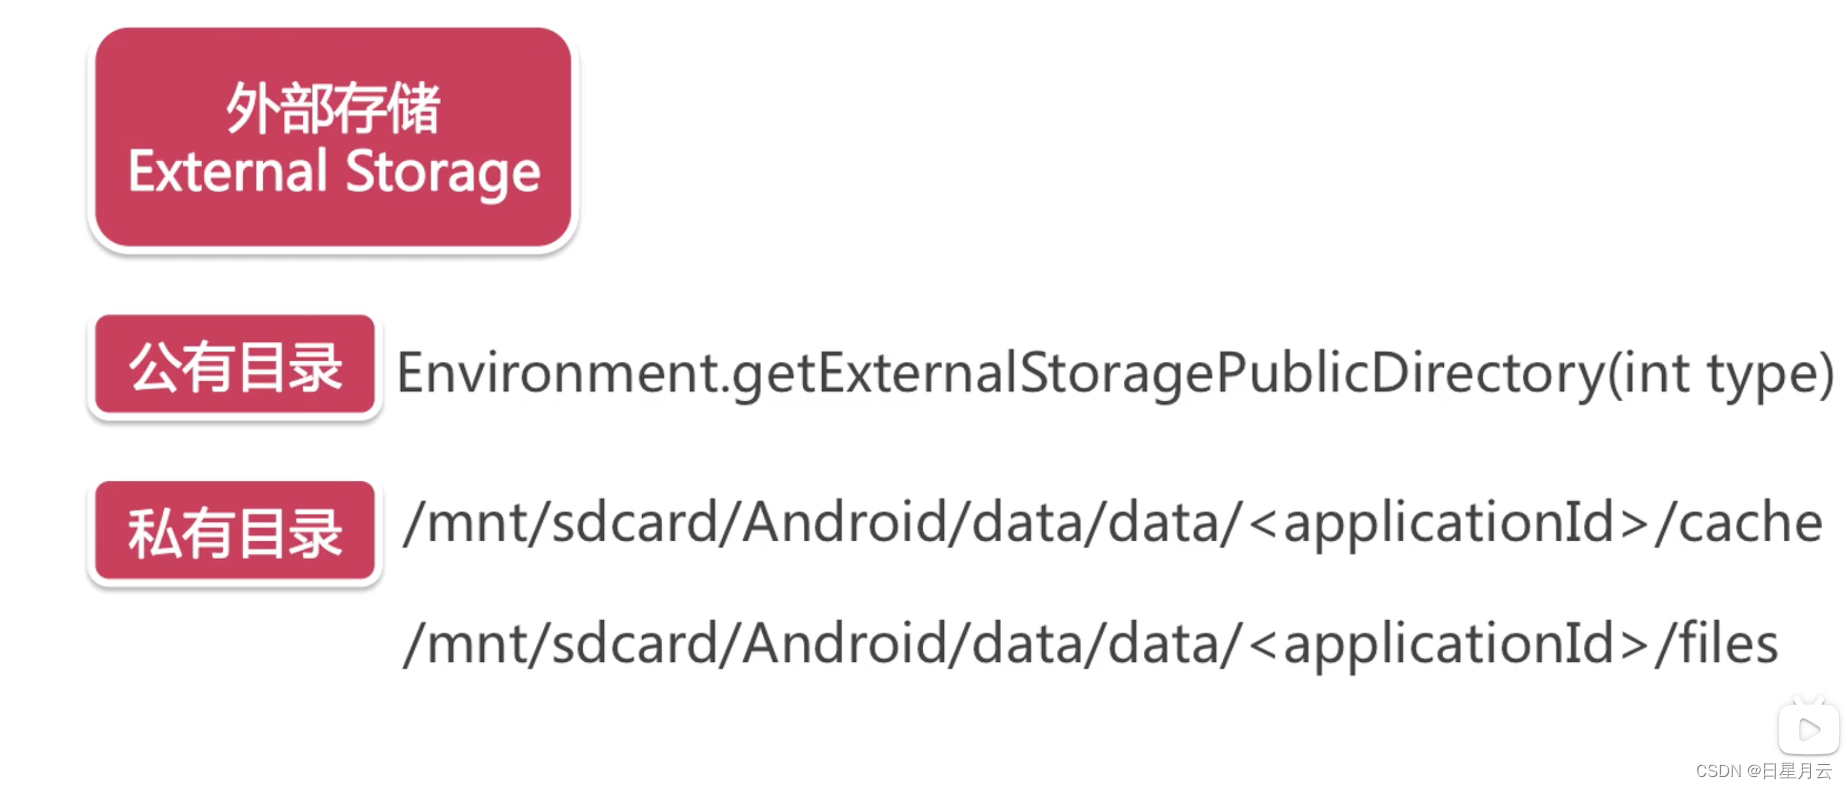
7-2-3 File 外部存储
save
//            fileOutputStream = openFileOutput(mFileName, MODE_PRIVATE);
            //创建文件夹
//            File dir = new File(Environment.getExternalStorageDirectory(), "example");
            String path = getApplicationContext().getExternalFilesDir(null).getAbsolutePath();
            File dir = new File(path, "example");
            if (!dir.exists()) {
                dir.mkdirs();
            }
            //创建文件
            File file = new File(dir, mFileName);
            if (!file.exists()) {
                file.createNewFile();
            }
read
//            fileInputStream = openFileInput(mFileName);
//            File file = new File(Environment.getExternalStorageDirectory().getAbsolutePath() + File.separator + "example", mFileName);
            String path = getApplicationContext().getExternalFilesDir(null).getAbsolutePath();
            File file = new File(path + File.separator + "example", mFileName);
第八章 广播
8-1 LocalBroadcastManager
只在应用内广播
只是演示广播的实现
这个场景:两个相邻页面传递信息
可以使用
startActivityForResult();
发送广播
 Intent intent = new Intent("com.example.update");
 LocalBroadcastManager.getInstance(BroadActivity2.this).sendBroadcast(intent);
注册组件
mBroadcast = new MyBroadcast();
IntentFilter intentFilter = new IntentFilter();
intentFilter.addAction("com.example.update");
LocalBroadcastManager.getInstance(this).registerReceiver(mBroadcast, intentFilter);
接收广播
 private class MyBroadcast extends BroadcastReceiver {
        @Override
        public void onReceive(Context context, Intent intent) {
            switch (intent.getAction()) {
                case "com.example.update":
                    mTvTest.setText("123");
                    break;
            }
        }
    }
安全处理:
页面销毁之后,取消注册
    @Override
    protected void onDestroy() {
        super.onDestroy();
        LocalBroadcastManager.getInstance(this).unregisterReceiver(mBroadcast);
    }
BroadActivity
BroadActivity2
activity_broad1.xml
activity_broad2.xml
2024-6-11 20:39:22
附:按压水波纹效果
如果是直角的
android:background="#06CD5D"
android:foreground="?selectableItemBackground"
TextView 代码如下
    <TextView
        android:id="@+id/tv_login"
        android:layout_width="match_parent"
        android:layout_height="50dp"
        android:layout_marginStart="40dp"
        android:layout_marginTop="80dp"
        android:layout_marginEnd="40dp"
        android:background="#06CD5D"
        android:foreground="?selectableItemBackground"
        android:elevation="8dp"
        android:gravity="center"
        android:text="微信登录"
        android:textColor="@color/colorWhite"
        android:textSize="18sp" />
如果按钮是圆角的
这样的效果按压纹是直角的
    <TextView
        android:id="@+id/tv_login"
        android:layout_width="match_parent"
        android:layout_height="50dp"
        android:layout_marginStart="40dp"
        android:layout_marginTop="80dp"
        android:layout_marginEnd="40dp"
        android:background="@drawable/btn_green_round"
        android:foreground="?selectableItemBackground"
        android:elevation="8dp"
        android:gravity="center"
        android:text="微信登录"
        android:textColor="@color/colorWhite"
        android:textSize="18sp" />
btn_green_round.xml
<?xml version="1.0" encoding="utf-8"?>
<shape xmlns:android="http://schemas.android.com/apk/res/android"
    android:shape="rectangle">
    <solid android:color="#06CD5D" />
    <corners android:radius="25dp" />
</shape>
如果想要圆角按钮,按压纹也是圆角的话。
需要ripple标签:水波纹效果
ripple_btn_wechat.xml
<?xml version="1.0" encoding="utf-8"?>
<ripple xmlns:android="http://schemas.android.com/apk/res/android"
    android:color="#22000000">
    <item android:drawable="@drawable/btn_green_round" />
</ripple>
TextView 代码如下:
    <TextView
        android:id="@+id/tv_login"
        android:layout_width="match_parent"
        android:layout_height="50dp"
        android:layout_marginStart="40dp"
        android:layout_marginTop="80dp"
        android:layout_marginEnd="40dp"
        android:background="@drawable/ripple_btn_wechat"
        android:elevation="8dp"
        android:gravity="center"
        android:text="微信登录"
        android:textColor="@color/colorWhite"
        android:textSize="18sp" />
WaveActivity
btn_green_round.xml
ripple_btn_wechat.xml
activity_wave.xml
2024-6-11 21:27:20
最后
2024-6-11 21:30:49
迎着日光月光星光,直面风霜雨霜雪霜。


 1万+
1万+


 被折叠的 条评论
为什么被折叠?
被折叠的 条评论
为什么被折叠?
 到【灌水乐园】发言


