


目录
前言
一、准备工作
二、zabbix server端
三、zabbix-agent Linux客户端的安装
四、zabbix-agent Windows客户端的安装
五、使用zabbix监控nginx
六、使用zabbix监控华为交换机
七、结尾
前言
什么是zabbix?
zabbix安装是当下主流的监控解决方案,zabbix安装与配置简单,学习成本低,完全开源免费!
Zabbix 是一个企业级的分布式开源监控方案。
Zabbix是一款能够监控各种网络参数以及服务器健康性和完整性的软件。Zabbix使用灵活的通知机制,允许用户为几乎任何事件配置基于邮件的告警。这样可以快速反馈服务器的问题。基于已存储的数据,Zabbix提供了出色的报告和数据可视化功能。这些功能使得Zabbix成为容量规划的理想方案。
一、准备工作
首先确定准备的虚拟机是没有安装任何zabbix软件,再进行克隆,又或者重新新建一台虚拟机
1、实验环境
| zabbix-serer | zabbix-agent | |
|---|---|---|
| IP | 192.168.15.232 | 192.168.15.233 |
| 主机名 | liang | ling1 |
| 恢复快照后的IP | 192.168.15.131 | 192.168.15.227 |
由于长时间做该实验,有错误恢复了一次快照,重启网卡IP发生了一次改变
2、快速修改名字的方法,不用重启即可生效
[root@liang ~] hostnamectl set-hostname  xxx
#xxx某代表主机名
3、关闭防火墙、selinux
[root@liang ~] setenforce 0
#临时关闭selinux
[root@liang ~]
[root@liang ~] sed -i 's/SELINUX=enforcing/SELINUX=disabled/' /etc/selinux/config
#永久关闭selinux,重启生效
[root@liang ~]
[root@liang ~] systemctl stop firewalld
#临时关闭防火墙
[root@liang ~]
[root@liang ~] systemctl disable firewalld.service
#永久关闭防火墙,重启生效
Removed symlink /etc/systemd/system/multi-user.target.wants/firewalld.service.
Removed symlink /etc/systemd/system/dbus-org.fedoraproject.FirewallD1.service.
[root@liang ~]
二、zabbix server端
1、(1)安装zabbix官方Repo源,LTS为稳定版
[root@liang ~] rpm -Uvh https://repo.zabbix.com/zabbix/6.0/rhel/8/x86_64/zabbix-release-6.0-1.el8.noarch.rpm
获取https://repo.zabbix.com/zabbix/6.0/rhel/8/x86_64/zabbix-release-6.0-1.el8.noarch.rpm
警告:/var/tmp/rpm-tmp.mowVzk: 头V4 RSA/SHA512 Signature, 密钥 ID a14fe591: NOKEY
准备中...                          ################################# [100%]
正在升级/安装...
   1:zabbix-release-6.0-1.el8         ################################# [100%]
[root@liang ~]
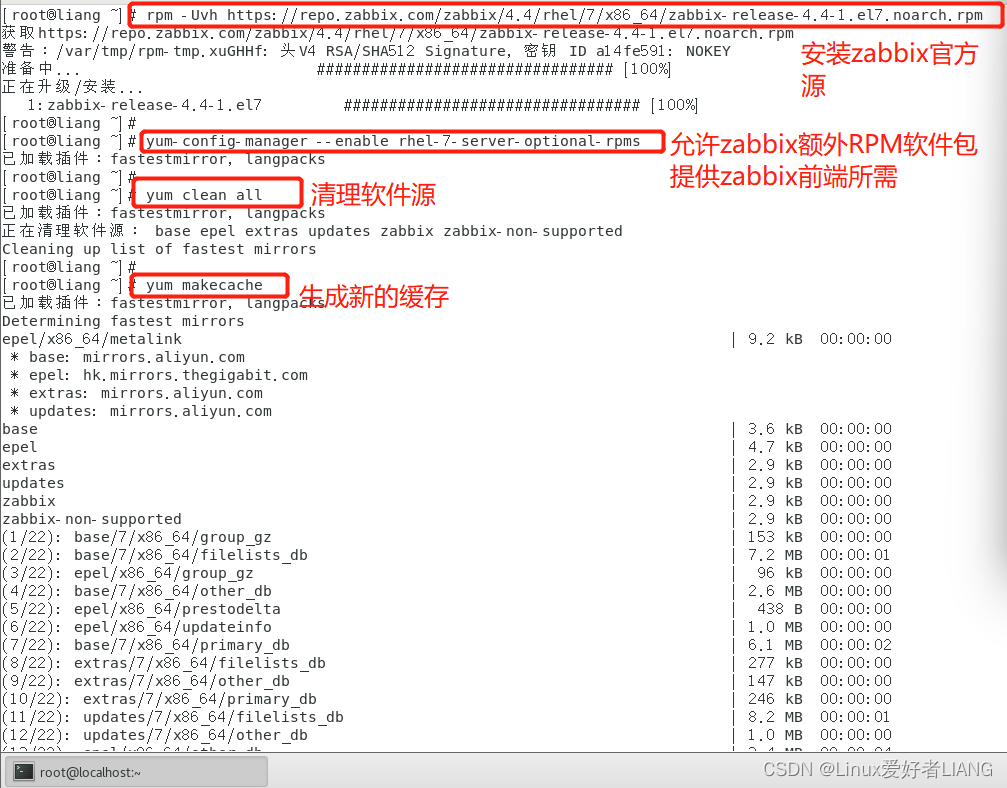
(2)允许 Zabbix 额外 RPM 软件包供 Zabbix 前端所需
[root@liang ~] yum-config-manager --enable rhel-7-server-optional-rpms
已加载插件:fastestmirror, langpacks
(3)清理全部软件源
[root@liang ~] yum clean all
已加载插件:fastestmirror, langpacks
正在清理软件源: base epel extras updates zabbix zabbix-non-supported
Cleaning up list of fastest mirrors
[root@liang ~]
(4)生成新的软件源
[root@liang ~] yum makecache
 以下内容省略………………………………

元数据缓存已建立
[root@liang ~]
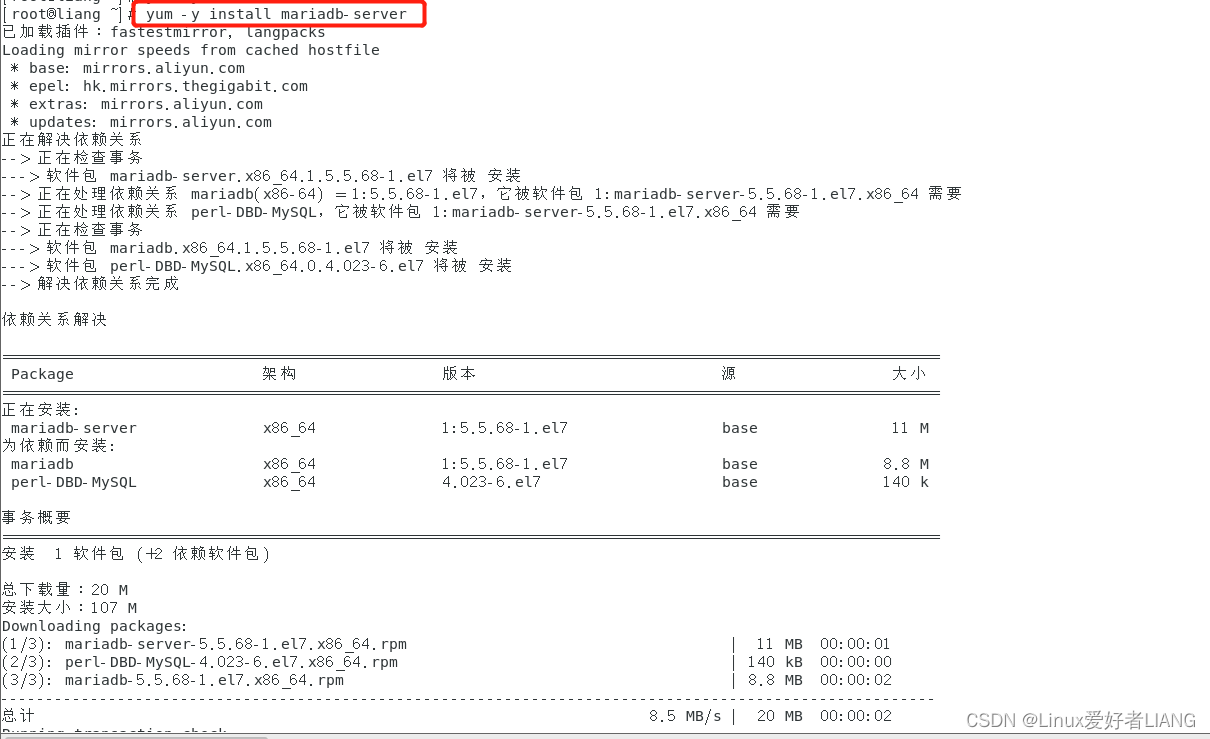
2、安装mariadb.server数据库,CentOS 7以后的版本用Mariadb 代替了MySQL
[root@liang ~] yum -y install mariadb-server

 以下内容省略………………………………

已安装:
  mariadb-server.x86_64 1:5.5.68-1.el7

作为依赖被安装:
  mariadb.x86_64 1:5.5.68-1.el7                   perl-DBD-MySQL.x86_64 0:4.023-6.el7

完毕!
[root@liang ~]
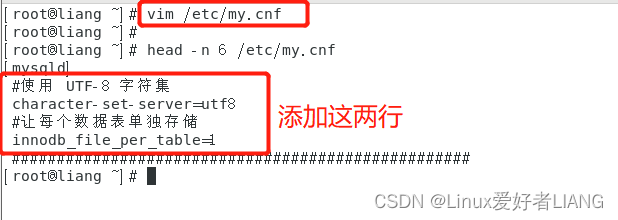
3、修改mariadb的配置文件
[root@liang ~] vim /etc/my.cnf
[mysqld]
#加入下面 2 行配置:
#使用 UTF-8 字符集
character-set-server=utf8
#让每个数据表单独存储
innodb_file_per_table=1
##########################################
以下内容省略………………………………
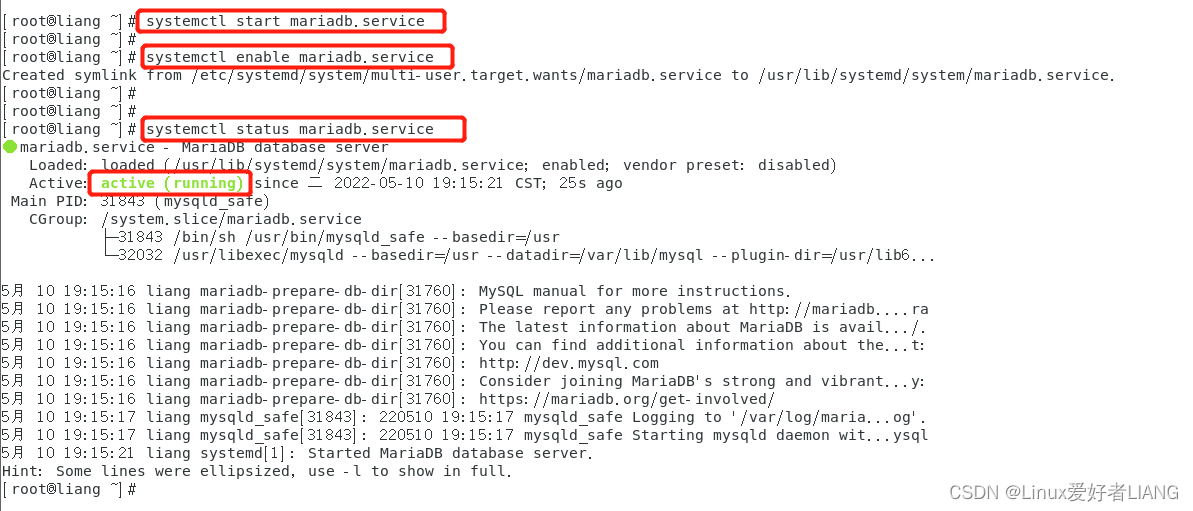
4、开启mariadb.server以及设置开机自启、并查看状态
[root@liang ~] systemctl start mariadb.service
[root@liang ~]
[root@liang ~] systemctl enable mariadb.service
Created symlink from /etc/systemd/system/multi-user.target.wants/mariadb.service to /usr/lib/systemd/system/mariadb.service.
[root@liang ~]
[root@liang ~]
[root@liang ~] systemctl status mariadb.service
● mariadb.service - MariaDB database server
   Loaded: loaded (/usr/lib/systemd/system/mariadb.service; enabled; vendor preset: disabled)
   Active: active (running)
    以下内容省略………………………………
[root@liang ~]
5、登录mariadb新建zabbix数据库和zabbix用户
[root@liang ~] mysqladmin -uroot password xxxx  #xxxx代表密码,以自己设定的为准
[root@liang ~] #新建数据库密码(由于第一次登录不需要密码,这里选择跳过直接新建数据库密码)
[root@liang ~]
[root@liang ~] mysql -uroot -p     #登录
Enter password:           #输入刚才设置的密码
Welcome to the MariaDB monitor.  Commands end with ; or \g.
Your MariaDB connection id is 3
Server version: 5.5.68-MariaDB MariaDB Server

Copyright (c) 2000, 2018, Oracle, MariaDB Corporation Ab and others.

Type 'help;' or '\h' for help. Type '\c' to clear the current input statement.

MariaDB [(none)]> create database zabbix character set utf8mb4 collate utf8mb4_bin;
#创建初始数据库,数据库名 zabbix,字符集 utf8,编码用 utf8_bin 将字符串中的每一个字符用二进制数据存储并区分大小写:
Query OK, 1 row affected (0.01 sec)


MariaDB [(none)]> create user zabbix@localhost identified by 'xxxx';
#新建zabbix用户并指定密码,将xxxx设定自己想要的密码,注意密码复杂度
Query OK, 0 rows affected (0.00 sec)


MariaDB [(none)]>
MariaDB [(none)]> grant all privileges on zabbix.* to 'zabbix'@'localhost' identified by 'XXXX';
Query OK, 0 rows affected (0.00 sec)


MariaDB [(none)]>  flush privileges;
Query OK, 0 rows affected (0.00 sec)
#对zabbix用户授权
Query OK, 0 rows affected (0.00 sec)

MariaDB [(none)]</
最低0.47元/天 解锁文章


 884
884


 被折叠的 条评论
为什么被折叠?
被折叠的 条评论
为什么被折叠?
 到【灌水乐园】发言


