


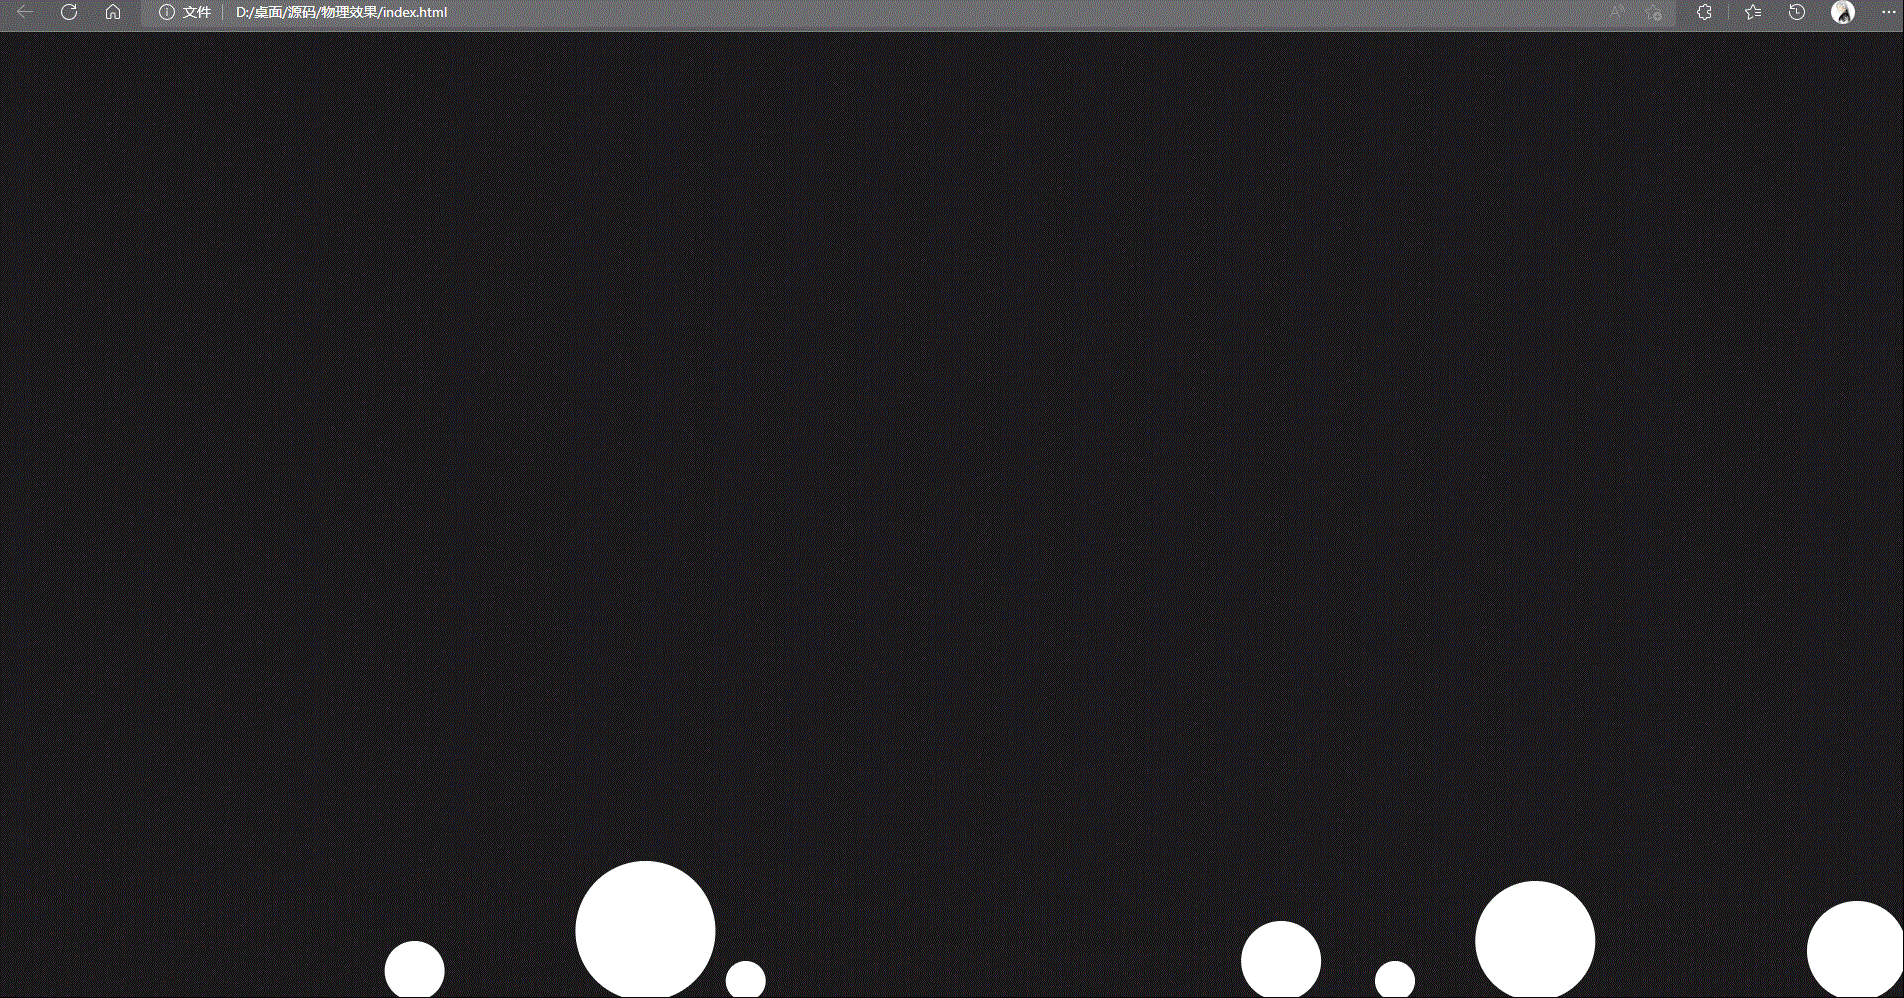
先来看效果,包括混沌小球碰撞,上抛,自由落体,滚动,想要手写游戏,这些都是最基础的内容,也是一些游戏库的底层原理。
开始之前,先回忆一些物理和数学知识
1. 自由落体,重力相关
2. 非弹性碰撞(角度,速度)
3. 向量,标量
4. 动量守恒,动能守恒

还需要对h5新内容canvas有了解(熟悉)
原理及其编码
1. 基础结构
首先,在HTML页面中,使用canvas作为画布创建,故事将在此处展开

初始化一下页面样式
* {
    box-sizing: border-box;
    padding: 0;
    margin: 0;
    font-family: sans-serif;
   }

   main {
     width: 100vw;
     height: 100vh;
     background: hsl(0deg, 0%, 10%);
     overflow: hidden;
   }
2. js部分
首先拿到画布,创建画笔

设置画布宽高
canvas.width = window.innerWidth
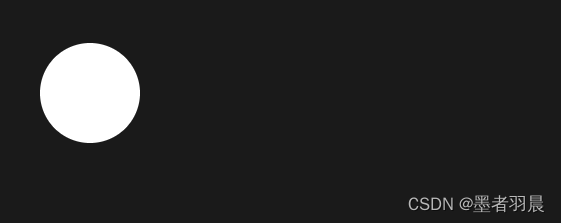
canvas.height = window.innerHeight绘制小球出来
ctx.fillStyle = "#ffffff"
ctx.beginPath()
ctx.arc(100, 100, 60, 0, 2 * Math.PI) //绘制圆形
ctx.fill()
此时就可以得到一个小球
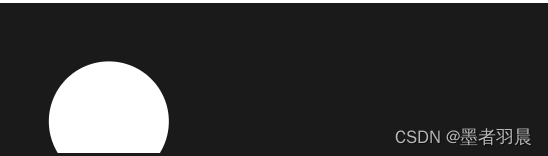
接下来,让小球移动,这里使用window.requestAnimationFrame()方法来让小球移动
window.requestAnimationFrame()简单介绍一下此方法
requestAnimationFrame()接收一个回调函数作为参数,每一次执行回调函数就相当于 1 帧动画,通过递归或循环连续调用,浏览器会在 1 秒内执行 60 次回调函数。
那么利用它,我们就可以对 canvas 进行重绘,以实现小球的移动效果的调用基本是持续进行的,所以我们也可以把它称为游戏循环。
动画思路:
定义一个函数作为 1 秒钟要执行 60 次的回调函数,每次执行完毕后继续调用 requestAnimationFrame(function)进行下一次循环
如果要移动小球,那么就需要把绘制小球和修改圆心 x、y 坐标的代码写到这个函数中
function process() {
  window.requestAnimationFrame(process)
}
window.requestAnimationFrame(process)
之后把小球的圆心坐标保存到变量xy中,然后再定义两个新的变量,分别表示在 x 轴方向上的速度vx,和 y 轴方向上的速度vy,然后把 context 相关的绘图操作放到定义好的函数中。
let x = 100
let y = 100
let vx = 12
let vy = 25

function process() {
  ctx.fillStyle = "#ffffff"
  ctx.beginPath()
  ctx.arc(x, y, 60, 0, 2 * Math.PI)
  ctx.fill()
  window.requestAnimationFrame(process)
}
window.requestAnimationFrame(process)
要想移动就要计算圆心坐标 x、y 的移动距离,熟知,距离=速度*时间,但是此时只有速度,还需要得到一下时间
首先要知道,requestAnimationFrame() 并不是完全一秒60帧,浏览器只会尽力的去实现,之后来看
requestAnimationFrame() 会把当前时间的毫秒数传递给回调函数,可以把本次调用的时间戳保存起来,然后在下一次调用时计算出执行这 1 帧动画消耗了多少秒,然后根据这个秒数和 x、y 轴方向上的速度去计算移动距离,分别加到 x 和 y 上,以获得最新的位置
注意这里的时间是上一次函数调用和本次函数调用的时间间隔,并不是第 1 次函数调用到当前函数调用总共过去了多少秒,所以相当于是时间增量,需要在之前 x 和 y 的值的基础上进行相加
let startTime;

function process(now) {
  if (!startTime) {
    startTime = now
  }
  let seconds = (now - startTime) / 1000
  startTime = now

  x += vx * seconds
  y += vy * seconds

  ctx.clearRect(0, 0, width, height)

  ctx.fillStyle = "#ffffff"
  ctx.beginPath()
  ctx.arc(x, y, 60, 0, 2 * Math.PI)
  ctx.fill()

  window.requestAnimationFrame(process)
}
至此,小球就可以移动起来了
ok,重点来了,因为咱这属于多个小球的混动系统,所以此处吧这代码抽象为一个类,方便构造多个小球
class Circle {
  constructor(context, x, y, r, vx, vy) {
    this.context = context;
    this.x = x
    this.y = y
    this.r = r
    this.vx = vx
    this.vy = vy
  }

  draw() {
    this.context.fillStyle = "#ffffff"
    this.context.beginPath()
    this.context.arc(this.x, this.y, this.r, 0, 2 * Math.PI)
    this.context.fill()
  }

  update(seconds) {
    this.x += this.vx * seconds
    this.y += this.vy * seconds
  }
}
此时,再次创建一个Gameboard类,来放置整个 canvas 的绘制过程,当作是游戏或引擎控制器
class Gameboard {
  constructor() {
    this.startTime
    this.init()
  }

  init() {
    this.circles = [
      new Circle(ctx, 100, 100, 60, 12, 25),
      new Circle(ctx, 180, 180, 30, 70, 45),
    ];
    window.requestAnimationFrame(this.process.bind(this))
  }

  process(now) {
    if (!this.startTime) {
      this.startTime = now
    }
    let seconds = (now - this.startTime) / 1000;
    this.startTime = now

    for (let i = 0; i < this.circles.length; i++) {
      this.circles[i].update(seconds)
    }
    ctx.clearRect(0, 0, width, height)

    for (let i = 0; i < this.circles.length; i++) {
      this.circles[i].draw(ctx)
    }
    window.requestAnimationFrame(this.process.bind(this))
  }
}

new Gameboard()
其实,到此为止都是准备过程,本项目重点是物理过程,现在正是开始重点部分
1. 小球的碰撞检测
首先,碰撞不是一个小球可以的,所以创建多个小球,在 Gameboard 类的 init() 方法中再添加几个小球
this.circles = [
   new Circle(ctx, 120, 100, 70, 120, 262),
   new Circle(ctx, 150, 170, 60, -190, 138),
   new Circle(ctx, 190, 260, 50, 138, -280),
   new Circle(ctx, 220, 280, 40, 142, 950),
   new Circle(ctx, 250, 200, 30, 135, -460),
   new Circle(ctx, 280, 355, 20, -165, 370),
   new Circle(ctx, 320, 300, 20, 125, 230),
];
现在来判断小球之间是否发生了碰撞
判断两个小球圆心的距离是否小于两个小球的半径之和就可以了,如果小于等于则发生了碰撞,大于则没有发生碰撞。圆心的距离即计算两个坐标点的距离公式

x1、y1 和 x2、y2 分别两个小球的圆心坐标,在比较时,可以对半径和进行平方运算,进而省略对距离的开方运算,直接看公式

开始比较是否判断,在 Circle 类中,先添加一个isCircleCollided(other)方法,接收另一个小球对象作为参数,返回比较结果
isCircleCollided(other) {
  let squareDistance =
      (this.x - other.x) * (this.x - other.x) +
      (this.y - other.y) * (this.y - other.y)
  let squareRadius = (this.r + other.r) * (this.r + other.r)
  return squareDistance <= squareRadius
}
再添加 checkCollideWith(other) 方法,调用 isCircleCollided(other) 判断碰撞后,把两球的碰撞状态设置为 true
checkCollideWith(other) {
  if (this.isCircleCollided(other)) {
    this.colliding = true
    other.colliding = true
  }
}
接着需要使用双循环两两比对小球是否发生了碰撞,由于小球数组存放在 Gameboard 对象中,给它添加一个 checkCollision() 方法来检测碰撞
checkCollision() {
  // 重置碰撞状态
  this.circles.forEach((circle) => (circle.colliding = false))

  for (let i = 0; i < this.circles.length; i++) {
    for (let j = i + 1; j < this.circles.length; j++) {
      this.circles[i].checkCollideWith(this.circles[j])
    }
  }
}
因为小球在碰撞后就应立即弹开,所以一开始要把所有小球的碰撞状态设置为 false,之后在循环中,对每个小球进行检测。这里内层循环是从 i + 1 开始的,是因为在判断 1 球和 2 球是否碰撞后,就无须再判断 2 球 和 1 球了
2. 边界碰撞
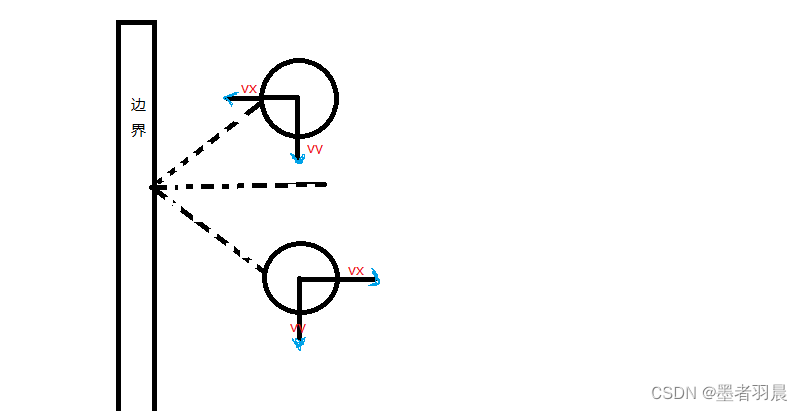
根据圆心坐标和半径来判断是否和边界发生了碰撞,例如跟左边界发生碰撞时,圆心的 x 坐标是小于或等于半径长度的,而跟右边界发生碰撞时,圆心 x 坐标应该大于或等于画布最右侧坐标(即宽度值)减去半径的长度。上边界和下边界类似,只是使用圆心 y 坐标和画布的高度值,在水平方向上(即左右边界)发生碰撞时,小球的运动方向发生改变,只需要把垂直方向上的速度 vy 值取反即可,在垂直方向上碰撞则把 vx 取反(手画图,略显难看)
在 Gameboard 类中添加一个 checkEdgeCollision() 方法,来检测边界碰撞
heckEdgeCollision() {
  this.circles.forEach((circle) => {
    // 左右墙壁碰撞
    if (circle.x < circle.r) {
      circle.vx = -circle.vx
      circle.x = circle.r
    } else if (circle.x > width - circle.r) {
      circle.vx = -circle.vx
      circle.x = width - circle.r
    }

    // 上下墙壁碰撞
    if (circle.y < circle.r) {
      circle.vy = -circle.vy
      circle.y = circle.r
    } else if (circle.y > height - circle.r) {
      circle.vy = -circle.vy
      circle.y = height - circle.r
    }
  });
}
碰撞时,除了对速度进行取反操作之外,还把小球的坐标修改为紧临边界,防止超出。接下来在 process() 中添加对边界碰撞的检测
现在来处理小球间的碰撞,需要使用到向量的知识,自己百度补一下
创建一个 Vector 工具类,来方便我们进行向量的运算
class Vector {
  constructor(x, y) {
    this.x = x;
    this.y = y;
  }

  /**
   * 向量加法
   * @param {Vector} v
   */
  add(v) {
    return new Vector(this.x + v.x, this.y + v.y);
  }

  /**
   * 向量减法
   * @param {Vector} v
   */
  substract(v) {
    return new Vector(this.x - v.x, this.y - v.y);
  }

  /**
   * 向量与标量乘法
   * @param {Vector} s
   */
  multiply(s) {
    return new Vector(this.x * s, this.y * s);
  }

  /**
   * 向量与向量点乘(投影)
   * @param {Vector} v
   */
  dot(v) {
    return this.x * v.x + this.y * v.y;
  }

  /**
   * 向量标准化(除去长度)
   * @param {number} distance
   */
  normalize() {
    let distance = Math.sqrt(this.x * this.x + this.y * this.y);
    return new Vector(this.x / distance, this.y / distance);
  }
}
接下来处理小球碰撞后的问题
碰撞处理最主要的部分就是计算碰撞后的速度和方向。通常最简单的碰撞问题是在同一个水平面上的两个物体的碰撞,称为一维碰撞,因为此时只需要计算同一方向上的速度,而现在的小球是在一个二维平面内运动的,小球之间发生正面相碰的概率很小,大部分是斜碰,需要同时计算水平和垂直方向上的速度和方向,这就属于是二维碰撞问题。不过,其实小球之间的碰撞,只有在连心线上有作用力,而在碰撞接触的切线方向上没有作用力,那么我们只需要知道连心线方向的速度变化就可以了,这样就转换成了一维碰撞
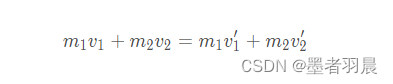
此时,就需要开头讲到的
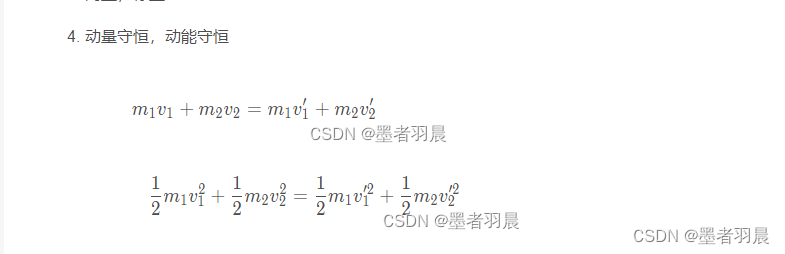
m1、m2 分别为两小球的质量,v1 和 v2 为两小球碰撞前的速度向量,v1' 和 v2' 为碰撞后的速度向量
如果不考虑小球的质量,或质量相同,其实就是两小球速度互换
v1' = v1
v2' = v2
给小球加上质量,然后套用公式来计算小球碰撞后速度,先在 Circle 类中给小球加上质量 mass 属性
class Circle {
  constructor(context, x, y, r, vx, vy, mass = 1) {
    // 其它代码
    this.mass = mass
  }
}
然后在 Gameboard 类的初始化小球处,给每个小球添加质量
this.circles = [
   new Circle(ctx, 120, 100, 70, 120, 262, 100),
   new Circle(ctx, 150, 170, 60, -190, 138, 10),
   new Circle(ctx, 190, 260, 50, 138, -280, 10),
   new Circle(ctx, 220, 280, 40, 142, 950, 60),
   new Circle(ctx, 250, 200, 30, 135, -460, 10),
   new Circle(ctx, 280, 355, 20, -165, 370, 10),
   new Circle(ctx, 320, 300, 20, 125, 230, 10),
];
在 Circle 类中加上 changeVelocityAndDirection(other) 方法来计算碰撞后的速度,它接收另一个小球对象作为参数,同时计算这两个小球碰撞厚的速度和方向,这个是整个引擎的核心
首先把两个小球的速度使用 Vector 向量来表示
changeVelocityAndDirection(other) {
    let velocity1 = new Vector(this.vx, this.vy)
    let velocity2 = new Vector(other.vx, other.vy)
  }
因为本身就已经使用 vx 和 vy 来表示水平和垂直方向上的速度向量了,所以直接把它们传给 Vector 的构造函数就可以了。velocity1 和 velocity2 分别代表当前小球和碰撞小球的速度向量
接下来获取连心线方向的向量,也就是两个圆心坐标的差
let vNorm = new Vector(this.x - other.x, this.y - other.y)接下来获取连心线方向的单位向量和切线方向上的单位向量,这些单位向量代表的是连心线和切线的方向
let unitVNorm = vNorm.normalize()
let unitVTan = new Vector(-unitVNorm.y, unitVNorm.x)
unitVNorm 是连心线方向单位向量,unitVTan 是切线方向单位向量,切线方向其实就是把连心线向量的 x、y 坐标互换,并把 y 坐标取反。根据这两个单位向量,使用点乘计算小球速度在这两个方向上的投影
let v1n = velocity1.dot(unitVNorm)
let v1t = velocity1.dot(unitVTan)

let v2n = velocity2.dot(unitVNorm)
let v2t = velocity2.dot(unitVTan)计算结果是一个标量,也就是没有方向的速度值,v1n 和 v1t 表示当前小球在连心线和切线方向的速度值,v2n 和 v2t 则表示的是碰撞小球 的速度值,在计算出两小球的速度值之后,就有了碰撞后的速度公式所需要的变量值了
let v1nAfter = (v1n * (this.mass - other.mass) + 2 * other.mass * v2n) / (this.mass + other.mass)
let v2nAfter = (v2n * (other.mass - this.mass) + 2 * this.mass * v1n) / (this.mass + other.mass)
1nAfter 和 v2nAfter 分别是两小球碰撞后的速度,现在可以先判断一下,如果 v1nAfter 小于 v2nAfter,那么第 1 个小球和第 2 个小球会越来越远,此时不用处理碰撞
然后再给碰撞后的速度加上方向,计算在连心线方向和切线方向上的速度,只需要让速度标量跟连心线单位向量和切线单位向量相乘
let v1VectorNorm = unitVNorm.multiply(v1nAfter)
let v1VectorTan = unitVTan.multiply(v1t)

let v2VectorNorm = unitVNorm.multiply(v2nAfter)
let v2VectorTan = unitVTan.multiply(v2t)
这样有了两个小球连心线上的新速度向量和切线方向上的新速度向量,最后把连心线上的速度向量和切线方向的速度向量进行加法操作,就能获得碰撞后小球的速度向量
let velocity1After = v1VectorNorm.add(v1VectorTan)
let velocity2After = v2VectorNorm.add(v2VectorTan)
之后我们把向量中的 x 和 y 分别还原到小球的 vx 和 vy 属性中
this.vx = velocity1After.x
this.vy = velocity1After.y

other.vx = velocity2After.x
other.vy = velocity2After.y
最后在 checkCollideWith() 方法的 if 语句中调用此方法,就可以实现小球之间的碰撞了
非弹性碰撞问题
现在小球之间的碰撞属于完全弹性碰撞,碰撞之后不会有能量损失,小球永远不会停止运动,我们可以让小球在碰撞之后损失一点能量,来模拟真实的物理效果,要让小球碰撞后有能量损失,可以使用恢复系数,它是一个取值范围为 0 到 1 的数值,每次碰撞后,乘以它就可以减慢速度
先处理边界碰撞,这个比较简单,假设边界的恢复系数为 0.8,然后在每次对速度取反的时候乘以它就可以了,把 Gameboard checkEdgeCollision()方法作如下改动
checkEdgeCollision() {
    const cor = 0.8                  // 设置恢复系统
    this.circles.forEach((circle) => {
      // 左右墙壁碰撞
      if (circle.x < circle.r) {
        circle.vx = -circle.vx * cor // 加恢复系数
        circle.x = circle.r
      } else if (circle.x > width - circle.r) {
        circle.vx = -circle.vx * cor // 加恢复系数
        circle.x = width - circle.r
      }

      // 上下墙壁碰撞
      if (circle.y < circle.r) {
        circle.vy = -circle.vy * cor // 加恢复系数
        circle.y = circle.r
      } else if (circle.y > height - circle.r) {
        circle.vy = -circle.vy * cor // 加恢复系数
        circle.y = height - circle.r
      }
    })
  }
接下来设置小球的恢复系数,给 Circle 类再加上一个恢复系数 cor 属性,每个小球可以设置不同的数值,来让它们有不同的弹性,然后在初始化小球时设置随意的恢复系数
加上恢复系数之后,小球碰撞后的速度计算也需要改变一下,可以简单的让 v1nAfter 和 v2nAfter 乘以小球的恢复系数
let cor = Math.min(this.cor, other.cor)
let v1nAfter =
    (this.mass * v1n + other.mass * v2n + cor * other.mass * (v2n - v1n)) /
    (this.mass + other.mass)

let v2nAfter =
    (this.mass * v1n + other.mass * v2n + cor * this.mass * (v1n - v2n)) /
    (this.mass + other.mass)
这里要注意的是两小球碰撞时的恢复系数应取两者的最小值,按照常识,弹性小的无论是去撞别人还是别人撞它,都会有同样的效果
现在小球碰撞后速度会有所减慢,不过还差一点,可以加上重力来让小球自然下落
重力部分
添加重力比较简单,先在全局定义重力加速度常量,然后在小球更新垂直方向上的速度时,累计重力加速度就可以了
重力加速度大约是 9.8
但是由于我们的画布是以象素为单位的,所以使用 9.8 看起来会像是没有重力,或者像是从很远的地方观察小球,这时候可以把重力加速度放大一定倍数
最后得到效果

完整dome
<!DOCTYPE html>
<html lang="en">

<head>
    <meta charset="UTF-8" />
    <meta http-equiv="X-UA-Compatible" content="IE=edge" />
    <meta name="viewport" content="width=device-width, initial-scale=1.0" />
    <title>Document</title>
    <style>
        * {
            box-sizing: border-box;
            padding: 0;
            margin: 0;
            font-family: sans-serif;
        }

        main {
            width: 100vw;
            height: 100vh;
            background: hsl(0deg, 0%, 10%);
            overflow: hidden;
        }
    </style>

</head>

<body>
    <main>
        <canvas id="canvas"></canvas>
    </main>
    <script>
        const canvas = document.getElementById("canvas")
        const ctx = canvas.getContext("2d")

        canvas.width = window.innerWidth
        canvas.height = window.innerHeight

        let width = canvas.width
        let height = canvas.height
        const gravity = 1200

        class Vector {
            constructor(x, y) {
                this.x = x
                this.y = y
            }
            add(v) {
                return new Vector(this.x + v.x, this.y + v.y)
            }
            substract(v) {
                return new Vector(this.x - v.x, this.y - v.y)
            }
            multiply(s) {
                return new Vector(this.x * s, this.y * s)
            }
            dot(v) {
                return this.x * v.x + this.y * v.y
            }
            normalize() {
                let distance = Math.sqrt(this.x * this.x + this.y * this.y)
                return new Vector(this.x / distance, this.y / distance)
            }
        }

        class Circle {
            constructor(context, x, y, r, vx, vy, mass = 1, cor = 1) {
                this.context = context
                this.x = x
                this.y = y
                this.r = r
                this.vx = vx
                this.vy = vy
                this.mass = mass
                this.cor = cor
                this.colliding = false
            }
            // 绘制小球
            draw() {
                this.context.fillStyle = "#ffffff"
                this.context.beginPath()
                this.context.arc(this.x, this.y, this.r, 0, 2 * Math.PI)
                this.context.fill()
            }

            //碰撞检测
            checkCollideWith(other) {
                if (this.isCircleCollided(other)) {
                    this.colliding = true
                    other.colliding = true
                    this.changeVelocityAndDirection(other)
                }
            }
            //判断碰撞
            isCircleCollided(other) {
                let squareDistance =
                    (this.x - other.x) * (this.x - other.x) +
                    (this.y - other.y) * (this.y - other.y)
                let squareRadius = (this.r + other.r) * (this.r + other.r)
                return squareDistance <= squareRadius
            }

            //处理碰撞后的速度和方向
            changeVelocityAndDirection(other) {
                // 创建两小球的速度向量
                let velocity1 = new Vector(this.vx, this.vy)
                let velocity2 = new Vector(other.vx, other.vy)
                let vNorm = new Vector(this.x - other.x, this.y - other.y)
                let unitVNorm = vNorm.normalize()
                let unitVTan = new Vector(-unitVNorm.y, unitVNorm.x)
                let v1n = velocity1.dot(unitVNorm)
                let v1t = velocity1.dot(unitVTan)
                let v2n = velocity2.dot(unitVNorm)
                let v2t = velocity2.dot(unitVTan)
                let cor = Math.min(this.cor, other.cor)
                let v1nAfter =
                    (this.mass * v1n + other.mass * v2n + cor * other.mass * (v2n - v1n)) /
                    (this.mass + other.mass)
                let v2nAfter =
                    (this.mass * v1n + other.mass * v2n + cor * this.mass * (v1n - v2n)) /
                    (this.mass + other.mass)
                if (v1nAfter < v2nAfter) {
                    return
                }
                let v1VectorNorm = unitVNorm.multiply(v1nAfter)
                let v1VectorTan = unitVTan.multiply(v1t)
                let v2VectorNorm = unitVNorm.multiply(v2nAfter)
                let v2VectorTan = unitVTan.multiply(v2t)
                let velocity1After = v1VectorNorm.add(v1VectorTan)
                let velocity2After = v2VectorNorm.add(v2VectorTan)
                this.vx = velocity1After.x
                this.vy = velocity1After.y
                other.vx = velocity2After.x
                other.vy = velocity2After.y
            }

            update(seconds) {
                this.vy += gravity * seconds
                this.x += this.vx * seconds
                this.y += this.vy * seconds
            }
        }

        class Gameboard {
            constructor() {
                this.startTime;
                this.init();
            }

            // 注册小球,初始化画布
            init() {
                this.circles = [
                    new Circle(ctx, 120, 100, 70, 120, 262, 100, 0.3),
                    new Circle(ctx, 150, 170, 60, -190, 138, 10, 0.7),
                    new Circle(ctx, 190, 260, 50, 138, -280, 10, 0.7),
                    new Circle(ctx, 220, 280, 40, 142, 950, 60, 0.7),
                    new Circle(ctx, 250, 200, 30, 135, -460, 10, 0.7),
                    new Circle(ctx, 280, 355, 20, -165, 370, 10, 0.7),
                    new Circle(ctx, 320, 300, 20, 125, 230, 10, 0.7),
                ];
                window.requestAnimationFrame(this.process.bind(this))
            }

            checkCollision() {
                this.circles.forEach((circle) => (circle.colliding = false))
                for (let i = 0; i < this.circles.length; i++) {
                    for (let j = i + 1; j < this.circles.length; j++) {
                        this.circles[i].checkCollideWith(this.circles[j])
                    }
                }
            }

            //检测墙壁碰撞
            checkEdgeCollision() {
                const cor = 0.8
                this.circles.forEach((circle) => {
                    if (circle.x < circle.r) {
                        circle.vx = -circle.vx * cor
                        circle.x = circle.r
                    } else if (circle.x > width - circle.r) {
                        circle.vx = -circle.vx * cor
                        circle.x = width - circle.r
                    }
                    if (circle.y < circle.r) {
                        circle.vy = -circle.vy * cor
                        circle.y = circle.r
                    } else if (circle.y > height - circle.r) {
                        circle.vy = -circle.vy * cor
                        circle.y = height - circle.r
                    }
                });
            }

            process(now) {
                if (!this.startTime) {
                    this.startTime = now
                }
                let seconds = (now - this.startTime) / 1000
                this.startTime = now;
                for (let i = 0; i < this.circles.length; i++) {
                    this.circles[i].update(seconds)
                }
                this.checkEdgeCollision()
                this.checkCollision()
                ctx.clearRect(0, 0, width, height)
                for (let i = 0; i < this.circles.length; i++) {
                    this.circles[i].draw(ctx)
                }
                window.requestAnimationFrame(this.process.bind(this))
            }
        }
        const game = new Gameboard()
    </script>
</body>

</html>


 142
142


 被折叠的 条评论
为什么被折叠?
被折叠的 条评论
为什么被折叠?
 到【灌水乐园】发言


