


🔱前言
如果说作为一名程序员,我要求我自己要不断的求证,那么同时作为一名热爱艺术的人,我则无法忍受主流的那种“丑陋”目标检测框(下图),所以这篇文章也就应用而生了。

纯原创,略带点科技艺术气息的目标检测框
🔱检测框展览
①
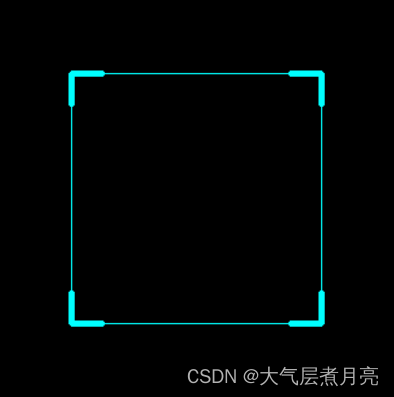
②

③

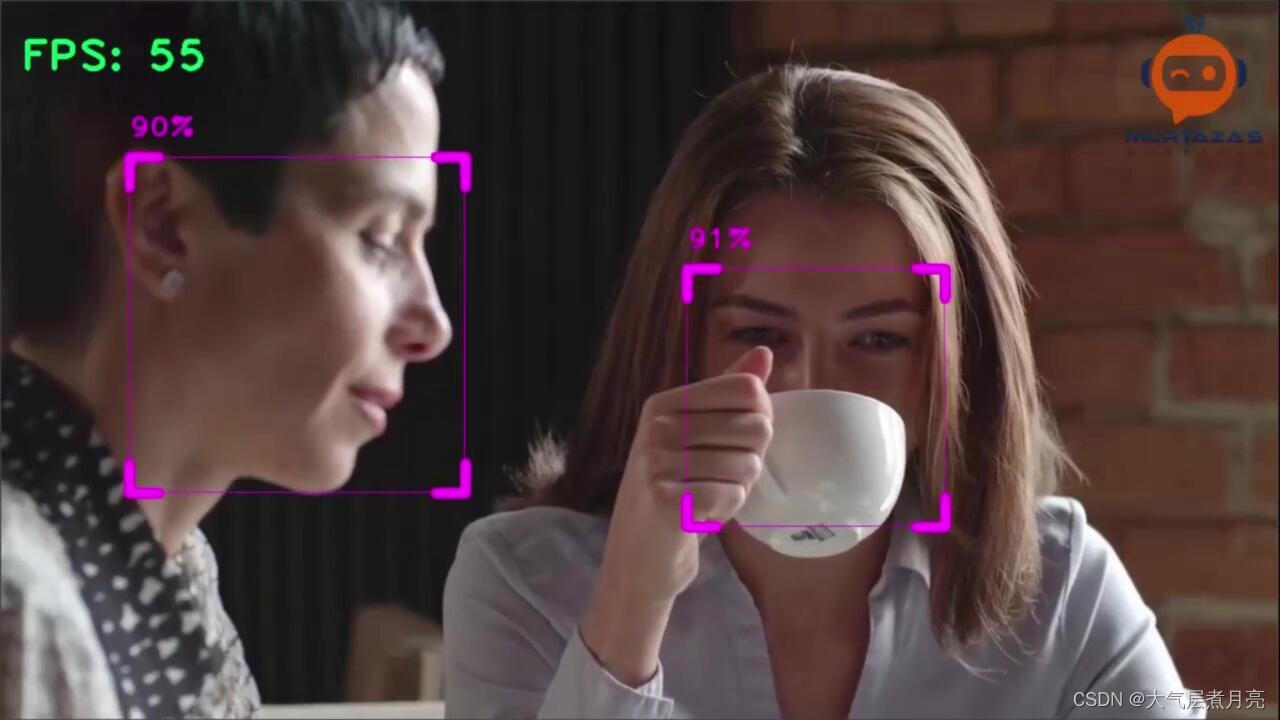
🔱在实际应用中效果的展览
📍Face
📍Body

🔱Code柜
📍magic_bbox.py
# -*- coding: UTF-8 -*-
"""
@Time    : 2022-9-15
@Author  : 江子良
@Email   : 2642898145@qq.com
"""
import cv2
import numpy as np

class Magic_Bbox(object):

    def __init__(self, color=(255, 255, 0), threasould=0.16):
        self.color = color
        self.threasould = threasould
        self.out_img = np.array([])

    def draw(self, old_image, b, draw_type):
        if draw_type == '0':
            cv2.rectangle(old_image, (b[0], b[1]), (b[2], b[3]), self.color, 1)
            b0_, b1_, b2_, b3_ = int((b[2]-b[0])*self.threasould), int((b[3]-b[1])*self.threasould), int((b[2]-b[0])*self.threasould), int((b[3]-b[1])*self.threasould)
            # 左上
            cv2.line(old_image, (b[0], b[1]), (b[0], b[1] + b1_), self.color, 4, 4)
            cv2.line(old_image, (b[0], b[1]), (b[0] + b0_, b[1]), self.color, 4, 4)
            # 右下
            cv2.line(old_image, (b[2], b[3]), (b[2], b[3] - b3_), self.color, 4, 4)
            cv2.line(old_image, (b[2], b[3]), (b[2] - b2_, b[3]), self.color, 4, 4)
            # 左下
            cv2.line(old_image, (b[0], b[3]), (b[0], b[3] - b3_), self.color, 4, 4)
            cv2.line(old_image, (b[0], b[3]), (b[0] + b0_, b[3]), self.color, 4, 4)
            # 右上
            cv2.line(old_image, (b[2], b[1]), (b[2], b[1] + b1_), self.color, 4, 4)
            cv2.line(old_image, (b[2], b[1]), (b[2] - b2_, b[1]), self.color, 4, 4)

        elif draw_type == '1':
            cv2.rectangle(old_image, (b[0], b[1]), (b[2], b[3]), self.color, 1)
            b0_, b1_, b2_, b3_ = 25, 25, 25, 25
            temp = 10
            # 左上
            cv2.line(old_image, (b[0] - temp, b[1] - temp), (b[0], b[1] + b1_), self.color, 4, 4)
            cv2.line(old_image, (b[0] - temp, b[1] - temp), (b[0] + b0_, b[1]), self.color, 4, 4)
            # 右下
            cv2.line(old_image, (b[2] + temp, b[3] + temp), (b[2], b[3] - b3_), self.color, 4, 4)
            cv2.line(old_image, (b[2] + temp, b[3] + temp), (b[2] - b2_, b[3]), self.color, 4, 4)
            # 左下
            cv2.line(old_image, (b[0] - temp, b[3] + temp), (b[0], b[3] - b3_), self.color, 4, 4)
            cv2.line(old_image, (b[0] - temp, b[3] + temp), (b[0] + b0_, b[3]), self.color, 4, 4)
            # 右上
            cv2.line(old_image, (b[2] + temp, b[1] - temp), (b[2], b[1] + b1_), self.color, 4, 4)
            cv2.line(old_image, (b[2] + temp, b[1] - temp), (b[2] - b2_, b[1]), self.color, 4, 4)

        elif draw_type == '2':
            cv2.rectangle(old_image, (b[0], b[1]), (b[2], b[3]), self.color, 1)
            b0_, b1_, b2_, b3_ = 25, 25, 25, 25
            temp = 10
            # 左上
            cv2.line(old_image, (b[0] - temp, b[1] - temp), (b[0] - temp, b[1] + b1_ - temp), self.color, 4, 4)
            cv2.line(old_image, (b[0] - temp, b[1] - temp), (b[0] - temp + b0_, b[1] - temp), self.color, 4, 4)
            # 右下
            cv2.line(old_image, (b[2] + temp, b[3] + temp), (b[2] + temp, b[3] - b3_ + temp), self.color, 4, 4)
            cv2.line(old_image, (b[2] + temp, b[3] + temp), (b[2] + temp - b2_, b[3] + temp), self.color, 4, 4)
            # 左下
            cv2.line(old_image, (b[0] - temp, b[3] + temp), (b[0] - temp, b[3] - b3_ + temp), self.color, 4, 4)
            cv2.line(old_image, (b[0] - temp, b[3] + temp), (b[0] - temp + b0_, b[3] + temp), self.color, 4, 4)
            # 右上
            cv2.line(old_image, (b[2] + temp, b[1] - temp), (b[2] + temp, b[1] + b1_ - temp), self.color, 4, 4)
            cv2.line(old_image, (b[2] + temp, b[1] - temp), (b[2] + temp - b2_, b[1] - temp), self.color, 4, 4)

        return old_image

    def show(self, img):
        cv2.imshow('fame', img)
cv2.waitKey(0)📍demo.py
@Time    : 2022-9-15
@Author  : 江子良
@Email   : 2642898145@qq.com
@param: img | 这个参数是要传入准备被作画的图片
@param:bbox| 这个参数是要传入准备作画的目标框位置 格式:(xmin,ymin,xmax,ymax)
@pararm:type| 这个参数是一一对应上面3种不同的目标检测框
@pararm:color| 请根据RGB表自行设置哦!
"""
RGB颜色对照表戳这里~http://t.csdn.cn/9z0SF
How to use?
from magic_bbox import Magic_Bbox
import numpy as np
import cv2

if __name__ == "__main__":
    img = np.zeros((320, 320, 3), np.uint8)  # 生成一个空灰度图像用于演示
    bbox = (60, 60, 260, 260)    # 生成一个bbox用于演示
    color = (255,255,0)
    '''
    type: 0 | 1 | 2
    '''
    mb = Magic_Bbox(color=color)
    img = mb.draw(img, bbox, '1')
    mb.show(img)
完毕!
如果大家觉得有用的话,欢迎三连喔~


 11万+
11万+

 被折叠的 条评论
为什么被折叠?
被折叠的 条评论
为什么被折叠?
 到【灌水乐园】发言


