


一、Vue脚手架配置代理
1. 案例引入
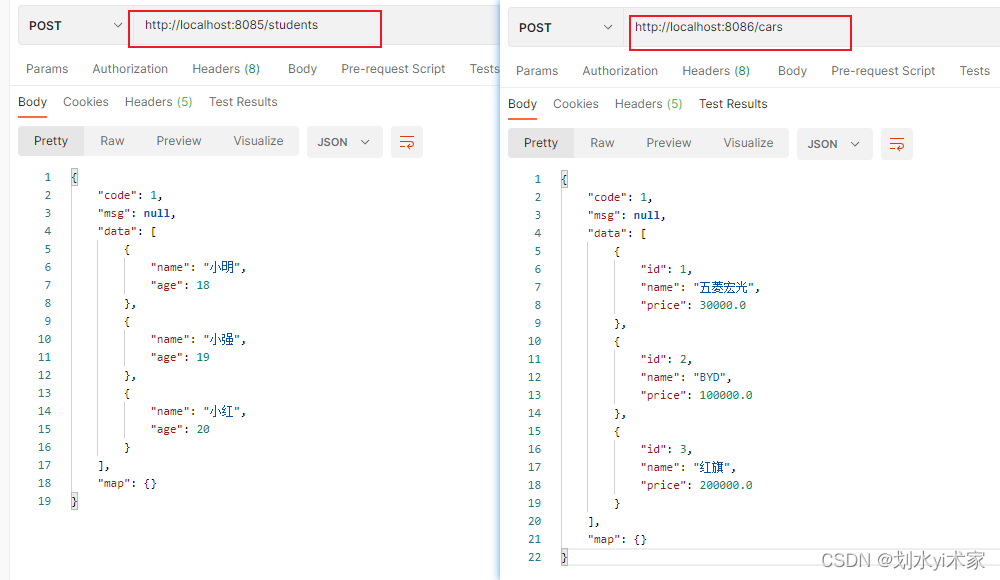
在本机服务中,开放了8085与8086端口分别用于获取学生与汽车信息。
我们在 Vue 中使用 axios 请求数据
- 首先安装 axios
npm install axios
- 引入 axios
import axios from 'axios'
src/App.vue
<template>
  <div id="app">
    <img alt="Vue logo" src="./assets/logo.png">
    <button @click="getStudent">获取学生信息</button>
  </div>
</template>

<script>

import axios from 'axios'

export default {
  name: 'App',

  methods: {

    getStudent(){
      axios({
        method: "post",
        url: "http://localhost:8085/students"
      }).then(function (resp) {
        if(resp.data.code !== 1) {
          _this.$message.error(resp.data.msg || "网络出了点小差错~~~");
        }else{
          console.log("data = ", resp.data)
        }
      })
    }
  },
}

</script>
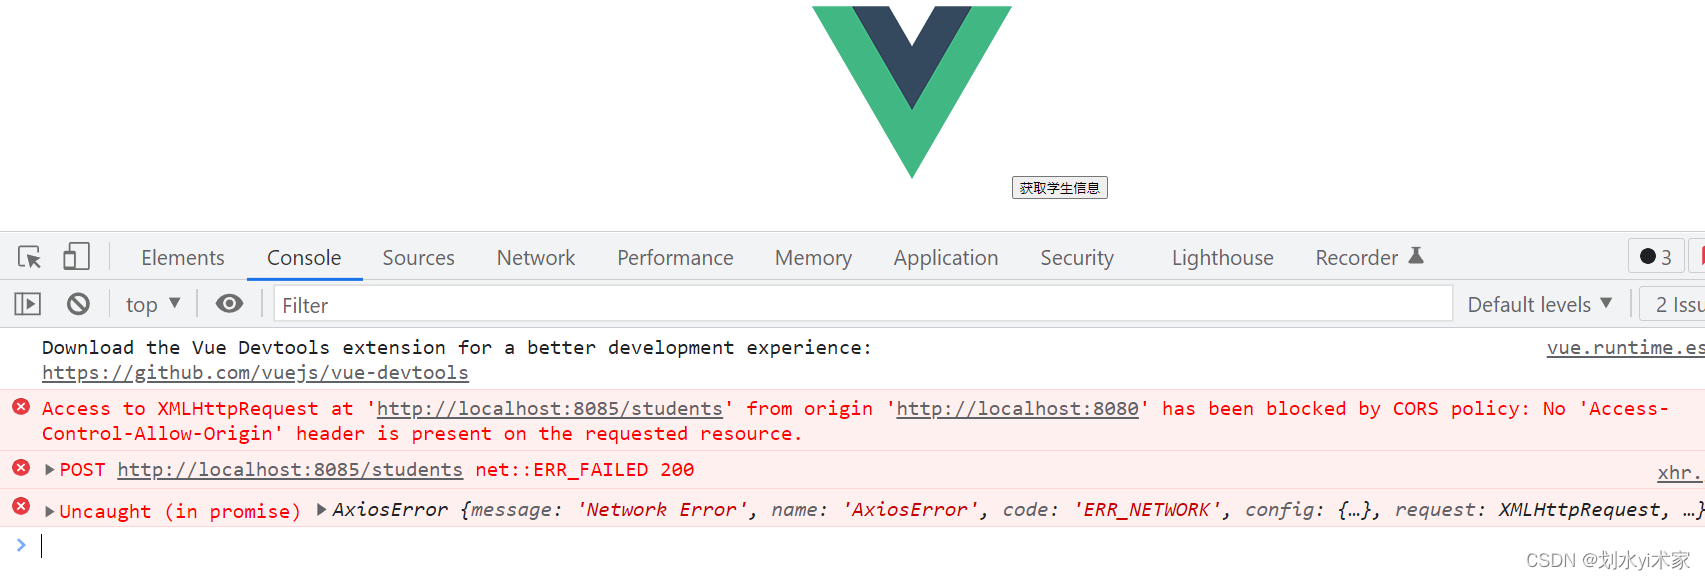
当直接请求时发生了跨域问题,在这里,主要是由于端口号不同。要解决的方法也有很多,在此处,我们可以使用Vue中的配置代理方式。
2. 配置代理_方式1
打开 vue.config.js 文件,配置代理。
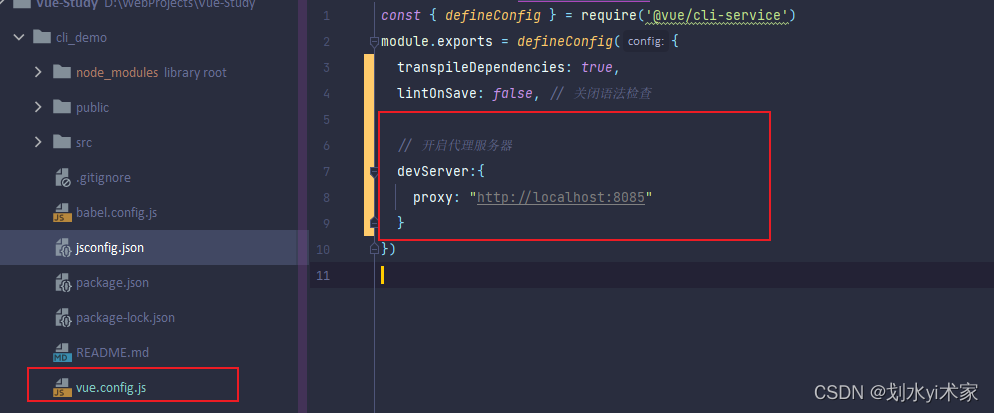
const { defineConfig } = require('@vue/cli-service')
module.exports = defineConfig({
	transpileDependencies: true,
	lintOnSave: false, // 关闭语法检查

	// 开启代理服务器
	devServer:{
		proxy: "http://localhost:8085"
	}
})
再将src/App.vue中的请求路径端口改为vue服务启动端口(8080)
<script>
import axios from 'axios'

export default {
  name: 'App',

  methods: {

    getStudent(){
      axios({
        method: "post",
        // 请求端口改为 8080
        url: "http://localhost:8080/students"
      }).then(function (resp) {
        if(resp.data.code !== 1) {
          _this.$message.error(resp.data.msg || "网络出了点小差错~~~");
        }else{
          console.log("data = ", resp.data)
        }
      })
    }
  },
}
</script>

配置代理_方式1:
- 优点:配置简单,请求资源时直接发给前端即可
- 缺点:不能配置多个代理,不能灵活的控制请求是否走代理
- 工作方式:若按照上述配置代理,当请求了前端不存在的资源时,那么该请求会转发给服务器 (优先匹配前端资源)
3. 配置代理_方式2
同样是在vue.config.js中做配置
devServer: {
    proxy: {
      	'/api1': { // 匹配所有以 '/api1'开头的请求路径
        	target: 'http://localhost:8085',// 代理目标的基础路径
        	changeOrigin: true,
        	// 将 /api1 替换为 空字符串,否则发送至后端时的 url 仍带有 /api1
        	pathRewrite: {'^/api1': ''}
      	},
      	'/api2': { // 匹配所有以 '/api2'开头的请求路径
        	target: 'http://localhost:8086',// 代理目标的基础路径
        	changeOrigin: true,
        	// 将 /api2 替换为 空字符串,否则发送至后端时的 url 仍带有 /api2
        	pathRewrite: {'^/api2': ''}
      	}
    }
}
src/App.vue
需要在请求路径端口号添加vue.config.js配置的路径名(例如api1)
<template>
  <div id="app">
    <img alt="Vue logo" src="./assets/logo.png">

    <button @click="getStudent">获取学生信息</button>

    <button @click="getCars">获取汽车信息</button>
  </div>
</template>

<script>
import axios from 'axios'

export default {
  name: 'App',

  methods: {

    getStudent(){
      axios({
        method: "post",
        url: "http://localhost:8080/api1/students"
      }).then(function (resp) {
        if(resp.data.code !== 1) {
          _this.$message.error(resp.data.msg || "网络出了点小差错~~~");
        }else{
          console.log("students data = ", resp.data)
        }
      })
    },

    getCars(){
      axios({
        method: "post",
        url: "http://localhost:8080/api2/cars"
      }).then(function (resp) {
        if(resp.data.code !== 1) {
          _this.$message.error(resp.data.msg || "网络出了点小差错~~~");
        }else{
          console.log("cars data = ", resp.data)
        }
      })
    }
  }
}


</script>

配置代理_方式2:
- 优点:可以配置多个代理,且可以灵活的控制请求是否走代理
- 缺点:配置略微繁琐,请求资源时必须加前缀


 496
496


 被折叠的 条评论
为什么被折叠?
被折叠的 条评论
为什么被折叠?
 到【灌水乐园】发言


