


 2.5核心代码
1.实验一
#include <stdio.h>
#include <stdlib.h>
#include <signal.h>
#include <unistd.h>
void waiting();
void stop();
int wait_mark;
int main()
{
    int p1, p2;
    while ((p1 = fork()) == -1)
        ; // create child process p1
    sleep(1);
    if (p1 > 0) // if p1 is parent process
    {
        printf("parent process is %d \n", getpid());
        while ((p2 = fork()) == -1)
            ;       // create child process p1
        if (p2 > 0) // if p2 is parent process
        {
            wait_mark = 1;
            signal(SIGQUIT, stop);
            waiting();
            kill(p1, 16); // send signal 16 to end the child1 process p1
            kill(p2, 17); // send signal 16 to end the child2 process p2
            wait(0);
            wait(0);
            printf("\n parent process %d is killed!\n", getpid());
            exit(0); // quit from the parent process
        }

        else
        { // child P2
            printf("child  P2 process %d is created by %d \n", getpid(), getppid());
            signal(SIGQUIT, SIG_IGN);
            wait_mark = 1;
            signal(17, stop); // receive 17, stop P2
            waiting();
            lockf(1, 1, 0);
            printf("\n child P2 process %d is killed by parent %d ", getpid(), getppid());
            lockf(1, 0, 0);
        }
    }
    else // killd p1
    {
        printf("child P1 process %d is created by %d \n", getpid(), getppid());
        signal(SIGQUIT, SIG_IGN);
        wait_mark = 1;
        signal(16, stop); // receive 16, stop P1
        waiting();
        lockf(1, 1, 0);//Lockf(1,1,0) 加锁
        printf("\n child P1 process %d is killed by parent %d ", getpid(), getppid());
        lockf(1, 0, 0);//Lockf(1,0,0)解锁
    }
    return 0;
}
void waiting()
{
    while (wait_mark != 0)
        ;
}
void stop()
{
    wait_mark = 0;
}


2.实验二
#include <stdio.h>
#include <stdlib.h>
#include <signal.h>
#include <unistd.h>
void waiting();
void stop();
int wait_mark;
int main()
{
    int p1, p2;
    while ((p1 = fork()) == -1)
        ;
    if (p1 > 0) // p1 is parent process
    {
        printf("\n parent is %d\n", getpid());
        wait_mark = 1;
        signal(SIGQUIT, stop);
        waiting();
        kill(p1, 16); // kill child P1
        wait(0);
        printf("\n parent process is killed \n");
        exit(0);
    }
    else // p1 child
    {
        while ((p1 = fork()) == -1)
            ;       // create p1 grandson
        if (p1 > 0) // this is the child, create child
        {
            printf("child P1 process %d is created by the parent %d \n", getpid(), getppid());
            signal(SIGQUIT, SIG_IGN);
            wait_mark = 1;
            signal(16, stop); // receive 16, stop P1
            waiting();
            kill(p1, 16);
            wait(0);
            lockf(1, 1, 0);
            printf("\n child P1 process %d is killed by parent %d \n", getpid(), getppid());
            lockf(1, 0, 0);
            exit(0); // quit from the parent process
        }
        else if (p1 == 0) // the result of p1's fork(), is the child of the next p1,is the grandson of the parent
        {
            printf("grandson process %d is created by the parent %d \n", getpid(), getppid());
            signal(SIGQUIT, SIG_IGN);
            wait_mark = 1;
            signal(16, stop);
            waiting();
            lockf(1, 1, 0);
            printf("\n grandson process %d is killed by parent %d \n", getpid(), getppid());
            lockf(1, 0, 0);
            exit(0); // p1 quit
        }
    }
    return 0;
}

void waiting()
{
    while (wait_mark != 0)
        ;
}

void stop()
{
    wait_mark = 0;
}

3.5核心代码
#include <stdio.h>
#include <sys/time.h>
#include <malloc.h>
#include <stdlib.h>

#define NR_TASKS 64            //系统支持的进程个数
#define TASK_RUNNING 0         //就绪态
#define TASK_UNINTERRUPTIBLE 2 //不可中断的睡眠状态
#define TASK_ZOMBIE 3          //僵死态

//进程表项
struct task_struct
{
    long pid;         //进程号
    long state;       //进程运行状态
    long priority;    //优先数
    long counter;     //进程剩余时间片
    long start_time;  //进程开始时间
    long excute_time; //进程执行时间
};

struct task_struct init_task = {
    .pid = 0,
    .state = 0,
    .priority = 0,
    .counter = 0,
    .start_time = 0,
    .excute_time = 0};

struct task_struct *current = &init_task;
unsigned long volatile jiffies = 0; //系统滴答数
struct task_struct *task[NR_TASKS] = {
    &init_task,
}; //进程指针数组
#define FIRST_TASK task[0]
#define LAST_TASK task[NR_TASKS - 1]

struct run_q
{ //进程就绪队列
    struct task_struct *data;
    struct run_q *next;
};
struct run_q *head = NULL, *end = NULL, *r_temp;

#define N_PROCESS 5                                                   //进程个数
#define MAX_RUNTIME 100                                               //最长运行时间
int process[N_PROCESS][2] = {{0, 3}, {2, 6}, {4, 4}, {6, 5}, {8, 2}}; //进程初始值
int totalExcuteTime = 0;                                              // cpu总的运行时间
int runState[N_PROCESS][MAX_RUNTIME] = {0};                           //进程运行状态的记录

void checkProcessCome(); //判断是否有进程到达,如果有则创建进程
void pause();            // 0号进程的运行体
void schedule_f();       // FCFS调度程序
void schedule_r();       // RR调度程序
void switch_to(int pid); //进程切换
void init();             //基于优先级调度器的初始化
void run(int pid);       //普通进程的运行体
void myfork(int pid);    //进程创建
void delete1(int pid);   //进程清除
//修改了delete->delete1
typedef void funtype(void);
funtype *schedule = NULL;

int main(int argc, char **argv)
{
    int i, j;
    int choice;
    //    struct timeval now;
    //    gettimeofday(&now,0);
    //    srand(now.tv_usec);
    //    for(i=0;i<N_PROCESS;i++){
    //        process[i][0] = 2*i;
    //        process[i][1] = 1 + (int)(10.0f*rand()/(RAND_MAX+1.0f));
    //    }
    while (1)
    {
        printf("please choice the schedule measure:\n");
        printf("f : 先到先服务的调度策略\n");
        printf("r : 轮循的调度策略\n");
        printf("q : 退出\n");
        printf("choice = ");
        choice = getchar();
        if (choice == '\n')
            choice = getchar();
        switch (choice)
        {
        case 'f':
            schedule = schedule_f;
            break;
        case 'r':
            schedule = schedule_r;
            break;
        case 'q':
            return 0;
        default:
        {
            schedule = NULL;
            printf("please input the true symbol(p or f or r)!\n\n");
            continue;
        }
        }
        printf("task id   Start  Service time\n");
        for (i = 0; i < N_PROCESS; i++)
        {
            printf("task %2d: %6d %6d\n", i + 1, process[i][0], process[i][1]);
            totalExcuteTime += process[i][1];
        }

        //调度
        init();

        //打印进程调度情况
        printf("Scheduling result\n");
        printf("time   : 0%*c%d\n", totalExcuteTime - 2, ' ', totalExcuteTime);
        for (i = 0; i < N_PROCESS; i++)
        {
            printf("task %2d: ", i + 1);
            for (j = 0; j < totalExcuteTime; j++)
            {
                if (runState[i][j] == 1)
                    printf("#");
                else
                    printf(" ");
                runState[i][j] = 0;
            }
            printf("\n");
        }
        while ((head != NULL) && (head != end))
        {
            r_temp = head;
            head = head->next;
            free(r_temp);
        }
        if (head)
        {
            free(head);
            head = NULL;
            end = NULL;
        }
        current = &init_task;
        jiffies = 0;
        totalExcuteTime = 0;
        printf("\n");
    }
    return 0;
}

void schedule_f()
{
    int i, next, c;
    struct task_struct **p;
    c = 9999;
    next = 0;
    i = NR_TASKS;
    p = &task[NR_TASKS];
    while (--i)
    {
        if (!*--p)
            continue;
        if ((*p)->state == TASK_RUNNING && (*p)->start_time < c)
            c = (*p)->start_time, next = i;
    }
    switch_to(next);
}

void schedule_r()
{
    int next;
    next = 0;
    if (current->state != TASK_RUNNING)
    {
        r_temp = head;
        if (head == end)
        {
            head = NULL;
            end = NULL;
        }
        else
        {
            head = head->next;
            end->next = head;
        }
        free(r_temp);
    }
    else if (head)
    {
        head = head->next;
        end = end->next;
    }
    if (head)
        next = head->data->pid;
    switch_to(next);
}

void switch_to(int pid)
{
    if (pid)
        run(pid);
    else
        pause();
}

void myfork(int pid)
{
    struct timeval now;
    struct run_q *p;
    task[pid] = (struct task_struct *)malloc(sizeof(struct task_struct));
    task[pid]->state = TASK_UNINTERRUPTIBLE;
    task[pid]->pid = pid;
    gettimeofday(&now, 0);
    srand(now.tv_usec);
    task[pid]->priority = 2 + (int)(4.0f * rand() / (RAND_MAX + 1.0f));
    task[pid]->counter = task[pid]->priority;
    task[pid]->start_time = jiffies;
    task[pid]->excute_time = 0;
    task[pid]->state = TASK_RUNNING;

    p = (struct run_q *)malloc(sizeof(struct run_q));
    p->data = task[pid];
    if (head == NULL)
    {
        head = end = p;
        head->next = end;
        end->next = head;
    }
    else
    {
        end->next = p;
        end = p;
        end->next = head;
    }
}

void delete1(int pid)
{
    free(task[pid]);
}

void checkProcessCome()
{
    int i;
    for (i = 0; i < N_PROCESS; i++)
    {
        if (process[i][0] == jiffies)
            myfork(i + 1);
    }
}

void init()
{
    int i;
    for (i = 1; i < NR_TASKS; i++)
    {
        task[i] = NULL;
    }
    checkProcessCome();
    schedule();
}

void pause()
{
    current = task[0];
    // printf("running task %d\n",pid);
    // usleep(1000000);
    jiffies++;
    totalExcuteTime++;
    checkProcessCome();
    schedule();
}

void run(int pid)
{
    int i;
    current = task[pid];
    runState[pid - 1][jiffies] = 1;
    // printf("running task %d\n",pid);
    // usleep(1000000);
    jiffies++;
    task[pid]->counter--;
    task[pid]->excute_time++;
    //判断进程是否运行完,如果是则将进程杀死
    if (task[pid]->excute_time == process[pid - 1][1])
    {
        // task[pid]->end_time = jiffies;
        task[pid]->state = TASK_ZOMBIE;
    }
    //判断所有进程是否都运行完,如果是则结束
    if (jiffies >= totalExcuteTime)
        return;
    checkProcessCome();
    schedule();
}


3.6实验总结
代码是真的多,没看多少但是可以运行出来,能够查看进程调度,然后验证了几组数据都是正确。没有细究,但是感觉这种策略调度算法其实在算法比较简单,之前刷到过任务调度器调度的算法,其实感觉和这个很相像,应该说是类页面置换的clock算法,他的调度是需要一定的时间间隔,如下:

这种算法,本身是c语言没有开辟进程,我直接采用数据来做一个记录,但是调度效率并不是很高,因此但是基与先来先服务,和轮巡都是比调度器算法效率高很多的,在PPT中也有最短时间优先,最短剩余时间优先和最短进程优先优先相比与这两个,在某种意义上更能提升调度效率。
下面是调度器的算法代码:
#include <bits/stdc++.h>
using namespace std;
char tasks[26] = {'A', 'A', 'A', 'A', 'A', 'A'};
int n = 2;
// maxCount 表示某个字符的最大个数
int main()
{
    int maxCount[26] = {0};
    int m = 0;
    for (auto temp : tasks) //执行次数为tasks数组个数次;
    {
        maxCount[temp - 'A']++;
        // cout << temp << endl
        //      << ++m;
    }
    //计算一个数组中不同的字符的个数(分别是每个字符的个数)
    int maxTimes = 0;
    //进行排序
    sort(maxCount, maxCount + 26);
    while (maxCount[25] > 0)
    {
        int i = 0;
        while (i <= n)
        {
            if (maxCount[25] == 0)
                break;
            if (i < 26 && maxCount[25 - i] > 0)
                maxCount[25 - i]--;
            maxTimes++;
            i++;
        }
        sort(maxCount, maxCount + 26);
    }
    cout << maxTimes << endl;
    return 0;}
实验4 线程同步实验
4.1实验目的
(1) 掌握操作系统并发的概念。
(2) 理解并发中的生产-消费者问题。
(3) 熟悉Linux线程编程机制,掌握线程同步的实现方式。
4.2实验内容
完成Linux线程程序,完成利用Linux线程信号量及PV操作实现消费者的同步关系的程序。
4 .3实验步骤
在test3.c中编写生产者和消费者两个线程函数,编译运行程序,并测试运行结果。
4.4实验结果
(1)结果展示

(2)结果分析
由于代码中设置的生产速率和消费速率均为1,所以生产者生产一个,消费者就会消费一个,lib中的物品数一直为1或者0。
4.5核心代码
#include <stdio.h>
#include <stdlib.h>
#include <unistd.h>
#include <semaphore.h>
#include <pthread.h>
#define msleep(x) usleep(x * 1000) //微秒
#define produce_SPEED 1            //生产速度
#define CONSUM_SPEED 1             //消费速度
#define INIT_NUM 0                 //仓库原有产品数
#define TOTAL_NUM 10               //仓库容量
sem_t p_sem,
    c_sem,
    sh_sem;
int num = INIT_NUM;
void produce()
{
    sleep(produce_SPEED);
}
int add_to_lib()
{
    num++;
    msleep(500);
    return num;
}
void consum()
{
    sleep(CONSUM_SPEED);
}
int remove_from_lib()
{
    num--;
    msleep(500);
    return num;
}
void *produceor(void *arg)
{
    while (1)
    {
        produce();
        sem_wait(&p_sem);//生产者信号量减1
        sem_wait(&sh_sem);//这个信号量是用来互斥的
        add_to_lib();
        printf("porduce:num is %d\n", num);
        sem_post(&sh_sem);
        sem_post(&c_sem);  //消费者信号量加1
    }
}
void *consumer(void *arg)
{
    while (1)
    {
        sem_wait(&c_sem);//消费者信号量减一
        sem_wait(&sh_sem);
        remove_from_lib();
        printf("consume:num is %d\n", num);
        sem_post(&sh_sem);
        sem_post(&p_sem);//生产者信号量加1
        consum();			//消费者延时
    }
}
int main()
{
    pthread_t tid_1, tid_2;
    sem_init(&p_sem, 0, TOTAL_NUM - INIT_NUM);
    sem_init(&c_sem, 0, INIT_NUM);
    sem_init(&sh_sem, 0, 1);
    pthread_create(&tid_1, NULL, produceor, NULL);
    pthread_create(&tid_2, NULL, consumer, NULL); //不停下的原因是因为修改
    pthread_join(tid_1, NULL);
    pthread_join(tid_2, NULL);
    return 0;
}
4.6实验总结
对于消费者生产者问题,我觉得其实核心就是如何实现生产者消费者的互斥,复习之前学习的TS指令等等,但是在消费者生产者还是信号量最适用。
复习一下生产者消费者:
描述了两个共享固定大小缓冲区的线程——即所谓的“生产者”和“消费者”在实际运行时会发生的问题。生产者的主要作用是生成一定量的数据放到缓冲区中,然后重复此过程。与此同时,消费者也在缓冲区消耗这些数据。该问题的关键就是要保证生产者不会在缓冲区满时加入数据,消费者也不会在缓冲区中空时消耗数据。要解决该问题,就必须让生产者在缓冲区满时休眠(要么干脆就放弃数据),等到下次消费者消耗缓冲区中的数据的时候,生产者才能被唤醒,开始往缓冲区添加数据。同样,也可以让消费者在缓冲区空时进入休眠,等到生产者往缓冲区添加数据之后,再唤醒消费者。
4.实验代码
#include <stdio.h>
#include <stdlib.h>
#define n 3
#define len 12

int interview_Array[len] = {2, 3, 2, 1, 5, 2, 4, 5, 3, 2, 5, 2};
int usepos[n] = {0};
//查找内存中是否有该页面
int Find_Exist(int *save_Frame, int num, int addr)
{
    int i;
    for (i = 0; i < num; i++)
    {
        if (save_Frame[i] == addr)
        {
            return i;
        }
    }
    return -1;
}
void Print_Frame(int *save_Frame, int num)
{
    printf("\t");
    int i;
    for (i = 0; i < num; i++)
    {
        if (i == 0)
        {
            if (save_Frame[i] == -999)
                printf("/ /");
            else
                printf("/%d/", save_Frame[i]);
        }
        else
        {
            if (save_Frame[i] == -999)
                printf(" /");
            else
                printf("%d/", save_Frame[i]);
        }
    }
    printf("\n");
}
int Find_LeastInteviewTime(int sta, int addr, int lenth)
{
    int i;
    for (i = sta; i < lenth; i++)
    {
        if (interview_Array[i] == addr)
        {
            return i - sta;
        }
    }
    return 99999;
}
int Find_Usingpos(int *pointer, int addr, int lenth)
{
    while (1)
    {
        if (usepos[*pointer] == 0)
        {
            return *pointer;
        }
        else
        {
            usepos[*pointer] = 0;
            *pointer = (*pointer + 1) % 3;
        }
    }
}
void OPT()
{
    printf("OPT\n");
    int *save_Frame = NULL;
    save_Frame = (int *)malloc(n * sizeof(int));
    int i;
    for (i = 0; i < n; i++)
        save_Frame[i] = -999;
    //测试样例: 2,3,2,1,5,2,4,5,3,2,5,2
    int addr;
    int cnt = 0; //页面中断次数
    int fail_time = 0;
    int pointer = 0;
    while (pointer < len)
    {
        addr = interview_Array[pointer++];
        printf("%d:%d", pointer, addr);
        if (cnt < n)
        {
            if (Find_Exist(save_Frame, cnt, addr) != -1)
            {
                Print_Frame(save_Frame, n);
            }
            else
            {
                save_Frame[cnt++] = addr;
                Print_Frame(save_Frame, n);
            }
        }
        else
        {
            if (Find_Exist(save_Frame, n, addr) != -1)
            {
                Print_Frame(save_Frame, n);
            }
            else
            {
                fail_time++;
                int *least_Time = (int *)malloc(n * sizeof(int));
                int max_Time = 0;
                int index;
                int j;
                for (j = 0; j < n; j++)
                {
                    least_Time[j] = Find_LeastInteviewTime(pointer, save_Frame[j], len);
                    if (least_Time[j] > max_Time)
                    {
                        max_Time = least_Time[j];
                        index = j;
                    }
                }
                save_Frame[index] = addr;
                Print_Frame(save_Frame, n);
                free(least_Time);
            }
        }
    }
    printf("Page Fault:%d\n", fail_time);
}
void clock()
{
    printf("clock\n");
    int *save_Frame = NULL;
    save_Frame = (int *)malloc(n * sizeof(int));
    int i;
    for (i = 0; i < n; i++)
        save_Frame[i] = -999;
    int addr = 0;
    int pointer = 0;
    int fail_time = 0;
    int cnt = 0;
    int sum = 0;
    while (cnt < len)
    {
        addr = interview_Array[cnt++];
        printf("%d:in%d", cnt, addr);
        if (sum < n) //驻留级未满
        {
            if (Find_Exist(save_Frame, sum, addr) == -1) //不在页框内
            {
                save_Frame[pointer] = addr;
                usepos[pointer] = 1;
                sum++;
                pointer = (pointer + 1) % 3;
                Print_Frame(save_Frame, n);
            }
            else //在页框内
            {
                int j;
                for (j = 0; j < n; j++)
                    if (save_Frame[j] == addr)
                        usepos[j] = 1;
                Print_Frame(save_Frame, n);
            }
        }
        else //驻留级满
        {
            if (Find_Exist(save_Frame, n, addr) == -1) //不在页框内
            {
                int temp = Find_Usingpos(&pointer, addr, n);
                save_Frame[temp] = addr;
                usepos[temp] = 1;
                pointer = (pointer + 1) % 3;
                Print_Frame(save_Frame, n);
                fail_time++;
            }
            else //在页框内
            {
                int k;
                for (k = 0; k < n; k++)
                    if (save_Frame[k] == addr)
                        usepos[k] = 1;
                Print_Frame(save_Frame, n);
            }
        }
    }
    printf("Page fault:%d\n", fail_time);
}
int main()
{
    OPT();
    clock();
    return 0;
}
5.实验总结
本次实验学习了页面置换算法,感觉比较简单,包括OPT、FIFO、LRU、CLOCK
四种算法,置换算法过程基本都掌握了,代码实现勉强搞懂,顺便复习一下,opt主要是最优选择,但是一般不适用,因为在操作系统中,我们不能完全确定未来需要哪一页,因此opt算法一般在实际不太实用。FIFO是先进先去,没有什么特点,因此FIFO置换算法的缺页率也比较高。然后对于LRU算法,是根据前面来选出一个最远的使用过的去替换,是基于已经有的页来看,因此也是实际中比较实用的一种方法。
最后是CLOCK算法,clock算法也是一种优化算法,因为他也能根据之前的来给出标志来判断之后应该去置换哪一个,这就是我的理解。
最后看了一下博客:
FIFO算法:总是淘汰在内存中停留时间最长(年龄最老)的一页,即先进入内存的页,先被换出。
优点:FIFO页面置换算法实现简单,要求的硬件支持较少。
缺点:(1)性能并不很好,效率不高;
存在Belady异常现象,即缺页率随内存块增加而增加。
OPT算法:最佳置换算法(Optimal Replacement, OPT)其实质是:为调入新页面而必须预先淘汰某个老页面时,所选择的老页面应在将来不被使用,或者是在最远的将来才被访问。
优点:保证有最小缺页率。
缺点:实现上很困难。
LRU算法:当需要置换一页时,选择在最近一段时间里最久没有使用过的页面予以淘汰。
优点:效率高,实现简单
缺点:偶发性的、周期性的批量操作会导致LRU的命中率急剧下降,缓存五日内情况比较严重
具体根据实验结果分析可以很容易的发现,三种算法当中,OPT的缺页率是最低的,当内存块较大时,有可能出现三种算法缺页率相同的情况,但若是三种算法的缺页率不同,OPT的缺页率一定是最低的。
实验6 系统调用
1.实验目的
学习如何产生一个系统调用,以及怎样通过往内核中增加一个新函数,从而在内核空间中实现对用户空间的读/写。学习重建内核。
2.实验内容
(1)设计并实现一个新的系统调用pedagogictime() ,该函数通过使用一个引用参数的调用返回当前的系统时间。
(2)编写一个用户空间程序来测试pedagogictime()。
3.实验环境
使用vmware虚拟机16.2.3,以及ubuntu.vmx
4.实验步骤
(1)学习PPT内容,学习了linux系统中的超级(root)用户,了解了普通用户如何进入超级用户:oslinux@oslinux-virtual-machine:~$ sudo –s
超级用户如何切换普通用户:root@oslinux-virtual-machine:~# su oslinux(用户名)
(2)复习了linux系统的基本体系结构:上面是用户(应用程序)空间,即用户程序执行的地方。用户空间下面是内核空间,存储linux内核。
(3)学习了系统调用(system call)相关知识,系统调用把应用程序的请求传给内核,调用相应的的内核函数完成所需的处理,将处理结果返回给应用程序。
(4)学习了系统调用好,系统调用好是系统调用再调用表中的偏移量,在进行系统调用是只要指定对应的系统调用号,就可以明确的要调用哪个系统调用,这就完成了系统调用的函数名称的转换。
(5)学习了系统调用表:sys_call_table,它是一个函数指针,每一个函数指针都指向其系统调用的封装例程。
(6)学习了系统调用的参数传递过程,对于参数传递,Linux是通过寄存器完成的。Linux最多允许向系统调用传递6个参数,分别依次由%ebx,%ecx,%edx,%esi,%edi和%ebp这个6个寄存器完成。
(7)实现重建内核。
5.实验步骤与实验结果:
一.安装VMware Tools (可选)
(1)打开虚拟机的菜单“VM”,下拉框中会有一个Install vmware tools 工具的安装选项。
点击之后,在ubuntu的桌面下会出现 VMwareTools…tar.gz 的文件。路径(/media/VMware Tools)
(2)将此文件复制到/tmp文件下进行解压
cp VMwareTools…gz /tmp
cd /tmp
tar -xzvf VMwareTools…gz
(3)进入解压目录,执行编译操作
cd VMwareTools…
sudo ./vmware-install.pl
开始进行安装,一路回车
(4)安装成功
Enjoy, the VMware team
(5)重新启动ubuntu系统就行了.reboot
 此图为安装VMTool解压并安装成功截图。
二.解压内核:
内核文件在文件目录Documents下,将压缩包解压到/usr/src/目录下。
(1)进入Documents目录下
oslinux@oslinux-virtual-machine:~$ cd Documents
(2)将压缩包拷贝到/usr/src/目录下
oslinux@oslinux-virtual-machine:~/Documents$ sudo cp linux-2.6.32.60.tar. bz2 /usr/src/
(3)进入 /usr/src/目录下
oslinux@oslinux-virtual-machine :~/Documents$
cd /usr/src/
(4)解压压缩包
oslinux@oslinux-virtual-machine:/usr/src$ sudo tar -jxvf linux-2.6.32.60.tar.bz2
三.编译内核
(1)编写系统调用服务例程
用编辑器打开sys.c文件:
oslinux@oslinux-virtual-machine:~$
sudo gedit /usr/src/linux-2.6.32.60/kernel/sys.c
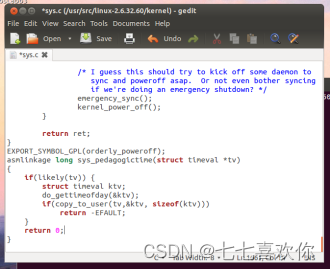
添加到sys.c文件的最后一行,代码如下:
asmlinkage long sys_pedagogictime(struct timeval *tv)
{
if(likely(tv)) {
struct timeval ktv;
do_gettimeofday(&ktv);
if(copy_to_user(tv,&ktv, sizeof(ktv)))
return -EFAULT;
}
return 0;
}
(2)添加系统调用号
oslinux@oslinux-virtual-machine:~$
sudo gedit/usr/src/linux-2.6.32.60/arch/x86/include/asm/unistd_32.h
将宏变量NR_syscalls的值加1:
 添加系统调用第二次看:
cd /usr/src/linux-2.6.32.60/arch/x86/kernel
sudo gedit syscall_table_32.S
.long sys_mycall /* 337 */
添加调用即可;
(3)修改系统调用表
在/usr/src/linux-2.6.32.60/arch/x86/kernel/syscall_table_32.S
中增加新的内核函数的指针。
oslinux@oslinux-virtual-machine:~$ sudo gedit /usr/src/linux-2.6.32.60/arch/x86/kernel/syscall_table_32.S
(4)重新编译Linux内核
在当前工作目录(/usr/src/linux-2.6.32.60)进入超级用户,才可以重建内核。
oslinux@oslinux-virtual-machine:~$ cd /usr/src/linux-2.6.32.60
oslinux@oslinux-virtual-machine:/usr/src/linux-2.6.32.60$ sudo –s
编译过程:
root@oslinux-virtual-machine:/usr/src/linux-2.6.32.60#
make mrproper //清除依赖
root@oslinux-virtual-machine:/usr/src/linux-2.6.32.60#
cp /boot/config-3.2.0-29-generic-pae .config
root@oslinux-virtual-machine:/usr/src/linux-2.6.32.60#
make oldconfig //更改配置(一直回车)
root@oslinux-virtual-machine:/usr/src/linux-2.6.32.60#
make clean //清除中间文件
root@oslinux-virtual-machine:/usr/src/linux-2.6.32.60#
make bzImage //编译内核
root@oslinux-virtual-machine:/usr/src/linux-2.6.32.60#
make modules //编译内核模块
root@oslinux-virtual-machine:/usr/src/linux-2.6.32.60#
make modules_install //安装内核模块
root@oslinux-virtual-machine:/usr/src/linux-2.6.32.60#
make install //安装内核
 内核安装完成截图
(5)启用新内核
重新启动ubuntu,开机时长按shift键直到进入启动加载页面,选择新编译的内核版本,按回车键确认选择并进入 系统 。

 进入系统后,查看内核版本,是否为新内核版本
oslinux@oslinux-virtual-machine:~$ uname –a
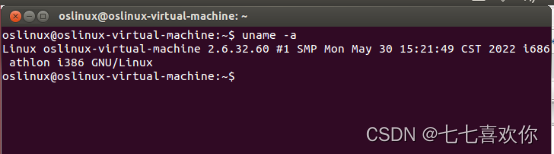 显示的是已经编译过的版本,版本正确。
(6)测试
编写测试程序,测试新的系统调用是否添加成功。
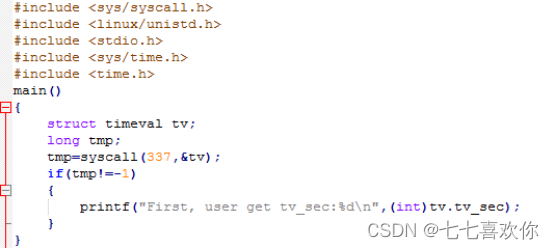
程序代码如上,运行代码显示结果:
通过程序中给的,前面设定的系统调用号337,获得系统到目前的总时间: 1970年1月1日,到现在的时间的秒数。结果正确。
(7)实验总结
太后悔Centos了,恨不得把所有实验,都用ubuntu做一遍,啊事实就是做了一些,另外的懒得做了,本来打算用centos做,但是后边内核安装等等的指令一直有问题,让我非常的痛苦,甚至差点玩坏了我的centos,做不下去的时候,我下载了ubuntu,事实证明我的选择没有错误啊,ubuntu直接安装好,解压后跟着ppt输入指令就没问题了,感觉都不怎么动脑子,唯一的收获就是记忆了一些linux常用的操作指令,让我收获蛮大的,然后也解决了之前对于linux时间的问题。
事实告诉我,以后环境尽量和推荐环境安装成一样的,这样的话会节省好多,之前数据库实验,由于先学了mysql,老师将数据库原理实验的时候,我们没有要求,但是到了后边MYSQL却没有TSQL语句。
就是如此,然后对于常见的指令也有了更加深入的了解,有些指令也有相同含义的近似指令 Uname -r /a 和Hostnamectl但是后者能查看比较全面得信息,但是hostnamectl也就只有在centos中才可以使用,ubuntu却不可以,指令还和linux的系统有关,哎,以ubuntu为主学习linux应该没啥问题。
实验7 系统缺页次数统计实验
1.实验目的
(1)理解内存管理中缺页的概念
(2)综合运用实验1,实验5,实验6中/proc文件系统、内存管理、系统调用、内核编译的知识
(3)掌握向/proc文件系统中增加文件的方法
(4)掌握linux内核模块的概念和操作方法
2实验内容
通过在内核中自建变量并利用/proc文件系统作为中介的方法来同届系统缺页的次数。
3.实验环境
系统版本:Ubuntu 14.04 LTS
内核版本: Linux 3.2.0.29-generic
欲编译内核:Linux-2.6.32.60
4.实验步骤
第一部分:在内核中实现缺页次数统计
ubuntu@oslinux-virtual-machine:~$
cd /usr/src/linux-2.6.32.60
//切换到预编译内核目录
ubuntu@oslinux-virtual-machine:~$ /usr/src/linux-2.6.32.60$
sudo gedit arch/x86/mm/fault.c
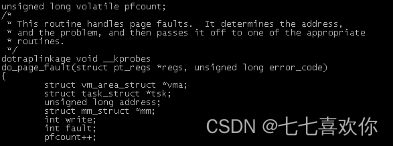
//在do_page_fault函数上一行定义统计缺页次数全局变量
pfcount unsigned long volatile pfcount;
//将pfcount加入到do_page_fault中,用以统计缺页次数.
pfcount++;
ubuntu@oslinux-virtual-machine:~$ /usr/src/linux-2.6.32.60$
sudo gedit include/linux/mm.h
//声明全局变量pfcount到头文件mm.h中,在extern int page_cluster下面添加代码:
extern unsigned long volatile pfcount;
 ubuntu@oslinux-virtual-machine:~$ /usr/src/linux-2.6.32.60$
sudo gedit kernel/kallsyms.c
//导出pfcount全局变量,让整个内核都可以访问
//最后一行添加代码如下:
EXPORT_SYMBOL(pfcount);
第二部分:编译安装新内核
ubuntu@oslinux-virtual-machine:~$ /usr/src/linux-2.6.32.60$
sudo make mrproper
//删除原来编译产生的垃圾
ubuntu@oslinux-virtual-machine:~$ /usr/src/linux-2.6.32.60$
sudo cp /boot/config-3.2.0-29-generic-pae .config
//导入原系统的内核配置
ubuntu@oslinux-virtual-machine:~$ /usr/src/linux-2.6.32.60$
sudo make oldconfig
//更改配置,一直回车
// Load an Alternate Configuration File -> 导入.config文件 -> Save an Alternate Configuration File -> Exit
//导入配置到欲编译内核中 )
ubuntu@oslinux-virtual-machine:~$ /usr/src/linux-2.6.32.60$
sudo make clean
ubuntu@oslinux-virtual-machine:~$ /usr/src/linux-2.6.32.60$
sudo make bzImage//编译内核
ubuntu@oslinux-virtual-machine:~$ /usr/src/linux-2.6.32.60$
sudo make modules//编译模块
ubuntu@oslinux-virtual-machine:~$ /usr/src/linux-2.6.32.60$
sudo make modules_install//添加模块到内核
ubuntu@oslinux-virtual-machine:~$ /usr/src/linux-2.6.32.60$
sudo make install//链接、组建内核
ubuntu@oslinux-virtual-machine:~$ /usr/src/linux-2.6.32.60$
sudo reboot//重新启动Linux系统
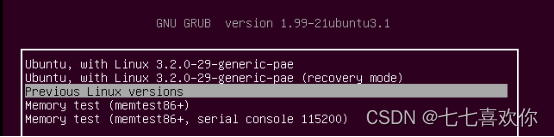
重新启动Linux系统,开机时长按shift键直到进入启动加载界面,选择新编译的内核版本,按回车进入系统。进入系统后,使用命令uname –a 验证内核版本是否安装成功。


第三部分:新建内核模块,通过/proc实现用户态下查看缺页次数
ubuntu@oslinux-virtual-machine:~$ mkdir source
//系统重启后,创建source文件夹,用于存放编写的模块程序
ubuntu@oslinux-virtual-machine:~$ cd source/
//切换到source目录
ubuntu@oslinux-virtual-machine:~/source$ gedit pf.c
//新建用于构建模块的代码
5.实验结果
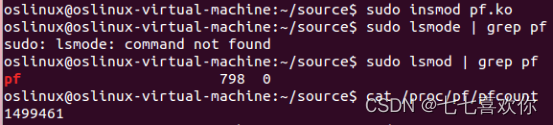
1.结果展示
 2.结果解读
第一个结果的含义是:第一个打印的pf,通过指令来验证pf内核模块是否加载到内核进程中,这是通过lsmod指令来实现的,lsmod指令将会列出所有已经载入的模块,而lsmod | grep pf则是显示pf这个模块是否已经加载进内核程序中。根据结果显示可知,新建的pf模块已经成功的加入了内核中。
第二个结果的含义:第二个结果是通过cat命令来显示文件的信息,在这里显示的是pfcount变量的信息,表示了进程线性地址空间里的页面的缺页发生次数。由输出结果可知,页面缺页次数为1499461次,而从进程的角度上来看,实际上是调用do_page_fault函数处理页面中断的次数为1499461次。
之所以会看到页面缺页的发生,是因为虚拟内存技术的应用是的进程线性地址空间里的页面不必常驻内存。当CPU请求一个不在内存中的页面时,会发生缺页,比如我们从内存读取/写入数据,而数据未在内存,此时都会发生缺页。缺页被定义为一种异常,会触发缺页中断处理流程。CPU结构提供一个do_page_fault函数处理缺页中断,由于每次发生一次缺页都要进入缺页中断服务函数do_page_fault一次,所以统计该函数被调用的次数就可以得到系统从开机到现在的缺页次数。
原本内核中并无pf这个文件,pf文件是后续通过编译代码中的语句:
Struct proc dir entry* proc mkdir (const char *name,struct proc_dir_entry *parent);
实现的。他帮我们创建了一个/proc文件,是的我们在内核模块中可以调用,同时,也能在用户态观察缺页的次数。
6.核心代码
#include < linux / init.h>
#include < linux / module.h>
#include < linux / kernel.h>
#include < linux / mm.h>
#include < linux / proc_fs.h>
#include < linux / string.h>
#include < asm / uaccess.h>

struct proc_dir_entry *proc_pf;
struct proc_dir_entry *proc_pfcount;
extern unsigned long volatile pfcount;
static inline struct proc_dir_entry *proc_pf_create(const char * name,
  mode_t mode, read_proc_t *get_info)
{
        return create_proc_read_entry(name, mode, proc_pf, get_info, NULL);
}

int get_pfcount(char *buffer, char **start, off_t offset, int length, int *peof, void *data)
{
        int len = 0;
        len = sprintf(buffer, "%ld \n", pfcount);
        return len;
}
static int pf_init(void)
{
        proc_pf = proc_mkdir("pf", 0);
        proc_pf_create("pfcount", 0, get_pfcount);
        return 0;
}

static void pf_exit(void)
{
        remove_proc_entry("pfcount", proc_pf);
        remove_proc_entry("pf", 0);
}

module_init(pf_init);
module_exit(pf_exit);
MODULE_LICENSE("GPL");
MODULE_AUTHOR("Aron.t.wang");
7.实验总结
此次试验学习了重新编译Linux内核,掌握了Linux内核和发行版本的区别。懂得了如何通过动态加载模块的方法,利用/proc文件系统作为中介来获取缺页数,本次实验做的比较久,在长时间学习中对指令的记忆也很牢固了,但是一些指令如lsmod指令等只是简单的使用,也没有怎么熟练的使用,不过也是学了一些,希望假期再能加强一下linux的使用,因为感觉好多面试都有用到一些linux相关的东西,自己也不能不知道,Linux下学期再会。


 1950
1950


 被折叠的 条评论
为什么被折叠?
被折叠的 条评论
为什么被折叠?
 到【灌水乐园】发言


